
Description
This is the official Permate for WordPress plugin that connects your website to Permate. With this plugin, you can install the Permate pixel, enabling you to easily run dynamic ads.
Permate connects Brands and Partners to enhance online revenue. Brands reach more customers through high-quality traffic from carefully selected partners, driving increased conversions & sales.
- With Brands: Start your affiliate program with Permate and effortlessly reach new customers. Grow your income with no upfront costs, paying only for successful conversions.
Key Features
- Discover & Recruit: Filter out invalid traffic and focus your investments on high-quality partners, ensuring your marketing efforts are efficient and yield the best results.
- Track & Optimize: Monitor and evaluate the quality of partner-driven traffic to your website, and analyze customer profiles to identify the most profitable prospects.
- Confirm & Pay: Filter out invalid traffic and focus your investments on high-quality partners, ensuring your marketing efforts are efficient and yield the best results.
How does Permate Connect work
You are Brand on the Permate platform, utilizing WordPress – WooCommerce for your business.
Your goal is to discover more qualified Partners (such as Publishers, KOLs, KOCs, etc.) to drive high-quality traffic and clients to your website, ultimately boosting your revenue.
Permate Connect will assist you in automatically mapping traffic and conversions from Permate’s Partners, providing detailed reports on the Permate Dashboard Report.
Visit the Installation Tab to learn more about the detailed steps.
Permate Connect’s permissions and policies:
- Does not collect or use users’ private data: We only collect values to identify whether the traffic comes from Permate and which Partner it originates from.
- Does not track user behavior: We do not use any information about user behavior on your website, ensuring the privacy of your customers is protected.
Screenshots
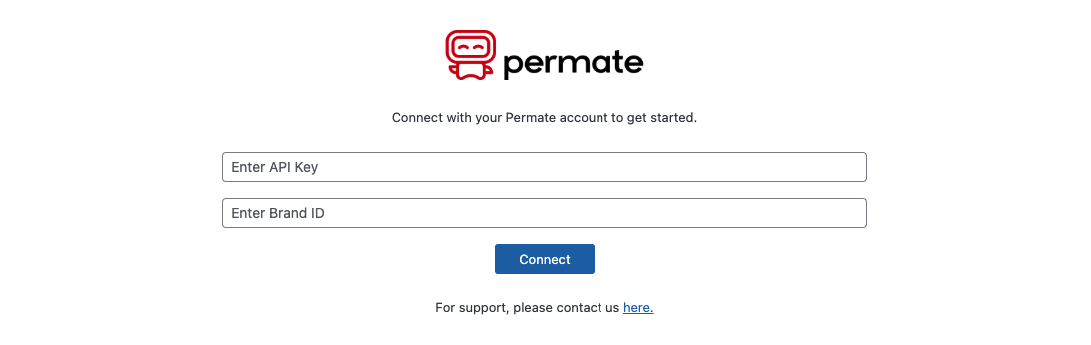
Permate connect
Installation
After successfully installing the Permate Connect Plugin, please follow these steps to integrate:
Step 1: Go to the Settings section.
Step 2: Select Permate Connect.
Step 3: If this is your first time accessing the Permate Connect interface, you need to enter the API Key and Brand ID for authentication. These two values are obtained from Permate. Once the authentication is successful, you will be taken to the main settings interface of Permate Connect.
Step 4: In the Affiliate Program section, there will be a list of all the offers you have created on Permate. You need to select one offer for your current website. If you don’t see any offers, please log in to permate.com to create a new offer and then return here (the new offer must have the conversion tracking method set to S2S Postback).
Step 5: If you decide to apply a single commission rate for all products on your website, skip this step. Conversely, if you intend to apply different commission rates for various product groups, check the box for Multiple conversion events, multiple commission tiers.
Step 6: In the Commission value based on section, you need to determine whether the commission is calculated based on the Subtotal or Total of the order, then select the corresponding value.
- Subtotal: The total order value excluding tax and shipping fees.
- Total: The final total order value.
Step 7: In the Event default section, you need to specify which WooCommerce order status corresponds to accepting conversions and rejecting conversions. Additionally, you need to determine where the conversion point will be set.
Suggested common configuration:
- Conversion approval: Completed
- Conversion rejection: Cancelled, Refunded, and Failed.
- Conversion endpoint: Create Order.
Step 8: In the Use Google Tag Manager section, check the box if you want to use Google Tag Manager. Note: you need to install Permate SuperTag into your Google Tag Manager.
Step 9: In the Allow connection section, check the box to activate the Permate Connect Plugin, uncheck it if you want to deactivate our Plugin.
Finally, select Save Changes to save all changes.
FAQ
-
Who can use this plugin?
-
Brands that have registered an account with Permate, successfully set up the offer, and achieved conversions can use this plugin.
-
Where can I contact support?
-
Visit the Permate Help Center here
-
How do I install the plugin?
-
To install the plugin, log in to your Permate account, navigate to the “System Setting” section, and copy your API Access and Brand ID, then create an offer.
-
How do I track my conversions?
-
You can track your conversions in real-time by going to the “Performance statistics” section in your Permate dashboard, where detailed metrics about your offers and campaigns are displayed.
Reviews
There are no reviews for this plugin.
Contributors & Developers
“Permate Connect” is open source software. The following people have contributed to this plugin.
ContributorsTranslate “Permate Connect” into your language.
Interested in development?
Browse the code, check out the SVN repository, or subscribe to the development log by RSS.
Changelog
1.0.0
- Initial plugin
1.1.0
- Update UI
- Add multiple event