


GitHub Copilot is an AI-powered coding assistant that acts as your personal pair programmer, providing suggestions and helping you write code more efficiently:
GitHub Copilot is your AI Pair Programmer that offers autocomplete code suggestions. It can receive suggestions as you start writing code or by providing a natural language comment that describes what you want the code to do for your work. The context in the file is analyzed, and the text editor offers suggestions.
GitHub Copilot is powered by a generative AI model that GitHub, OpenAI, and Microsoft developed.
Table of Contents:
GitHub Copilot: Your AI Pair Programmer

GitHub Copilot is trained in mostly all languages, which are part of public repositories. So, the quality of suggestions you will receive will depend on the volume of data for that language in the public repositories. Languages with less representation in public repositories may receive fewer suggestions.

GitHub Copilot is available as an extension to the following IDEs:
- VS Code
- Visual Studio
- Neovim
- IntelliJ
- Azure Data Studio
Code suggestions received from GitHub Copilot will help the developers to write code faster but may contain insecure code patterns, bugs, older APIs used, etc. So, the security and quality of code are in the developer’s hands. Precautions like unit testing, code analysis, and scanning for security vulnerabilities should be taken. GitHub Copilot uses filters to block offensive words in suggestions received.
GitHub Copilot also provides a Chat interface, which is an extension to GitHub Copilot that provides conversational AI assistance within your IDEs.

GitHub Copilot works well for languages like Python, JavaScript, Typescript, Java, C#, Ruby, GO, C++, etc. It can also assist in query generation for databases.
Billing for GitHub Copilot and Versions
GitHub Copilot is a paid service charged monthly or yearly. You can manage it through your account on GitHub.com, through an Organization and manage members for GitHub Copilot access, or through your enterprise on GitHub Enterprise Cloud.
Here is a table describing a comparison of each GitHub Copilot version and the pricing. Note that the pricing may change.
| Feature | GitHub Copilot Individual | GitHub Copilot Business | GitHub Copilot Enterprise |
| Pricing | 10 USD per month | 19 USD per month per user | 39 USD per month per user |
| Type of account | Personal accounts | Organization or enterprise accounts | GitHub Enterprise Cloud accounts |
| GitHub Copilot Chat | Yes | Yes | Yes |
| GitHub Copilot CLI | Yes | Yes | Yes |
| Editor support | Yes | Yes | Yes |
| Block suggestions from public code | Yes | Yes | Yes |
| Audit logs | No | Yes | Yes |
| GitHub Copilot chat in GitHub.com | No | No | Yes |
| GitHub Copilot in Pull Request Summary | No | No | Yes |
| Organization wide management | No | Yes | Yes |
For individual accounts, access to GitHub Copilot go to your Profile -> Settings -> Billing and Plans -> Plans and Usage. Under Add-ons, you can manage your subscription.

For this article, I am using GitHub Copilot enabled for my account on github.com.
Similarly, you can set up a policy to allow or disallow suggestions to match public code and also allow GitHub to either use or not use code snippets for product improvements. From your profile, go to the settings and Copilot section and set the policies.

Recommended Reading => Explore All About Project Planning with GitHub Projects
Installing GitHub Copilot Extension in VS CODE IDE
For this article, I will use the VS CODE IDE to show the usage with examples. Let’s start by installing the GitHub Copilot extension
Launch VS Code IDE, search, and install the GitHub Copilot extension. This will also enable the GitHub Copilot Chat extension. Installation is not required separately.

Post the installation of the extension, first-time users will need to sign in to VS Code with the same GitHub account which has access to GitHub Copilot. You will be prompted to sign in.

Usage: Code suggestion
As we have installed the copilot extension and signed in to GitHub as seen in the previous section, we will now look at the first code suggestion in the editor.
Example #1: Create a file called employee.java and as you start typing GitHub Copilot starts giving you code suggestions. Press TAB to accept else press CTRL + ENTER and it will provide you with 10 suggestions. You can then accept the appropriate suggestion.

Press CTRL+ENTER after typing class employee

Example #2: In the code editor, add a comment // Program to add employee details to the MySQL database press CTRL + ENTER and select the appropriate suggestion. GitHub converts the comment to code. These are also the prompts that you add in the CHAT interface.

Here is the code accepted as below. Let’s select the main method now and right-click to select Copilot -> Explain This

You can see the explanation of the main method is given in the chat interface on the left.

Select the main method and right-click to select Copilot -> Generate Docs. Accept the suggestion.

Example #3: Generate Unit test for the method
In the code editor, add a comment //Program to add employee details and display the details, and press CTRL+ENTER to accept the appropriate suggestion.
In the chat interface, enter a prompt like Generate unit test for the method. Here the context for the method is addEmployeeDetails which is selected in the code editor.

For the unit test case generated in the chat interface, you can then select Insert into New File.
Example #4: Using Chat interface for a Java program
Prompt in chat: Java program to use Java BufferedReader and FileReader to open a text file and read the contents of it.

Example #5: Generate Javadoc and inline comments for Java files
Enter the prompt in chat. Generate the full javadoc for the file employee.java and all methods in the chat window. JavaDoc comments on methods and classes start with /** and end with */

Prompt in chat – Generate inline comments for the file employee.java. Inline Java comments, which begin with two slashes //

Example #6: Making changes to existing code and code fixes using inline Chat.
Assume that you have the following code, which is already in place.

I want to log the output of each operation. So, for this, I select the entire Switch statement and enter a prompt in the chat interface to log the results of addition, subtraction, multiplication, and division. Here is the output.

I can then use the option Insert at Cursor to get the code replaced. Here is the final output after the code changes. An EXCELLENT way to make code changes quickly.

In the above code for the Division case, if the second number is ZERO, the code cannot be handled and an appropriate exception will result. So, this needs to be fixed.
Follow-up prompt: Select the code and type in the prompt. Do you see any issues in the code.

The issues and code to be fixed are given and, if acceptable replace it in the code by selecting the particular case. A quick way to fix issues in the code.
Example #7: Generate docstring for Python programs
In Python, docstring is for associating documentation with modules, methods, classes, and functions.
Prompt in chat: Generate docstring for the file employee.py

Suggested Reading => Boost Your Career with these SQL Certifications
Example #8: SQL Query and Stored Procedure
Prompt for SQL Query: SQL queries for adding and deleting employee details in a MySQL database

Prompt for Stored Procedure: Stored procedure for adding and deleting employee details in a MySQL database.

Generate SQL Query using the editor.
In VS Code, create a SQL file called employee_query.sql. Type in the below and press TAB and ENTER key.

Next

Next, show the tables

Next order by example

Descending Order


SQL Join Example


Generation and execution of MySQL Query
Create a file called mysql_script.sql. In the code editor, add an inline comment CTRL+I.

In the chat window add a prompt. Add another field address. Insert at the bottom.

After the Alter statement, add a prompt. Provide me with 5 insert statements for the above table.

Add code to create a database as well. The completed code is as below.
create database employee_db;
use employee_db;

CREATE TABLE employee (
    id INT PRIMARY KEY AUTO_INCREMENT,
    name VARCHAR(255) NOT NULL,
    age INT,
    email VARCHAR(255),
    state VARCHAR(255),
    country VARCHAR(255)
);
ALTER TABLE employee
ADD COLUMN address VARCHAR(255);

INSERT INTO employee (name, age, email, state, country, address)
VALUES ('John', 30, '[email protected]', 'California', 'USA', '123 Main St');

INSERT INTO employee (name, age, email, state, country, address)
VALUES ('Jane', 32, '[email protected]', 'New York', 'USA', '456 Broadway St');

INSERT INTO employee (name, age, email, state, country, address)
VALUES ('Bob', 28, '[email protected]', 'Texas', 'USA', '789 Houston St');

INSERT INTO employee (name, age, email, state, country, address)
VALUES ('Alice', 35, '[email protected]', 'Florida', 'USA', '1011 Miami St');

INSERT INTO employee (name, age, email, state, country, address)
VALUES ('Charlie', 33, '[email protected]', 'Washington', 'USA', '1213 Seattle St');
Run the above code either through the command line or from the MySQL workbench.


Example #9: Generate Shell script
Prompt in chat: Shell script to list repositories in a GitHub Organization.

Example #10: JavaScript program
Prompt in chat: JavaScript program to calculate days between dates

Example #11: Generate an HTML file
Prompt in chat: Generate an index.html file to display Name, address, phone number, city, and state

Another example is to build a Login Form in HTML using the code editor. Create a html file and as you start typing, it gives the entire declaration and the tags with the elements.

Start to add the <body> tag and you can see the code completed to enter username and password.
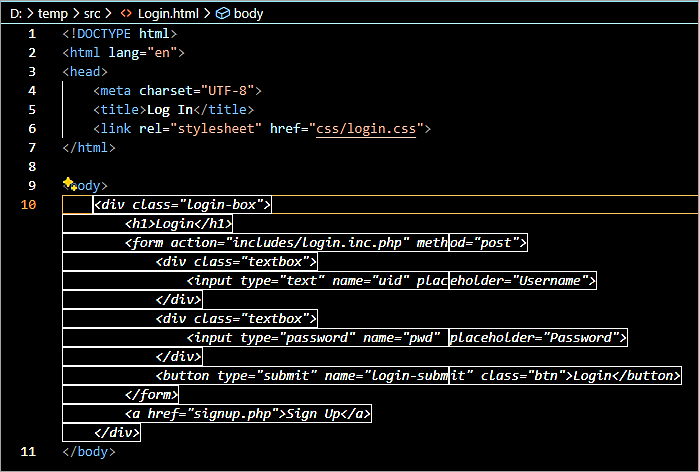
The completed code is as below with a bit of modifications.

With the above code, I deployed the HTML file to Tomcat and pointed my browser to the URL.

It was pretty quick to generate the complete HTML file, given the context of Login.html. GitHub Copilot could interpret the <!DOCTYPE html> declaration, <html>, <head>, and <body> tags along with the <form> elements with the <input> tag within it.
With a bit of beautification by adding the color style, I could quickly generate and deploy the HTML file.
Example #12: Create a dictionary of countries
Add the comment //dictionary of 2 letter ISO country code and their corresponding country name and a line of code
const countries {
}
Press TAB to accept it.

Example #13: Match patterns with regular expressions in Javascript.
Use GitHub Copilot to validate a phone number and get the right regular expression. Add a prompt //Validate a phone number with a code.
// Validate a phone number
function validatePhoneNumber {
let pattern =
}
Press TAB to accept the code using the regular expression.

Example #14: Translate the code to another language.
Prompt: Translate the code to Spanish

Example #15: Convert the code to C#
Select the code in the java file and enter the prompt.
Prompt: Convert the code to C#

Example #16: Running terminal commands
If you forget the syntax to run commands, then GitHub Copilot chat can help you with it using the @terminal command.
Prompt 1: @terminal How do I clone my GitHub repository
Insert the suggestion into to terminal and add the GitHub repository URL in the terminal window.

Prompt 2: How do I commit my code changes?

Example #17: Node.js example to build a web application
As an example, to build a web application using Node.js enter the following prompt
Prompt: Build a web application using Node.js that allows users to add, edit, and delete to-do items
Though I cannot provide the full output, you can scroll down to get the complete implementation code along with execution instructions.

Let’s look at another Node.js example to create a basic HTTP server
In VS Code create a file hello-server.js and add a comment // Create a basic http server using nodejs. Press the TAB+ENTER key to accept. Also, other comments are auto-generated.
Add comment to Import the http module which contains the functionality to create the server.

Next, define the host and port to which the server will be bound to. Add the below comments and the code will be auto-completed. Press the TAB+ENTER key to accept.

Now create the server.

Add a comment to listen to the port

Run the server. From the terminal window, enter the command.


Example #18: DevSecOps uses a case to containerize a Node Project
In this example, we will see how to containerize the NODE project and ask GitHub Copilot to generate steps to create a Jenkins pipeline
Sample Node project in the VS Code workspace

Prompt 1: @workspace Containerize the node project using the latest base image
A Dockerfile is created along with instructions to use a Docker build and run commands.


Prompt 2: @workspace Generate a Jenkins pipeline using the above Dockerfile along with instructions to build and push the docker image to Dockerhub


Example to containerize a Maven project
Maven project loaded in VS Code with a WAR file in the target folder. We will ask GitHub Copilot to containerize this project.

In the chat interface, enter the prompt.
@workspace Containerize the project


GitHub Copilot for Agile User Stories
Example #1: User Stories for online shopping
Prompt in chat: Generate a user story for online shopping

Example #2: Generate development tasks for the user story
Prompt in chat: For the user story As a user, I want to register an account so that I can have a personalized shopping experience generate tasks

Example #3: Generate manual test cases
Prompt in chat: For the user story As a user, I want to register an account so that I can have a personalized shopping experience and generate manual test cases.

GitHub Copilot and JetBrains IntelliJ IDEA IDE
JetBrains IntelliJ IDEA IDE (Ultimate, Community and Education) is also supported by GitHub Copilot to get code suggestions. To use GitHub Copilot in IntelliJ IDE the GitHub Copilot plugin must be installed. Let’s look at how to install the plugin and an example of Code Generation/Completion.
Installing the GitHub Copilot plugin
Launch the IntelliJ IDEA IDE and go to the File-> Settings -> Plugins. Search for the GitHub Copilot plugin under Marketplace. Click on Install to install the plugin.

Post the installation you may need to restart the IDE and then sign-in to the GitHub account where the Copilot subscription is enabled. You can also sign in from the Tools-> ![]() GitHub Copilot menu.
GitHub Copilot menu.
Example #1: Code Completion
In the code editor, add a comment as
//Create employee class

Example #2: Issue with the code
In the code editor highlight the code and asks the question in the chat interface
Is there any issue with the code

Example #3: Inline Chat within IntelliJ IDE
To use Inline chat within IntelliJ IDE, upgrade the GitHub Copilot plugin to version 1.5.21.6667 or above

To use Inline chat e.g. create an index.html file in a project. Position your cursor in the line to start the inline chat and right-click choose “GitHub Copilot ->+ Inline Chat” Or “Ctrl+Shift+G”


Click on Insert Code Block at Cursor

Prompts used for Java lang in VS Code IDE can be tried in the IntelliJ IDEA IDE as well.
Use Cases for Usage with GitHub Copilot
The following could be the broad set of use cases to keep in mind while using GitHub Copilot in your projects.
- Agile User Story, Development Tasks, and Test Case Generation
- Code Generation
- Code Completion
- Code Explain
- Code Translation
- Code Review, Refactor and Optimization
- Unit Test Case Generation
- Document Generation
- GitHub Copilot Inline Chat – CTRL + I
- Scanning and Fix Code for Vulnerabilities
- @Workspace and @ Terminal Commands Usage
- Creating UML diagrams
- Selenium Test Script Generation
- DevSecOps Pipeline Generation
Conclusion
In this article, we have seen how GitHub Copilot, your AI programmer helps to expedite your development by providing code suggestions based on comments. GitHub Copilot works for both new and existing projects and provides autocomplete code suggestions and documentation support for the languages.
Though GitHub Copilot helps to code faster and better the security and quality of the code have to be taken care of by the developer.
Was this helpful?
Recommended Reading
-

Only a GitHub repository is needed to create & run a GitHub Actions workflow. This tutorial explores the use of GitHub Actions for managing encrypted environment variables known as secrets: During deployments, you would often need certain keys (AWS, Azure, etc.), passwords, or tokens to authenticate to various systems. These…
-

List of the Top GitHub Alternatives with Features and Comparison: With the advancement in technology and consistency in fast-paced development, developers are demanding the latest tools and methods of software development. Businesses are more likely to grow with modern technologies and rapid acceleration in the industry. In an era where…
-
This GitHub Projects tutorial is a step-by-step guide to Project Planning with GitHub, including settings, creating custom fields, managing access, etc: GitHub recently introduced a new beta feature for better project planning. This new experience gives the project team a view of a roadmap for the future. The project plan…
-
Learn the Differences Between Git vs GitHub: If you are either learning or working in the software industry, then you must have come across the terms Git and GitHub frequently. Sometimes people even use them interchangeably. In reality, both Git and GitHub are related to version control, however, they are…
-
This GitHub Advanced Security tutorial explains all about quickly building a secure code using its features - GitHub Secret Scanning & GitHub Code Scanning to maintain the code quality. GitHub is a web-based service for Software Development and Version Control using Git. It provides features like issues, Project Planning, CI/CD,…
-
This Tutorial Explains how to Download and use the GitHub Desktop to Collaborate With GitHub From Your Desktop for Efficient Version Control: As we all know, GitHub provides a website to host Git repositories. In our previous tutorials on GitHub, we have seen the developer’s activities on versioning files mostly…
-
A complete study of the usage and administration of a GitHub Private Repository along with its features. Learn to quickly manage Private Repositories from here: About GitHub Repository: A repository in GitHub contains your project's source code and its revision history. You can collaborate on the project's work within the…
-
This Tutorial on GitHub Explains Concepts like GitHub Projects, Organization and Teams, Fork a Repository, Issues and Project Milestones, GitHub Wiki etc: In the previous tutorial of the series of tutorials on GitHub, we saw how a developer can utilize the platform to store the Project-related artifacts and version control…


