Months ago at the local CeX I had spotted The Simpson’s hit & run for a mere 8GBP. Sweet, I know the game has a massive cult following, and I wanted to try it, but being old and grumpy I wanted to have a physical copy, you know so I could know it only had weird Vivendi spyware on it.
Fun fact! Vevendi bought the call centre I worked at in Miami back in the early 00’s and I had hoped to somehow swing my way to Sierra. Instead I got saddled working with Ticketmaster. Not the fun I wanted.
Anyways flash forward a few decades and yeah, this game is from ’03 back in those good olde days. Wow time flies!
On the home front, I’m not a big fan of Windows 11. As a matter of fact, I hate it. The UI is just obnoxious, and as much fun as WSL is, even it cannot save the horror that is Windows 11’s two things that drive me away from the platform
The absolute braindead notepad
It’s reverse sorting of applications on the ALT-TAB stack
Seriously, the last application I used should be the FIRST on the ALT-TAB stack not the last. WTF. And notepad, what the actual fuck, with AI? I can’t even reliably search & replace without it absolutely trashing a document trying to replace double spaces with single spaces. How can you fuck up notepad? Microsoft found a way. Even better replacing it with the one from Windows 8.1 or launch Windows 10 just completly screws up the OS.
Great job guys!
So I did what anyone else would do, I put aside a hundred pounds a month, and after 6 months I pulled the trigger and got a M4 Mac Mini.
Cyberpunk 2077 over 100FPS!
The good? It’s surprisingly fast for what it is. It actually plays CyberPunk 2077 (there is a native version, you can even hit over 100fps!, or even 72fps with ray tracing – granted I did drop the resolution to 720p, and medium textures, and added in frame generation), Crossover is mostly okay, I can still use SQL Server 4.20, and Word 6 for NT, although Excel has major issues for some reason. Edge & Onedrive work just fine, and shockingly. whisper.cpp using the metal backend & ggml isn’t too horrible:
whisper_model_load: model size    =  538.59 MB
whisper_backend_init_gpu: using Metal backend
ggml_metal_init: allocating
ggml_metal_init: found device: Apple M4
ggml_metal_init: picking default device: Apple M4
ggml_metal_load_library: using embedded metal library
ggml_metal_init: GPU name:   Apple M4
ggml_metal_init: GPU family: MTLGPUFamilyApple9  (1009)
ggml_metal_init: GPU family: MTLGPUFamilyCommon3 (3003)
ggml_metal_init: GPU family: MTLGPUFamilyMetal3  (5001)
Just remember to build with “-DWHISPER_COREML=1” set for Apple hardware.
Input #0, flac, from 'lotr-tape12-sie1.flac':
  Metadata:
    title           : Mount Doom Part 1
    album           : The Lord of the Rings
    artist          : Brian Sibley
    date            : 1981
    genre           : Audio Book
    track           : 23
    encoder         : Lavf58.76.100
  Duration: 00:31:35.63, start: 0.000000, bitrate: 596 kb/s
And the m4 Mac Mini crunched through the 31 minutes in 2:47! You can check the output here:
18.52s user 1.69s system 12% cpu 2:47.64 total
Or the JFK benchmark:
whisper_print_timings:    total time =  1464.12 ms
./medium.sh samples/jfk.wav  0.18s user 0.15s system 22% cpu 1.512 total
Ok that’s all great, but what about this optical drive?
I picked up an Apple Super Drive A1379 used from CeX, again for a whopping 28GBP. Sure it’s a bit scuffed up and ugly but plugging it into my Windows 11 laptop it shows up right away. Nice
Also let me take a moment to say thanks for basically writing this on the under side of the drive in what may as well have been black in on a black surface. I’ve had to use sunlight & a full flash to get this to show up to verify the model number. And what I suspect is 2 parts of the larger problem, it being an optical drive from 2012.
Model No: A1379
Like seriously could they make it any harder. And yes dropoping support has always been a thing.
Okay, so I still have my Windows 11 laptop, and when connected I cannot insert a disc to save my life. Well to cut the story short, YOU NEED A DRIVER. I kid you not.
The driver, named AppleODDInstaller64.exe is what you are after, and luckily for you, I’ve already gone through the motion of extracting various bootcamp driver packs to find it, and upload it to archive.org.
With the driver loaded, I could then finally just copy the files off the install discs and install into crossover. Of course the default install requires CD1 to be inserted like a key disc, so gamecopyworld to the rescue.
Simpsons Hit & Run on OS X Sequoia 15.6.1 (24G90) / CrossOver Version 25.1.1 (25.1.1.38624)
I have to say that running x86 code through the new rosetta feels pretty snappy. The biggest dissapointment of course is that there is no 32bit support in OS X. Crossover at least maintains that pretty well, although there is no Win16 support. And yes I’ve tried otvdm, and no it doesn’t work.
The funny part is that Hit&Run runs signiicantly faster on the M4 OS X / Crossover setup. That’s unexpected! The annoying part is that although Crossover does support controllers, neither DirectInput or Xinput seem to work. So I’m forced to use keyboard and mouse, which is kind of annoying as I still don’t have a proper desk after moving, and I end up just using bluetooth and my TV to do stuff, as I’m even writing this from my couch.
At least there are some alterantives out there. I know there will be the inevitable cry, what about Linux, and honestly I’d probably go with the Milk-V Titan, and all in on RISC-V. But considering how much more expensive the Titan is than the Jupiter, I’ll be sitting on the sidelines for the first wave to see if the much hoped for 64GB of RAM, and real GPU support actually works. Although I’m glad I got the 16gb model of the Jupiter, I never could get any GPU device recognized so I mostly use it for weird internet edge stuff, as at least if I do get hit with buffer overflows, being RISC-V means default out of the box x86/x86_64 attacks are meaningless.
I don’t get invited to all the cool people events.
I never get to bask in the glory of FOMO Apple glory.
It’ll be 20 years ago the rumors were insane that Apple was going to dump the beloved PowerPC for intel. Darwin (the open-source core to OS X) was publicly available on Intel processors, and the scene was set for one of the most exciting transitions of the time:
The WWDC 2005 announcement
At the 2005 WWDC the bomb was dropped.
The star of the show, of course is that the entire OS X 10.4 Tiger demo was on the intel machine, and for a low price of being invited, belonging to the club & $999 USD you too could be part of the next big FOMO.
So as the big reveal went, not only was OS X on intel now a thing, it “secretly” was always a thing, and had always been the escape hatch from being locked in. And it’s no surprise, it saved NeXT as the i386 “white box” was the cheapest and fastest NeXT ever, just as further transitions to 64 bit then ARM64 would necessitate.
So how does one reasonably acquire one of these mythical beasts, 20 years after the fact? Well basically unless you are a cool kid in the know, you don’t.
however as mentioned in a few places the ATK was quickly out together with standard parts. And if this sounds like the genesis of the IBM 5150 PC, you’d be right! The star of the show is the late SSE3 enabled Pentium 4 processors and the Intel 915 chipset with onboard GMA 900 video.
Thankfully intel sold these parts to whomever basically wanted them, so they were sold on a bunch of partner boards, OEM, and even Intel fabricated boards. It may be my fault as typical board/processor/ram setups can be had for £5 in the UK, the magical 915 chipset has jumped these well north of £100. However, from my searching there are a few OEM systems with the needed chips, and that is the Dell Dimension 3100.
She’s ugly, but she works!
Now I know I got lucky as I got mine for £0.99 + £9 shipping! A huge shout out to my patreons for financing stuff like this! The unit was shown in pictures absolutely filthy, missing an optical drive and “untested”. We all know that it’s code for it was tested, it didn’t work, and it wasn’t worth their time to clean up and fix.
Opening the system up, revealed an ancient mechanical SATA disk, a bunch of dust bunnies, and empty memory sockets where the ram should go. Since I had purchased 7 other boards over the last 2 years (yes! Really! 7!!!), I have ample spare ram, gave it 2x512MB sticks, a new cr2032 CMOS battery, and the hard disk failed to spin or detect, but the machine powered up, did the POST test with no issues! I’ve got to say I was super happy so far! I have a £6 SSD I picked up from CeX, so I placed that into the machine, and now for the OS install.
My first choice was to create a Linux bootable USB stick and just copy the deadmoo image to the SSD. Of course, this came with the caveat that the disk is in the VMDK format which needed to convert using Qemu’s qemu-img utility to a raw disk image, then to compress it with gzip, as the Ubuntu install image seems to only understand gzip. I guess the next pro move is to see about a static standalone iSCSI target, or maybe even rsync? I think there is even Qemu network disk protocols by now, so it may be a way to get around the lack of optical media…? Anyways!
The deadmoo image can be decompressed and copied to the hard disk easily! It’s about 2gb compressed and 6GB uncompressed. A reboot, and we’re quickly and semi glitched in as Curtis to their desktop!
there is a pre-installed driver causing issues which drops us back to the fallback SVGA buffer, and I’m happy to report that the artificing you see under emulation is also present on physical hardware. Delete the TPM driver AppleTPMACPI.kext (the root password is ‘bovinity’), and reboot again. This time there won’t be any further glitches in the video, but there is another change to make, the core graphics needs to be replaced with the SSE3 variant so that after yet another reboot again Rosetta is fully working, giving us access to PowerPC applications (that don’t require Altivec! That wouldn’t arrive until 10.4.4 just in time for the public release!). This lets the screen savers run, and important applications like iTunes and Internet Explorer 5 for Max OS X.
As Steve had demo’d it’s pretty amazing at how much just works. You can really get an appreciation at just how truly portable C is, and how LIBC is the real cross platform winner is. The company behind Rosetta transitive, had a bright future ahead of them as you can’t get a better public endorsement that Steve Jobs at a WWDC! SGi had licensed them for Itanium IRIX, and if the other Unix vendors didn’t partner there was also a Linux path. Honestly, I’m surprised SUN didn’t buy them and do the same thing as Apple and jettison the SPARC, as they can sell a LOT more 1u servers, desktops and laptops than giant E10ks, but IBM equally scared and trapped on their AIX / UnixWare Itanium merge Monterey that sold like 5 units, instead bought the company and quickly disappeared the technology.
What a shame for the industry, but x86_64 still is an unstoppable force. Well at least until someone seriously challenges them.
Getting back to OS X, this is meant for developers, and the deadmoo image has X code installed, although I prefer to use the cli tools. This is a weird time in history as many things may support OS X, but they make really bad platform assumptions, and force endian directions breaking the given stance of all OS X is big endian – even though Intel Darwin has been around the entire time.
Ive had good luck with stuff that is much later than vintage 2005, as I’m lazy and it’s 2025. The fun stuff id built were:
SDL 1.15
DOSBox SVN
Qemu 0.10
Classic Cube
ssystem-1.6
I had thought that the performance using GCC 3 would be better than GCC 4 for Qemu, but after a lot of work I’d benched it with DooM v1.1 that V4 is faster.
Ssystem-1.6
Compatibility with OpenGL games is atrocious, but I’m pretty sure by the time 10.4.4 went public compatibility was better, although I doubt contemporary machines did all that well as there is a reason there was a rush to get intel versions out.
Building your own:
Intel 915G/915GV/910GL PCI Accelerated SVGA BIOS
The primary ingredient here is a board with the Intel 910/915 Graphics chips, which limits us to the late Intel Pentium 4 boards, with that terrible integrated video. It’s not the best video chipset in the world, but the only one that 10.4.1 had 3d acceleration for.
Apple Development Platform ADP 2,1
I had found out that the Dell 3100 pre-built tower has the supported chipset & CPU, however it doesn’t have the correct onboard network card.
Intel Desktop Board D915PSY
The Intel LAN boards of the era with the 915 moniker & Pentium 4 should be fine enough.
I don’t know why they are so expensive either.
Although in the recent years these boards have gotten rather expensive. I can’t imagine why, as they absolutely suck for retro gaming as you’d 100% use a GPU, Other than 10.4.1 I can’t imagine why anyone would want a P4/915 combo.
While you could dd a deadmoo image onto 2 disks, then play partition games, it’s far easier to use the converted ISO with 10.4.1 to just boot up and install if that is an option.
If you don’t have a 910/915 based board, you can run this under emulation well enough. The weird graphical glitches you’ll experience are present on real hardware as well.
While not terribly useful, it is an interesting glimpse as at least x86 is available to the masses.
While I had posted endlessly about this particular computer, as someone that I had long desired as a kid, overall, the PS/2 model 60 is an underwhelming machine, with an exceptionally high price tag. Many other fans of other 80s 16-bit computers, were able to augment their weak processors with faster 16bit CPUs, and even 32bit processors. As it turns out, the IBM PS/2 also had options:
Is another $425 worth the sunk cost of a $10,000 286?
On the one hand, I have to imagine that if you could afford a $10,000+ 286 in 1987 you probably would have upgraded to something else in the last 5 years. The Kingston upgrade heralds from 1993, and well that 10Mhz 286 is pretty much borderline useless for productivity. I’m not even going to talk about gaming! DooM is right around the corner being released at the end of the year, and how on earth can you justify this monster of a machine at your desk?
So let’s unpack this little doodad!
Installation
The old 80286 & 80287 processors removed.
The first step in the manual says you need to extract your main processor, and maths co-processor if you have one installed. The FPU’s are so cheap now, it seemed crazy to not get one. Although the only thing more bizarre is that considering the asking price of the PS/2 model 60, is that the FPU was even considered optional. This was a serious business machine afterall!
Pin 1 of the 80286 processor socket
With the processor extracted, the next big task is to identify pin 1. Looking from the top it’s impossible to see, but rotating the board around it’s easier to see the indentation that they left on the board to denote pin 1. Unfortunately, the socket they used has no visible indication, and Intel had not learned the importance of keying parts yet, making incorrect insertion impossible.
With pin 1 identified, it’s now time to gently insert the upgrade module.
Fully loaded module
I had also purchased the 80387sx 25Mhz math coprocessor. Combining this with the IBM IBM 486SLC2-50 (50G6950) should give a rather 486 like experience. And keeping with 80s tradition all the chips point in various directions making this look like a mess.
Physical installation is as simple as that, with the module socketed we are go for power on!
BOCARAM/2 strikes back
Since this is the model 60, that means I’m still using that BOCARAM/2 card that totally messes up with the BIOS settings, so I have to remove the card, and configure things one card at a time.
But it does work!
Brining up MSD it does indeed show that it is a 486, with built in math coprocessor. I didn’t try it without one, to see if it becomes a 486SX, but I guess it would?
Default performance however…
Default clock speed
For some reason it felt faster doing the initial memory test. But that was demonstrably false. By default, the upgrade module runs at the original speed, meaning you have 32bit instructions at the 286’s 10Mhz clock. There is an included driver for MS-DOS & OS/2 2.0 GA that will turn on all the fancy features, but that means that it won’t work for Windows NT, or Xenix. SAD.
Turbo CPU
However, with the driver enabled, we are talking 386DX/33 speeds! Making this 2x the speed of the PS/2 Model 80 @16mhz!
Yes it runs DooM!
And why yes, it runs DooM! Performance is terrible since the memory is all 16bit, and the VGA on the PS/2 model 60/80 motherboards is 8bit, well there is so much performance left behind.
The 32bit port of Sarien to Pharlap 386 v4 /Watcom7 is pretty fast as well!
DUMB SCSI is the best SCSI
And SCSI remains a winner with the 32bit dumb SCSI card in a 16bit MCA slot, I still get 2,318.9 Kilobytes/Second
The good
The upgrade when compared to a new system is a fantastic bit of value. People had been buying and selling 386sx machines, which are basically full feature 286 machines with the hobbled 16-bit external 386 processors. Into the early 90’s all the rage was faster clocks, internal clock doubling, and yet even more cache. The later PS/2 model 80, running at 25Mhz did include the 82385 cache controller, and soldered on the motherboard cache ram, making it the best of the 80’s.
The bad
There is literally only so much you can do with a 16bit machine, and it being 1993, the Pentium was already shipping it’s 5v 60/66Mhz variant, with the infamous FDIV bug. Over the next year the Pentium would see it’s voltage dropped to 3.3v, and clock speed increased. Good times. The Pentium would drive 64-bit memory access along with faster 33Mhz PCI bus making it an incredible machine. Even a hopped up 286 is vastly outclassed, with its ancient and laughably tiny MFM hard disks, and 16-bit memory/peripheral bus.
If you are hanging onto a computer from 1987 in 1993, odds are you have old software anyways, and this is such an incredibly compelling upgrade for such an old klunker. By default it preserves the 286 speeds on boot if you so need them, but it’s nice having some 32bit POWER.
Although I wouldn’t want to use GCC on a machine this starved of resources, not even in 1993.
So I had gotten this Boca Ram/2 card with 2MB of RAM, with space for an additional 6MB. Unfortunately trying to find matching memory has been a lost cause. Since the existing memory is 9 chip modules, I take that to mean it’s parity RAM, so I went shopping for much more available 3 chip modules.
2MB!
I picked up 2x 1MB modules for £10.
Slotting them carefully into the ram card, taking great care as the clips are plastic!
4MB of ram slotted, made in the USA!
Now from what I can remember being told is to never ever ever mix memory types like this. But logically I have to think that 9×1 = 4+4+1, right? RIGHT?!
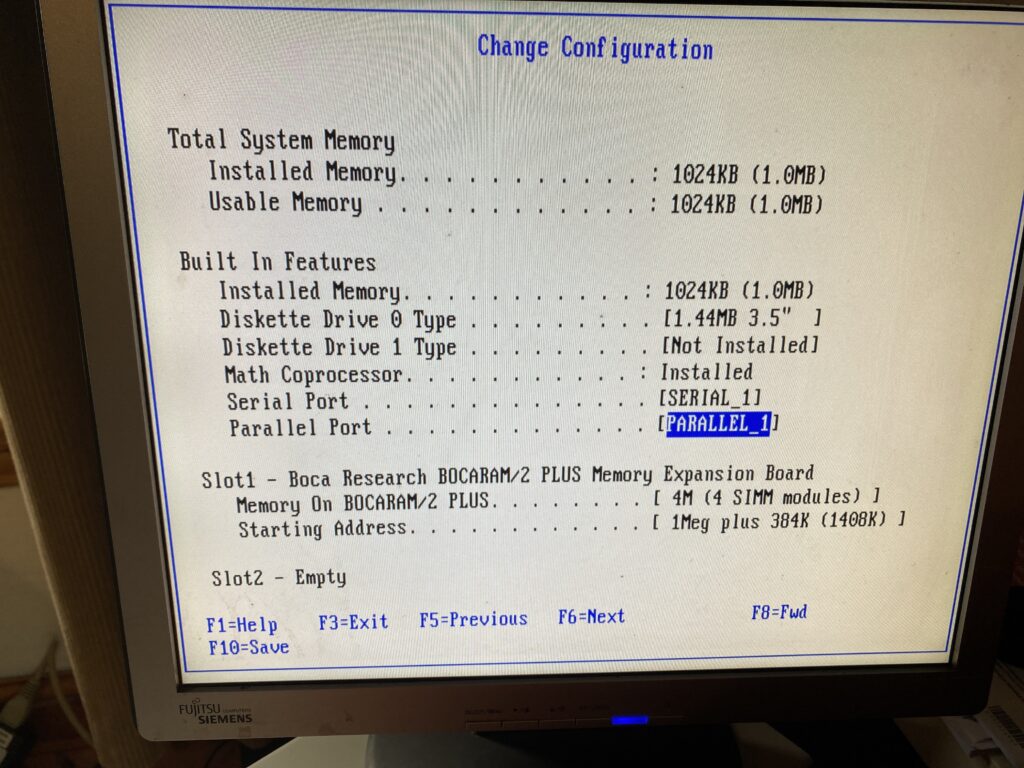
I copied the @7A7A.ADF onto the reference disk image, slotted the card and booted up to the config, and toggled the card to 4M
4M (4 SIMM modules)
I didn’t trust the auto-config, plus I just wanted to see what was there. Also I’ve always wondered if the PS/2 model 60 (or 30? 50z?) can slot higher density than the 256kb SIMM’s that IBM had used. I guess one day I’ll give it a shot.
Anyways thinking that this is about done, I save the config and reboot and now It’s Bocaram/2 issues.
Immediately, on reboot I get error 164.
164 POST detected a base memory or extended memory size mismatch error.
1. Run F1 Setup. Check System Summary menu for memory size change. 2. Run the Extended Memory Diagnostic tests.
Booting from the reference disk just crashes the PC.
Fantastic.
Pressing F1 however does let you boot, ignoring the issue.
After a bunch of digging I found this zip file with some utils. And just guessing br2pmems ‘fixes’ the CMOS settings allowing the machine to boot normally.
So now it’ll recognize the 5MB of RAM, and just boot normally. GREAT. But booting the reference disk still hangs the machine.
Which then brings me to the next upgrade:
The IBM SCSI with Cache
The IBM SCSI with Cache aka the SPOCK. Since I ruined the one SCSI card, and ended up picking up a second card, but this time with the appropriate cable I’ve caused a massive market panic on Microchannel SCSI cards. Seriously check eBay, and you will see that the pricing has collapsed with many now selling in the £20-30 range. You’re welcome!
Not really wanting a 3rd SCSI card, but my eye saw this one with the cache RAM, and I figured if I wanted the ultimate PS/2 of course I’d want a caching controller. This looks to be the first rev of the PCB, but with the ‘hot fixes’ in place from the second rev. While the ROMs are stepping back to 1990, I don’t care much about the 1GB disk limit, as the BlueSCSI can emulate all the available devices in the chain, so I’m not losing anything in the way of capacity. This is a 286 after all.
Since the RAM card screws up the setup program, I have to remove it, and the old SCSI controller, re-configure the system with all the RAM and disks removed first. Then put in the new controller, and re-run setup.
I just accept the defaults, and reboot to check what happened. So far it looks good, slot 8 being near the middle of the PCB, and closer to the disk cage where the blue SCSI rests.
placehold all the drives!
Remembering that the IBM controllers inventory the disks backwards, the 380MB disk image on SCSI ID 6, is the primary boot disk. I didn’t set it to the full 1GB as I want to later see how older versions of DOS/OS2 work with this, and I know they have issues with disks bigger than 512MB, but I figured matching a disk that did exist in 1988 would be more realistic.
With the SCSI setup, I could put the troublesome Boca board back with the RAM, and get my system booting up with the new “faster” SCSI controller, and all that new RAM.
Old SCSI controller
Of course I did a few benchmarks on the old SCSI controller so I would know how much more awesome the new one is.
As you can see this is booted with my normal config.sys with a himem.sys and smartdrv from Windows 3.1 on a MS-DOS 5.1 install.
2,345.8 KB/sec With himem.sys & smartdrv
2,347.5 KB/sec with no himem.sys
2,316.6 KB/sec with runtime xmsmmgr & smartdrv
2,334.0 KB/sec with Windows 3.1 himem.sys no smartdrv
So, with these scores in hand, you can see that the penalty for various XMS memory access being turned on is there, but it’s nowhere near as massive as I’d have thought for performance. Even with it just being there, although again it’s so minimal.
Now for the real shocker:
2,079.2 KB/Sec
That’s right, the advanced card is slower. A good 11% slower. Well, that was disappointing. I’m still keeping it in the machine, as having a hardware caching controller was all the rage, just like Mach microkernels. Maybe it’d make more of a difference in a 32bit system, but it’s performance is very underwhelming. For anyone wondering, the WDC AC2340, is an EIDE 340MB hard disk, with a 64kb cache. Im sure it was considered very fancy, and fast for the era, and it’s nice to know that no matter the SCSI controller, the BlueSCSI blows it out of the water. Also keeping in mind that MFM data transfers are usually sub 400KB/sec, so this is much more faster.
Okay you have all this XMS what are you going to do with it?
Well, after I did manage to get this original copy of Word for Windows 1.0, I thought that it would be a good test. One fun thing is that it includes the ‘runtime’ version of Windows 2.11, which can also upgrade an existing install of Windows 2 if detected. Running Windows 2 on MS-DOS 5, does involve loading the setver command in the config.sys, and rebooting. Windows 2 cannot use XMS (more on that) but instead uses the older LIM EMS standard that allows a 64kb page to be viewed from a far larger card. Since the 8086/80286 still use 64kb segments it’s not all that crazy to use.
And that brings me to this great program EMM286!
It allocates a 64kb page in low ROM, and backfills it from XMS. So I give it 3MB, and now I have 1.3MB of XMS left, and 3MB of LIM EMS ready for Windows!
So now I have EMS & XMS! And didn’t have to get some pesky EMS board either. I am pretty sure you need device drivers to use EMS, so how do you use LIM EMS under OS/2 1.x? I have no idea. Probably not I guess?
Anyways I run word, everything is great, it sees extra ram. I exit windows, and unload EMM286, and ..
3.4MB of XMS available? Somehow I lost a megabyte of RAM from Windows 2?! I’m not sure what is going on, or why or how Windows even touched it. Needless to say if you want it back, you need to reboot.
DOS 10.21494KB free!
That’s right 494KB free! I thought MS-DOS under OS/2 just used some stubs in real mode, and called back to protected mode. No doubt this is totally wrong, there has to be some weird version of DOS+OS2 that actually runs in real mode going on here. I know that ‘bimodal drivers’ were a thing, but it sure seems like there really is a ‘real mode OS/2’ kernel with MS-DOS tacked onto the side.
Windows 3.0 standard mode, 286 + 5MB of RAM
It’s annoying OS/2 can’t tell you how much ram it sees and what is in use, but at least Windows 3.0 can. It’s more than enough to run Sim City, clearly making this one of the more expensive machines to run the game as intended. With the added RAM it doesn’t thrash as hard, but having emulated disks probably doesn’t matter as much as access time is always zero, and it’ll stream data as fast as it can. You can feel the difference moving between tasks, but things like the OS/2 file manager that loads a view into every directory is still incredibly slow. What were they thinking?!
Thouhts?
Back in the day this would have been an incredibly expensive upgrade. And is it worth it? The machine is still locked at 10Mhz. The FPU is also locked at 10Mhz, and you can feel it. The lightening fast disk access, despite it being some 11% slower is really hard to tell. Does the caching help at all? Applications don’t have to page in/out like crazy before as there is enough RAM to actually run them, but that is where the 10Mhz processor just isn’t there.
Just like the caching SCSI controller, I’m sure we’ve all heard how having that magical EMS memory would help out games like Wing Commander.
XMS/DOS High + EMM286 on the left, and just XMS + DOS High on the right
Well, I had to put them side by side, as I couldn’t believe it, but adding EMS made it noticeably slower. I was *NOT* expecting that. I should add that I used Vegas & this quick tutorial, on how to pan & resize one video to get them side by side. No doubt it’s not perfect but it’s enough to see that once the ship explodes, the performance on the EMS configuration is greatly throttled. It’s moments like this that makes me wonder is this something the caching SCSI card would do better implicitly? Or is it snake oil as well?
3MB is enough to load OS/2, and one application, just as Word v1 or Excel v2/v3 load just fine, but swapping between them is basically unloading one from memory, and loading the other back out to disk. It’s a shame RAM cost so much 1987-1992 as people really could have benefited from it. It’s just utterly bizarre that on such an outrageously expensive system that you even need RAM upgrade cards, it really should have been baked into the main logic board.
(This is a guest post by Antoni Sawicki aka Tenox)
I’m preparing a Windows NT RISC exhibition for VCF West 2023. While the CHM building is air conditioned, it’s far far from ideal and we have a rather hot summer. Most of the vintage machines lack CPU power management. Some, such as Alphas, are notorious for overheating. Despite installing modern fans and heatsinks, this still makes me uneasy. I wanted to come up with some thermal monitoring system to see whats going on in real time. Maybe alert or shut down if things go out of hand.
For a while now I been thinking about using Arduino with a thermistor. It would read the temperature sensor and send the data via serial port to the host. This should universally work for most old computers, as they commonly have serial ports. However, upon some prototyping I realized that between custom pcb/wiring, power requirements and TTL to RS232 converter, the whole thing was becoming a little too complicated for what I really wanted. Fortunately I came across a rather ingenious solution – someone sells this item on eBay:
It’s basically a thermal probe with RS232 interface, emitting a plain text ASCII string output. No drivers or software required. They are a little bit pricey. Perhaps readers can find a cheaper version. However it’s absolutely a perfect solution for what I really wanted. Note that the seller can make shorter cables on request. The default 3m is insanely long for this purpose.
With help of some thermal glue, installed the probe in to the CPU heat sink and routed the cable to a COM port in the back.
Above pictures are from Multia and PWS.
You can simply read the temperature as an ASCII string from the COM port:
However since this is a prestigious event I wanted something fancier. Also a simple terminal can’t really tell when was the data received and therefore is current. I banged out a simple Win32 app to have something nice on the screen:
If there is no update from serial port in last 10 seconds, “no data” will be shown. The text label changes color if the temperature goes over a threshold to warn if things are getting too hot.
I even added a thermal shutdown, if it goes over a critical value. However this only works on Windows 2000 and above. Earlier Windows NT versions lacked ACPI HAL support to invoke power down. Fortunately this will work nicely for 2210 build on PWS 500 and Windows XP on Itanium!
After VCF I’ll make something for Unix and VMS as well. Perhaps also a service / daemon version that can run in the background and doesn’t require GUI.
Since I was a kid growing up in Canada, everything was NTSC. And my first computer the Commodore 64 was of course NTSC based. My parents refused to get me a monitor, so I had to use the RF modulator to get it to work on a TV. In north America we had these RF modulators on the back of the TV’s to connect our systems up (Atari, Commodore, Nintendo, SEGA etc..)
And the picture looked terrible, it was an antenna so it was suspectable to all kinds of RF emission interference, grounding issues and all kind of all around problems. It’s no wonder I had 20/20 vision as a kid, but it was absolutely destroyed because I was even forbidden to buy a proper monitor.
So thanks to patreon and ebay, I found this amazing bundle for 49GBP, a Commodore 64, plus tape drive. The catch being it didn’t include any proper cables, so I went to Tesco and bought an RF lead. I have this weird LG TV, a LG 50PC1D 50in Plasma TV. The original list price was an eye watering £1800! I got it used a while back for a more reasonable £130.
Lots of Inputs!
While I was at Tesco, I didn’t see any kinds of RF boxes. I was hoping I could just plug the cable directly from the TV into the Commodore C64, and it turns out that is exactly how it works.
With the cable plugged in, I was able to eventually get an image. I found out that the LG is more than capable of locking the RF image from the Commodore 64, and it looks awesome!
One man and his Droid over the RF on the LG 50PC1D
It’s a lot better than I was expecting. Clearly RF on a ‘modern’ TV works great.
Of course getting this to work wasn’t all that intuitive, and again probably because I’ve only delt with NTSC TV’s where the channel would be locked to either 3 or 4. Not so in Europe.
Channel 4
So setting the TV to channel for, and the band to ‘cable’ you can see the distinct border of the basic screen. The image of course is useless but you can see it trying. And that is because after letting the TV scan and find the picture on it’s own it’s actually channel 36.
Messing with the image options I found that there is 3 systems to choose from:
System L
You can see the image trying to form under System L, but it’s obviously no good
System BG
While the image looks better, the speakers erupt with absolute static. And the image is a bit faint, but immediately recognizable. It does look better in person however.
System I
And finally we have System I, over V/UHF on Channel 36.
I don’t know if this will help anyone trying to get anything working. Maybe it’s only relevant for people new to PAL territories like me.
Shockingly no explosions, I was recapping stuff to notice that the PSU I’m using is sliced. Of course a 35 year old PSU runs better. I need some transistors, and maybe some diodes, but I don’t have good access to any at the moment. So weird how 80’s DRAM could need +12/+5/-5v to operate. Oh well.
So I wanted to capture some composite PAL signals, and well yeah I have a fancy capture card but it’s only HDMI of all things. NO VGA, EGA/CGA and sure no composite. So I headed down to Sun CHeong Computer Co. Ltd. 246 Apliu Street Shum Shai Po, and picked up one of these.
Although it’s not all that great, I have a webcam, and toggling between the display inputs can trigger a bluescreen.
So yeah it’s not so great.
I can’t really comment on the quality of the capture as it turns out I don’t have any RCA cables, so this is me running a jumper wire to the device directly. This is FAR from ideal but here we go:
So yeah…. It’s probably me, but there you go. at $99 HKD ($13 USD?) it’s not great. Actually its damned near temperamental. But its better than nothing.
While talking about home brew 8080 and 8086 systems on Discord an ebay search brought me to Elijah’s store page where this small little curiosity was up for sale. It’s literally just a NEC v30 on a Raspberry Pi hat, for a mere $15 USD! Interestingly enough the v30 can operate at 3.3v meaning no special hardware is required to interface to the GPIO bus on a Pi. This reminds me so much of the CP/M cartridge for the Commodore 64, and the price being so right I quickly ordered one and eagerly awaited to 2 weeks shipping to Asia.
While I have Pi 4’s that I run Windows 10 on to drive some displays & power point, I wanted to use the slightly faster Pi400 for this. The Pi400 has a compatible GPIO expansion port so just like a cartridge it’s a simple matter of slotting the card, powering up and building the software. While there is an included binary, it’s a 32bit one, and I’m running Manjaro on the Pi400 for a similar look/feel as the PineBook Pro. Anyways the dependences are SDL2, and an odly named ‘wiringPi’ library that allows C programs to interface to the GPIO.
You can download the emulator over on homebrew8088, specifically the Raspberry Pi Second Project. The last ‘ver 2’ download has the project configured for a v30 which is an 8086 analogue, unlike the v20 which is an 8088. When physically interfacing to the processor things like this really matter!
With the emulator built it was pretty simple to fire it up, and boot into MS-DOS:
first boot!
I have to admit I was a little startled at first as I really had no idea if this was going to work at all. I’d spoken to an engineer friend and he was saying plugging a CPU directly into the GPIO bus, and toggling connections to actually emulate the board was both crazy and that without any electrical buffers it’d most likely either fry the processor and maybe the Pi as well. I suspect this being low voltage may be sparing both, although I have no EE so I’m not going to pretend to know.
Loading up Norton SI confirms what Elijah had posted on Ebay is that it runs very slowly about 1/3rd the speed of an XT. Now I may not know anything about hardware but this seemed at least something a profiler could at least tell me what is going on, and if someone like me helicoptering in on the shoulder of giants could see something.
This will build a profiled version of the emulator that’ll let us know which functions are being called both the number of times, and how much time to do so. Not knowing anything but having profiled other emulators, the usual pattern is that you spend most time fetching and possibly translating memory; Both in feeding instructions and pushing/popping data from stack and pointers. Waiting is usually for initialisation and for IO.
Once you’ve run your profiled executable, it’ll dump a binary file gmon.out which you can then use gprof to format to a text file like this:
gprof pi gmon.out > report.txt
And then looking at the report you can see where the top time, along with top calls are. Some things just take a while to complete and other well they get called far too often.
As expected Start_System_Bus takes 1 second, followed by 1,100,374 calls to set the Data_Bus_Direction_8086_OUT (no doubt the Pi needs to alternate between reading and writing to the CPU), followed by 5,954,106 ticks of the CLK function. Of course the real culprit is Print_Char_9x16 which was called 286,883 times, and is responsible for nearly 40% of the tuntime!
Obviously for a simple MS-DOS boot the screen should not be calling any print char anywhere near this many times. Clearly something is amiss. Not knowing anything I added a simple counter to block at the top of the Print_Char_9x16 function to let it only execute 1:1000 times, and I got this:
Obviously it’s not right, which means that the culprit really isn’t Print_Char_9x16 but rather what is calling it. It was a simple change to each of the Mode functions to only render a fraction of the time, and I changed it to a define to let me fire it more often. This is a simple diff, assuming WordPress doesn’t screw it up. It’s not pretty but it gets the job done.
$ diff -ruN ver2/vga.cpp ver2-j/vga.cpp
--- ver2/vga.cpp	2020-07-29 10:36:51.000000000 +0800
+++ ver2-j/vga.cpp	2021-06-04 01:51:33.546124473 +0800
@@ -1,5 +1,9 @@
 #include "vga.h"

+static int do9x16 = 0;
+#define VIDU 5000
+
+
 void Print_Char_18x16(SDL_Renderer *Renderer, int x, int y, unsigned char Ascii_value)
 {
 	for (int i = 0; i < 9; i++)
@@ -23,6 +27,12 @@

 void Mode_0_40x25(SDL_Renderer *Renderer, char* Video_Memory, char* Cursor_Position)
 {
+do9x16++;
+if(do9x16>VIDU)
+        {do9x16=0;}
+else
+        {return;}
+
 	int index = 0;
 	for (int j = 0; j < 25; j++)
 	{
@@ -36,6 +46,7 @@
 	Print_Char_18x16(Renderer, (Cursor_Position[0] * 18), (Cursor_Position[1] * 16), 0xDB);
 	SDL_RenderPresent(Renderer);
 }
+
 void Print_Char_9x16(SDL_Renderer *Renderer, int x, int y, unsigned char Ascii_value)
 {
 	for (int i = 0; i < 9; i++)
@@ -57,6 +68,12 @@
 }
 void Mode_2_80x25(SDL_Renderer *Renderer, char* Video_Memory, char* Cursor_Position)
 {
+do9x16++;
+if(do9x16>VIDU)
+        {do9x16=0;}
+else
+        {return;}
+
 	int index = 0;
 	for (int j = 0; j < 25; j++)
 	{
@@ -102,6 +119,12 @@

 void Graphics_Mode_320_200_Palette_0(SDL_Renderer *Renderer, char* Video_Memory)
 {
+do9x16++;
+if(do9x16>VIDU)
+        {do9x16=0;}
+else
+        {return;}
+
 	SDL_RenderClear(Renderer);
 			int index = 0;
 			for (int j = 0; j < 100; j++)
@@ -156,6 +179,12 @@
 }
 void Graphics_Mode_320_200_Palette_1(SDL_Renderer *Renderer, char* Video_Memory)
 {
+do9x16++;
+if(do9x16>VIDU)
+        {do9x16=0;}
+else
+        {return;}
+
 	SDL_RenderClear(Renderer);
 			int index = 0;
 			for (int j = 0; j < 100; j++)
While it feels more responsive on the console, it’s still incredibly slow. SI was returning the same speed which means that although we aren’t hitting the screen anywhere near as often it’s still doing far too much. Is it really a GPIO bus limitation? Again I have no idea. But the next function of course is the clock.
First I tried dividing the usleep in half thinking that maybe it’s not getting called enough. And running SI revealed that I’d gone from a 0.3 to a 0.1! Obviously this is not the desired effect! So instead of a divide I multiplied it by four:
Now it’s scoring a 1.5! Obviously these are all ‘magic numbers’ and tied to the Pi400 and more importantly I haven’t studied the code at all, I’m not trying to disparage or anything, if anything it’s just a quick example why profiling your code can be so important! At the same time trying to run games is so incredibly slow I don’t even know if my changes had any actual impact to speed as emulation of benchmarks can be such a finickie thing.
My goto game, Battletech 3025 Crescent Hawks Inception loads to the first splash but then seems to hang. I could be impatient or there could be further issues but I’m just some impatient tourist with a C compiler…
With my changes and re-running the profiler I now see this:
Which is now what I expect with the bulk of the emulation now calling Read_Memory, with the Clock following that and of course our tamed screen renderer (although its still called far too much!) with the Data_Bus_Direction being further down the list. No doubt some double buffering and checking what changed in between calls would go a LONG way to optimise it, just as would actually studying the source code.
The one cool thing about this is that if I wanted to write a PC emulator this way gives me the confidence that the CPU is not only 100% cycle accurate, but it’s 100% bug for bug accurate since we are using a physical processor.
And again for $15 USD + Shipping I cannot recommend this enough!
The following is a guest post by PA8600/PA-RISC! Thanks for doing another great writeup on that PowerPC that was going to transform the industry!.. but didn’t.
The history of the PReP platform from IBM is quite interesting, not only because of its place in the history of Windows NT but also the history of the PowerPC architecture in general. When the PowerPC platform was new, IBM (just like a few other vendors, notably DEC) had grand plans to replace the x86 PC clone market (they helped create) with PowerPC. Of course thanks to various factors such as Apple’s refusal to play along, the launch of the Pentium Pro CPU (and the later Itanium disaster), and high cost, this plan never ended up panning out. Later IBM PReP machines were designed for AIX and Linux use only, and they were sold as regular old RS/6000 computers.
Still, Microsoft being Microsoft and willing to port their OS to literally anything hedged their bets and made MIPS, PowerPC, and Alpha ports of Windows NT (along with a PC98 release for Japan only). In the guest post about Solaris for PowerPC I made, I talked about the history of IBM’s PReP platform some more so you should go read that post if you want an initial rundown on PReP’s flaws and history. But I have learned a bit about the Windows NT port for PowerPC, and I discovered a rare version of it as well. By now everyone with a PReP machine (or PPC Thinkpad) has run Windows NT 4.0 on it, and if PReP machines are emulated it’s guaranteed this will be the second most run OS on it aside from AIX of course.
IBM also made a half-baked OS/2 port for PowerPC as well, and then there’s the previously mentioned Solaris port. All of these are rarities and it’s worth documenting. With how rare PReP machines are and their high prices on eBay when they do turn up for sale (or their tendency to be snapped up fast), I think it’s fitting to write perhaps the most in depth look at PReP hardware that anyone has seen.
Windows NT 3.51: “The PowerPC Release”
It’s commonly accepted that Windows NT 3.51 was the first release for PowerPC hardware and it was even called this within Microsoft. Featuring HALs for most of the early PReP machines including the Moto Powerstack, the rare FirePower machines built for NT (which used Open Firmware), the Power Series 6050/70 (and maybe 7248), and the unobtanium IBM 6030, it’s pretty much what you’d expect for a first release for PPC. It’s a polished, solid OS that’s arguably faster than NT4 on the same machine. Aside from the red boot screen (on my Weitek GPU), it’s pretty much Windows NT 3.51 but on the PowerPC. It’s like running NT 3.51 on MIPS or Alpha, it’s interesting but more software will likely run on 4 anyhow (especially on Alpha).
One interesting quirk of Windows NT for PowerPC is it does not report the CPU type of your machine. It simply reports “PowerPC” and what machine you’re running it on. It does not tell you that you’re running it on a 601, it tells you that it’s running on an IBM-6015.
Unsurprisingly Visual C++ 4 works on PowerPC Windows NT 3.51 as well. This is no shock, Visual C++ 4 was designed to work on 3.51 as well as NT 4.0. The same goes with many of the pre compiled programs. One advantage Windows NT 3.51 offers over 4.0 is that it is simply faster than 4.0 on the PowerPC 601.
There’s not much else about Windows NT 3.51 for PowerPC quirk wise that hasn’t been said elsewhere about NT 4. It runs in little-endian mode (one of the few PPC OSes to), it has 16 bit Windows emulation that’s slow, and it needs specific PReP machines to run. One interesting series of articles about the “behind the scenes” of the port worth reading is the Raymond Chen article series, and this discusses the quirks of programming a PowerPC 60x CPU in little-endian mode as well. It can be installed with the same ARC disks NT4 uses, and of course the same SMS and firmware disks will work. In fact QEMU at one time was capable of booting the IBM firmware image from these disks.
Here’s something I’ve found out from research however. There was actually a limited release of Windows NT 3.5, it’s been dumped, and it is a real operating system. It also requires a very specific model of RS/6000 to work, and one with a interesting history giving it a unique place among the PReP machines. While I was unable to make it work in the end, I did discover and document a lot of interesting features of PReP machines.
Enter Sandalfoot: The IBM 7020/6015 (and demystifying PReP machines)
To understand the HCL and weirdness of Windows NT for PowerPC (and why it won’t run on Macs), we need to take a look at one such machine it runs on. This is my RS/6000 40p, a machine that was given several brand names by IBM and used as a development platform for PReP software and operating system ports. This is also perhaps the most historically significant RS/6000 model from the era. While it wasn’t the first PowerPC RS/6000 (that honor goes to the 250), it was the first to use the PCI and ISA busses and it was a few months ahead of both the initial PCI PowerMacs and other PReP boxes. It’s also one of the few true bi-endian machines as just like other PReP machines, the MIPS Magnum, HP’s Integrity, and modern Power8+ machines it has OSes for both endians available.
In 1994 (presumably October 28, if the planned availability date is correct), IBM released the RS/6000 40p (announcement letter here, codenamed Sandalbow) and the Power Series 440 (codenamed Sandalfoot). Both are near-identical machines with different faceplates and boot screens. The RS/6000 ranged in price from around $4,000-6,000 and was designed to be an entry-level AIX workstation, bundling a copy of AIX with each machine. As an AIX machine it’s relatively slow and fits the entry-level badge quite well, but thanks to the 601’s POWER instructions it served as a transition machine over to the later 604 AIX machines. Unlike the later PowerPC 603 and 604 machines, it featured POWER instructions allowing it to run both legacy AIX POWER software and later PowerPC software. The Power Series was presumably sold to those wanting a PReP box for Windows instead.
Since IBM PReP hardware is so obscure and undocumented, I’m going to document this as best as I can being the owner of an IBM Model 6015/7020. The machine features a 66mhz PowerPC 601 (similar to that of the Power Mac 6100 and RS6K 250), PCI and ISA slots, and IBM’s “Dakota” PReP firmware (more on the boot process here). It uses an off the shelf NCR 53c810 SCSI controller, Crystal CS4321 sound chip, an Intel 82378 PCI bridge, and a NIC can be inserted into the ISA slots (mine has the famous 3com Etherlink III). The Super-IO chip is also off the shelf, and is a National PC87312VF. The clock IC is a Dallas DS1385S, a close relative of the Dallas DS1387 (with internal battery). At least some of the IBM custom ICs are the chipset ICs and those are also documented. A Linux 2.4 dmesg can be found here.
Mine is also maxed out at 192mb of RAM, however there are some solder pads for more and the chipset is limited at 256mb. This makes me wonder if the system was based on a reference design of some sort. There was an ultra-rare 604 upgrade as well, but considering how there are more 7248 and 7043 machines in the wild I can assume many customers just waited for that instead due to its superior AIX performance.
If the idea sounds familiar (off the shelf chips + RISC CPU) it’s because it was the very same idea used to create the two other non-x86 Windows NT platforms. The Microsoft Jazz MIPS platform most MIPS NT boxes were influenced by was infamously based on the same idea of a “PC with a MIPS CPU”. To a lesser extent, this was also seen on the DECpc AXP 150 and other EISA/ISA/PCI based Alpha machines designed to both run Windows NT and DEC’s own OSes. Crazy undocumented custom hardware and expansion busses were thrown out the window in favor of industry standards. In fact when I posted a photo of the motherboard to a chat full of PC nerds, they stated it looked remarkably like a normal PC motherboard. The whole industry would later adopt PCI and sometimes ISA on non-x86 machines to cut costs and reuse the same expansion cards.
The main difference between the RS/6000 40p and the Power Series variant is the boot ROM logo and chime. The RS/6000 and “OEM” systems used a boot ROM that featured the PowerPC logo and just a beep, while the Power Series machines featured a logo more closely resembling the PowerPC Thinkpads complete with the chime. One can boot firmware from a floppy as well by typing in the name of the ROM image in the prompt and pressing enter, and watching as it reboots once the firmware is loaded into RAM. Here’s a video I filmed demonstrating this, along with some other quirks including there being two SMS keys: F1 for a nice flashy GUI SMS and F4 for a text based SMS, along with F2 for netbooting (with the right NIC of course).
The Sandalfoot machines were LPX form factor machines, featuring a riser card and generic sheet-metal case popular with prebuilt machines from this era. The LPX form factor was wildly popular in the mid 90s due to its versatility, seeing use by both IBM and DEC for their RISC machines, various PC builders, and even Apple for the clone program and clone based Power Macintosh 4400. The Sandalfoot machines also drove home one of the core goals of the PReP project, which was to build a PowerPC platform using as many off the shelf and PC style components as possible instead of using lots of custom ICs like Apple did. I dug out one of my cameras to take a few high-res photos of the motherboard of this computer to illustrate this. Compare this to the motherboard of the Power Macintosh 6100 or even the 601 based 7200 and notice the bigger heatsink and use of fewer custom ICs (Apple loved those).
There were three main GPU options: the famous S3 Vision864, the Weitek Power 9100 (or P9100 for short) as a higher end option, and IBM’s own GXT150P. The S3 was the entry level GPU and the Weitek was a higher-end and faster GPU. The GXT150P is beyond the scope of this because it is unsupported on the other PReP OSes, only AIX. The other two video cards are essentially unmodified Diamond PC cards with the BIOS chips missing.
The Sandalfoot machines are perhaps the most important PReP machines due to their role in PReP OS development. Both OS/2 Beta 1 and Windows NT 3.5 were written for this machine in particular as it was one of the first PowerPC machines to support PReP and feature PCI/ISA slots, unlike the NuBus Macs released a few months earlier or the first PPC box: the MCA based RS/6000 Model 250. They also often shipped with the well documented and emulated S3 Vision 864 video card, a common GPU family in PCs of the time to the point where it was even included on some motherboards and emulated in too many PC emulators/virtualization programs to count (notably 86box/PCem). In fact it’s successor (the 7248) featured one soldered to the motherboard.
Windows NT 3.51 was dubbed the Power PC release, because it was designed around the Power PC version of NT, which was originally supposed to ship in version 3.5. But IBM constantly delayed the Power PC chips, necessitating a separate NT release. “NT 3.51 was a very unrewarding release,” Thompson said, contrasting it with Daytona. “After Daytona was completed, we basically sat around for 9 months fixing bugs while we waited for IBM to finish the Power PC hardware. But because of this, NT 3.51 was a solid release, and our customers loved it.” NT 3.51 eventually shipped in May 1995.
I think a more accurate thing to write is that there simply weren’t many PReP boxes out in late 1994. Windows NT 3.51 supported the Motorola PowerStack series, the IBM 6050/6070 (and maybe the 7248, which came out in July 1995), and rare FirePower machines. Windows NT only features HALs for the 6015 (Sandalfoot/Power 440/RS6K 40P), 6020 (Thinkpad 800), and the 6030 (a rare IBM machine that likely was only sent to a few developers). By 1995, there were more PReP machines on the market and this made the NT 3.51 release logical. NT4 even supported a few servers, mainly the RS6K E20, E30, and F30.
Windows NT 3.5 was most likely a limited release for testing purposes on the Sandalfoot machine as it’s HCL file declares it as “Build 807” with a date of October 18, 1994. The date seems to be around a week or two before the first 40p machines at least shipped. Some more files were modified later on and the folders were created on November 9th, 1994. Hardware support is very barren, and the readme file even has a section dedicated to quirks of the 40p along with a list of supported software for the x86 emulator. This might have been considered a beta as well, as an announcement letter for the Thinkpad 800 (6020) explicitly mentions Windows NT and that this version might be a beta for developers. It also talks about a Windows SDK for it and a Motorola compiler used to build 3.5 software.
However the real problem for me has to do with getting a video card. Windows NT 3.5 for PowerPC does not support the Weitek P9100 GPU that came with many RS/6000 branded machines, and neither does OS/2 for PowerPC. It only supports the S3 Vision 864 and 928 video cards. It’s listed in the setup options, but choosing it causes a txtsetup.sif error. I’m going to assume that the development units came with the S3 video card instead. My box contained a Weitek card which works for AIX, Solaris, and Windows NT 3.51/4. I bought a card from eBay to use with NT 3.5 and the OS/2 port.
The readme also features an ominous warning with the S3 video cards, that only revision B3 is supported and that 928 cards need 2MB of VRAM for anything above 256 colors. My revision of the card I ordered was B4, so I took the risk of seeing if it worked with my system. I also removed the ROM chip as the system initializes the video card itself and that having a ROM chip can cause the system to not complete the self-test or display video. As the IBM Weitek card lacks a BIOS, I did this.
Despite the scratches on the card from possibly coming out of an ewaste pile, the card worked fine in both a PC I inserted it in for testing purposes and the IBM system. I now had a 40p with a GPU much more well supported among non-AIX or Windows NT operating systems.
Anyhow, let’s talk about the install process in closer detail here. Windows NT for PowerPC installs in a similar manner to Solaris for PowerPC on the IBM PReP machines. First the floppy disk boots ARC, then when you choose to install it the machine copies the ARC bootloader/firmware to the hard disk so it can load it from there at each boot. The floppy disk can also be used to load ARC if the loader is damaged on the hard disk. Keep in mind, on IBM machines ARC is not stored in the ROM unlike on many other ARC capable machines so this has to be done. The Firepower machines do something very similar by using an Open Firmware shim, and unsuccessful attempts at emulating PPC NT have exploited VENEER.EXE to attempt booting instead of using the IBM firmware. It fails because they’re not emulating the hardware, just trying to find a quick way to just boot NT.
Once this is done, the installer loads up and installs just like every other NT install. It checks the HAL by reading the machine ID, what video hardware the machine has, and whatnot to prepare the installer. You need a IBM 6015, 6020, or 6030 according to the HALs it has and only the S3 video cards are on the HCL.
Or that’s what should happen. I first tried using ARC 1.51 as it worked for 3.51 and was greeted with a HAL error BSOD:
I first attempted to use older ARC boot floppies and I got somewhere, the BSOD changed to the classic 07b, and then I got nothing else. Using ARC 1.48 and 1.49 gave me this, I got some i/o error with ARC 1.46 (the first 3.51 ARC floppy), and any previous ARC floppy is most likely undumped. I’m assuming either the error is due to an ARC mismatch, a weird firmware mismatch/hardware revision mismatch, or some incorrect SCSI ID Solaris style. There might very well be some weird forgotten trick to making it work (maybe a Windows expert could dig through the files and find some weirdness), but I’m going to move onto another obscure PPC rarity:
OS/2 PowerPC Boot Attempts: Beta 1 and the Final
Recently the OS/2 Museum site dumped Beta 1 for PowerPC. It’s an earlier version of OS/2 for PowerPC that insists on a Sandalfoot machine with an S3 GPU. Unlike the other OS/2 PowerPC disc, it features a verbose boot featuring the kernel it uses. If you want to really see OS/2 for PPC working, try it on a 7248 or read this post about it.
This failed to boot, throwing up an error about mounting the disk or something. I did record it doing something at least however, an improvement over the Weitek which just does nothing at the PowerPC screen. I tried several things including removing the external SCSI CD drive and that didn’t fix much. It also declares 88c05333 an unknown PCI device.
So I decided to try the “final” build. The final build requires a 6050/70, and some people did get it working on the PPC Thinkpads. I decided to see what it’d do on my machine. Unsurprisingly it did absolutely nothing but give me a blank white screen and sometimes a 00016000 error (for a trashed CMOS). If anything the 6015 loves to trash it’s CMOS contents for absolutely no reason, especially when OS/2 is involved.
Anyhow this was very anti-climatic, as the OSes I threw at it found reasons to not work on it whatsoever. I weeded out the GPU being at fault by testing Windows NT 4.0 and finding out that it works just fine with the GPU, however I seem to have fewer resolutions available than what the Weitek card allows. It did change the boot screen font, making me wonder if the red boot screen is a GPU driver quirk.
However changing the device IDs with OS/2 PowerPC Beta 1 got me somewhere, as I now got a screen about the HDD failing to write. I formatted the HDD to FAT using the ARC diskette, then I nuked all the partitions, but not much else changed. I’m not sure what the error means, but it was a letdown.
Unless these OSes require some long lost firmware, I’m wondering if there’s else that’s causing issues with installation. Either way, it was a letdown. Nothing I tried worked and I spent hours messing with everything from SCSI IDs to using different drives.