Chrome Selenium Driver in Visual Studio C#
I’m sure you’ve all heard of Selenium by now. It’s a popular tool used for automating web browser interactions. And while there are many different selenium bindings available, Selenium WebDriver with Chrome using Visual Studio C# is also applicable.
Here’s a beginner-friendly guide covering the following:
- Basics of setting up Selenium C# Client Drivers
- How to use Chrome Selenium Driver in Visual Studio
- Tips to Use Chrome Developer Tools to Create Automated Selenium Tests
INDEX
Configuring Selenium 2.0 with Chrome to work in Visual Studio
First Download the Selenium C# Client Drivers
Configure Visual Studio to work with Selenium
Install Dependencies in Project Way
Install Using NuGet
Time to Code Some Selenium C# Test Scripts!
Using Chrome Developer Tools When Creating Automated Selenium Tests
Configuring Selenium With Chrome to Work in Visual Studio
In a previous post/video, I showed how to get started using Selenium WebDriver for IE in Visual Studio using Selenium Chrome Driver.
Since then, I’ve received a few questions about doing the same with Selenium Web Driver and Chrome in Visual Studio. Rather than answer each one individually, I thought it would be better to frame my reply in the form of a quick post.
Also, I know I wrote this 9 years ago, but it still works! I also modified some of the locations of the selenium driver service info. Today in this post, we will check out how to configure Selenium WebDriver to work with Visual Studio and Google Chrome Version.
I

How to Set Up the Selenium C# Client Drivers
Here are the three steps to complete downloading the Selenium C#:
1. Download the C# DLLs from Selenium’s website:
https://www.selenium.dev/downloads/
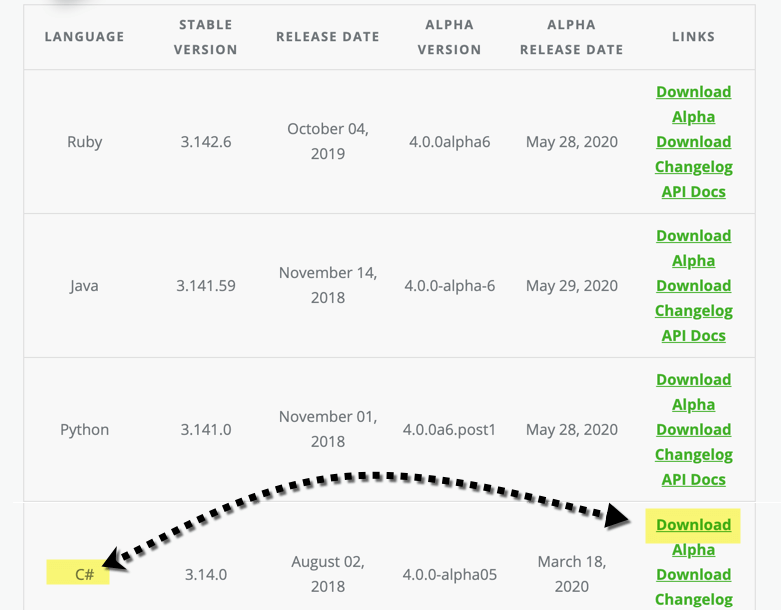
2. You also need to download Chrome Driver from:
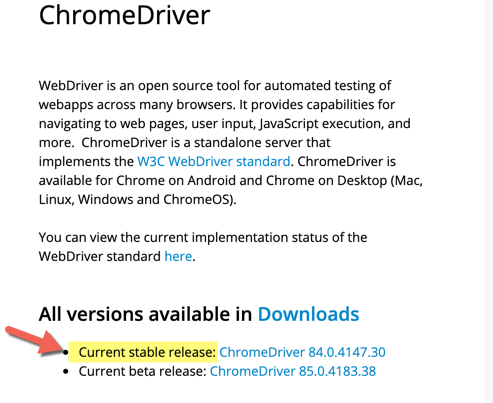
3. Once you’ve downloaded the required Selenium files, extract the zips to a local drive on your computer.
Configure Visual Studio to work with Selenium. If you’re using Visual Studio, there’s a good chance that you want to use Selenium with it.
Here’s how it works:
Install Dependencies in Project Way
- The first way is to include all the dependencies in your project:
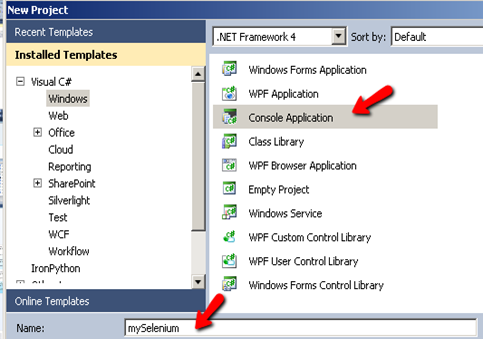
- Launch Visual Studio and start a new project
- Select ‘Console Application’ and name your project mySelenium
-
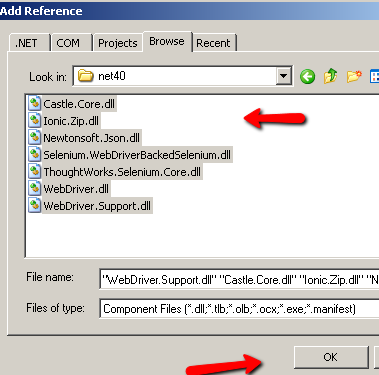
In your project, select Project>Add References from the toolbar and browser to the location where you extract the DLLs. Make sure that you select the correct version of .NET that you will be using:
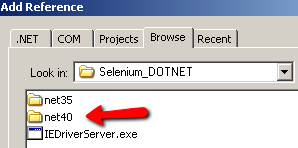
-
Select all the DLLs and click ok
Install Using NuGet
The easiest way is to just use .NET’s NuGet package management in Visual Studio.
- Right-click on your project and select “Manage NuGet Packages”
- In the Manage NuGet Packages Search type Selenium
- Click on the Selenium.WebDriver option and select the “Add Packages” button
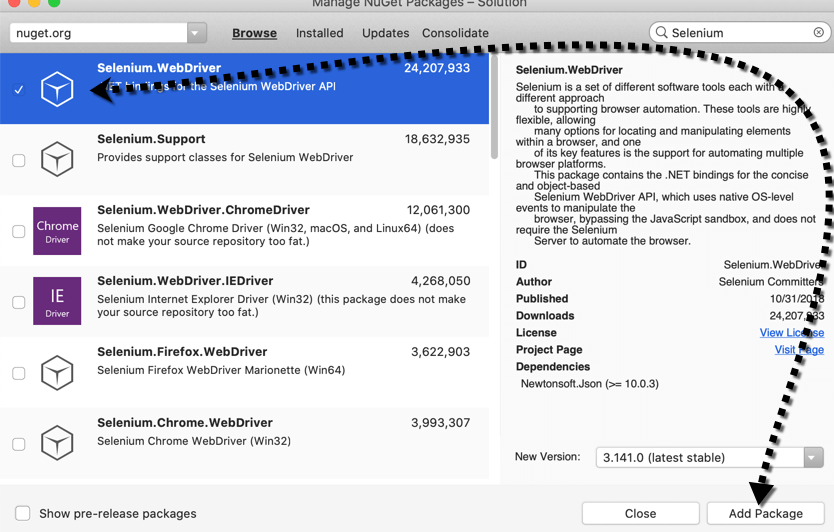
- This will automatically add all the Selenium dependencies to your project.
Get Free Test Automation Tips
Time to Code Some Selenium C# Test Scripts!
Cool – now that we have the Selenium DLLs referenced in our project, it is time to test the configuration by running a quick test.
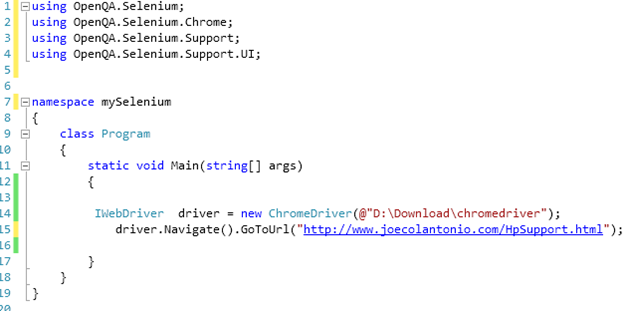
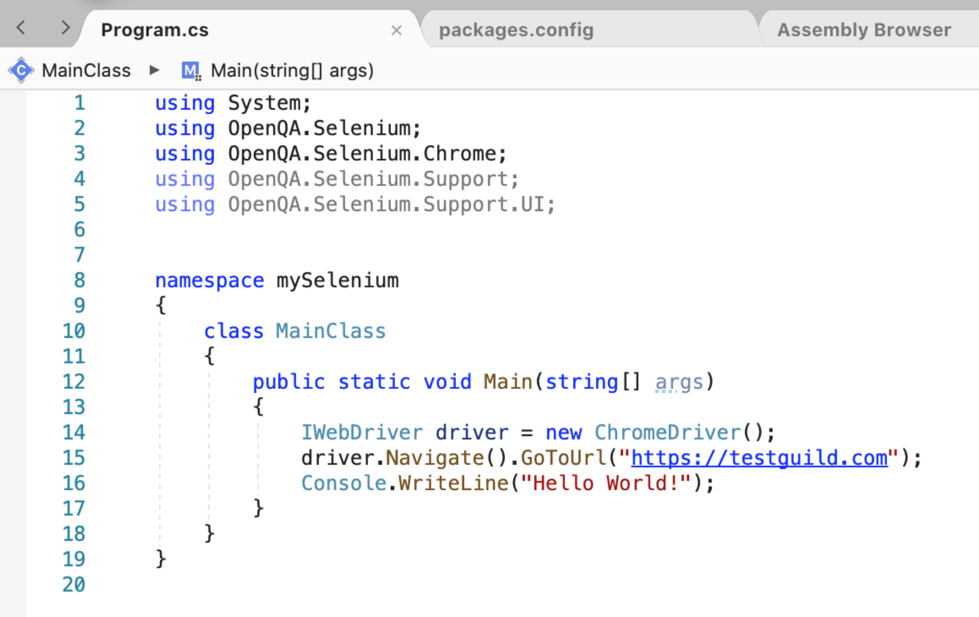
1. At the top of your project code, after the last ‘using’ namespace, add the following Selenium namespaces:
- using OpenQA.Selenium;
- using OpenQA.Selenium.Chrome;
- using OpenQA.Selenium.Support.UI;
2. Add the following code in your static void main string:
//!Make sure to add the path to where you are extracting the chromedriver.exe:
IWebDriver driver = new ChromeDriver(@”D:Downloadchromedriver”); //<-Add your path
driver.Navigate().GoToUrl(“https://testguild.com/HpSupport.html”);
Note: You could also create an environment variable named webdriver.chrome.driver on your machine. That value is the path to where the local chromedriver.exe is located. If you set up a webdriver.chrome.driver variable, you would not have to pass the chrome driver argument when you create a ChromeDriver instance.
Note for Mac Users: If you are installing on a Mac, you can add the ChromeDriver to your /usr/local/bin. Open your terminal and type sudo nano /ect/paths. At the end of the file, add /usr/local/bin and save. Go to your system properties and make sure that you allow app downloads for chrome driver under your Security & Privacy Settings.
Your code, if you’re using a hardcoded path for the chrome driver, should look like this:
If you install the chrome driver to your PATH, your code should look like this
3. Run the test – Google Chrome browser should start and bring up https://testguild.com/HpSupport.html
Listen to Test Automation Podcasts
Using Chrome Developer Tools When Creating Automated Selenium Tests
If you are going to be scripting against Chrome, you should check out the built-in Developer tools (Ctrl+Shift+I). You can also run more Selenium test scripts on the Google Chrome browser.
For those familiar with QTP, this is like QTP’s spy feature.
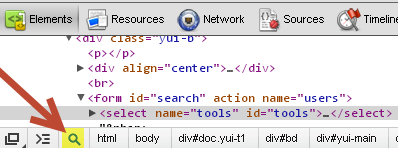
- In Google Chrome, go to Tools>Developer tools.
- Using the Chrome magnifying glass icon feature allows you to spy on an element’s attributes. You then use these attributes in your Selenium code to help identify fields in your web application.
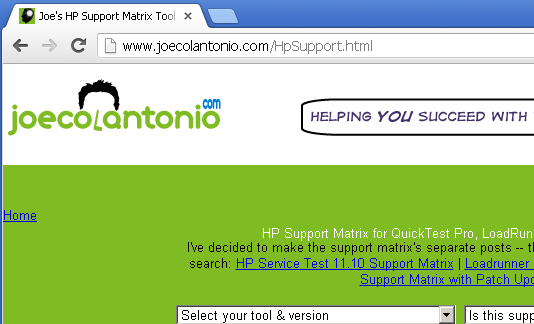
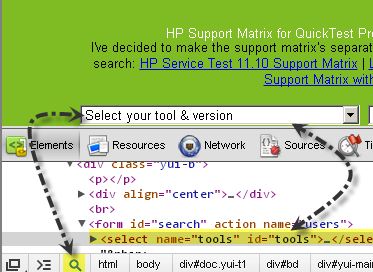
3. For example, if we want to navigate to www.joecolantonio.com/HpSupport.html and select a value from the ‘Select your tool & Version’ you would point the magnifying glass to the ‘Select your tool & version” field to get its attributes:
4. Now that we know what the id is, we can use that to help Selenium interact with it. For example:
IWebDriver driver = new ChromeDriver(@”D:Downloadchromedriver”);
driver.Navigate().GoToUrl(“https://testguild.com/HpSupport.html”);
IWebElement myField = driver.FindElement(By.Id(“tools”));
myField.SendKeys(“QTP10”);
5. Run the test – it should start Chrome, navigate to http://www.joecolantonio/HPSupport.Html, and select QTP10 from the Select your tool & version.
Good luck, and happy Selenium scripting to you!
For more .NET Csharp-based Selenium test automation awesomeness, check out the following TestGuild podcast.
In this episode, Nikolay Advolodkin, founder of UltimateQA and the #1 Selenium WebDriver service instructor in the world as rated by Udemy.com, shares with you some Selenium C# tips, tricks, and more from his popular video courses on test automation.

Joe Colantonio is the founder of TestGuild, an industry-leading platform for automation testing and software testing tools. With over 25 years of hands-on experience, he has worked with top enterprise companies, helped develop early test automation tools and frameworks, and runs the largest online automation testing conference, Automation Guild.
Joe is also the author of Automation Awesomeness: 260 Actionable Affirmations To Improve Your QA & Automation Testing Skills and the host of the TestGuild podcast, which he has released weekly since 2014, making it the longest-running podcast dedicated to automation testing. Over the years, he has interviewed top thought leaders in DevOps, AI-driven test automation, and software quality, shaping the conversation in the industry.
With a reach of over 400,000 across his YouTube channel, LinkedIn, email list, and other social channels, Joe’s insights impact thousands of testers and engineers worldwide.
He has worked with some of the top companies in software testing and automation, including Tricentis, Keysight, Applitools, and BrowserStack, as sponsors and partners, helping them connect with the right audience in the automation testing space.
Follow him on LinkedIn or check out more at TestGuild.com.
Related Posts

Look, I’ve been doing test automation for over 25 years. I’ve heard the predictions. “Manual testing is dead.” “AI will […]

The 72.8% Paradox That Changes Everything After interviewing 50+ testing experts in 2025 and analyzing data from our 40,000+ member […]

Look, I’ve been doing this testing thing for over 25 years now. I first wrote about the AI “three waves” […]

What’s New in Low-Code/No-Code Testing for 2026 A lot had changed on the The low-code/no-code testing space and it has […]