

Benefits at a Glance
- Works reliably on all major Linux distributions
- Uses correct KVM/libvirt settings for maximum compatibility
- Ensures Windows 11 installs cleanly without errors
- Optimizes performance with virtio, TPM, and proper CPU configuration
- Produces a fast, stable VM for daily use
Windows 11 version 25H2 is Microsoft's latest major release, featuring a refined interface, faster performance, enhanced security, and better hardware support. It's the most polished Windows 11 experience, making it ideal for virtual machines.
If you want to run Windows 11 on KVM, there are a few extra steps needed to ensure everything works smoothly. This guide shows you how to properly install Windows 11 on KVM using the latest recommended settings so you get a clean, secure, and high-performance virtual machine ready for everyday use.
These steps work consistently across major Linux distributions including Fedora, Ubuntu, Debian, Arch, and others.
Before You Begin
Make sure you meet the following requirements before creating the Windows 11 25H2 virtual machine:
- Your host system can provide at least 2 CPU cores (dual-core or better) running at 1 GHz or higher for the VM.
- Your host can assign a minimum of 4 GB RAM (8 GB or more recommended) for the VM.
- Your host can allocate at least 64 GB of virtual disk space (128 GB or more recommended) for the VM.
- You have installed the KVM hypervisor on your host system. If not, see my other guide: How Do I Properly Install KVM on Linux (2024)
- You have downloaded the latest VirtIO drivers ISO for Windows guests from: virtio-win-drivers
- You have downloaded the official Windows 11 25H2 ISO from Microsoft: Download Windows 11
Alright, let’s get started.
Table of Contents
- Section 1: Prepare KVM for a Proper Windows 11 VM
- 1.3 Select the Correct Chipset and Firmware
- 1.4 Configure the CPU for Maximum Performance
- 1.5 Configure the Storage for Better Speed
- 1.6 Add a Driver ISO for Windows Virtio Support
- 1.7 Improve Network Performance
- 1.8 Add a TPM Device for Windows Requirements
- 1.9 Add the QEMU Guest Agent Channel
- 1.10 Add an RNG Device to Improve Entropy
- 1.11 Enable Hyper-V Enlightenments for Better Performance
Section 1: Prepare KVM for a Proper Windows 11 VM
Before installing Windows 11, it is important to set up KVM and configure the virtual hardware correctly. In this section, you will use the virt-manager interface to adjust all required settings, starting with XML editing and moving through the recommended hardware configuration.
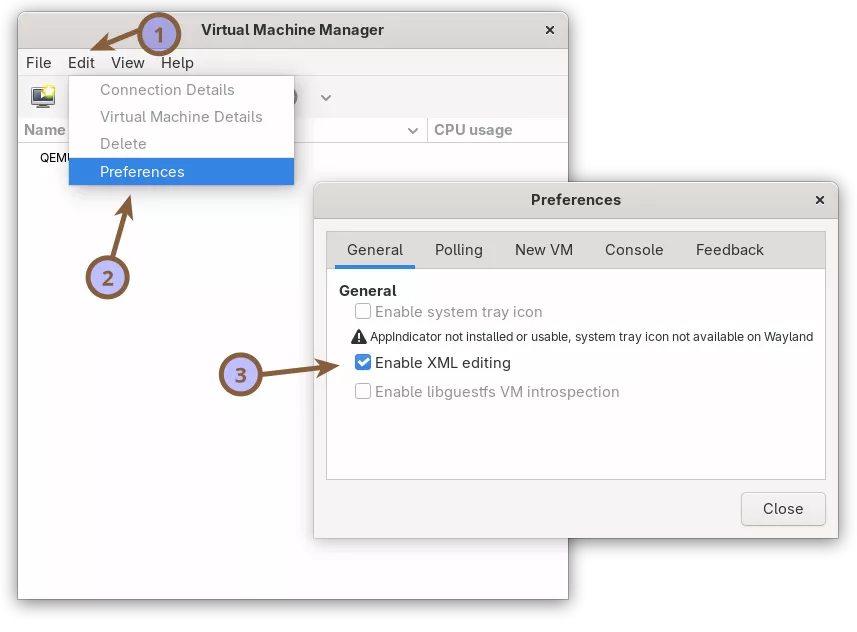
1.1. Enable XML Editing in virt-manager
Some Windows 11 optimizations require changes that can only be done in the XML editor. Enabling XML editing in virt-manager ensures you can apply these advanced configuration tweaks when needed.
Open Virtual Machine Manager.
Go to Edit > Preferences and check Enable XML editing to turn on the XML editor.
1.2 Configure Default Virtual Hardware Using the Setup Wizard
The Virtual Machine Manager wizard creates the basic structure of your Windows 11 virtual machine. After the initial setup, you will fine-tune the hardware settings to make sure the guest runs smoothly.
Click the computer icon in the top left.
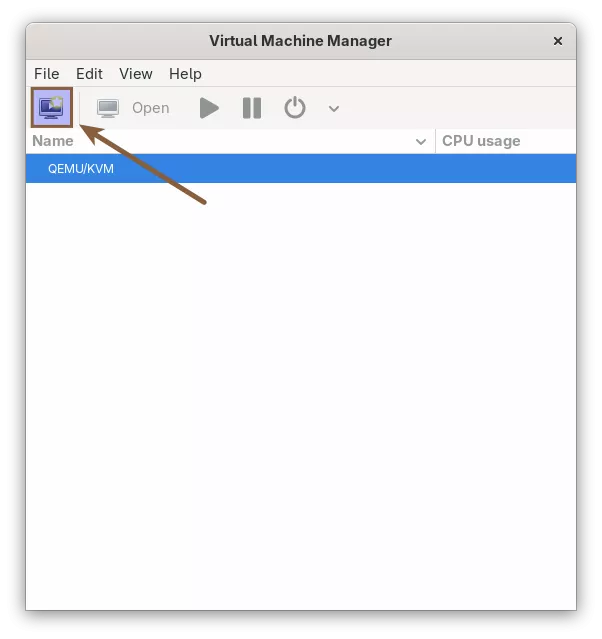
This opens a five step wizard for creating a new virtual machine.
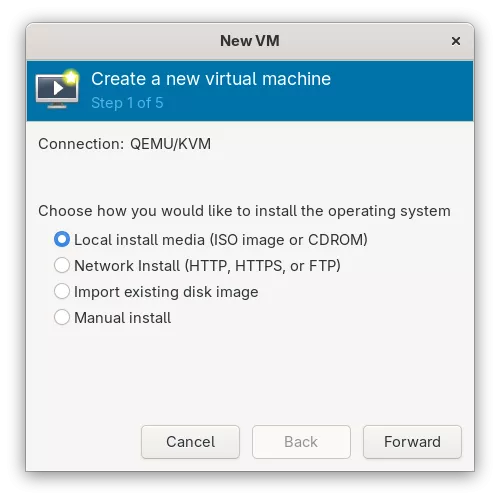
STEP 1: Choose how you want to install the operating system
Since you are installing Windows 11 from an ISO image, choose the first option and click Forward.
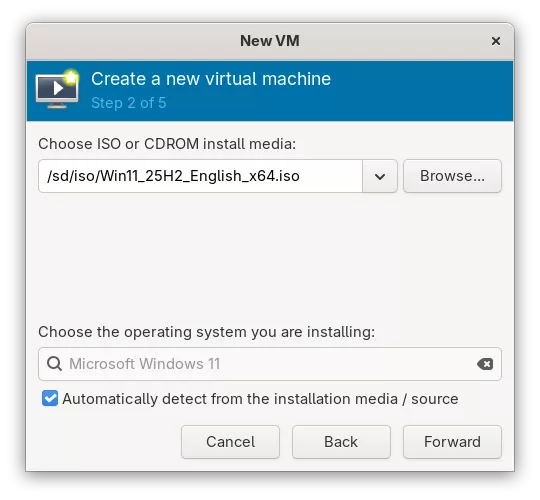
STEP 2: Choose the ISO installation media
Select the Windows 11 25H2 ISO file. Make sure Microsoft Windows 11 is detected automatically. Click Forward.
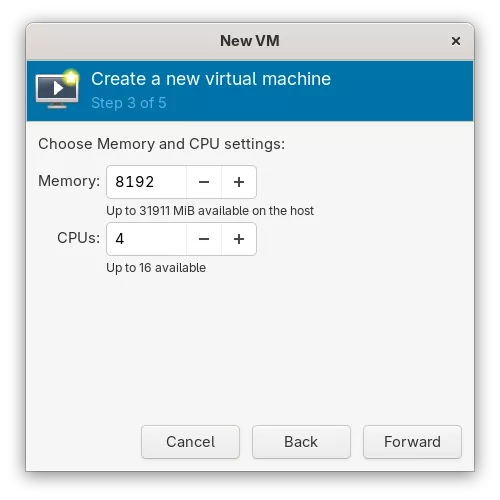
STEP 3: Choose Memory and CPU settings
Set the guest RAM and CPU count. For example, you can assign 8 GiB of RAM and 4 virtual CPUs. Adjust these values based on your system resources. Click Forward.
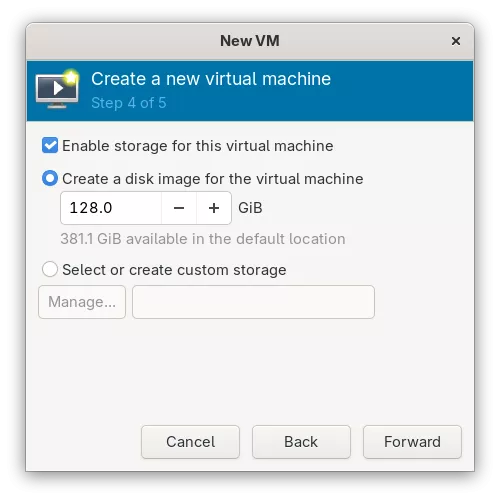
STEP 4: Enable storage for the virtual machine
Choose the disk size for the virtual machine. virt-manager creates a QCOW2 image that starts small and grows as data is added. A size of 128 GiB works well, but you can choose what you prefer. Windows 11 requires at least 64 GiB. Click Forward.
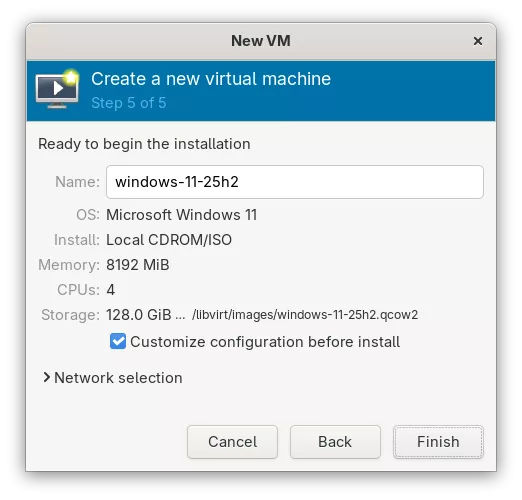
STEP 5: Set the virtual machine name
Enter a name for the virtual machine. For example, windows-11-25h2.
Enable the checkbox for Customize configuration before install, so you can apply the required Windows 11 optimizations in the next section. Click Finish.
You will now be taken to the advanced configuration window.
1.3 Select the Correct Chipset and Firmware
In the Overview section, make sure the chipset is set to Q35 and the firmware is set to UEFI. This provides a modern, compatible boot environment for Windows 11 and helps avoid hardware issues during installation.
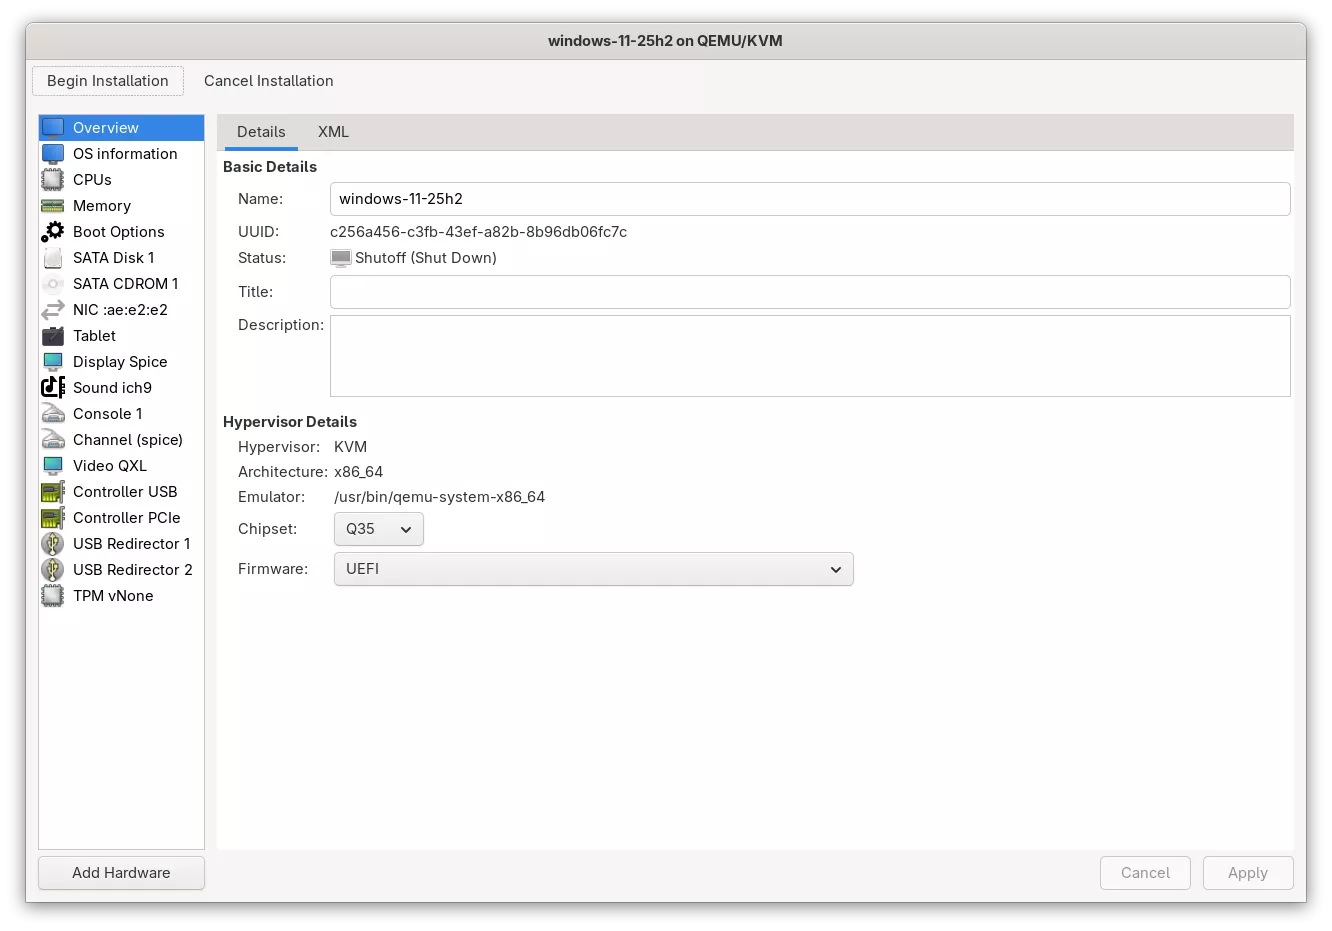
Q35 provides a modern PCIe-based virtual hardware layout. It avoids the legacy limitations of the older i440FX chipset and offers better device compatibility, improved passthrough behavior, and overall stability.
UEFI enables modern booting with Secure Boot support. It provides faster initialization than legacy BIOS and is required for proper Windows 11 installation, TPM integration, and seamless Secure Boot functionality.
1.4 Configure the CPU for Maximum Performance
For best performance, the Windows 11 VM needs a correctly configured virtual CPU. In this step, you will enable host-passthrough and set the proper core and thread topology so Windows uses the CPU efficiently.
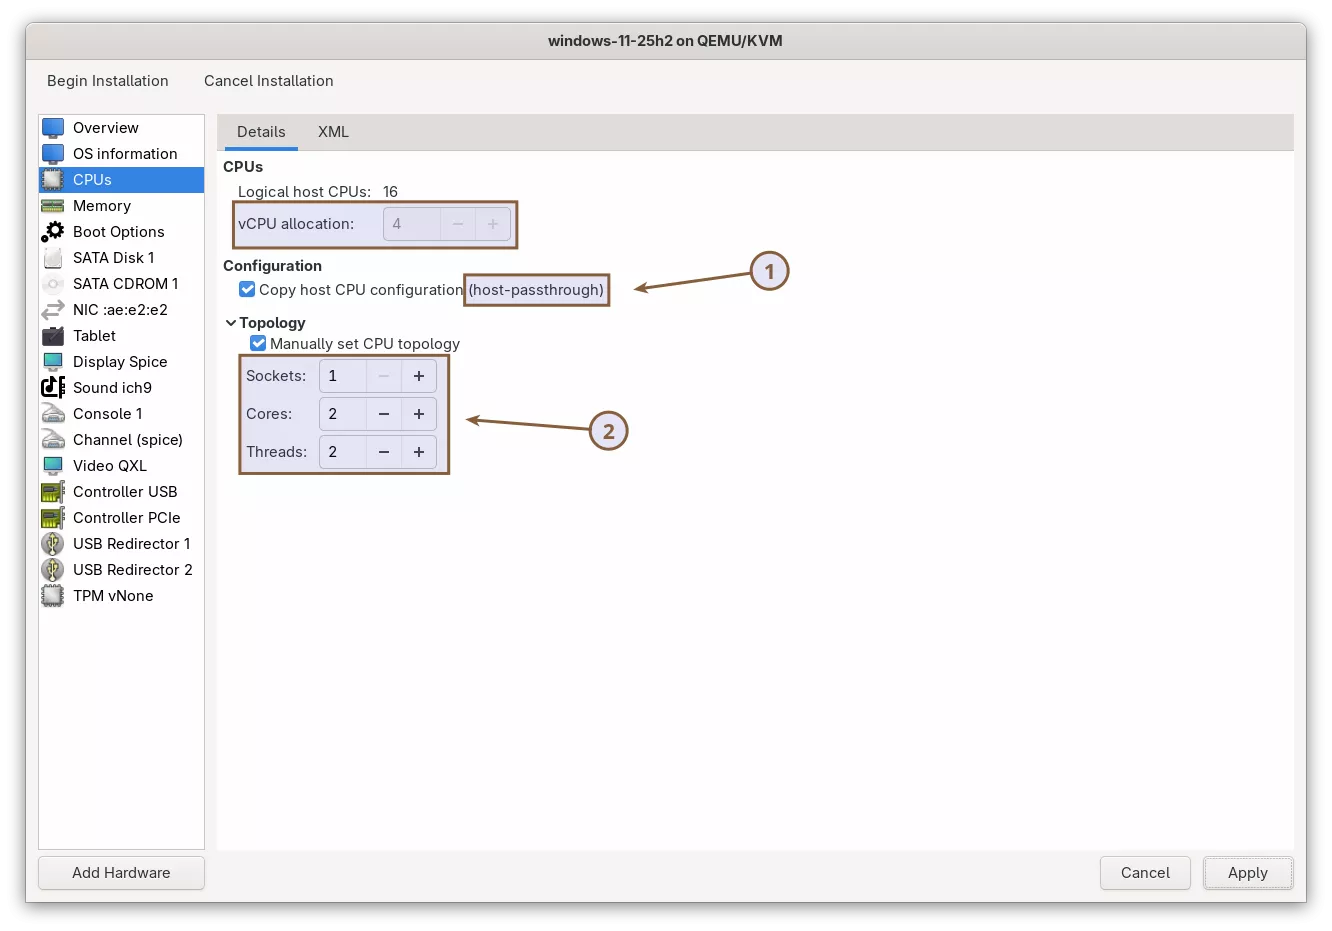
Ensure that host-passthrough is selected. This mode exposes your CPU’s exact model and features directly to the guest, allowing the VM to run much closer to native performance. It is also the recommended and default option in KVM for most workloads.
Check the Manually set CPU topology checkbox to define the CPU layout yourself. Windows sometimes guesses the CPU layout incorrectly, such as treating the VM as a dual-socket system. Explicitly defining the topology avoids this and ensures Windows schedules threads correctly.
To configure the topology correctly, first determine whether your host CPU supports simultaneous multithreading. Intel calls this Hyper-Threading, while AMD refers to it as SMT (Simultaneous Multi-Threading).
Run this on your Linux host:
lscpu | grep "Thread(s) per core"
Thread(s) per core: 2
On my Intel system, it shows 2, which means Hyper-Threading is enabled.
- If it shows 2, your CPU supports simultaneous multithreading (Intel Hyper-Threading or AMD SMT).
- If it shows 1, your CPU does not support simultaneous multithreading.
Now configure the vCPU topology accordingly.
If your host CPU has 2 threads per core (HT/SMT enabled), then for a 4-vCPU VM set:
- Sockets: 1
- Cores: 2
- Threads: 2
If your host CPU does not have HT/SMT (1 thread per core), then for a 4-vCPU VM set:
- Sockets: 1
- Cores: 4
- Threads: 1
This makes the virtual CPU layout accurately reflect the host, ensuring Windows schedules workloads efficiently.
Note: Always mirror your host’s real topology. Do not invent extra sockets or threads, as this lowers performance and can confuse Windows.
CPU Topology Quick Reference:

1.5 Configure the Storage for Better Speed
Storage configuration has a major impact on Windows 11 performance inside a KVM virtual machine. Changing the default SATA settings to more modern paravirtualized options, choosing the correct caching strategy, and enabling discard support can significantly improve responsiveness and reduce I/O bottlenecks.
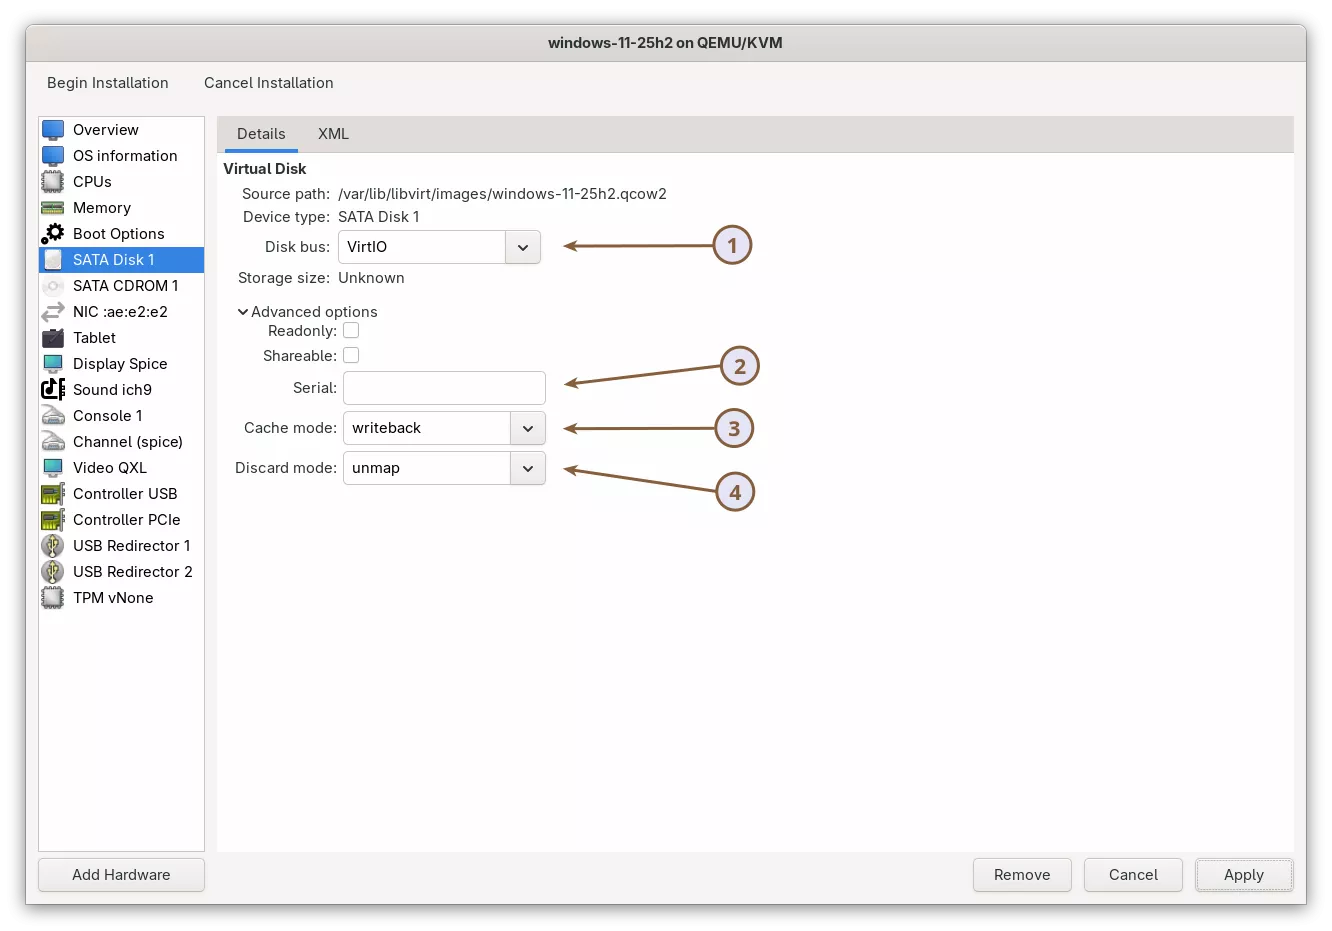
Change the Disk bus to VirtIO. SATA works, but it emulates an entire legacy storage controller, which adds overhead and slows down every read and write. VirtIO is a paravirtualized driver designed specifically for virtual machines. It avoids emulation, reduces latency, increases throughput, and uses fewer CPU cycles.
Serial Number (optional). The Serial field allows you to assign a virtual disk hardware serial number. Windows exposes this to applications exactly like a physical disk’s serial number.
You only need to set this if:
- You have software inside Windows that binds its license to a disk serial number.
- You want your VM’s virtual disk to match that serial for consistency.
If you do not have a specific licensing requirement, leave this field empty. There is no performance benefit in setting it.
Get your real disk’s serial number:
## On Linux:
lsblk -dpo NAME,SERIAL /dev/sdX

## On Windows:
Get-PhysicalDisk | Select-Object FriendlyName, SerialNumber
Replace /dev/sdX with your actual disk.
Change the Cache mode to writeback for better performance. Writeback lets the host cache disk writes, making Windows installations, updates, and everyday use noticeably faster. Small random writes benefit the most, and the risk of data loss on a typical desktop system is very low because Linux flushes cached data frequently. For qcow2-based desktop VMs, writeback provides the best overall speed and is the recommended choice.
Note: In my older version of this guide, I recommended using the none cache mode. It is a safe and predictable option because it bypasses the host page cache, which is why it is common in server setups.
- Use none if you want the safest and most consistent behavior.
- Use writeback if you want the fastest and smoothest Windows experience.
Keep the Discard mode set to unmap. This enables TRIM support for the virtual disk. With discard set to unmap, Windows can tell the host which blocks are no longer in use. This helps prevent qcow2 images from growing unnecessarily, improves long-term storage performance, and allows SSDs to maintain their write speed. There is no downside for typical desktop setups, so keeping discard on unmap is recommended.
1.6 Add a Driver ISO for Windows Virtio Support
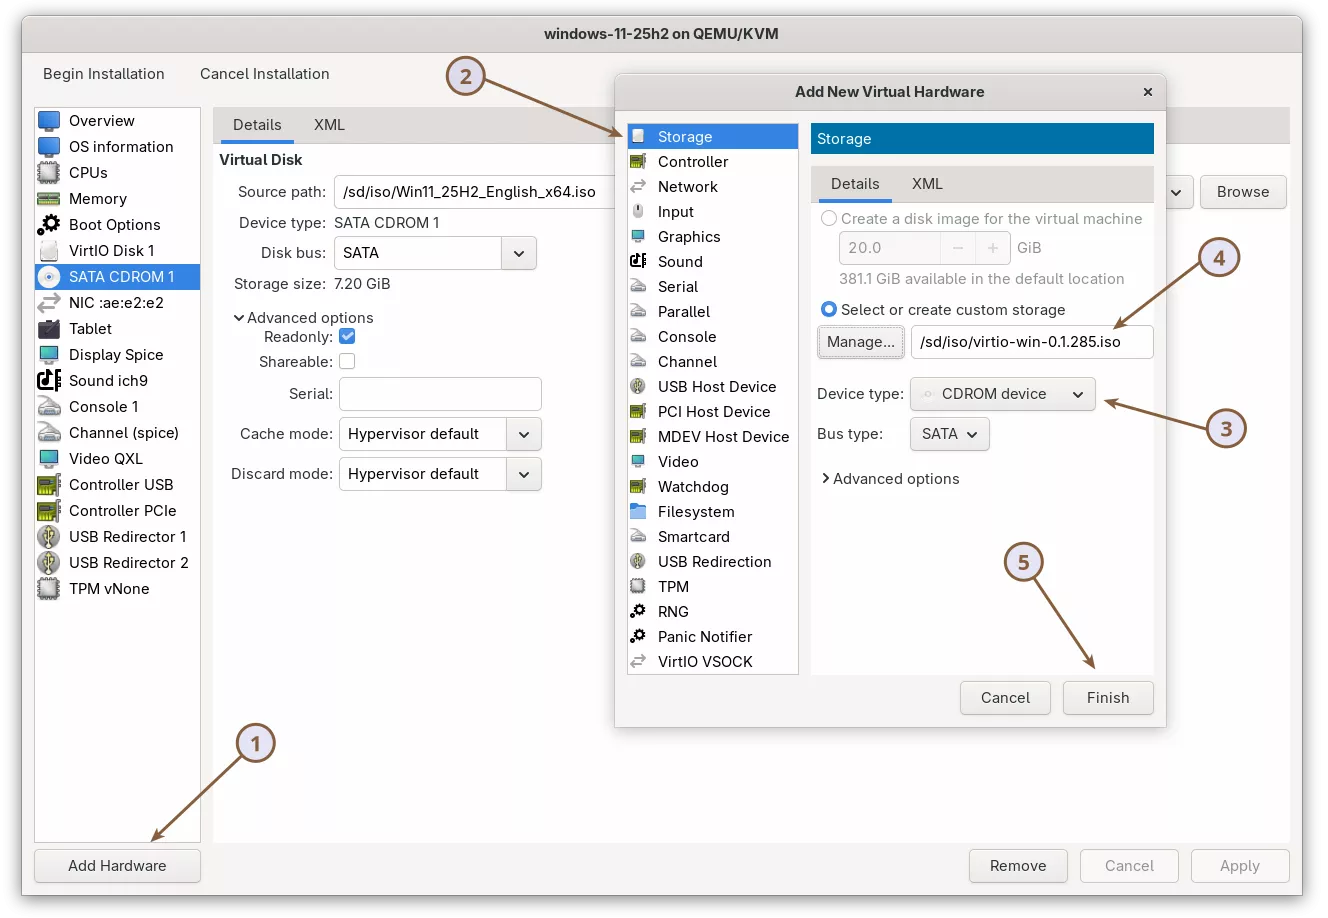
Windows does not include VirtIO drivers by default, and Microsoft does not provide them. To install Windows 11 on a VirtIO-based KVM virtual machine, the installer needs storage and network drivers from the virtio-win.iso package.
Because the Windows installer cannot see VirtIO devices without these drivers, you must attach the VirtIO driver ISO using a separate CDROM device before starting the installation.
First, download the latest virtio-win.iso from the VirtIO Drivers page.
Then click Add Hardware. In the window that appears, select Storage from the left panel, choose CDROM device as the device type, select the virtio-win.iso file you downloaded, and click Finish.
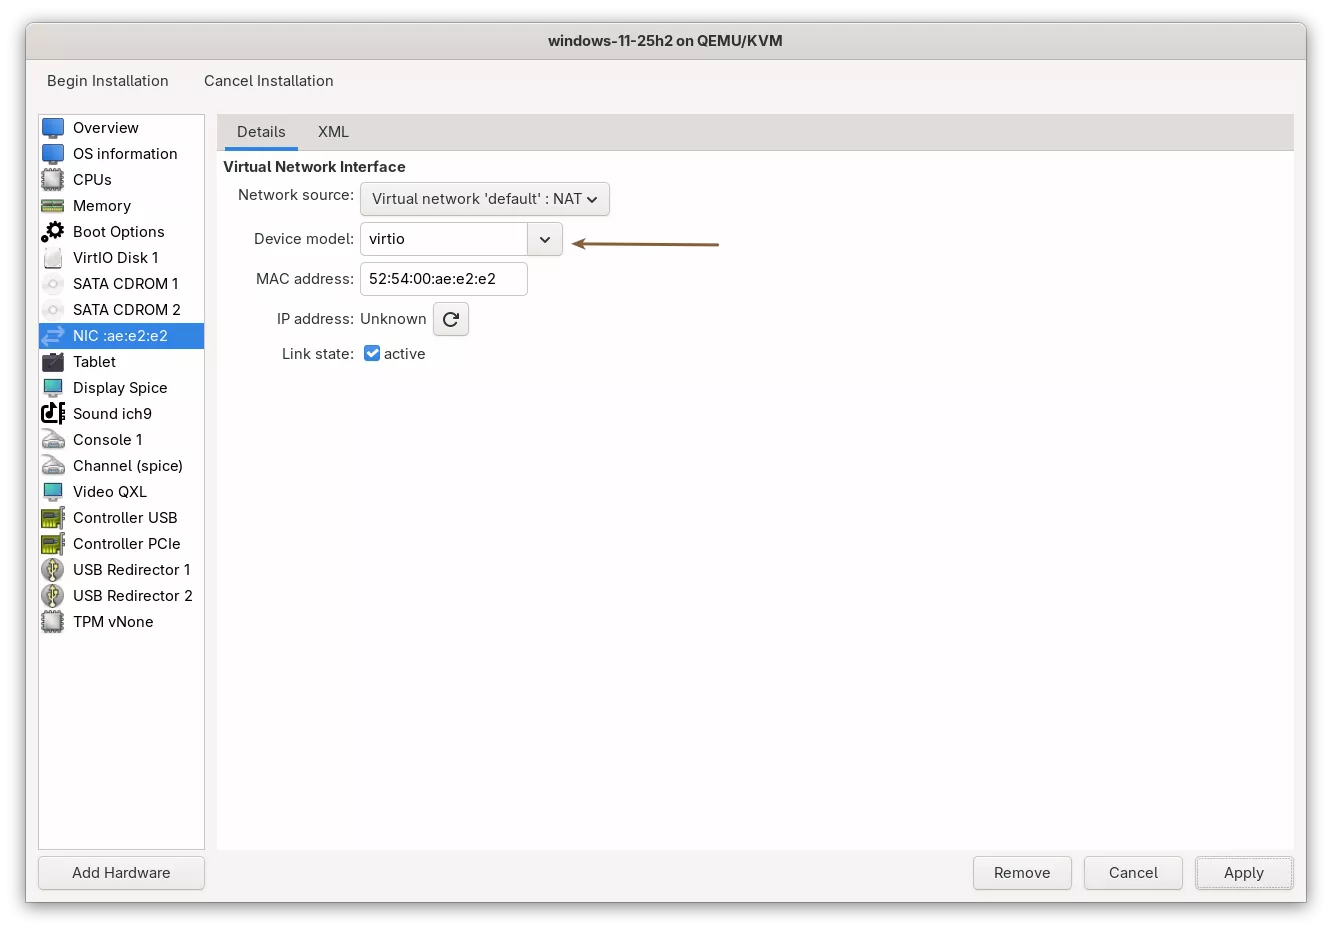
1.7 Improve Network Performance
By default, the virtual machine uses an emulated network device, which is slower. The VirtIO network driver is specifically designed and optimized for virtualization, so switching to it improves throughput, reduces latency, and gives the guest more efficient access to the host network.
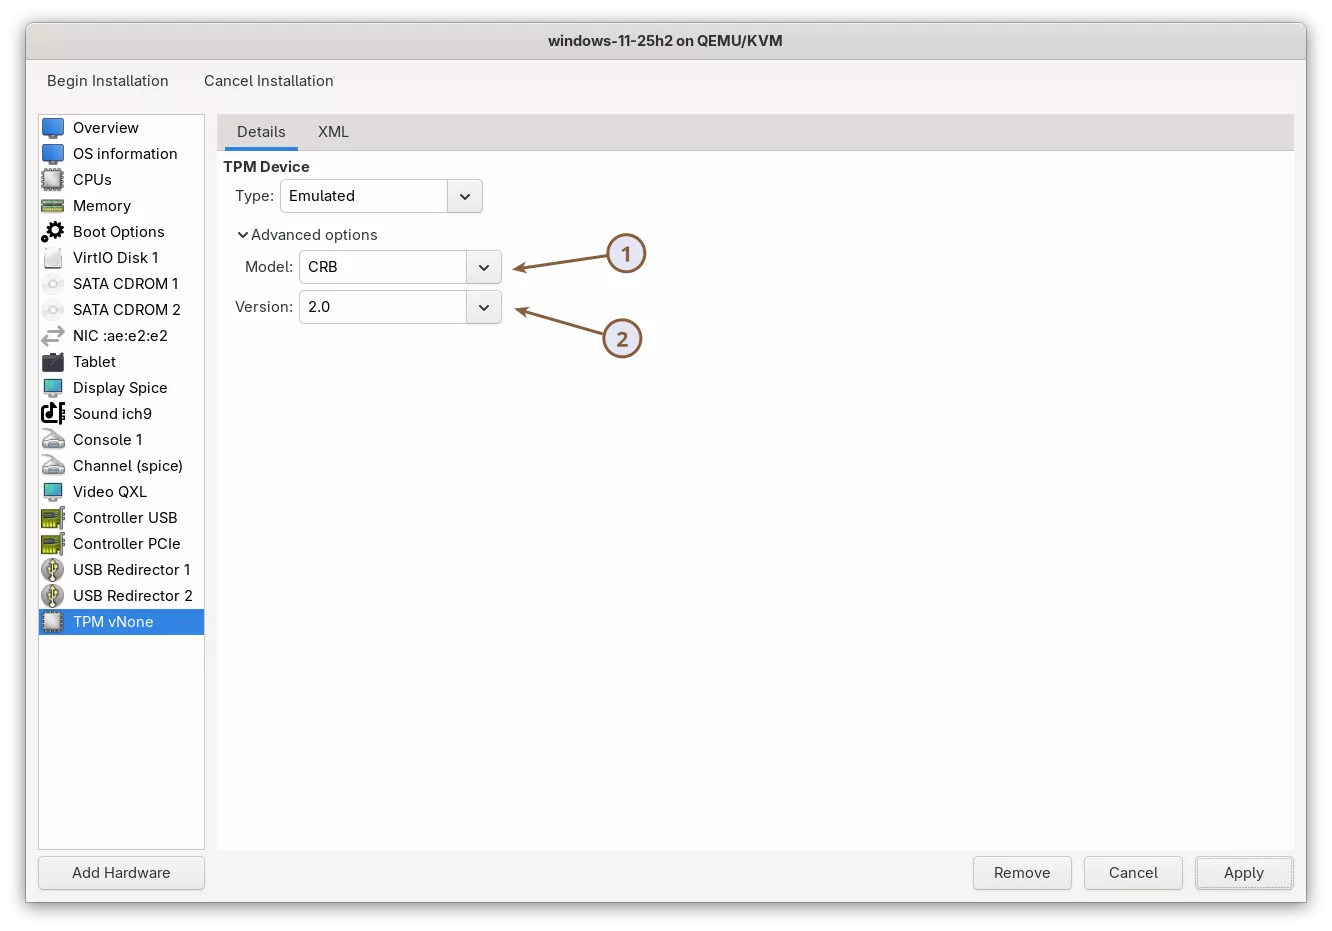
1.8 Add a TPM Device for Windows Requirements
Windows 11 checks for a TPM 2.0 device during installation. KVM supports a fully functional virtual TPM, so adding it now ensures the installer accepts the system and all security features work correctly.
Select the CRB interface type, which is the recommended TPM 2.0 interface for Windows 11.
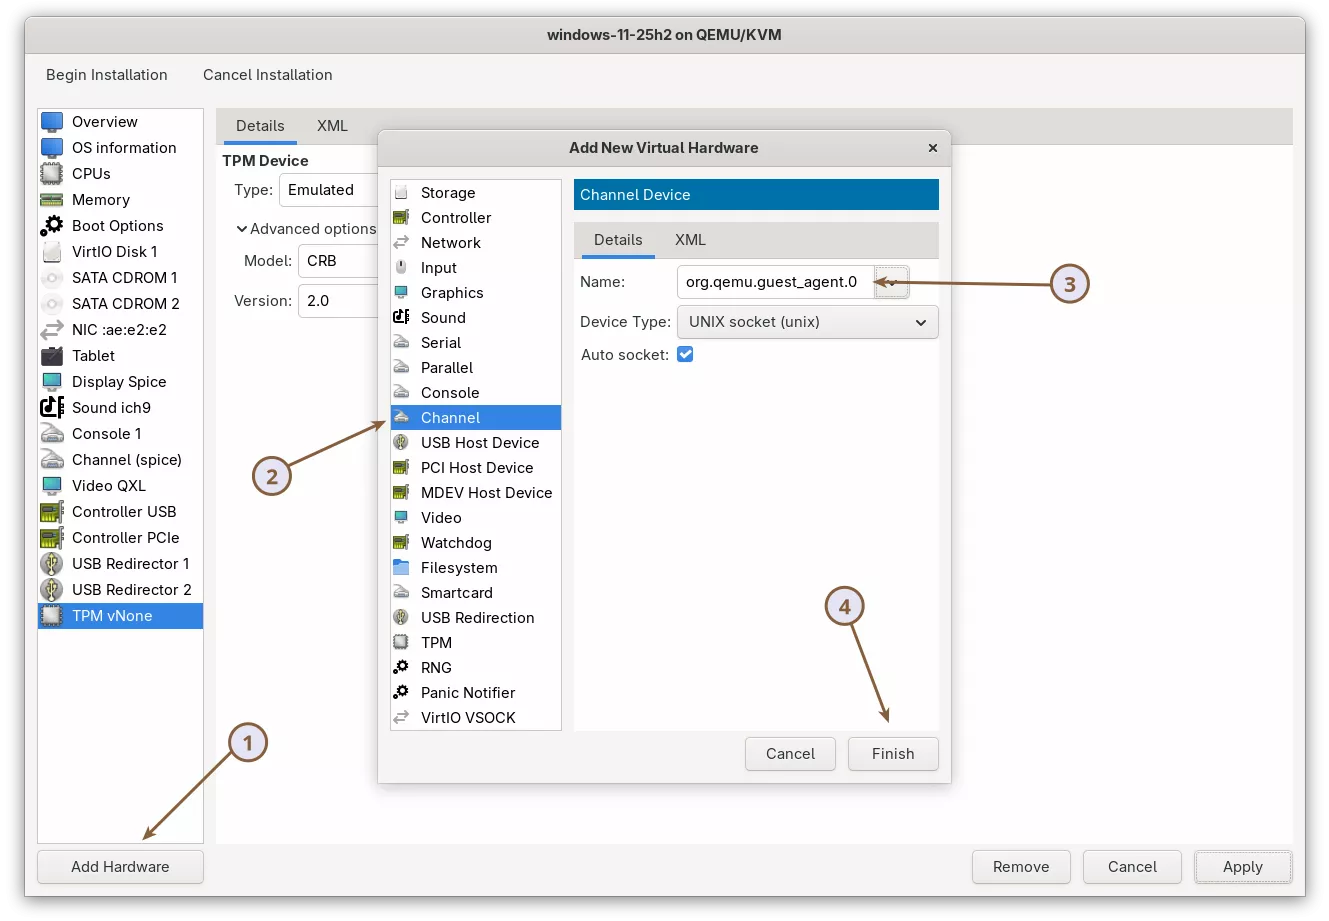
1.9 Add the QEMU Guest Agent Channel
The QEMU Guest Agent allows the host and the Windows 11 virtual machine to communicate through a private channel. This gives libvirt a safe and controlled way to run commands inside the guest. Many VM management features depend on the guest agent or work much better when it is installed.
What the guest agent is used for
- Clean shutdown and reboot without relying on ACPI
- Query the guest IP address
- Query mounted filesystems
- Online filesystem trim
- Freeze and thaw filesystems for consistent snapshots
- Online disk resizing
- Reporting guest status back to the host
For example, after creating the Windows 11 guest virtual machine, you can shut it down from the host by running:
sudo virsh shutdown windows-11-25h2 --mode=agentThis method is more reliable than virsh shutdown --mode=acpi because it guarantees a clean shutdown when the guest agent is running. Without the agent, libvirt must inject an ACPI shutdown event, and some guests ignore it. You can also reboot using the same syntax with virsh reboot.
Some of the commands you can try, among others, include:
## Query the IP address
sudo virsh domifaddr windows-11-25h2 --source agent

## Show mounted filesystems
sudo virsh domfsinfo windows-11-25h2

## Issue a TRIM command
sudo virsh domfstrim windows-11-25h2
To enable these features, you need to add a QEMU guest agent channel to the Windows 11 virtual machine.
Click the Add Hardware button to open the Add New Virtual Hardware window and select Channel. In the drop-down list, select org.qemu.guest_agent.0 and click Finish to apply.
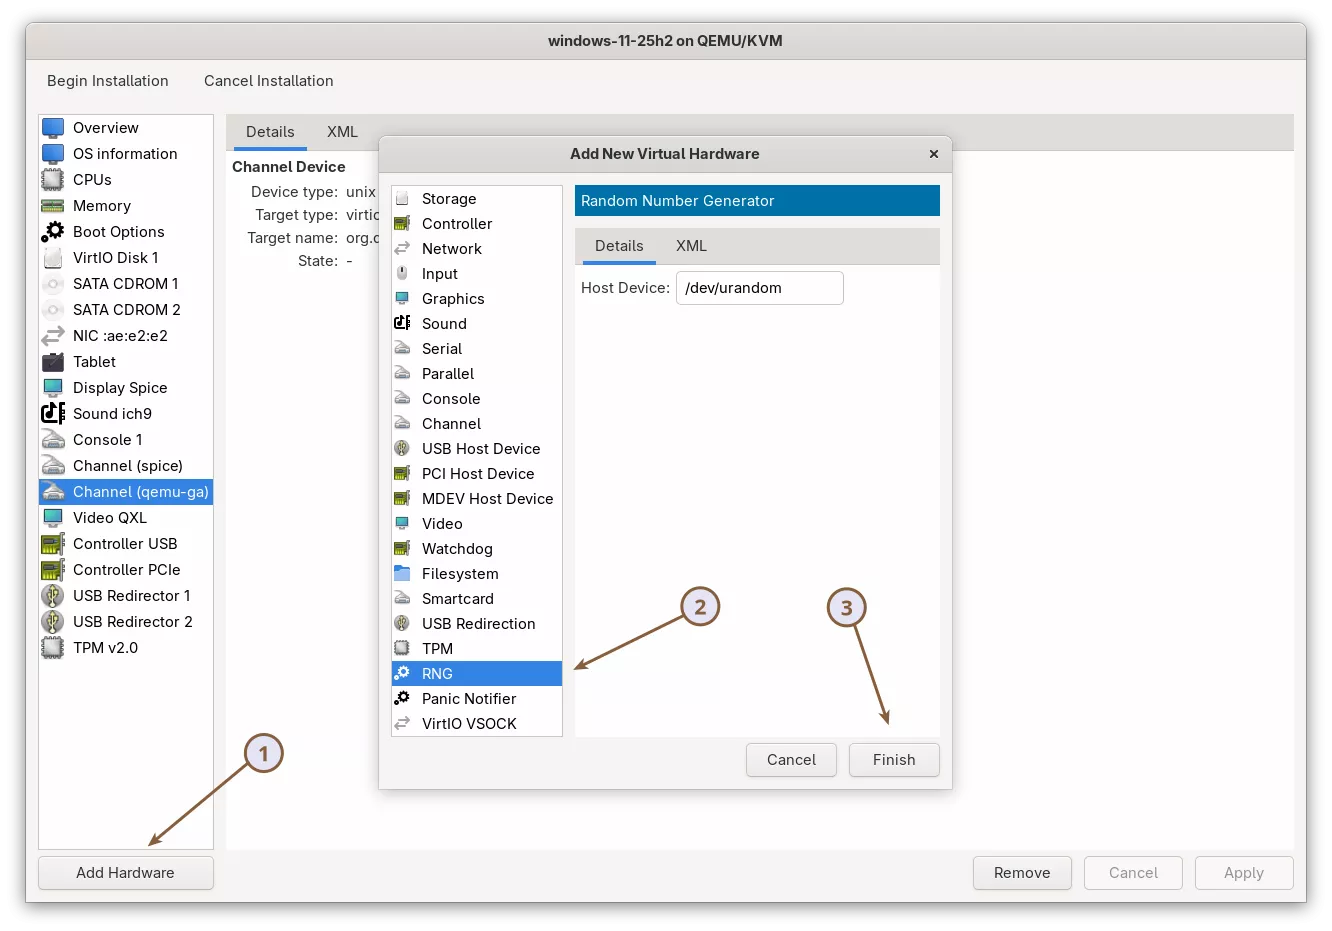
1.10 Add an RNG Device to Improve Entropy
A Random Number Generator (RNG) device provides entropy to the guest operating system. Entropy is required for cryptographic operations such as TLS, SSH, VPNs, disk encryption, and many Windows security functions. Modern operating systems rely on a strong source of randomness to operate correctly.
Virt-manager can add a virtual RNG device that feeds randomness from the host into the guest. This improves security and can reduce delays in workloads that depend on high-quality entropy.
Click the Add Hardware button to open the Add New Virtual Hardware window and select RNG. Leave the random source set to /dev/urandom (default) and click Finish to apply.
1.11 Enable Hyper-V Enlightenments for Better Performance
Windows 11 runs best on KVM when Hyper-V enlightenments and a correct CPU topology are enabled. These features improve performance, provide accurate timekeeping, and allow Windows to recognize the virtual environment more efficiently.
For deeper technical details, see the pages 'Hyper-V Enlightenments' and 'Hypervisor Features'.
For most users, virt-manager’s default Hyper-V enlightenments are already sufficient. They provide all the core features Windows expects and are safe, stable, and suitable for normal desktop workloads.
If you want lower latency or better performance, you can enable an extended Hyper-V configuration. This adds features like synthetic timers, improved frequency reporting, better reset handling, and a custom vendor ID that unlocks additional Windows optimizations.
Note: Before making changes, copy your existing Hyper-V section into a text file. This gives you a simple backup you can restore if anything behaves unexpectedly.
Click the XML tab and add or replace the highlighted XML in the <hyperv>, <cpu>, and <clock> sections.
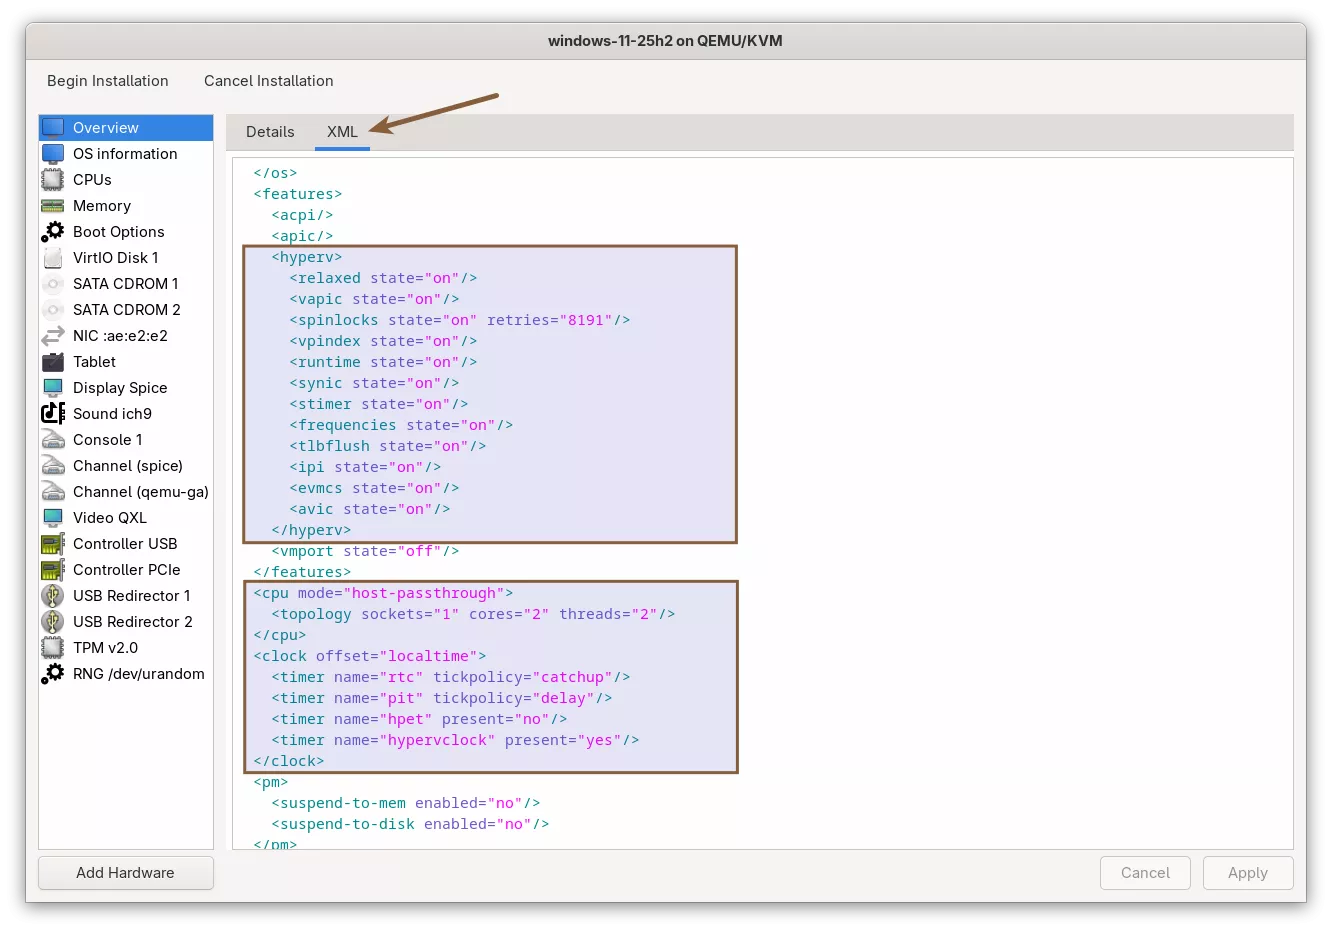
For VMs using an Intel CPU model:
<hyperv mode="custom">
  <relaxed state="on"/>
  <vapic state="on"/>
  <spinlocks state="on" retries="8191"/>
  <vpindex state="on"/>
  <runtime state="on"/>
  <synic state="on"/>
  <stimer state="on">
    <direct state="on"/>
  </stimer>
  <reset state="on"/>
  <vendor_id state="on" value="KVM Hv"/>
  <frequencies state="on"/>
  <reenlightenment state="on"/>
  <tlbflush state="on"/>
  <ipi state="on"/>
  <evmcs state="on"/>
</hyperv>

<cpu mode="host-passthrough" check="none" migratable="on">
  <topology sockets="1" cores="2" threads="2"/>
  <feature policy="require" name="vmx"/>
</cpu>

<clock offset="localtime">
  <timer name="rtc" tickpolicy="catchup"/>
  <timer name="pit" tickpolicy="delay"/>
  <timer name="hpet" present="no"/>
  <timer name="hypervclock" present="yes"/>
</clock>
For VMs using an AMD CPU model:
<hyperv mode="custom">
  <relaxed state="on"/>
  <vapic state="on"/>
  <spinlocks state="on" retries="8191"/>
  <vpindex state="on"/>
  <runtime state="on"/>
  <synic state="on"/>
  <stimer state="on">
    <direct state="on"/>
  </stimer>
  <reset state="on"/>
  <vendor_id state="on" value="KVM Hv"/>
  <frequencies state="on"/>
  <reenlightenment state="on"/>
  <tlbflush state="on"/>
  <ipi state="on"/>
</hyperv>

<cpu mode="host-passthrough" check="none" migratable="on">
  <topology sockets="1" cores="2" threads="2"/>
  <feature policy="require" name="svm"/>
</cpu>

<clock offset="localtime">
  <timer name="rtc" tickpolicy="catchup"/>
  <timer name="pit" tickpolicy="delay"/>
  <timer name="hpet" present="no"/>
  <timer name="hypervclock" present="yes"/>
</clock>
Here is what the extended Hyper-V enlightenments do:
- relaxed: smoother timing under load
- vapic: faster interrupt handling
- spinlocks: prevents long stalls during lock contention
- vpindex, runtime, synic: synthetic interfaces that reduce virtualization overhead
- stimer + direct: high-precision timers for Windows
- reset: cleaner VM reset handling
- vendor_id: helps Windows detect a Hyper-V compatible environment
- frequencies: exposes correct CPU frequency information
- reenlightenment: improves performance during frequency scaling
- tlbflush and ipi: more efficient memory and interrupt signaling
- evmcs (Intel only): optimized Hyper-V VMCS operations for better performance
These settings improve performance, timekeeping accuracy, and compatibility with features like Memory Integrity and Core Isolation.
For example, for a VM with an Intel CPU, it should look like this:
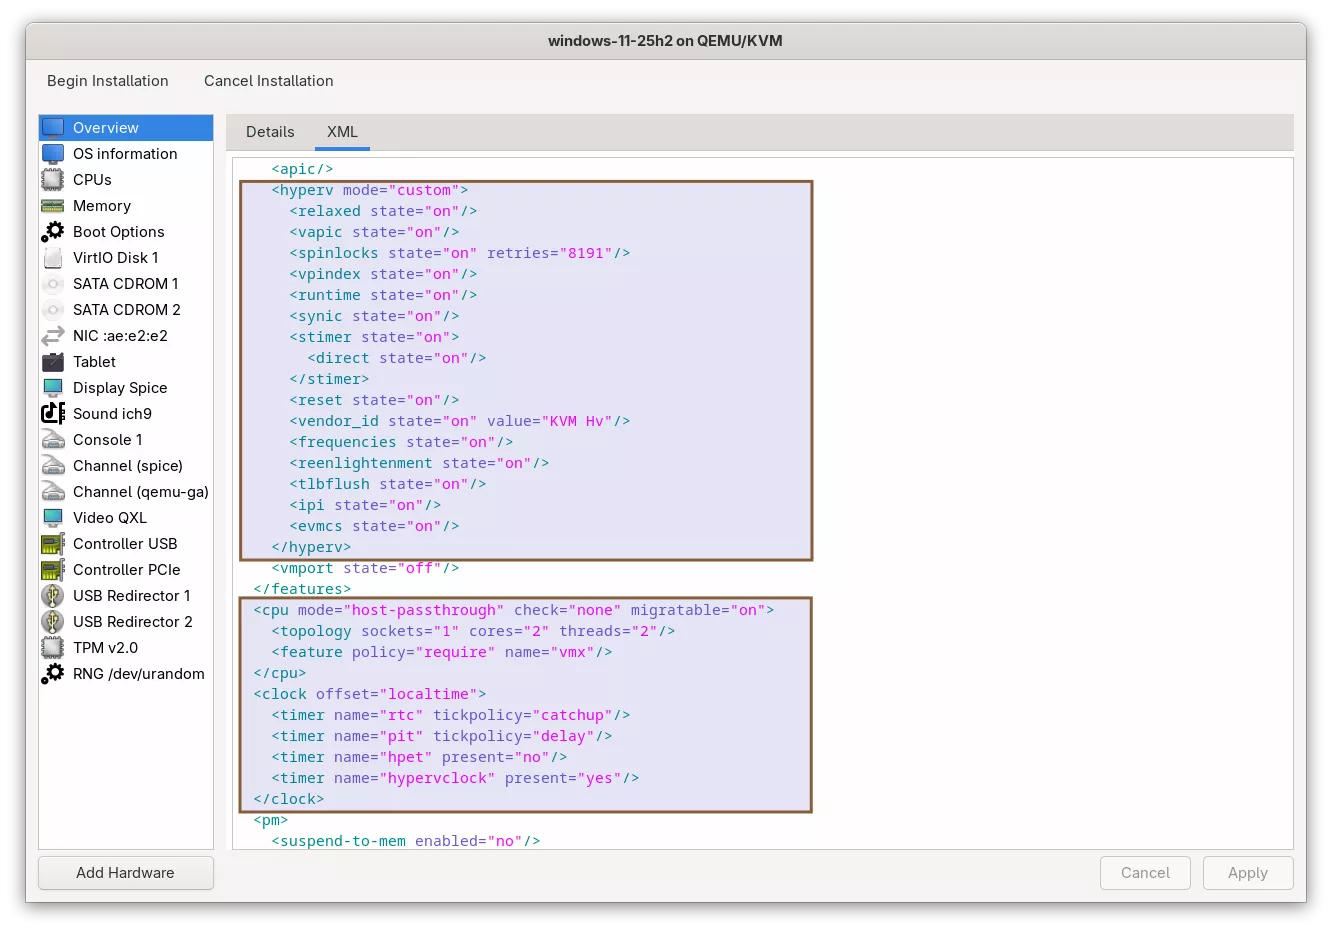
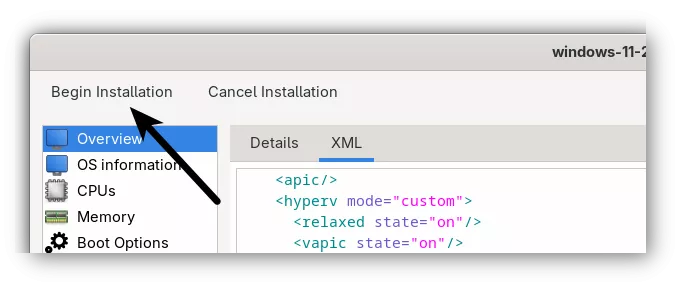
All the required virtual hardware and performance-related settings for Windows 11 are now configured. Click the Begin Installation button in the upper left corner to start the setup.
Section 2: Installing a Windows 11 Virtual Machine on KVM
When the VM starts, it will briefly show a message that says:
Press any key to boot from CD or DVD…
Press a key as soon as you see this. If you miss it, the VM will skip the installer and try to boot from the empty virtual disk, which makes it look like the setup is not working.
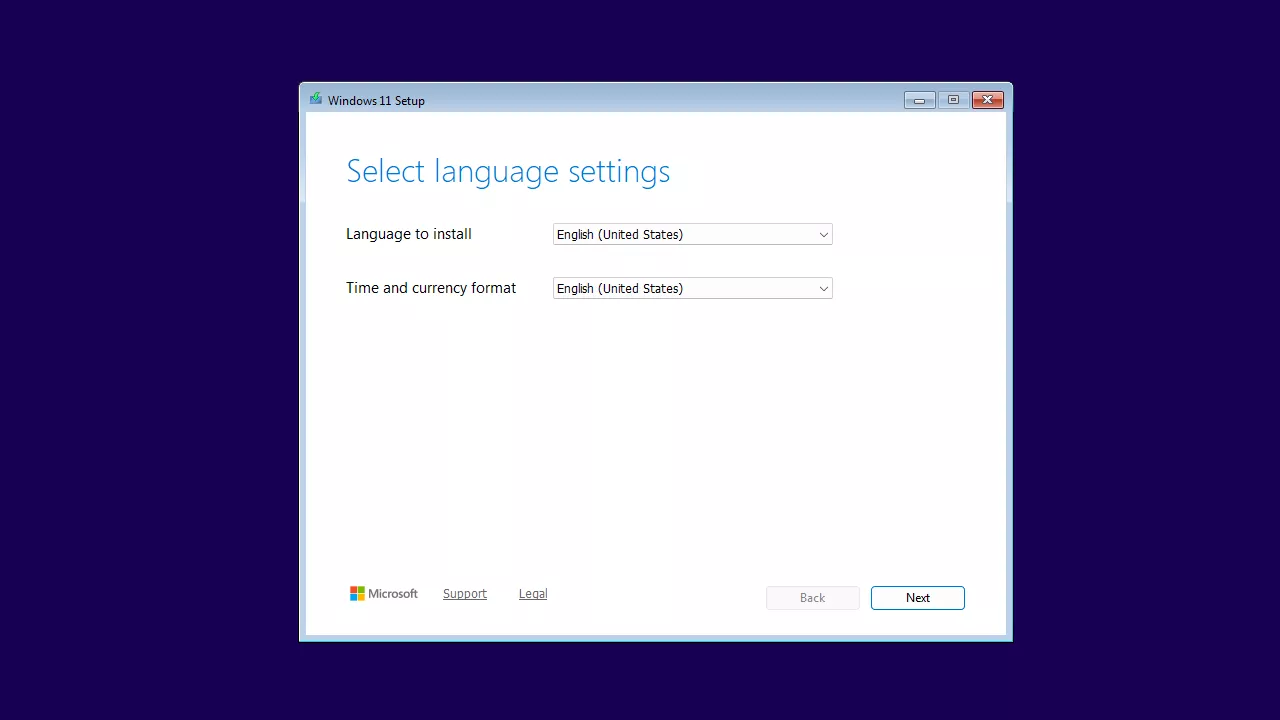
After the installer loads, the first screen will appear. Select your language and your time and currency format, then click Next.
Continue to the next screen until you reach the Select setup option page. Choose Install Windows 11, check the I agree box, and click Next to continue.

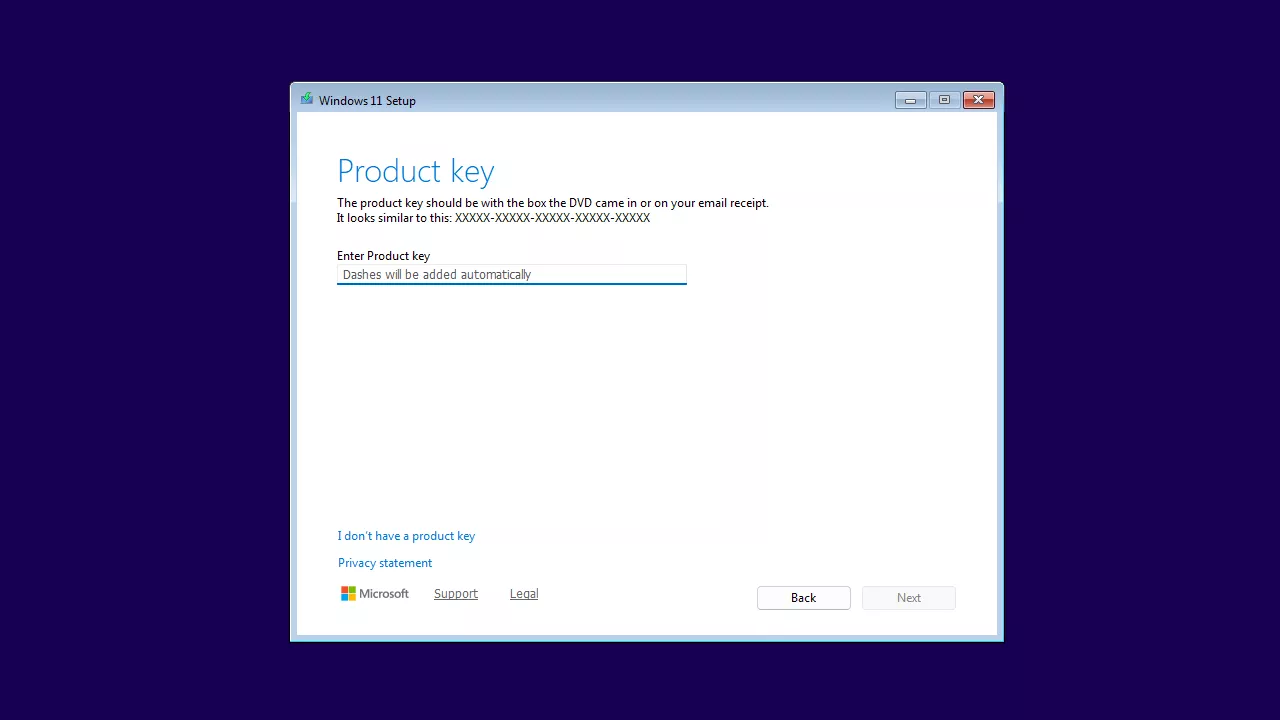
On the next screen, the Windows activation page will appear. If you have a product key, enter it here. Otherwise, select I don't have a product key. Then click Next to continue.
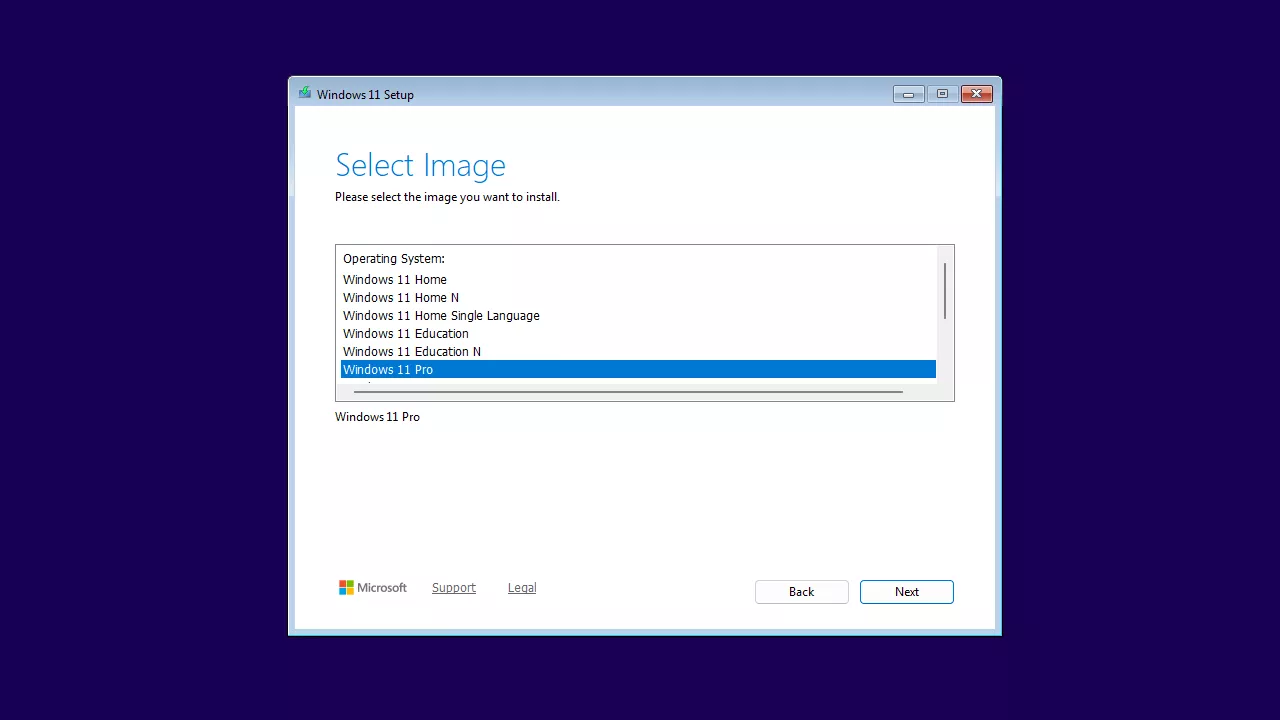
Next, choose the Windows edition you want to install. For this guide, I’ll be using Windows 11 Pro as the example. Click Next to continue.
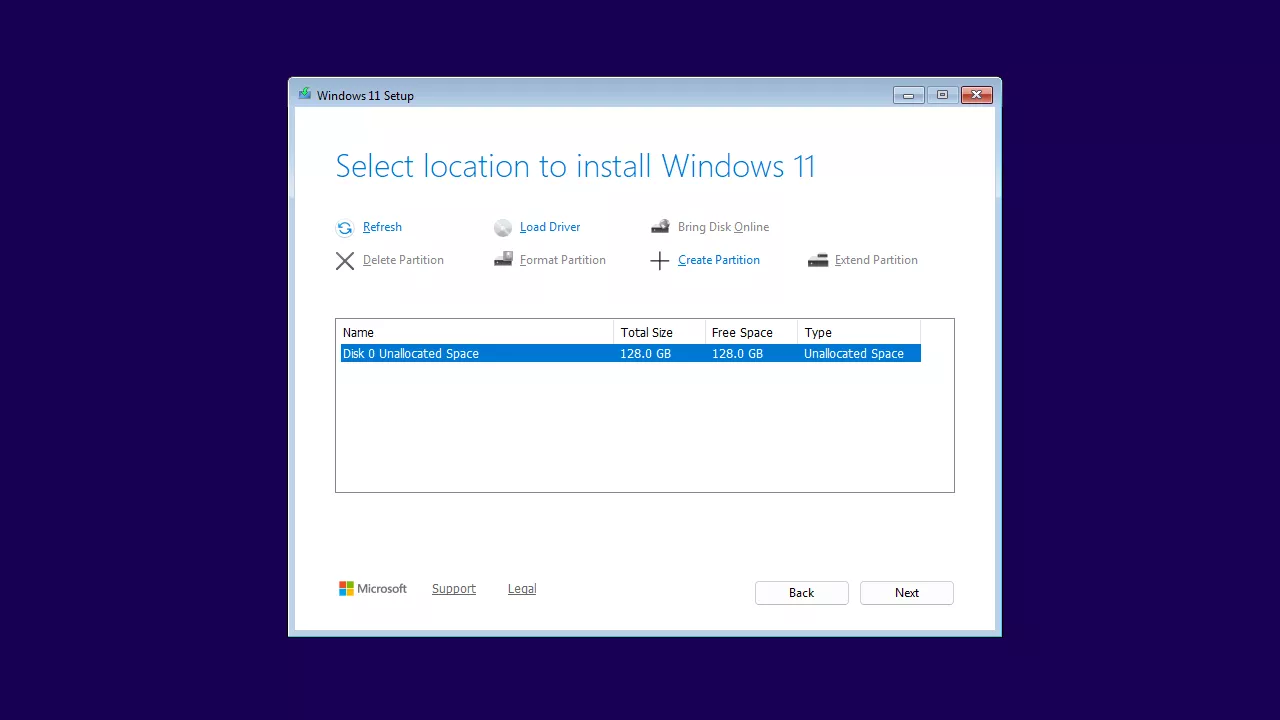
Go to the next screen and you’ll reach the Select location to install Windows 11 page, where you would normally choose the disk for installation. However, as you can see, the installer cannot find any drives.
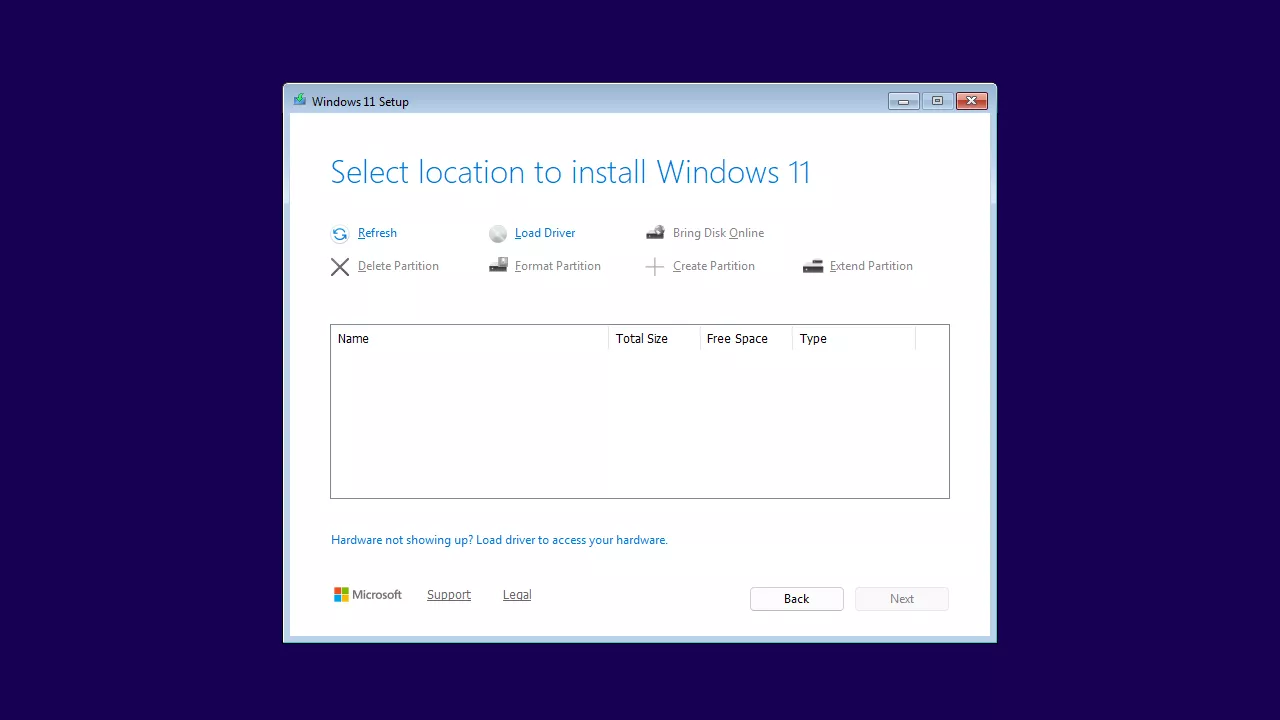
This happens because we selected the VirtIO disk bus earlier for better performance. Windows doesn’t include VirtIO drivers by default, so the installer can’t detect the disk until you load the drivers manually.
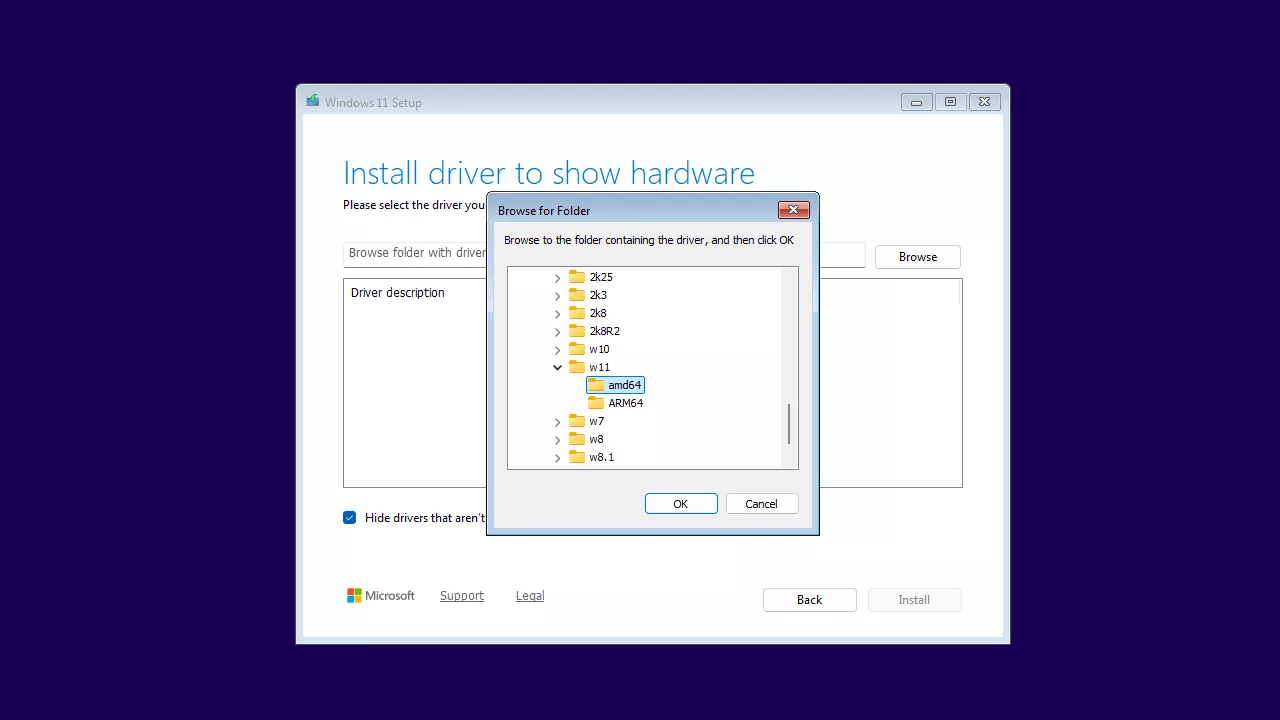
To install the VirtIO disk driver, click the Load Driver button, then click Browse. In the window that opens, expand the second CD drive that contains the virtio-win.iso (E: for me), then expand Viostor, expand w11, select amd64, and click OK.
You should now see the driver listed as Red Hat VirtIO SCSI Controller with viostor.inf. Select it and click Install.
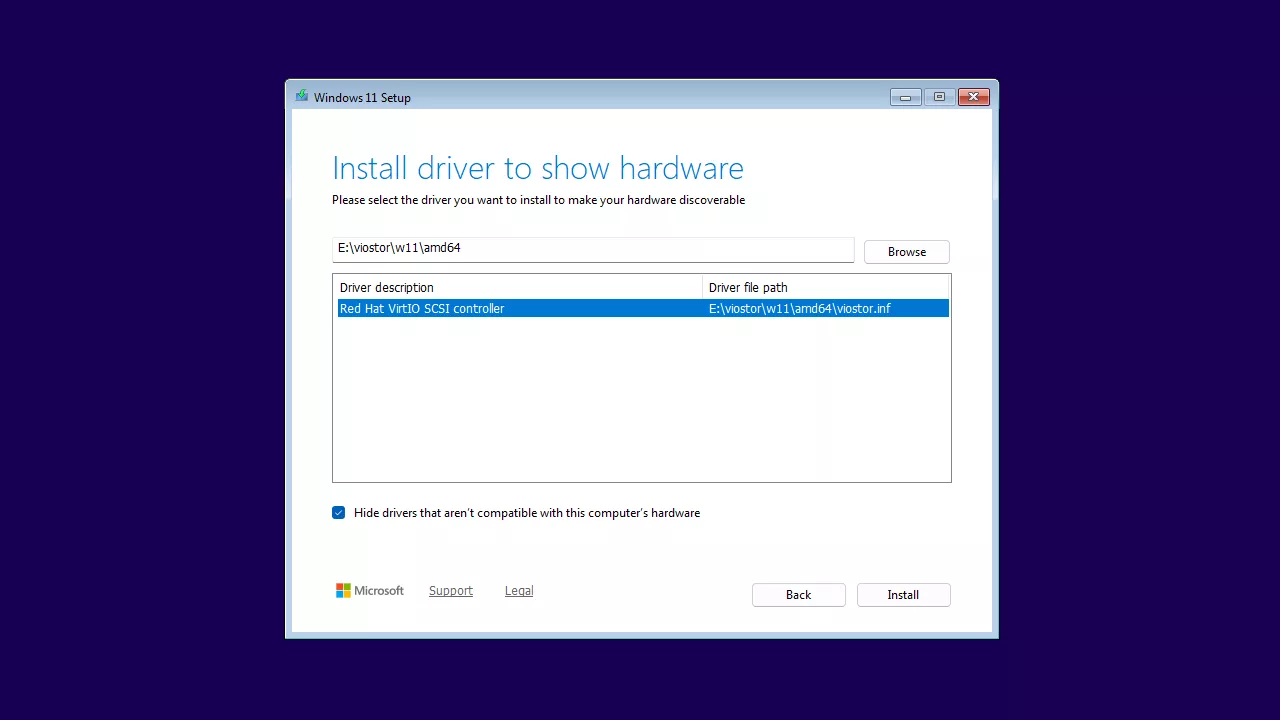
You should now see the disk appear after installing the VirtIO storage driver.
But don’t continue with the installation yet. You still need to install the VirtIO network driver, otherwise the network won’t work and you won’t be able to complete the setup.
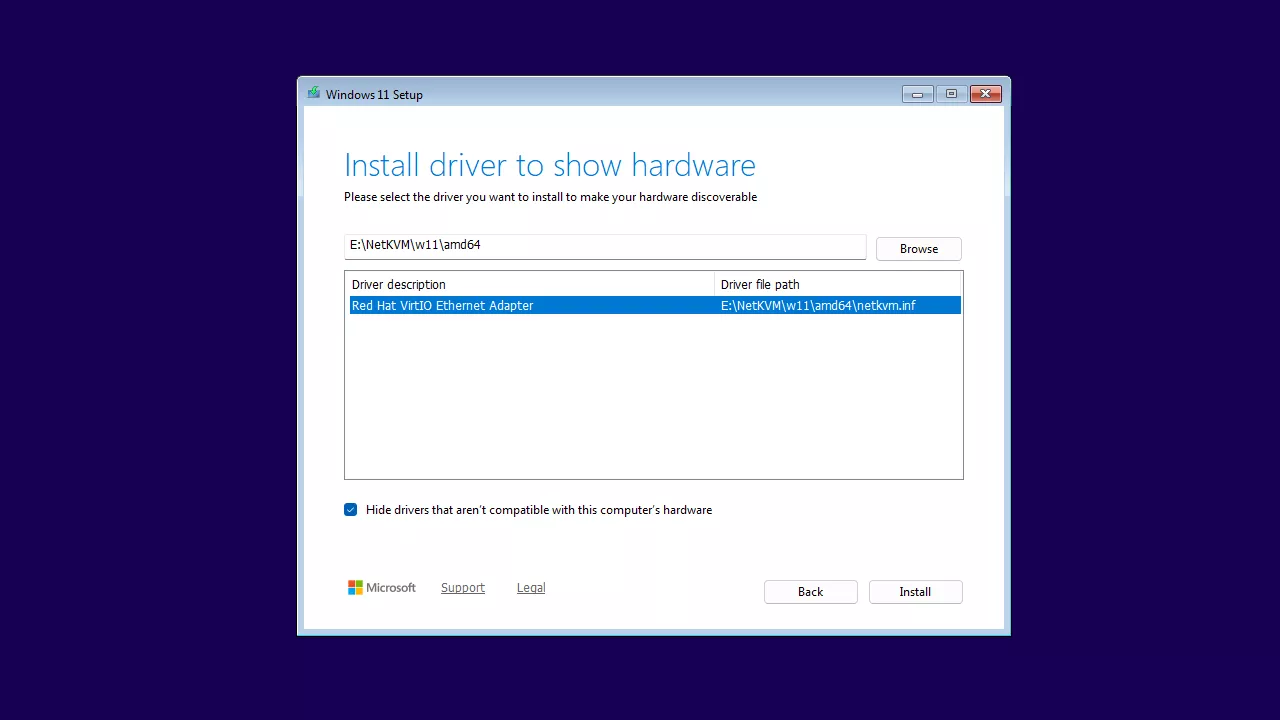
Repeat the same procedure for the network driver: click Load Driver, then Browse. In the window that appears, expand the second CD drive, then expand NetKVM → w11 → amd64, and click OK.
You should now see the driver listed as Red Hat VirtIO Ethernet Adapter with netkvm.inf. Select it and click Install.
After installing the VirtIO network driver, click Next and the installation will begin.
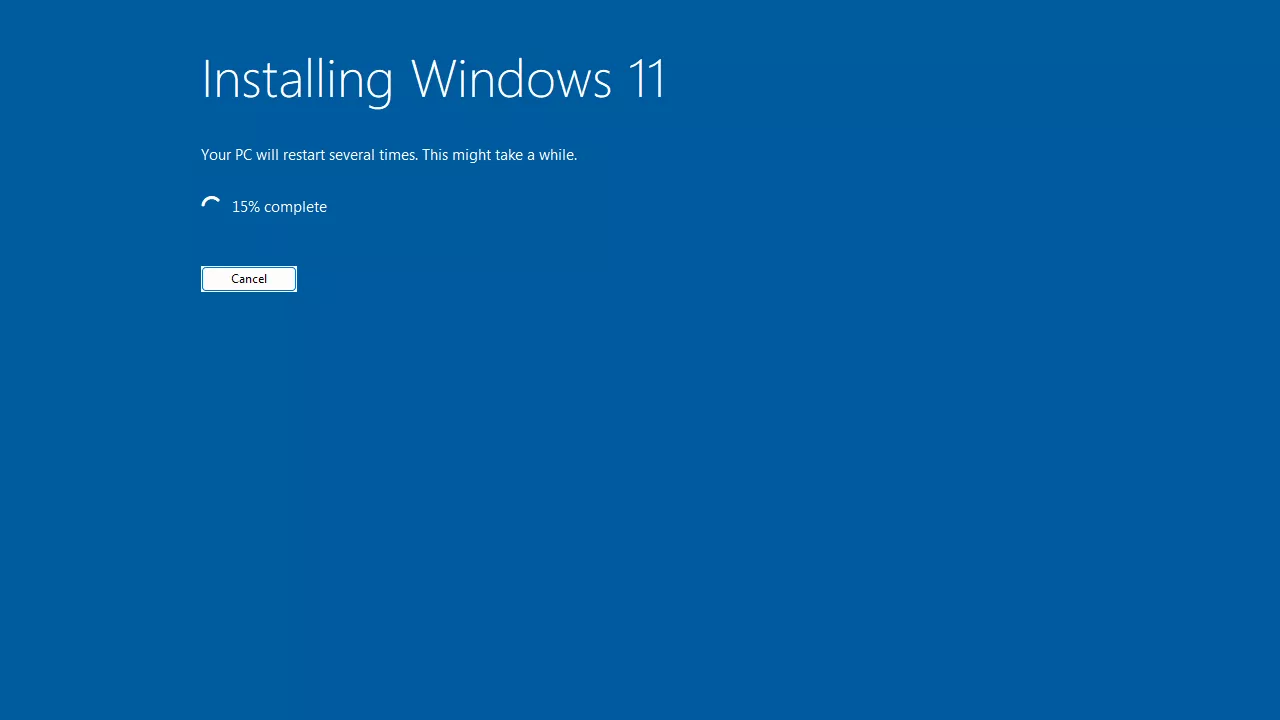
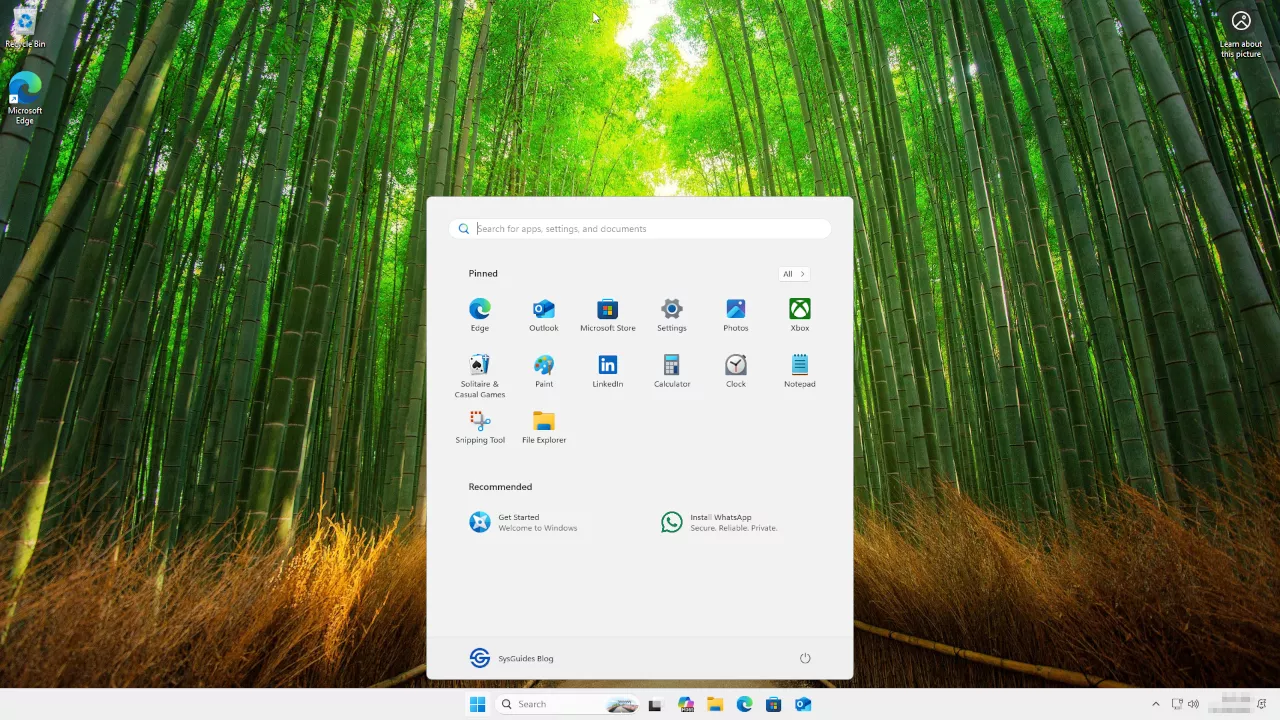
The remaining steps are just personalization and account setup. Complete them according to your preferences, and once everything is finished, Windows 11 will boot to the desktop.
Section 3: Install VirtIO Windows Guest Tools
Now that Windows 11 is installed, you need to install the VirtIO Windows Guest Tools package.
This installer provides the required VirtIO drivers along with the QEMU Guest Agent and SPICE Guest Tools. It also installs the QXL video driver, which enables features like copy and paste integration and automatic resolution changes when using SPICE. These components improve performance and make the VM behave more like a native desktop session.
So open Windows Explorer, go to the second CD Drive (E:), and double click the virtio-win-guest-tools.exe installer to begin the installation.

Once the virtio-win-guest-tools installation completes, in the windows-11-25h2 window in virt-manager, click the View menu, then Scale Display, set it to None, and enable the Auto resize VM with window option. This allows the Windows 11 guest to automatically adjust its resolution when you resize the window or go full screen.

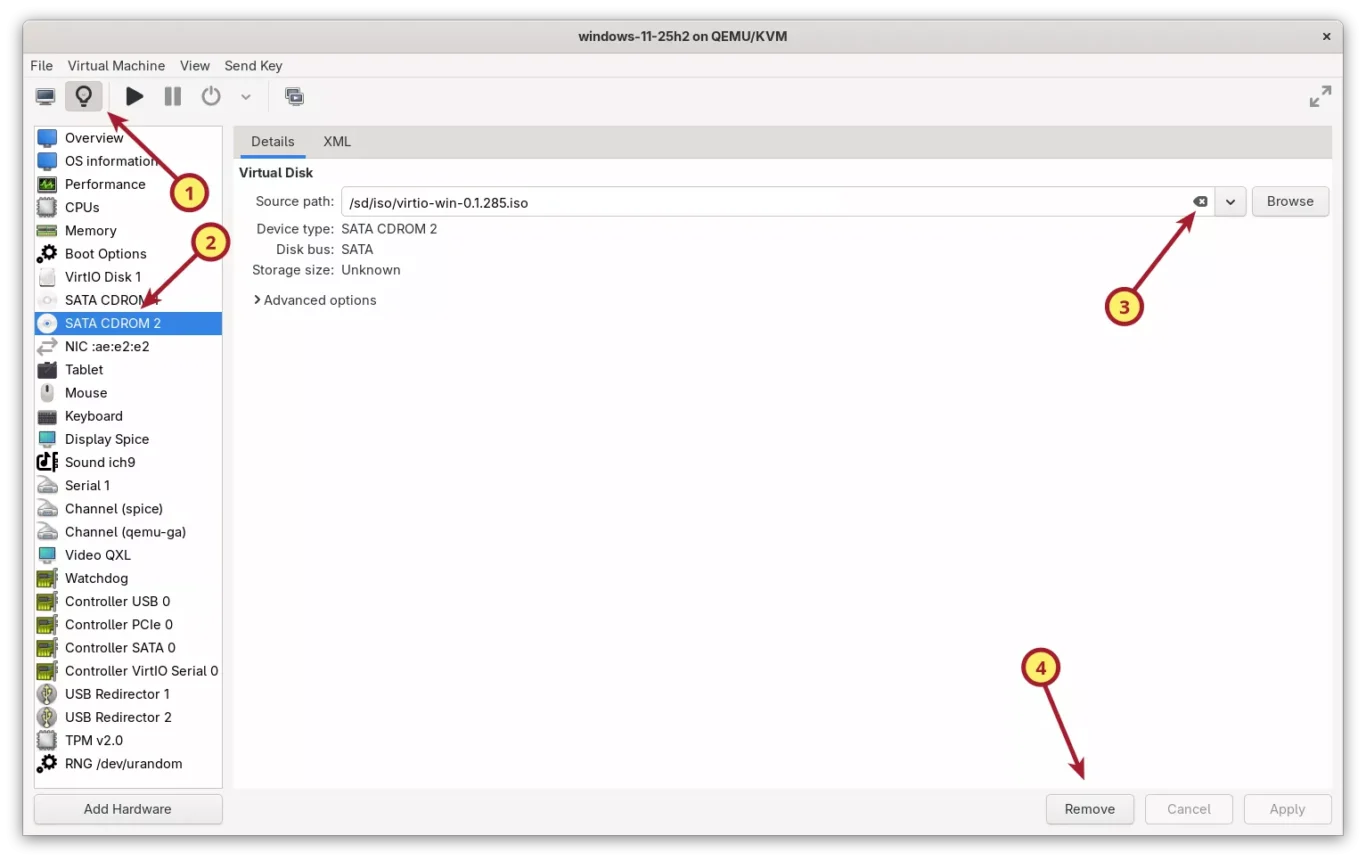
Now that the guest tools are installed, the second CDROM drive is no longer needed. Shut down your Windows 11 VM, click the lightbulb icon to open the hardware details, unmount the virtio-win.iso image, and remove the second CDROM drive.
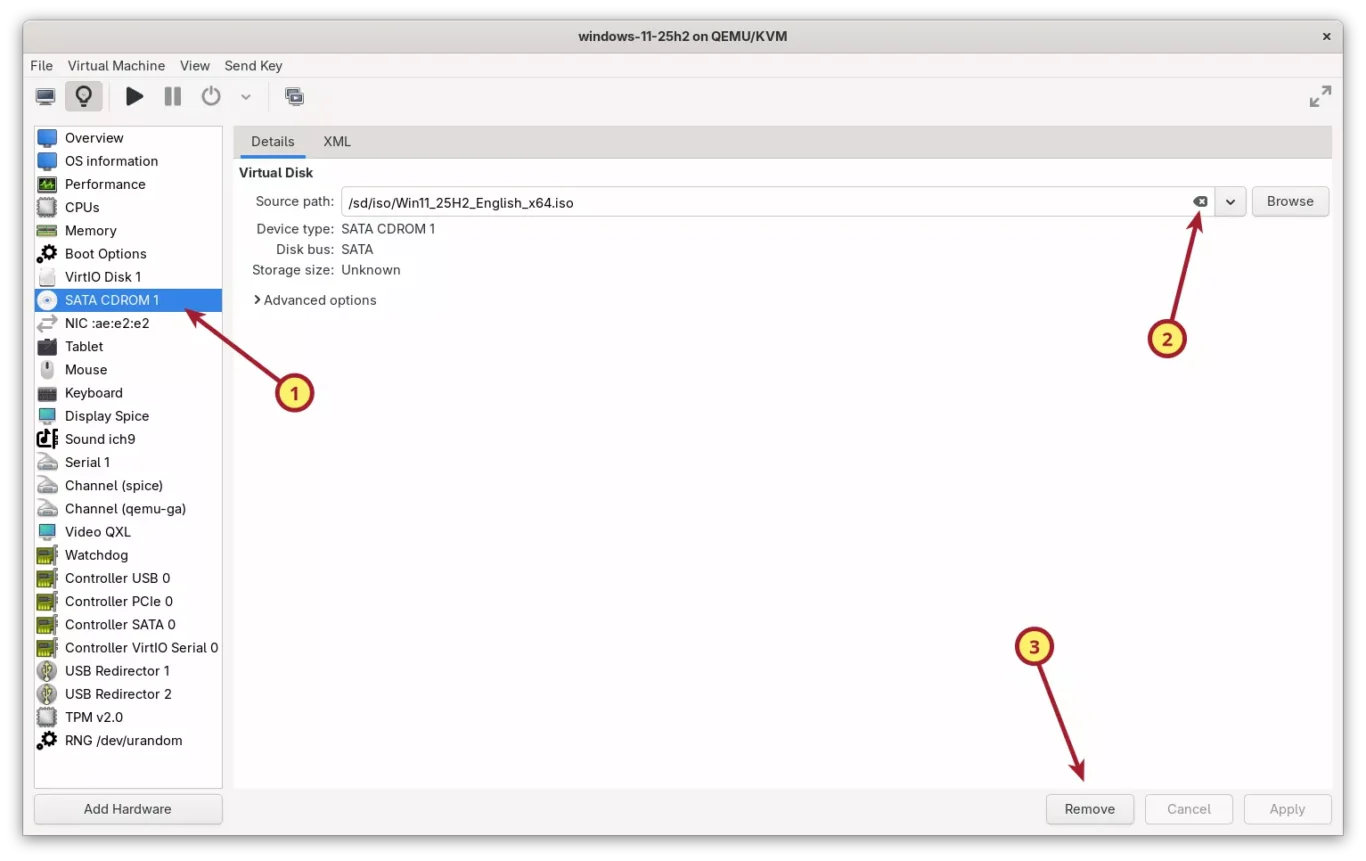
Unmount the Windows 11 installer ISO from the first CDROM drive as well, since it is no longer needed.
Section 4: Optimize Windows 11 for Better Performance
Windows 11 runs well in a KVM virtual machine, but it still ships with many background services, animations, advertisements, and scheduled tasks that are not useful in a VM. These features consume CPU time, disk I/O, and memory, which slows the system down. In this section, we will apply a set of safe and practical optimizations that improve responsiveness and reduce unnecessary background activity without breaking Windows updates or features.
4.1 Disable SuperFetch (SysMain)
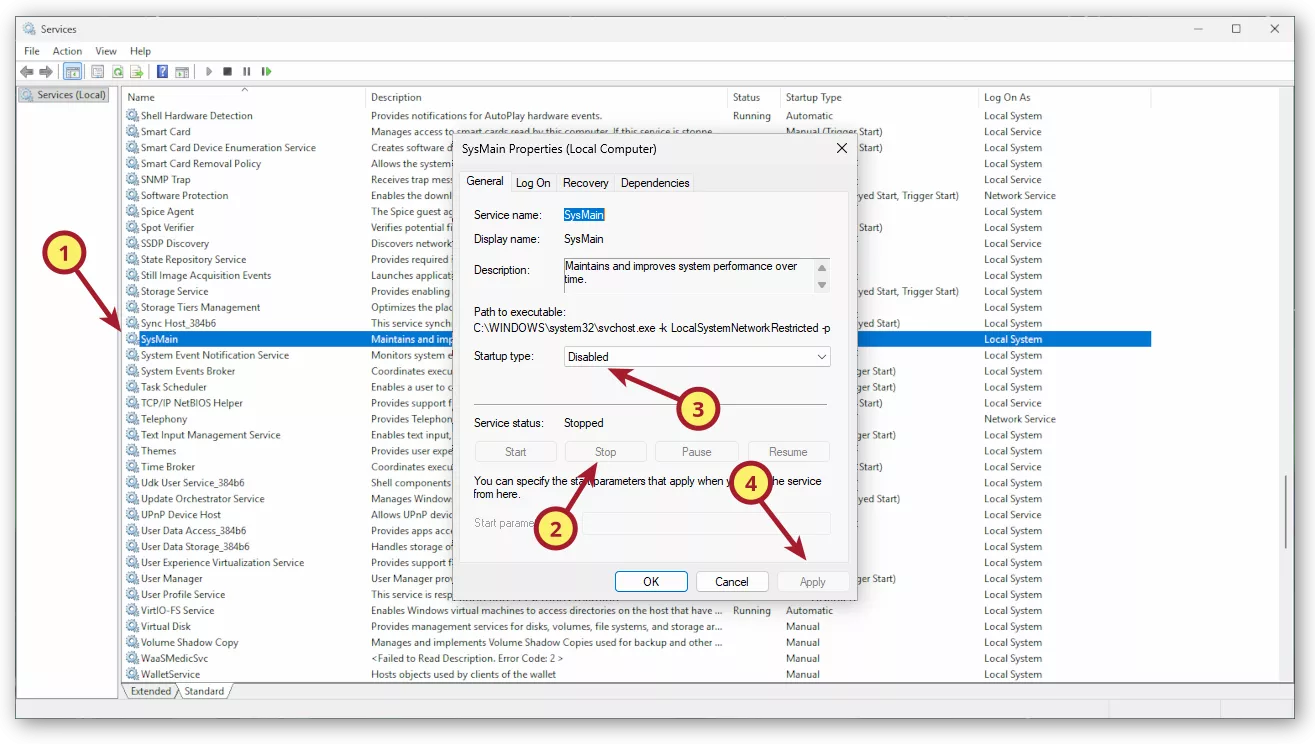
SuperFetch, now called SysMain, is designed to speed up application loading on physical systems, especially those with slow hard drives. In a virtual machine it often has the opposite effect. It keeps reading and writing large amounts of data in the background, which increases disk usage and slows down the VM. Disabling it makes Windows 11 more responsive inside KVM.
Steps to disable SuperFetch (SysMain):
- Press Win + R, type services.msc, and press Enter.
- Scroll down and find SysMain in the list.
- Double click SysMain to open its properties window.
- Click Stop to stop the service.
- Change Startup type to Disabled.
- Click Apply and OK.
4.2 Disable Windows Web Search
Windows Web Search integrates Bing results into the Start Menu. It also runs background processes that are not useful inside a virtual machine. Disabling it reduces network requests and improves overall responsiveness when opening the Start Menu.
Steps to disable Windows Web Search:
- Press Win + R, type regedit, and press Enter.
- Navigate to:
HKEY_CURRENT_USER\Software\Policies\Microsoft\Windows - If the key Explorer does not exist, right click Windows, select New, choose Key, and name it Explorer.
- Inside Explorer, right click on the right side, choose New, select DWORD (32 bit) Value, and name it DisableSearchBoxSuggestions.
- Double click it and set Value data to 1.
- Close the Registry Editor and restart Windows.
This disables online Bing results and keeps the Start Menu search local and lightweight.

4.3 Remove Ads and Recommendations
Windows 11 displays ads, suggestions, and promotional notifications across the Start Menu, Lock screen, and Settings app. These are unnecessary inside a virtual machine, and turning them off reduces background activity.
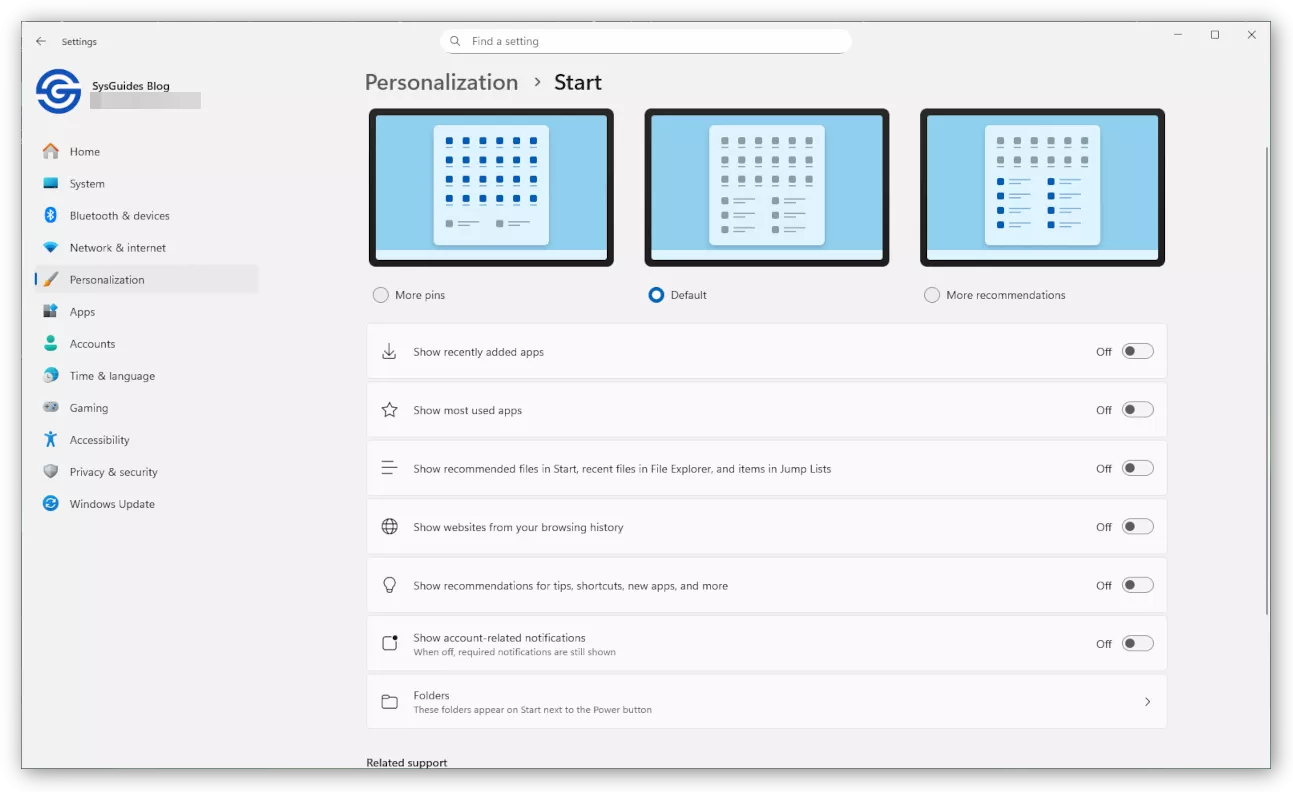
4.3.1 Disable Ads in Start Menu:
Go to Settings > Personalization > Start and turn off:
- Show recently added apps (optional)
- Show recommendations for tips, shortcuts, new apps, and more
Optional additional toggles you may disable:
- Show recommended files in Start, recent files in File Explorer, and items in Jump Lists
- Show websites from your browsing history
- Show account related notifications
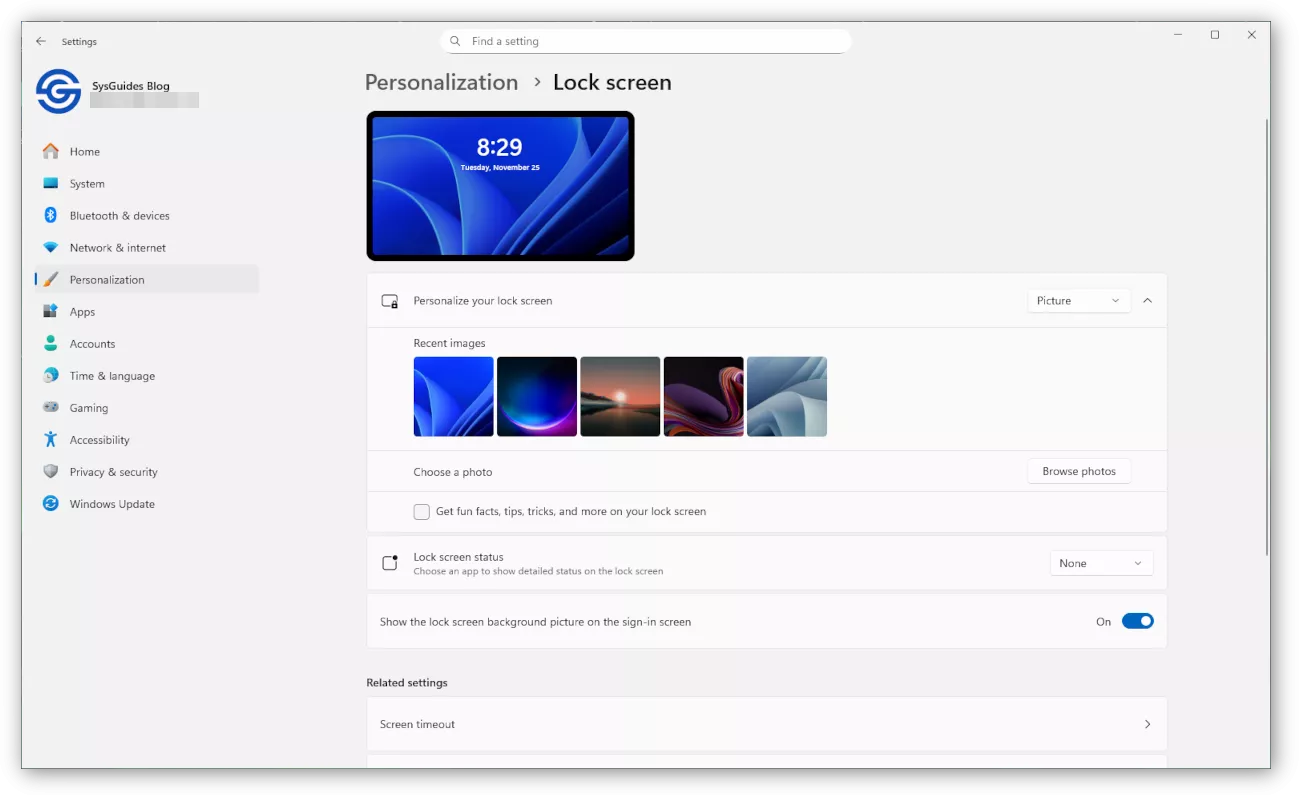
4.3.2 Remove Ads and Messages from the Lock Screen
Go to Settings > Personalization > Lock screen and configure:
- Change Personalize your lock screen from Windows Spotlight to Picture
- Turn off Get fun facts, tips, tricks, and more on your lock screen
- Set Lock screen status to None
4.3.3 Disable Recommendations and Advertising Settings
Go to Settings > Privacy & security > Recommendations & offers and turn off:
- Personalized offers
- Allow websites to access my language list (optional)
- Improve Start and search results
- Show notifications in Settings
- Recommendations and offers in Settings
- Advertising ID
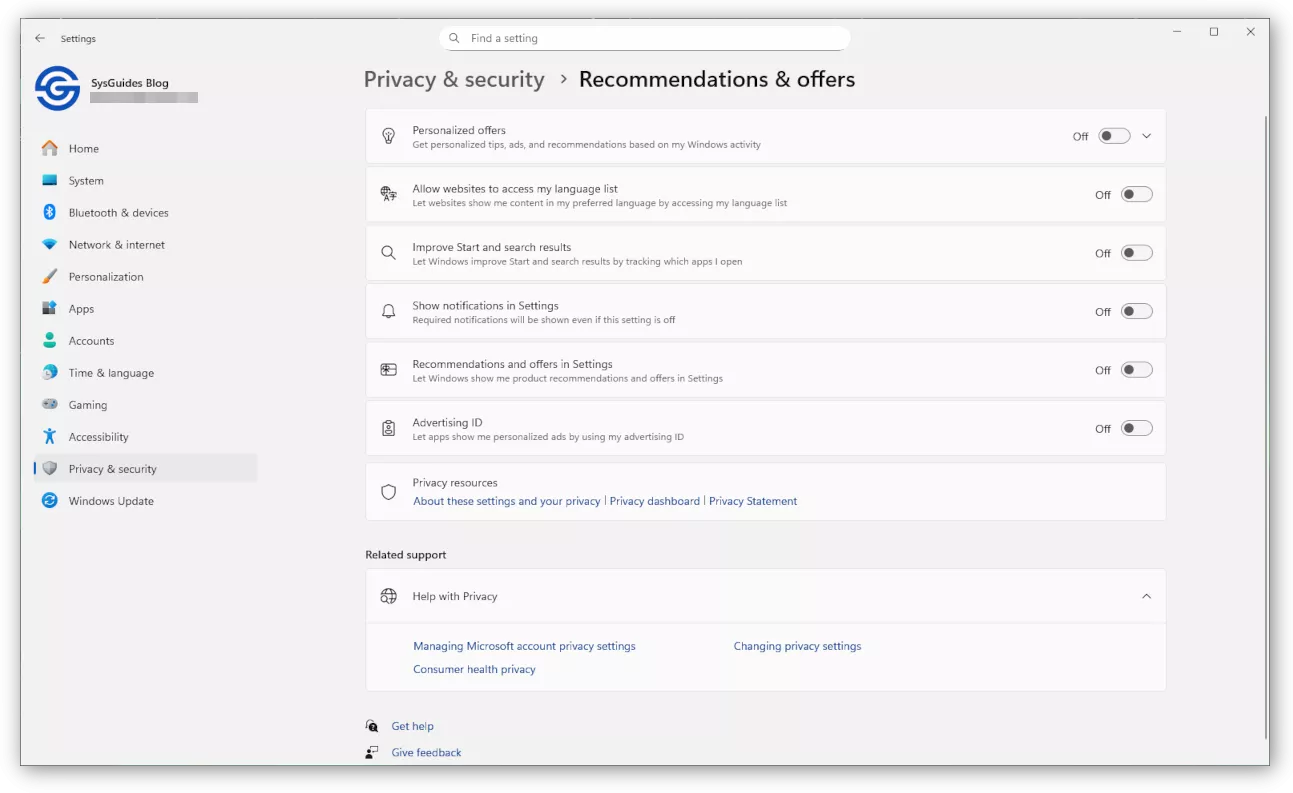
After applying these settings, Windows 11 will show fewer ads, suggestions, and promotional messages, making your VM cleaner and reducing background activity.
4.4 Disable Widgets and the Sliding News Panel
The Widgets panel in Windows 11 loads news, weather, and personalized content in the background. Even when you never open it, it uses RAM, CPU cycles, and GPU resources. Disabling it makes the VM lighter and prevents the panel from sliding in from the left.
Steps to disable Widgets:
- Right click any empty area on the Taskbar.
- Click Taskbar settings.
- In the Taskbar items list, turn Widgets off.
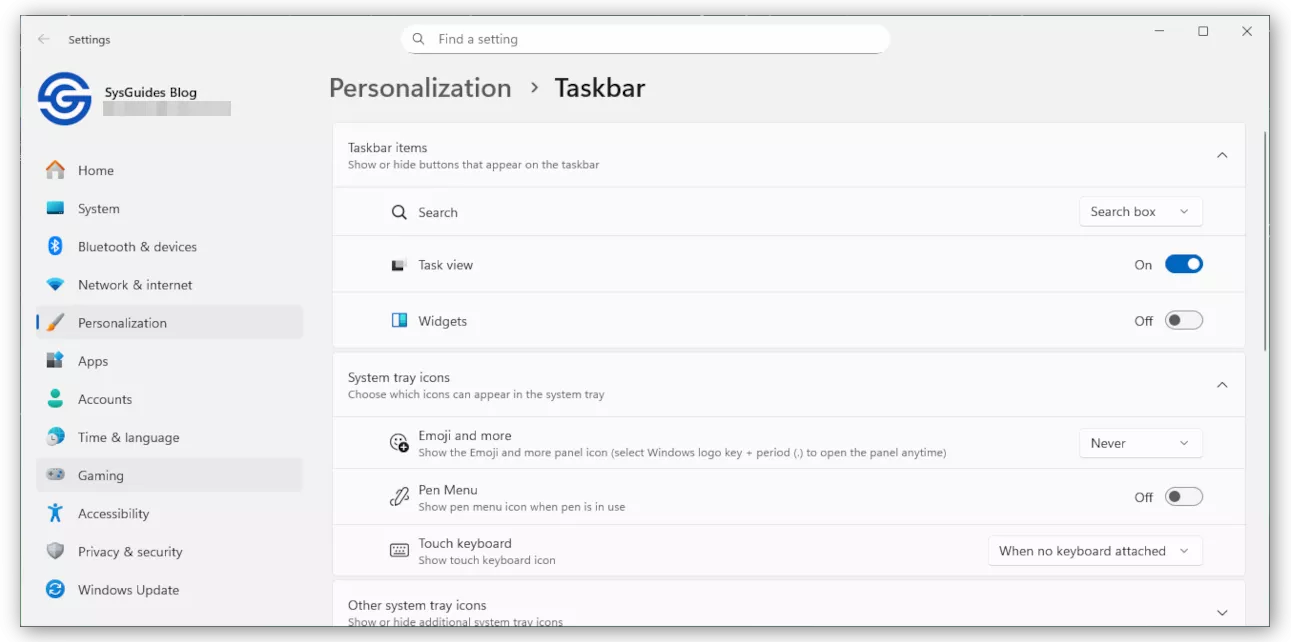
This immediately removes the Widgets button and stops the background content service that powers the sliding news feed.
4.5 Disable useplatformclock
Windows includes a legacy boot option called useplatformclock, which forces the operating system to use the HPET hardware timer. In a virtual machine HPET is fully emulated and much slower than the virtualized TSC timer that Windows normally uses. If this option is enabled, the Windows 11 VM becomes less responsive and uses more CPU. Most installations do not have this set, but it is worth checking and removing it if present.
Steps to check and disable useplatformclock:
Press Win + X and select Windows Terminal (Admin). Then run:
bcdedit /enumIf the useplatformclock entry does not appear in the output, Windows is already using the optimal timer configuration and no changes are needed.
If you see 'useplatformclock Yes', disable it by running:
bcdedit /deletevalue useplatformclockRestart Windows.
After the reboot, useplatformclock will be removed and Windows will return to using the default high performance virtualized TSC timer, which is the recommended configuration for KVM.
4.6 Disable Unnecessary Scheduled Tasks
Windows includes several scheduled tasks that collect diagnostic data, update location maps, or support retail demo features. These tasks provide no benefit inside a virtual machine and only add CPU wakeups and disk activity. Disabling a few of the heaviest tasks improves responsiveness.
How to open Task Scheduler
Press Win + R, type taskschd.msc, and press Enter.
This opens the Windows Task Scheduler.
How to disable a scheduled task
In Task Scheduler:
- Navigate to the folder path shown in the list below
- Select the task in the middle pane
- Click Disable in the right-side Selected Item panel
The task will immediately switch to Disabled state.

Note: Only disable tasks if they appear on your system. Some tasks may not exist depending on the Windows 11 build.
Scheduled tasks safe to disable in a VM
A. Application Experience
- Task Scheduler Library
Microsoft → Windows → Application Experience- ProgramDataUpdater
ProgramDataUpdater collects app compatibility and telemetry information. It provides no benefit in a VM and is safe to disable.
B. Autochk
- Microsoft → Windows → Autochk
- Proxy
The Proxy task sends autochk and disk check analytics to Microsoft’s diagnostic systems. This is unnecessary in virtual machines.
C. Customer Experience Improvement Program
- Microsoft → Windows → Customer Experience Improvement Program
- Consolidator
- UsbCeip
Consolidator uploads diagnostic and usage statistics on a daily schedule. UsbCeip collects USB device usage metrics for quality improvement. Both tasks are purely telemetry related and safe to disable in a VM.
D. Disk Diagnostic
- Microsoft → Windows → DiskDiagnostic
- Microsoft-Windows-DiskDiagnosticDataCollector
Microsoft-Windows-DiskDiagnosticDataCollector gathers disk health, failure prediction, and other diagnostic information, which is only useful on real hardware, not virtual disks.
E. Maps
- Microsoft → Windows → Maps
- MapsUpdateTask
- MapsToastTask
MapsUpdateTask downloads offline map data in the background. MapsToastTask shows notifications related to map updates. Both are irrelevant in a VM environment.
F. RetailDemo
- Microsoft → Windows → RetailDemo
- CleanupOfflineContent
CleanupOfflineContent handles leftover content for retail demonstration units (store display PCs). It serves no purpose on regular systems or virtual machines.
G. Windows Error Reporting
- Microsoft → Windows → Windows Error Reporting
- QueueReporting
QueueReporting sends crash reports and telemetry to Microsoft. Disabling it prevents background uploads but does not affect Windows stability.
These scheduled tasks are not required in a Windows 11 virtual machine and disabling them helps reduce background activity without affecting normal operation.
4.7 Disable Unnecessary Startup Programs
Many applications add themselves to Windows startup even when they are not needed. In a virtual machine this increases boot time and keeps background processes running that consume CPU and memory. Cleaning the startup list makes Windows lighter and faster.
Steps to disable unwanted startup programs:
- Press Ctrl + Shift + Esc to open Task Manager.
- Go to the Startup apps tab.
- Review the list and disable anything you do not need on every boot.
To disable, select the item and click Disable.
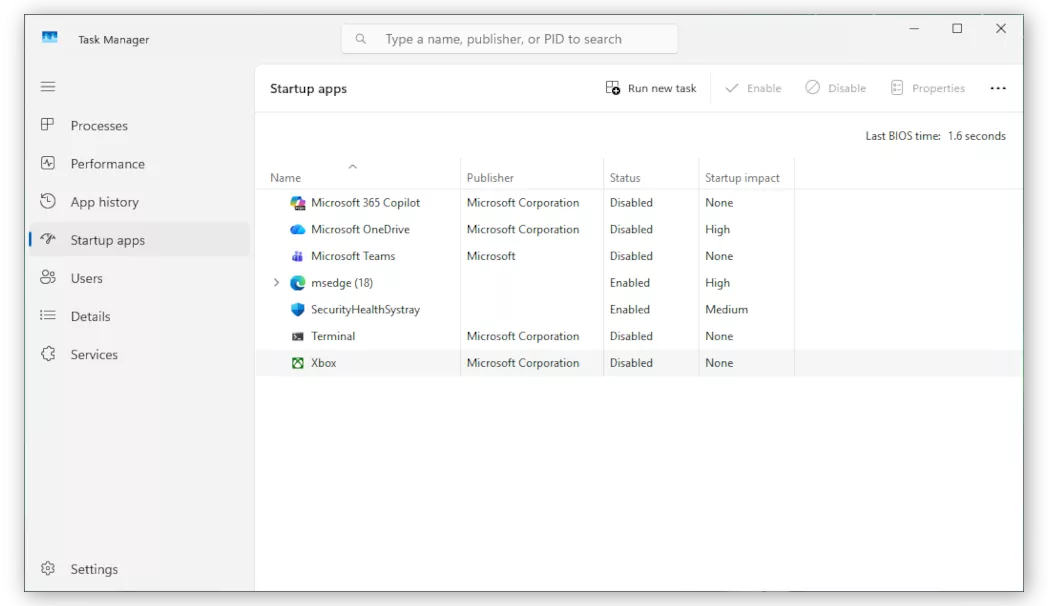
Safe examples you can disable:
- Microsoft OneDrive (unless you use it)
- Teams or Skype
- Spotify or Discord
- Game launchers
- Adobe or printer utilities
- OEM update tools
- Updaters for software you rarely use
Windows system entries like Windows Security, Explorer, or Shell Infrastructure Host should remain enabled.
A clean startup list noticeably improves login speed and reduces background RAM usage in a VM.
4.8 Adjust Visual Effects for Best Performance
Windows 11 includes many animations and visual effects that look nice on real hardware but add unnecessary overhead inside a virtual machine. Reducing these effects makes the desktop feel more responsive, especially when using virtio graphics.
Steps to adjust visual effects:
- Press Win + R, type sysdm.cpl, and press Enter.
- In the System Properties window, go to the Advanced tab.
- Under Performance, click Settings.
- Select Adjust for best performance to disable all animations.
Then re-enable the following options to keep text and icons clear:- Show thumbnails instead of icons
- Show window contents while dragging
- Smooth edges of screen fonts
- Click Apply and OK.
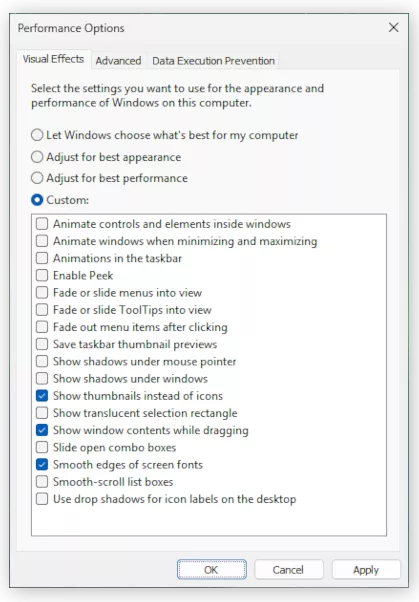
These settings reduce animation overhead while preserving visual clarity.
Conclusion
Running Windows 11 inside a KVM virtual machine is reliable and efficient when configured correctly. With the right chipset, CPU topology, virtio storage drivers, TPM support, and guest tools, the VM behaves almost like a native installation. After applying the performance optimizations in this guide, Windows becomes lighter and more responsive inside KVM, making it suitable for everyday productivity, development, testing, and other practical workloads. The end result is a stable and fast Windows 11 VM that fits smoothly into a Linux desktop workflow.