

Want to speed up your internet, boost privacy, and make your Linux system feel snappier? Configuring DNS on Linux is one of the easiest ways to achieve this.
DNS (Domain Name System) works like the internet's address book, translating website names like google.com into IP addresses that computers use to connect.
Most Linux systems use your ISP's DNS servers, which can be slow, unreliable, or may log your browsing activity. Switching to trusted options like Google, Cloudflare, or Quad9 can improve browsing speed, reduce package installation delays, and protect your privacy.
Every time you visit a website, update software, or sync apps, DNS resolution happens behind the scenes. Fast, reliable DNS makes your entire internet experience smoother.
Why Choose a Custom DNS Provider?
- Speed: Faster DNS resolution means quicker website loading. Even 50ms improvement is noticeable.
- Privacy: ISP DNS servers often log queries and track browsing habits. Privacy-focused providers limit or eliminate logging.
- Security: Some DNS services block malicious domains, preventing access to phishing sites and malware.
- Content Filtering: Certain providers offer filtering for adult content, gambling, or other categories - useful for families and workplaces.
This guide shows you how to configure DNS on Linux using trusted providers like Google, Cloudflare, and Quad9. Whether you prefer GUI tools, command-line methods, or editing config files, you'll learn to set up DNS for better speed, privacy, and protection on any Linux distribution.
Table of Contents
- 1. Top DNS Providers: A Comparative Look
- 2. Understanding DNS Configuration Methods in Linux
- 3. How to Set DNS in Linux Systems
- 4. Verifying Which DNS Server Linux Is Using
- 5. Conclusion
- 6. Watch on YouTube
1. Top DNS Providers: A Comparative Look
While your ISP provides a default DNS server, several public DNS providers offer compelling advantages in terms of speed, privacy, and security. Let's compare three leading options: Google Public DNS, Cloudflare DNS, and Quad9.
1.1. Google Public DNS
Google's widely-used DNS service launched in 2009, focusing on speed and reliability.
IP Addresses:
IPv4: 8.8.8.8, 8.8.4.4
IPv6: 2001:4860:4860::8888, 2001:4860:4860::8844
Key Features:
- Fast global DNS resolution using Google's distributed infrastructure
- High reliability with extensive worldwide server coverage
- Supports DNS-over-HTTPS (DoH) and DNS-over-TLS (DoT) encryption
- DNSSEC validation protects against spoofing and cache poisoning
- Clean NXDOMAIN responses with no ads or redirects
Trade-off: Logs DNS queries for 24-48 hours for analytics (not linked to personal info).
Best For: Speed and reliability over privacy.
1.2. Cloudflare DNS
Cloudflare DNS, launched in 2018, emphasizes privacy and speed with a commitment to never log your IP address.
Cloudflare offers several DNS options depending on your needs:
1.2.1. Standard Cloudflare DNS
Fast, privacy-focused DNS service that improves browsing speed without logging identifiable user data. Ideal for general use with strong encrypted DNS support.
IP Addresses:
IPv4: 1.1.1.1, 1.0.0.1
IPv6: 2606:4700:4700::1111, 2606:4700:4700::1001
Key Features:
- Fast DNS resolution using Cloudflare's global network
- No logging of IP addresses or browsing activity
- Supports DNS-over-HTTPS (DoH) and DNS-over-TLS (DoT) encryption
- DNSSEC validation prevents DNS attacks
- Clean NXDOMAIN responses with no ads or redirects
Trade-off: Minimal technical data logging (ASN, rough location) for abuse prevention and rate limiting.
Best for: Users prioritizing privacy with speed - ideal for privacy advocates, developers, and general users.
1.2.2. Cloudflare for Families (Malware Blocking)
Security-enhanced Cloudflare DNS that blocks malware and phishing domains for safer internet use at home or in shared environments.
IP Addresses:
IPv4: 1.1.1.2, 1.0.0.2
IPv6: 2606:4700:4700::1112, 2606:4700:4700::1002
Key Features:
- All standard Cloudflare DNS features
- Blocks malware and phishing domains automatically
- No additional software required for protection
- Maintains strong privacy policy without activity tracking
- Only blocks harmful content - regular websites remain accessible
Trade-off: No adult content filtering - focuses solely on malware and phishing protection.
Best for: Users wanting automatic protection against harmful websites while keeping unrestricted access to regular content.
1.2.3. Cloudflare for Families (Malware and Adult Content Blocking)
Filtered Cloudflare DNS that blocks both malware and adult content for safer family internet use.
IP Addresses:
IPv4: 1.1.1.3, 1.0.0.3
IPv6: 2606:4700:4700::1113, 2606:4700:4700::1003
Key Features:
- All Cloudflare for Families (Malware Blocking) features
- Blocks adult content for family-safe browsing
- Enforces Safe Search on supported search engines
- Protects shared devices in homes, schools, and child-friendly spaces
- Encrypted DNS with strong privacy and no browsing history logging
Trade-off: May block legitimate websites due to strict filtering; no customization options.
Best for: Families, schools, shared computers, and users avoiding inappropriate content in public or professional environments.
1.3. Quad9 DNS
Non-profit DNS service that prioritizes security and privacy by blocking malicious domains using threat intelligence from trusted sources.
IP Addresses:
IPv4: 9.9.9.9, 149.112.112.112
IPv6: 2620:fe::fe, 2620:fe::9
Key Features:
- Blocks malicious domains using real-time threat feeds
- Non-profit operated from Switzerland with strong privacy laws
- No logging of personally identifiable information
- Supports DNS-over-HTTPS (DoH) and DNS-over-TLS (DoT) encryption
- DNSSEC validation prevents tampering and fraud
- Clean NXDOMAIN responses with no ads or redirects
Trade-off: No content filtering for adult sites; may occasionally block safe domains if misclassified as threats.
Best For: Users wanting strong malware protection with solid privacy from a non-profit that doesn't track or sell user data. Swiss-based operation provides legal privacy protection.
2. Understanding DNS Configuration Methods in Linux
Linux offers several DNS configuration methods depending on your system setup and preferences. These operate at different layers - some are user interfaces (GUI, nmtui, nmcli) while others are underlying services (systemd-resolved) or configuration systems (Netplan).
You typically only need one method. Choose what fits your environment. For example, configuring DNS through desktop settings usually eliminates the need to adjust systemd-resolved manually, though you might use systemd-resolved commands for advanced features or troubleshooting.
Important: Avoid mixing configuration methods for basic DNS settings to prevent conflicts.
| Method | When to Use | What It Does |
|---|---|---|
| GUI (Settings App) | Desktop users wanting simple point-and-click configuration | Configures NetworkManager through graphical interface |
| nmtui | Terminal users preferring menu-driven interface | Configures NetworkManager through text-based menus |
| nmcli | Advanced users, scripting, automation, troubleshooting | Configures NetworkManager through command-line |
| systemd-resolved | Advanced DNS features (DoT, DNSSEC, split DNS) or direct control | Directly configures the DNS resolution service |
| Netplan | Ubuntu Server, systemd-networkd systems, declarative config | Generates network configuration files for systemd-networkd |
Understanding the Layers: User Interface → Network Manager → DNS Resolver
Most desktop systems use NetworkManager + systemd-resolved together. Server systems often use Netplan + systemd-networkd + systemd-resolved.
IPv6 Support Check: Many routers have IPv6 disabled by default, even if your ISP supports it. Check IPv6 availability at test-ipv6.com before configuring DNS. If "No IPv6 detected":
- Access router admin panel
- Find "IP Protocol Version" or "Connection Type" settings
- Select "IPv4/IPv6" (dual-stack mode) if available
- Save settings and restart router
- Retest at test-ipv6.com
DNS Server Addresses: All examples in this article use Cloudflare's standard DNS servers for consistency and simplicity:
IPv4: 1.1.1.1, 1.0.0.1
IPv6: 2606:4700:4700::1111, 2606:4700:4700::1001
Configuration Approach: Choose a method based on your system and connectivity.
- Always configure IPv4 DNS (universal compatibility)
- Also configure IPv6 DNS if test-ipv6.com shows IPv6 connectivity
- Recommended: Use both IPv4 and IPv6 DNS when available for better redundancy and performance
After making DNS changes, it’s a good idea to reboot your system to ensure the new settings are fully applied across all services.
3. How to Set DNS in Linux Systems
In this section, I’ll show you how to set public DNS servers in Linux using different methods. Whether you prefer a graphical tool or the command line, you can pick the approach that suits your system best.
3.1. Using GUI (Settings App)
Desktop Linux distributions include graphical network configuration tools that make DNS setup straightforward. These settings apps provide an easy point-and-click interface while using NetworkManager as the backend, which then communicates with your system's DNS resolver (typically systemd-resolved).
The following example demonstrates DNS configuration on Ubuntu 24.04 with GNOME. Other desktop environments (KDE, XFCE, MATE, Cinnamon, etc.) follow a similar pattern: open your system settings, navigate to Network or Wi-Fi settings, and look for DNS configuration options.
GNOME Settings:
- Open Settings > Network or Wi-Fi.
- Select your active network connection and click the Settings (gear) icon.
- Navigate to the IPv4 or IPv6 tab.
- Change the DNS method from Automatic to Manual
- Enter your preferred DNS servers in the DNS field (separated by commas)
- Click Apply to save changes.

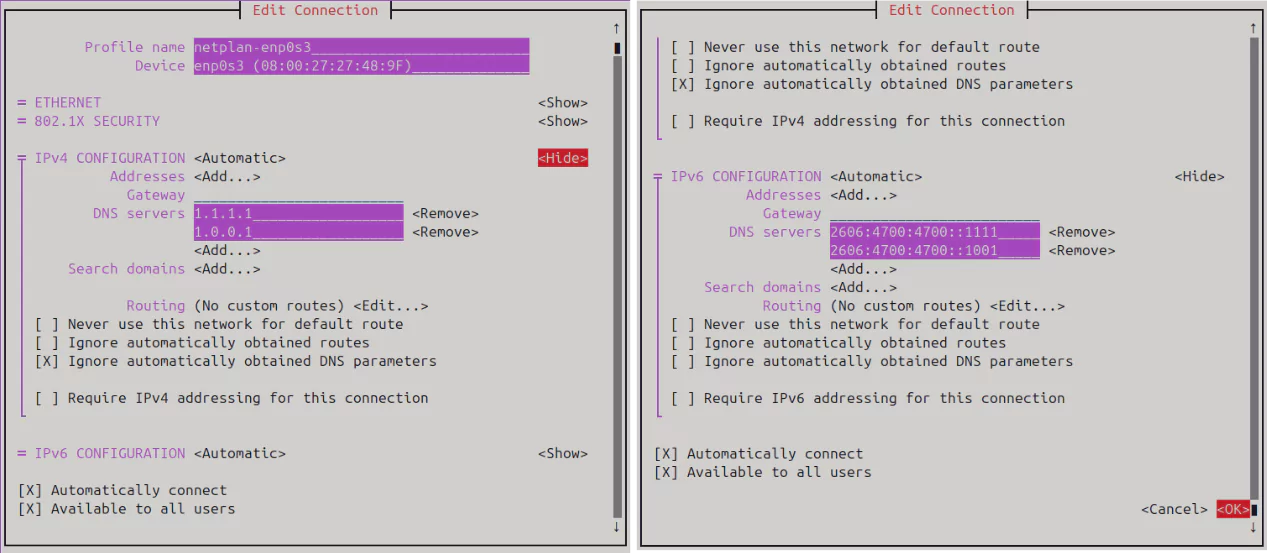
3.2. Using nmtui (NetworkManager Text UI)
If you're using a Linux system with terminal access but no GUI, or if you prefer menu-driven interfaces, nmtui provides a simple and user-friendly way to manage network settings, including DNS. Both nmtui and nmcli configure the same NetworkManager backend, but nmtui uses interactive menus while nmcli uses direct commands.
- Open a terminal and run '
sudo nmtui'. - Select Edit a connection and press Enter.
- Choose your active network interface (e.g.,
eth0,enp0s3,wlp2s0) and press Enter. - In the connection settings, scroll down to IPv4 CONFIGURATION and press Enter on
<Show>. - In the DNS servers section, enter your preferred IPv4 DNS addresses, each on a separate line.
- If your connection supports IPv6, scroll down to IPv6 CONFIGURATION and press Enter on
<Show>. - In the DNS servers section, press Enter on
<Add...>and enter your IPv6 DNS addresses, each on a separate line. - Press OK to save the configuration.
- Back in the main menu, select Activate a connection to deactivate and then reactivate the modified connection. This applies the new settings.
- Finally, select Quit to exit
nmtui.
Verify the configuration:
$ resolvectl status3.3. Using nmcli (NetworkManager CLI)
While nmtui offers menu-driven configuration, nmcli provides direct command-line control over NetworkManager settings. This makes it ideal for scripting, automation, remote management, or when you need to make quick changes without navigating through menus.
To set custom DNS servers using nmcli, follow these steps:
Find your active connection name.
$ nmcli connection show
NAME            UUID                                  TYPE      DEVICE
netplan-enp0s3  1eef7e45-3b9d-3043-bee3-fc5925c90273  ethernet  enp0s3
lo              be480c06-c6ed-43fd-9d39-071cbbc5e17a  loopback  lo
Look for the connection name under the NAME column (e.g., 'Wired connection 1' or enp0s3).
Set IPv4 DNS servers. Replace "netplan-enp0s3" with your actual connection name.
$ sudo nmcli connection modify "netplan-enp0s3" ipv4.dns "1.1.1.1 1.0.0.1"
$ sudo nmcli connection modify "netplan-enp0s3" ipv4.ignore-auto-dns yes
Set IPv6 DNS servers (if applicable):
$ sudo nmcli connection modify "netplan-enp0s3" ipv6.dns "2606:4700:4700::1111 2606:4700:4700::1001"
$ sudo nmcli connection modify "netplan-enp0s3" ipv6.ignore-auto-dns yes
Reactivate the connection to apply changes:
$ sudo nmcli connection down "netplan-enp0s3" && sudo nmcli connection up "netplan-enp0s3"Verify the configuration:
$ resolvectl status3.4. Using systemd-resolved
Your Linux system uses a DNS resolution service called systemd-resolved that runs behind the scenes. While NetworkManager tools work fine for basic DNS changes, configuring systemd-resolved directly gives you access to advanced features like encrypted DNS queries (DNS-over-TLS), security validation (DNSSEC), and sophisticated per-interface DNS rules. (DNS-over-TLS and DNSSEC setup are not covered in this article.)
3.4.1. Set Global DNS Servers
Edit the resolved configuration file:
$ sudo nano /etc/systemd/resolved.confFind the [Resolve] section and add this line:
[Resolve]
DNS=1.1.1.1 1.0.0.1 2606:4700:4700::1111 2606:4700:4700::1001
Restart systemd-resolved to apply changes:
$ sudo systemctl restart systemd-resolvedVerify the configuration:
$ resolvectl status3.4.2. Set DNS Per Interface
Identify your interface name (e.g., enp0s3):
$ resolvectl statusCreate the network configuration file:
$ sudo nano /etc/systemd/network/20-enp0s3.networkAdd the configuration:
[Match]
Name=enp0s3

[Network]
DNS=1.1.1.1 1.0.0.1 2606:4700:4700::1111 2606:4700:4700::1001
Restart networking:
$ sudo systemctl restart systemd-networkd
$ sudo systemctl restart systemd-resolved
Verify the configuration:
$ resolvectl statusNote: When both global and interface-specific DNS servers are configured, systemd-resolved gives priority to the interface-specific settings. The global DNS servers are only used if no DNS is set for the active interface.
3.5. Using Netplan
Netplan is Ubuntu's declarative network configuration system that uses YAML files to define network settings, including DNS. It's the default on Ubuntu Server editions and systems that don't use NetworkManager. Netplan generates configuration for the actual network backend (usually systemd-networkd) and works alongside systemd-resolved for DNS resolution.
Open your Netplan config file. The file name might differ. Use ls /etc/netplan to check.
$ sudo nano /etc/netplan/01-network-manager-all.yamlEdit or add the DNS settings under your interface. Here's an example:
# Let NetworkManager manage all devices on this system
network:
  version: 2
  ethernets:
    enp0s3:
      dhcp4: yes
      dhcp6: yes
      nameservers:
        addresses:
          - 1.1.1.1
          - 1.0.0.1
          - 2606:4700:4700::1111
          - 2606:4700:4700::1001
Replace enp0s3 with your actual interface name.
Apply the changes:
$ sudo netplan applyVerify DNS is active:
$ resolvectl status4. Verifying Which DNS Server Linux Is Using
After setting DNS, it's important to verify which servers are actually in use. On systems like Ubuntu and Fedora, systemd-resolved may report 127.0.0.53 as the DNS server, even though queries are forwarded to your configured DNS provider.
For example, when you run dig google.com to get google.com's IP address, you get this output:
$ dig google.com

; <<>> DiG 9.18.30-0ubuntu0.24.04.2-Ubuntu <<>> google.com
;; global options: +cmd
;; Got answer:
;; ->>HEADER<<- opcode: QUERY, status: NOERROR, id: 37539
;; flags: qr rd ra; QUERY: 1, ANSWER: 1, AUTHORITY: 0, ADDITIONAL: 1

;; OPT PSEUDOSECTION:
; EDNS: version: 0, flags:; udp: 65494
;; QUESTION SECTION:
;google.com.			IN	A

;; ANSWER SECTION:
google.com.		202	IN	A	142.250.182.78

;; Query time: 9 msec
;; SERVER: 127.0.0.53#53(127.0.0.53) (UDP)
;; WHEN: Sat Jul 12 00:10:54 IST 2025
;; MSG SIZE  rcvd: 55
In the output, look for the line highlighted in amber. The SERVER line shows 127.0.0.53 instead of your configured DNS (like 1.1.1.1). This is normal - 127.0.0.53 is systemd-resolved's local DNS resolver that forwards queries to your upstream DNS servers like 1.1.1.1.
On Arch Linux, the SERVER line typically shows the actual DNS IP (e.g., 1.1.1.1) since systemd-resolved isn't used by default.
To confirm that your local DNS resolver is actually forwarding queries to the DNS servers you configured, you can use network monitoring.
Start by opening two terminals side by side.
In Terminal 1, run the following command to capture DNS traffic:
$ sudo tcpdump -i any -n port 53This listens for DNS packets (UDP/TCP port 53) on all interfaces.
In Terminal 2, first flush the DNS cache and then make a DNS query:
$ sudo resolvectl flush-caches
$ dig google.com
Back in Terminal 1, you should see output similar to this:
00:46:49.007232 lo    In  IP 127.0.0.1.54264 > 127.0.0.53.53: 24285+ [1au] A? google.com. (51)
00:46:49.007395 enp0s3 Out IP 192.168.1.6.39085 > 1.1.1.1.53: 14733+ [1au] A? google.com. (39)
00:46:49.015863 enp0s3 In  IP 1.1.1.1.53 > 192.168.1.6.39085: 14733 1/0/1 A 142.250.182.78 (55)
00:46:49.015950 lo    In  IP 127.0.0.53.53 > 127.0.0.1.54264: 24285 1/0/1 A 142.250.182.78 (55)
Here’s what’s happening:
- The first line shows the
digcommand sending a DNS request tosystemd-resolvedat127.0.0.53. - The second line shows
systemd-resolvedforwarding that request out through your network interface (enp0s3) to1.1.1.1, the DNS server you configured. - The third line is the response coming back from
1.1.1.1. - The final line shows
systemd-resolvedpassing that response back to the local application (dig).
This confirms that even though dig reports the DNS server as 127.0.0.53, the actual query is being forwarded to your configured upstream DNS server (1.1.1.1 in this case).
This example shows DNS traffic over IPv4. If you've configured IPv6 DNS servers, you'll see similar lines with IPv6 addresses instead.
5. Conclusion
Configuring DNS on your Linux system is a powerful way to boost internet speed, enhance privacy, and protect against online threats. Whether you prioritize Google’s lightning-fast resolution, Cloudflare’s privacy-focused approach, or Quad9’s robust security, the right DNS provider depends on your needs. By following the GUI, TUI, or CLI methods outlined above, you can easily set up DNS on any Linux system, from desktops to servers.
Take the time to test your DNS performance and ensure your configuration supports both IPv4 and IPv6 for future-proofing. With a few simple commands or clicks, you can unlock a faster, safer, and more private internet experience. Choose your DNS provider wisely, follow best practices, and enjoy a seamless online experience tailored to your Linux environment.