Want to use PayPal to accept payments for your digital products, courses, or memberships? SCP makes it easy to connect your PayPal account, securely process payments, and receive real-time updates through webhooks.
Follow this guide to configure PayPal step by step.
☑️ Step 1: Log in to Your PayPal Developer Account
- Go to the PayPal Developer Portal:
https://developer.paypal.com - Click Log In and use your PayPal Business account credentials
💡 Make sure you’re using a Business Account, not Personal, for API access and live payments.
☑️ Step 2: Create a New App to Get API Credentials
- After logging in, go to:
Dashboard → My Apps & Credentials - Choose the appropriate environment:
- Sandbox for testing
- Live for real payments
- Click “Create App”
- Enter a name (e.g., SCP Integration) and click Create App
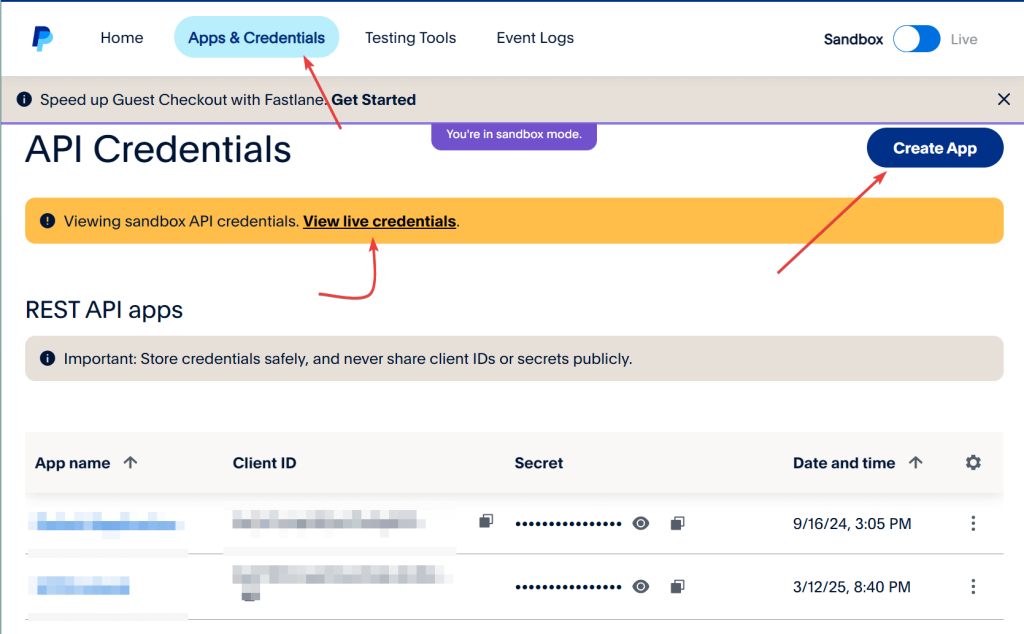
Once created, you’ll see the following:
- ✅ Client ID
- ✅ Secret Key
Repeat the process for both:
- 🧪 Sandbox (Test) environment
- 💳 Live environment
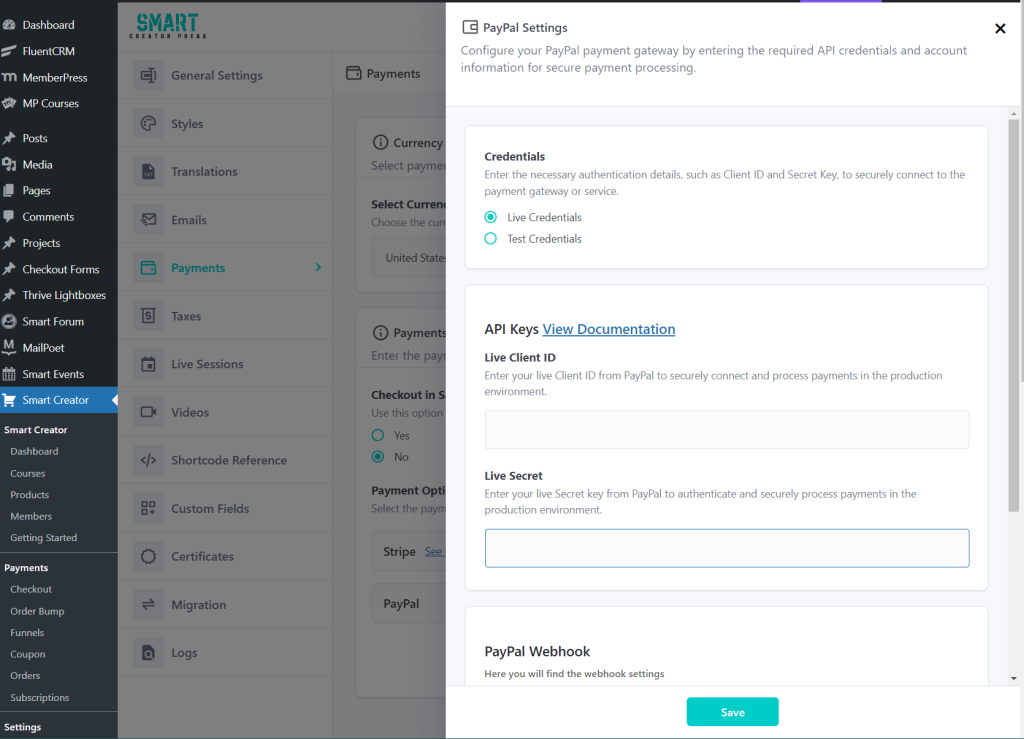
☑️ Step 3: Enter API Credentials in SCP
Now that you have your PayPal credentials:
- Go to your WordPress admin dashboard
- Navigate to:
SCP → Settings → Payments - Toggle ON the PayPal payment method
- Click Edit next to PayPal

Paste your credentials:
🔐 Live Credentials
- Live Client ID – paste the key from your Live app
- Live Secret – paste the secret from your Live app
🧪 Test Credentials
- Test Client ID – paste the key from your Sandbox app
- Test Secret – paste the secret from your Sandbox app
- Click Save Changes
✅ You’ve now securely connected your PayPal account to SCP.
☑️ Step 4: Set Up PayPal Webhooks
To receive real-time updates about payments, subscription events, and cancellations, you need to set up webhooks in your PayPal Developer Dashboard.
📩 In SCP:
- Go to SCP → Settings → Payments
- Scroll to the PayPal Webhook section
- Copy the Webhook URL
It looks like this:https://yourdomain.com/?scp-webhook=paypal
🔁 In PayPal:
- Go to:
My Apps & Credentials → [Select your App] - Scroll down to the Webhooks section
- Click Add Webhook
- Paste the Webhook URL from SCP
- Under Event Types, select the following:
- Checkout Events >>
CHECKOUT.ORDER.APPROVED - Payments & Payouts >>
PAYMENT.CAPTURE.COMPLETED,PAYMENT.SALE.COMPLETED,PAYMENT.SALE.DENIED - Payment Refunds >>
PAYMENT.CAPTURE.REFUNDED - Billing Subscription >>
BILLING.SUBSCRIPTION.CREATED,BILLING.SUBSCRIPTION.ACTIVATED,BILLING.SUBSCRIPTION.CANCELLED
- Checkout Events >>
- Click Save

🔐 Get Your Webhook ID
- After the webhook is saved, PayPal will display a Webhook ID
- Copy this Webhook ID
- Return to SCP → Settings → Payments
- Paste it into the Webhook ID field
- Save changes
✅ Your PayPal integration is now fully webhook-enabled!
☑️ Optional: Admin-Only Sandbox Mode
If you want to test payments while logged in as an admin, without affecting your live data:
- Go to SCP → Settings → Payments
- Enable the toggle for:
“Always use sandbox for admin”
This is useful for debugging or testing the checkout flow.
🧪 How to Test a PayPal Payment
To test your PayPal integration in sandbox mode:
- Go to https://developer.paypal.com/dashboard/accounts
- Use the Sandbox Buyer account credentials
- In SCP, grab your Product or Course URL
- Open it in a private/incognito window
- Click Enroll or Buy Now
- Complete checkout using your Sandbox Buyer account
✅ What to Check:
- You’re redirected to the Order Summary Page
- You’re logged in automatically
- You can access your product in the Member Dashboard
- You receive the Welcome Email
🚀 You’re All Set!
You’ve now connected PayPal to SCP and configured:
☑️ Live & Test API credentials
☑️ Webhook URL & ID
☑️ Real-time event notifications
☑️ Admin sandbox testing
Your site is ready to start accepting payments via PayPal! 🎉


