Handle Promise.allSettled() resolved and each rejected Promise
This is a Javascript post! As you probably already knew, that Promise.all() is all or never. How about run all the things even there is/are a rejected promise(s)? There is Promise.allSettled() for that.
The issue is about catching the error for specific promise(s). You CANNOT do this:
await Promise.allSettled(
        [
            promise2,
            promise1,
            promise3
        ]
    )
    .then((results) => results.forEach((result) => {
        // ...
    }))
    .catch(
        // ...
    )
    .finally(
        // ...
    );
As above will only works for Promise.all(), while the resolved promises won’t executed even only there is one promise that rejected.
What you need to do is loop the results, and you will get the result like the following:

On loop, you can check if it has status == ‘rejected’, that a way you know that the promise rejected. The result will always has ‘reason’ key when it rejected, even if the reject value is undefined. So, the code can be:
await Promise.allSettled(
        [
            promise2,
            promise1,
            promise3
        ]
    )
    .then(
        (results) => {
            for (let result of results) {
                if (result.status == 'rejected') {
                    // handle rejected promise here
                    // eg: make console.log()...
                    console.log('error : ' + result.reason);

                    // continue to next iteration
                    continue;
                }

                // handle fulfilled promise here
                // eg: append in the div
                document.getElementsByClassName('load')[0].innerHTML += result.value + '<br />';
            }
        }
    )
    .finally(
        // ...
    );
That’s it!
References:
Connecting to non-public PostgreSQL schema with CodeIgniter 4
If you are building application with CodeIgniter 4 using PostgreSQL database, you will have to use ‘public’ default schema. How about if you want to use a different schema for specific needs? For example, you have the the product table that placed in “inventory” schema like the following:

To be able to make operation against “inventory” schema, we need to update schema property of Database Connection class. If we use Model class, eg: ProductModel class, we can override __construct() method and update the schema value, like the following:
<?php

namespace App\Models;

use CodeIgniter\Database\ConnectionInterface;
use CodeIgniter\Model;
use CodeIgniter\Validation\ValidationInterface;

class ProductModel extends Model
{
    protected $table      = 'product';
    protected $returnType = 'array';

    public function __construct(ConnectionInterface &$db = null, ValidationInterface $validation = null)
    {
        parent::__construct($db, $validation);

        $this->db->schema = 'inventory';
    }
}
So, whenever we call:
use App\Models\ProductModel;

// ...
$model = model(ProductModel::class);
$model->findAll();
We will find all product table records in ‘inventory’ schema on first priority, if table not found in the ‘inventory’ schema, it will fallback to ‘public’.
That’s it.
Using preInsert event for generating UUID with laminas-db

If you want to do something before insert data into database table, for example: generate id as UUID binary, you can do with preInsert event. For example, you have the following album table structure:
DROP TABLE IF EXISTS `album`;

CREATE TABLE `album` (
  `id` binary(16) NOT NULL COMMENT 'uuid binary',
  `artist` varchar(255) COLLATE utf8_unicode_ci NOT NULL,
  `title` varchar(255) COLLATE utf8_unicode_ci NOT NULL
) ENGINE=InnoDB DEFAULT CHARSET=utf8 COLLATE=utf8_unicode_ci;

ALTER TABLE `album`
  ADD PRIMARY KEY (`id`);
Now, to generate the UUID data, you can use ramsey/uuid, you can require:
➜ composer require ramsey/uuid
Now, time for the action!
Note, this is just a quick example to show you how it works. You can borrow your design architecture you love in real implementation.
For example, in laminas-mvc-skeleton application, we inject the IndexController with db adapter via factory:
namespace Application\Controller;

use Laminas\Db\Adapter\AdapterInterface;

class IndexControllerFactory
{
    public function __invoke($c)
    {
        return new IndexController($c->get(AdapterInterface::class));
    }
}
Now, we can update the module/Application/config/module.config.php controller factory:
// ...
    'controllers' => [
        'factories' => [
            Controller\IndexController::class => Controller\IndexControllerFactory::class,
        ],
    ],
// ...
In our IndexController __construct, we can use the db adapter to create the TableGateway instance featuring EventFeature:
<?php

declare(strict_types=1);

namespace Application\Controller;

use Laminas\Db\Adapter\AdapterInterface;
use Laminas\Db\TableGateway\Feature\EventFeature;
use Laminas\Db\TableGateway\Feature\EventFeature\TableGatewayEvent;
use Laminas\Db\TableGateway\Feature\EventFeatureEventsInterface;
use Laminas\Db\TableGateway\TableGateway;
use Laminas\Mvc\Controller\AbstractActionController;
use Laminas\View\Model\ViewModel;
use Ramsey\Uuid\Uuid;

class IndexController extends AbstractActionController
{
    private $albumTableGateway;

    public function __construct(AdapterInterface $adapter)
    {
        $events =  $this->getEventManager();
        $events->attach(EventFeatureEventsInterface::EVENT_PRE_INSERT, function (TableGatewayEvent $event) {
            $insert     = $event->getParam('insert');
            $insert->id = Uuid::uuid4()->getBytes();
        });

        $this->albumTableGateway = new TableGateway('album', $adapter, new EventFeature($events));
    }
}
Above, with EventFeatureEventsInterface::EVENT_PRE_INSERT, we update the insert id with the binary value generated.
Let’s check with index action for insert:
// ...
    public function indexAction()
    {
        $this->albumTableGateway->insert([
            'artist' => 'Sheila on 7',
            'title'  => 'Pejantan Tangguh',
        ]);

        return new ViewModel();
    }
// ..
Ok, when open the index page, we will have the album table inserted with id generated in preInsert event.
mysql> SELECT LOWER(
    ->         CONCAT(SUBSTR(HEX(id), 1, 8)
    ->         , '-'
    ->         , SUBSTR(HEX(id), 9, 4)
    ->         , '-'
    ->         , SUBSTR(HEX(id), 13, 4)
    ->         , '-'
    ->         , SUBSTR(HEX(id), 17, 4)
    ->         , '-'
    ->         , SUBSTR(HEX(id), 21))
    ->     ) as id,
    ->     artist,
    ->     title
    ->     FROM album;
+--------------------------------------+-------------+------------------+
| id                                   | artist      | title            |
+--------------------------------------+-------------+------------------+
| 551a8518-cdd2-4f3a-968d-a45a4b232b5e | Sheila on 7 | Pejantan Tangguh |
+--------------------------------------+-------------+------------------+
1 row in set (0.00 sec)
For complete event list, you can read the documentation https://docs.laminas.dev/laminas-db/table-gateway/#tablegateway-lifecycle-events
Using laminas-cli to Consume Symfony Console Command in Mezzio Application

So, you want to use Symfony Console Command in Mezzio Application? You can! There is laminas-cli for that. While it still in development, you already can give it a try. First, I assume that you already installed the mezzio application. Next, you can set minimum-stability and prefer-stable config in your composer.json:
➜  composer config minimum-stability dev
➜  composer config prefer-stable true
By above command, you can ensure that you can install the non-stable dependency, while prefer stable version if found. Next, you can require the laminas-cli via command:
➜ composer require laminas/laminas-cli
After installed, let’s create our first command: “HelloWorld command”, like the following:
namespace App\Command;

use Symfony\Component\Console\Command\Command;
use Symfony\Component\Console\Input\InputArgument;
use Symfony\Component\Console\Input\InputInterface;
use Symfony\Component\Console\Output\OutputInterface;

use function sprintf;

final class HelloWorld extends Command
{
    protected function configure()
    {
        $this
            ->addArgument('message', InputArgument::REQUIRED, 'Greeting Message');
    }

    protected function execute(InputInterface $input, OutputInterface $output)
    {
        $message = $input->getArgument('message');
        $output->writeln(sprintf('<info>Hello to world: %s<info>! ', $message));

        return 0;
    }
}
Greet! Now, time to register it to our App\ConfigProvider class:
<?php

declare(strict_types=1);

namespace App;

class ConfigProvider
{
    public function __invoke(): array
    {
        return [
            // ...
            'laminas-cli'  => $this->getCliConfig(),
            // ...
        ];
    }

    public function getCliConfig(): array
    {
        return [
            'commands' => [
                // ...
                'app:hello-world' => Command\HelloWorld::class,
                // ...
            ],
        ];
    }

    public function getDependencies(): array
    {
        return [
            'invokables'         => [
                // ...
                Command\HelloWorld::class  => Command\HelloWorld::class,
                // ...
            ],
        ];
    }

    // ...
}
First, in getDependencies(), we register the command, if the command has dependency, you need to provide factory for it. And then, in __invoke() method, we register the commands, which you can move the commands definition in separate method. That’s it! Now, you can run the command:
➜  vendor/bin/laminas app:hello-world "Good Morning"
Hello to world: Good Morning!
Create RESTful API in CodeIgniter 4
In CodeIgniter 4, there is already CodeIgniter\RESTful\ResourceController that make building RESTful API easier. It can consume the model by provide modelName property.
Preparation
1. Register Routes
// app/Config/Routes.php
$routes->resource('products');
2. Create Model and Entity Classes
For example, we have the ProductModel class:
<?php namespace App\Models;

use App\Entities\Product;
use CodeIgniter\Model;

class ProductModel extends Model
{
    protected $table           = 'product';

    /**
     *  $returnType as entity class  in RESTful API might not work in CodeIgniter 4.0.2.
     *  You can define as "object" at CodeIgniter 4.0.2 for RESTful API usage.
     *
     *       protected $returnType      = 'object';
     *
     */
    protected $returnType      = Product::class;

    protected $allowedFields   = [
        'product_code',
        'product_name',
    ];
    protected $validationRules = [
        'product_code' => 'required|alpha_numeric|exact_length[5]|is_unique[product.product_code,id,{id}]',
        'product_name' => 'required|alpha_numeric_space|min_length[3]|max_length[255]|is_unique[product.product_name,id,{id}]',
    ];
}
Above model require entity class, so, we can create as follow:
<?php namespace App\Entities;

use CodeIgniter\Entity;

class Product extends Entity
{
    protected $attributes = [
        'product_code' => null,
        'product_name' => null,
    ];

        // filter on create/update data if necessary
    public function setProductCode(string $productCode): self
    {
        $this->attributes['product_code'] = strtoupper($productCode);
        return $this;
    }

        // filter on create/update data if necessary
    public function setProductName(string $productName): self
    {
        $this->attributes['product_name'] = ucwords($productName);
        return $this;
    }
}
3. Ensure the pages has “csrf” filter DISABLED for the RESTful API pages
CSRF usually uses only for public web interation forms. For API, we can use authorization token (eg: for Oauth usage). We can disable csrf filter in app/Config/Filters.php like the following:
<?php namespace Config;

use App\Filters\PostRequestOnly;
use CodeIgniter\Config\BaseConfig;

class Filters extends BaseConfig
{
    // ...

    public $globals = [
        'before' => [
            'csrf' => [
                'except' =>  [
                    '/products',
                    '/products/*',
                ],
            ],
        ],
    ];

    // ...
}
The API
We can create a controller for it, that extends CodeIgniter\RESTful\ResourceController:
<?php namespace App\Controllers;

use CodeIgniter\RESTful\ResourceController;

class Products extends ResourceController
{
    protected $modelName = 'App\Models\ProductModel';
    protected $format    = 'json';
}
For display all products, we can create method index:
// ...
    public function index()
    {
        return $this->respond($this->model->findAll());
    }
// ...
This is the output of all products:

For display product by id, we can add method show:
// ...
    public function show($id = null)
    {
        $record = $this->model->find($id);
        if (! $record)
        {
            return $this->failNotFound(sprintf(
                'product with id %d not found',
                $id
            ));
        }

        return $this->respond($record);
    }
// ...
This is the output when product found and not found:

For create new product data, we can add method create:
// ...
    public function create()
    {
        $data = $this->request->getPost();
        if (! $this->model->save($data))
        {
            return $this->fail($this->model->errors());
        }

        return $this->respondCreated($data, 'product created');
    }
// ...
Above, we use getPost() from request object to get POST data. This is the output when product creation is succeed and failed:

For update product data, we can add method update:
// ...
    public function update($id = null)
    {
        $data       = $this->request->getRawInput();
        $data['id'] = $id;

        if (! $this->model->save($data))
        {
            return $this->fail($this->model->errors());
        }

        return $this->respond($data, 200, 'product updated');
    }
// ...
Above, we use getRawInput() from request object to get PUT data. Currently, there is no “respondUpdated” method, I created Pull Request for it at https://github.com/codeigniter4/CodeIgniter4/pull/2816 for addition of “respondUpdated” method.
This is the output when product update is succeed and failed:

Now, the last one, the delete, we can add delete method:
// ...
    public function delete($id = null)
    {
        $delete = $this->model->delete($id);
        if ($this->model->db->affectedRows() === 0)
        {
            return $this->failNotFound(sprintf(
                'product with id %d not found or already deleted',
                $id
            ));
        }

        return $this->respondDeleted(['id' => $id], 'product deleted');
    }
//...
This is the output when product delete is succeed and failed:

That’s it 😉
Using Swoole in Mezzio application with Sdebug

If you didn’t try Swoole, you need to try it. It is a PECL extension for developing asynchronous applications in PHP. If you build a Mezzio Application, there is already mezzio-swoole component that ease for its settings and usage.
First, if you didn’t have a mezzio skeleton, you can install the skeleton:
➜ composer create-project mezzio/mezzio-skeleton
Next, install the swoole extension:
➜ sudo pecl install swoole
After it, you can install the mezzio-swoole component:
➜ composer require mezzio/mezzio-swoole
That’s it, you can now open mezzio-skeleton directory and run the mezzio-swoole command, and we will get the following output:
➜ cd mezzio-skeleton
➜ ./vendor/bin/mezzio-swoole start

Swoole is running at 127.0.0.1:8080, in /Users/samsonasik/www/mezzio-skeleton

PHP Warning:  Swoole\Server::start(): Using Xdebug in coroutines is extremely dangerous, please notice that it may lead to coredump! in /Users/samsonasik/www/mezzio-skeleton/vendor/mezzio/mezzio-swoole/src/SwooleRequestHandlerRunner.php on line 169
If you have Xdebug installed, you will get above command output “PHP Warning” output. To fix it, we can uninstall the Xdebug, and install Sdebug instead. We can do the following command:
➜ sudo pecl uninstall xdebug
➜ git clone https://github.com/swoole/sdebug.git
➜ cd sdebug && sudo ./rebuild.sh
Now, you will get the Sdebug information if we run php -v:
➜  ~ php -v
PHP 7.4.4 (cli) (built: Mar 24 2020 10:45:52) ( NTS )
Copyright (c) The PHP Group
Zend Engine v3.4.0, Copyright (c) Zend Technologies
    with Sdebug v2.9.3-dev, Copyright (c) 2002-2020, by Derick Rethans
    with Zend OPcache v7.4.4, Copyright (c), by Zend Technologies
Let’s try run mezzio-swoole command again:
➜ cd mezzio-skeleton
➜ ./vendor/bin/mezzio-swoole start

Swoole is running at 127.0.0.1:8080, in /Users/samsonasik/www/mezzio-skeleton
Worker started in /Users/samsonasik/www/mezzio-skeleton with ID 0
If you got Segmentation fault in the future, that may because of the `Sdebug`, if you don’t require the ‘Xdebug’/’Sdebug’ feature. You can just uninstall them all together
Succeed! Now, time to benchmark! I used wrk for it. I tested it in Macbook Pro 2011, core i5, with 16GB RAM. I access the page with HTML+JS+CSS in there.
1. Without Swoole
Let’s CUT the previous mezzio-swoole ( type CTRL + C ) command and use PHP Development server:
➜ cd mezzio-skeleton
➜ composer serve

> php -S 0.0.0.0:8080 -t public/
[Sun Apr  5 12:24:15 2020] PHP 7.4.4 Development Server (http://0.0.0.0:8080) started
Now, we can run the benchmark with run wrk command in separate terminal:
➜ wrk -c 1000 -t 10 http://localhost:8080/

Running 10s test @ http://localhost:8080/
  10 threads and 1000 connections
  Thread Stats   Avg      Stdev     Max   +/- Stdev
    Latency     1.33s   629.53ms   2.00s    50.33%
    Req/Sec    16.09     12.96    60.00     69.26%
  544 requests in 10.09s, 4.25MB read
  Socket errors: connect 759, read 580, write 1, timeout 393
Requests/sec:     53.90
Transfer/sec:    430.92KB
2. With Swoole
Let’s CUT the previous PHP Development server command ( type CTRL + C ) command and use mezzio-swoole command:
➜ cd mezzio-skeleton
➜ ./vendor/bin/mezzio-swoole start

Swoole is running at 127.0.0.1:8080, in /Users/samsonasik/www/mezzio-skeleton
Worker started in /Users/samsonasik/www/mezzio-skeleton with ID 0
Now, we can run the benchmark with run wrk command in separate terminal:
➜ wrk -c 1000 -t 10 http://localhost:8080/

Running 10s test @ http://localhost:8080/
  10 threads and 1000 connections
  Thread Stats   Avg      Stdev     Max   +/- Stdev
    Latency     1.15s   590.35ms   2.00s    54.14%
    Req/Sec    30.13     35.31   170.00     83.03%
  1373 requests in 10.09s, 25.10MB read
  Socket errors: connect 759, read 80, write 0, timeout 418
Requests/sec:    136.07
Transfer/sec:      2.49MB
Above, we get double total requests with swoole in same time! That’s it!
References:
- https://docs.mezzio.dev/mezzio-swoole/v2/intro/
- https://github.com/swoole/swoole-src/issues/1681#issuecomment-608980271/
- https://github.com/swoole/sdebug
- https://github.com/ezimuel/swoole-benchmark
- https://formulae.brew.sh/formula/wrk#default
Using Model::paginate() for SQL Join in CodeIgniter 4
From Model, in CodeIgniter 4, we can paginate existing query that we use in current table defined in $table property, eg in model, like the following:
<?php namespace App\Models;

use CodeIgniter\Model;

class ProductModel extends Model
{
    /**
     * define properties table, returnType, allowedFields, validationRules, etc here
     */

    // ...
	public function getPaginatedProductData(string $keyword = ''): array
	{
		if ($keyword)
		{
			$this->builder()
				 ->groupStart()
					 ->like('product_code', $keyword)
					 ->orLike('product_name', $keyword)
				 ->groupEnd();
		}

		return [
			'products'  => $this->paginate(),
			'pager'     => $this->pager,
		];
	}
    // ...

}
That’s for paginate rows in same table, how about in SQL Join? We can! For example, we have a use case to get product and price from the following table relation

that can be grabbed with join:
SELECT
     `product`.`*`,
     `price`.`price`
         FROM
             `product`
         JOIN
             `price`
         ON
             `product`.`id` = `price`.`product_id`
         WHERE
            `price`.`date` = DATE_FORMAT(NOW(),'%Y-%m-%d');
If we want an object representation with entity class, we can create an entity for that:
<?php namespace App\Entities;

use CodeIgniter\Entity;

class ProductWithPrice extends Entity
{
    protected $attributes = [
        'id'           => null,
        'product_code' => null,
        'product_name' => null,
        'price'        => null,
    ];
}
Now, in the model, we can query the join and then paginate:
<?php namespace App\Models;

use App\Entities\ProductWithPrice;
use CodeIgniter\Model;

class ProductModel extends Model
{
    // ...
	public function getPaginatedProductWithPriceData()
	{
		$this->builder()
			 ->select(["{$this->table}.*", 'price.price'])
			 ->join('price', "{$this->table}.id = price.product_id")
			 ->where("price.date = DATE_FORMAT(NOW(),'%Y-%m-%d')");

		return [
			'productWithPrices'  => $this->asObject(ProductWithPrice::class)
                                         ->paginate(),
			'pager'              => $this->pager,
		];
	}
    // ...
}
That’s it, the paginate() function now will paginate the query join we have with the object entity for the result row.
How to Avoid –stderr When Running phpunit for Functional/Integration Testing
When you do a Functional/Integration test with session and/or header relation. It will force you to use --stderr when running phpunit, or it will got error, eg: you’re testing that on logout when session exists as user, page will be redirected to login page with status code 302, and it got the following error:
$ vendor/bin/phpunit test/Integration/LogoutPageTest.php
PHPUnit 8.5.2 by Sebastian Bergmann and contributors.

Logout Page (AppTest\Integration\LogoutPage)
 ✘ Open logout page as auser redirect to login page
   ┐
   ├ Failed asserting that 500 matches expected 302.
   │
   ╵ /Users/samsonasik/www/mezzio-authentication-with-authorization/test/Integration/LogoutPageTest.php:36
   ┴

Time: 155 ms, Memory: 10.00 MB


FAILURES!
Tests: 1, Assertions: 1, Failures: 1.
You can use --stderr option on running it:
$ vendor/bin/phpunit test/Integration/LogoutPageTest.php --stderr
PHPUnit 8.5.2 by Sebastian Bergmann and contributors.

Logout Page (AppTest\Integration\LogoutPage)
 √ Open logout page as auser redirect to login page

Time: 150 ms, Memory: 8.00 MB

OK (1 test, 2 assertions)
or define stderr=true in phpunit.xml configuration:
<?xml version="1.0" encoding="UTF-8"?>
<phpunit xmlns:xsi="http://www.w3.org/2001/XMLSchema-instance"
         xsi:noNamespaceSchemaLocation="vendor/phpunit/phpunit/phpunit.xsd"
         bootstrap="vendor/autoload.php"
         colors="true"
         testdox="true"
         stderr="true">

    <!-- testsuites, filter, etc config -->

</phpunit>
Marking all test to be using stderr is a workaround, as not all tests actually require that, eg: unit test doesn’t need that. To avoid it, we can define @runTestsInSeparateProcesses and @preserveGlobalState disabled in the controller class that require that, so, the test class will be like the following:
<?php

declare(strict_types=1);

namespace AppTest\Integration;

use Laminas\Diactoros\ServerRequest;
use Laminas\Diactoros\Uri;
use Mezzio\Authentication\UserInterface;
use PHPUnit\Framework\TestCase;

/**
 * @runTestsInSeparateProcesses
 * @preserveGlobalState disabled
 */
class LogoutPageTest extends TestCase
{
    private $app;

    protected function setUp(): void
    {
        $this->app = AppFactory::create();
    }

    public function testOpenLogoutPageAsAuserRedirectToLoginPage()
    {
        $sessionData                    = [
            'username' => 'samsonasik',
            'roles'    => [
                'user',
            ],
        ];
        $_SESSION[UserInterface::class] = $sessionData;

        $uri           = new Uri('/logout');
        $serverRequest = new ServerRequest([], [], $uri);

        $response = $this->app->handle($serverRequest);
        $this->assertEquals(302, $response->getStatusCode());
        $this->assertEquals('/login', $response->getHeaderLine('Location'));
    }
}
That’s it!
Publish Test Coverage to Codecov from Github Actions
![]()
Github Actions is one of ways to run Continues Integration. For Coverage report, we can use Codecov to publish the coverage result after running and generating test coverage.
For example, you have a Github Repository. You can open https://codecov.io/login and choose “Github”:

After you logged in, you can choose repository, or directly access https://codecov.io/gh/{your github user}/{your github repo}, for example, I use “samsonasik” as user, and “mezzio-authentication-with-authorization” as repository name:
On very first, we need to activate Webhook by open https://codecov.io/gh/gh/{your github user}/{your github repo}/settings, for example:
Then, we click “Create new webhook” under Github Webhook:

After it done, we can copy “Repository Upload Token”:

by click “Copy” after then token, and back to Github, and save to Secrets section under Your Github Repository Settings with click “Add a new secret”, with eg: named: CODECOV_TOKEN, fill the value with your copied token, and click “Add secret” to save it to be like as follow:

The preparation is done. Now, time to add the github workflow, eg: “.github/workflows/ci-build.yml” at your repository, eg for php package/project and use phpunit, the workflow can be like the following:
name: "ci build"

on:
  pull_request:
  push:
    branches:
      - "master"

jobs:
  build:
    name: PHP ${{ matrix.php-versions }}
    runs-on: ubuntu-latest
    strategy:
      fail-fast: false
      matrix:
        php-versions: ['7.2', '7.3', '7.4']
    steps:
      - name: Setup PHP Action
        uses: shivammathur/[email protected]
        with:
          extensions: intl
          php-version: "${{ matrix.php-versions }}"
          coverage: pcov
      - name: Checkout
        uses: actions/checkout@v2
      - name: "Validate composer.json and composer.lock"
        run: "composer validate"
      - name: "Install dependencies"
        run: "composer install --prefer-dist --no-progress --no-suggest && composer development-enable"
      - name: "Run test suite"
        run: "vendor/bin/phpunit --coverage-clover=coverage.xml"
      - name: Upload coverage to Codecov
        uses: codecov/codecov-action@v1
        with:
          token: ${{ secrets.CODECOV_TOKEN }}
          file: ./coverage.xml
          flags: tests
          name: codecov-umbrella
          yml: ./codecov.yml
          fail_ci_if_error: true
That’s it. To trigger the Continues Integration, we can push a commit to the repository.
When its succeed (ci build green), we can then display coverage badge, eg at README.md like the following:
[](https://codecov.io/gh/{your github user}/{your github repo})
that will show:
![]()
Install PHP 7.4 in macOS Sierra with Homebrew
So, you’re still using macOS Sierra because of old mac hardware or whatever reason. You can still using Homebrew, while you will get the following warning:
Warning: You are using macOS 10.12.
We (and Apple) do not provide support for this old version.
You will encounter build failures with some formulae.
Please create pull requests instead of asking for help on Homebrew's GitHub,
Discourse, Twitter or IRC. You are responsible for resolving any issues you
experience while you are running this old version.
Read above warning carefully before continue, as you will responsible yourself if experiencing issues.
First, if you are still want to try it, what you need to do is verify that you have latest Xcode 9.2 that support macOS Sierra:
$ /usr/bin/xcodebuild -version

Xcode 9.2
Build version 9C40b
If you’re still using older version, you can first remove the Application/Xcode directory and download manually (yes, manually) as you cannot update via App Store from the following URI:
That’s about 5GB file. After downloaded, you can extract to /Application that will be about 10GB contents, if you’re using old mac hardware, it may take a while. After it extracted, you need to accept its license by run command:
$ sudo xcodebuild -license accept
If everything is correct, you can update and upgrade Homebrew with commands:
$ brew update
$ brew upgrade
When done, you can verify that some “probably” dependencies needs install/update with run brew doctor until it only show 1 warning, which is outdated operating system:
$ brew doctor

Please note that these warnings are just used to help the Homebrew maintainers
with debugging if you file an issue. If everything you use Homebrew for is
working fine: please don't worry or file an issue; just ignore this. Thanks!

Warning: You are using macOS 10.12.
We (and Apple) do not provide support for this old version.
You will encounter build failures with some formulae.
Please create pull requests instead of asking for help on Homebrew's GitHub,
Discourse, Twitter or IRC. You are responsible for resolving any issues you
experience while you are running this old version.
Now, we can follow to install php 7.4 for it at https://getgrav.org/blog/macos-catalina-apache-multiple-php-versions which the example is for macOS Catalina, that the steps can be used in macOS Sierra.
On PHP Installation section steps, run install php 7.4 command via Homebrew:
$ brew install [email protected]
And that’s it, if everything is correct, now you have PHP 7.4.
Bonus
You can add Xdebug extension with clone latest xdebug from its repository at https://github.com/xdebug/xdebug :
$ git clone https://github.com/xdebug/xdebug
$ cd xdebug
$ git checkout 2.8.1
$ phpize
$ ./configure --enable-xdebug
$ sudo make
$ sudo make install
After it, add the following line to /usr/local/etc/php/7.4/php.ini
zend_extension="/usr/local/Cellar/php/7.4.0/pecl/20190902/xdebug.so"
zend_extension pointed to real location of xdebug.so installed above.
The alternative can be via pecl command:
$ sudo pecl install xdebug
If everying correct, you will get PHP 7.4 with Xdebug 2.8.1 like the following php -v command output:

Create templated 404 page in Slim 4 with CallableResolver
In Slim 4 Skeleton, the 404 response handled in App\Application\Handlers\HttpErrorHandler::respond() which check against Slim\Exception\HttpNotFoundException. We can create a templated 404 page for it with utilize Slim\CallableResolver via callableResolver property which can resolve the callable handler. I assume that we are using Twig template engine, and already has setup of Twig service like in my previous post.
We can create a not found handler like the following in src/Application/Handlers/NotFoundHandler.php
<?php
// src/Application/Handlers/NotFoundHandler.php
declare(strict_types=1);

namespace App\Application\Handlers;

use Psr\Http\Message\ResponseInterface;
use Slim\Views\Twig;

use function compact;

class NotFoundHandler
{
    private $view;

    public function __construct(Twig $view)
    {
        $this->view = $view;
    }

    public function __invoke(
        ResponseInterface $response,
        string            $message
    ): ResponseInterface {
        return $this->view->render($response, '404.html.twig', compact('message'));
    }
}
We can create a view based on it like the following at templates/404.html.twig:
{# templates/404.html.twig #}

{% extends "layout.html.twig" %}
{% block title '404 - '~parent() %}

{% block body %}

{{ message }}

{% endblock %}
Now, in App\Application\Handlers\HttpErrorHandler::respond(), we can check when $exception instanceof HttpNotFoundException to make a self called resolved NotFoundHandler.
// src/Application/Handlers/HttpErrorHandler.php
// ...
    protected function respond(): Response
    {
        // ...
        if ($exception instanceof HttpNotFoundException) {
            $response = $this->responseFactory->createResponse($statusCode);
            return ($this->callableResolver->resolve(NotFoundHandler::class)(
                $response,
                $exception->getMessage()
            ));
        }
        // ...
    }
// ...
So, when the Slim\Exception\HttpNotFoundException thrown, it will shown the 404 page with brought the message passed into it like the following:
Bonus
We can create a handling against Request as well, eg: show 404 templated page only when request doesn’t has Accept: application/json or X-Requested-With:XmlHttpRequest header, so, we can modify like the following:
// src/Application/Handlers/HttpErrorHandler.php
// ...
    protected function respond(): Response
    {
        // ...
        if ($exception instanceof HttpNotFoundException) {
            $isAppJsonAccept  = $this->request->getHeaderLine('Accept')           === 'application/json';
            $isXmlHttpRequest = $this->request->getHeaderLine('X-Requested-With') === 'XmlHttpRequest';

            if (! $isAppJsonAccept && ! $isXmlHttpRequest) {
                $response = $this->responseFactory->createResponse($statusCode);
                return ($this->callableResolver->resolve(NotFoundHandler::class)(
                    $response,
                    $exception->getMessage()
                ));
            }

            // already return early, no need else
            $error->setType(ActionError::RESOURCE_NOT_FOUND);
        }
        // ...
    }
// ...
So, for example, when called via ajax, it will show like the following:

Create “Abstract Factory” service in PHP-DI with RequestedEntry and Wildcards
If you’re familiar with Zend Framework’s servicemanager, you may already used the abstract factory which acts as limbo when service not registered. When the pattern checked is matched, it will try to create service based on it, automatically.
We can do that in PHP-DI as well. For example, we are experimenting with my previous post on DDD in slim 4 framework:
├───Application
├───Domain
│   ├───DomainException
│   │       DomainException.php
│   │       DomainRecordNotFoundException.php
│   │
│   ├───Post
│   │       Post.php
│   │       PostNotFoundException.php
│   │       PostRepository.php
│
└───Infrastructure
    └───Persistence
        ├───Post
        │       ZendDbPostRepository.php
We are going to create service with pattern “App\Domain\Post\PostRepository” from App\Infrastructure\Persistence namespace with as an object from “App\Infrastructure\Persistence\Post\ZendDbPostRepository”. In PHP-DI, we can combine both RequestedEntry and Wildcards definitions, the service definition will be like the following:
<?php
declare(strict_types=1);

use DI\ContainerBuilder;
use Psr\Container\ContainerInterface;
use Zend\Db\Adapter\AdapterInterface;
use Zend\Db\ResultSet\HydratingResultSet;
use Zend\Db\TableGateway\TableGateway;
use Zend\Hydrator\ObjectPropertyHydrator;
use DI\Factory\RequestedEntry;

return function (ContainerBuilder $containerBuilder) {

    $containerBuilder->addDefinitions([

        'App\Domain\*\*Repository' => function (RequestedEntry $entry, ContainerInterface $c) {

            // get entity class name,
            // eg: "Post" by service named "App\Domain\Post\PostRepository"
            preg_match(
                '/(?<=App\\\\Domain\\\\)([A-Z][a-z]{1,})(?=\\\\\1Repository)/',
                $entry->getName(),
                $matches
            );
            $entity          = current($matches);
            $fullEntityClass = 'App\Domain' . str_repeat('\\' . $entity, 2);
            $fullRepoClass   = 'App\Infrastructure\Persistence' . '\\' . $entity . '\ZendDb' . $entity . 'Repository';

            $tableGateway = new TableGateway(
                $fullEntityClass::TABLE,
                $c->get(AdapterInterface::class),
                null,
                new HydratingResultSet(new ObjectPropertyHydrator(), new $fullEntityClass)
            );

            return new $fullRepoClass($tableGateway);
        },

    ]);
};
That’s it!
Apply Twig Extension via Middleware in Slim 4
If we use Slim 4, we can use Twig for template engine, and there is slim/twig-view for that. However, when dealing with extension, especially routing and uri related stuff, we can’t use a way like in Slim 3, at least, by default, at least, what I know right now. There is an alternative way to add twig extension, which is via Middleware!
First, I assume that the Twig service already registered in app/dependencies.php:
<?php
// app/dependencies.php
declare(strict_types=1);

use DI\ContainerBuilder;
use Psr\Container\ContainerInterface;
use Slim\Views\Twig;

return function (ContainerBuilder $containerBuilder) {
    $containerBuilder->addDefinitions([
        // ...
        Twig::class => function (ContainerInterface $c) {
            return new Twig(__DIR__ . '/../templates', [
                'cache' => __DIR__ . '/../var/cache',
                'auto_reload' => true
            ]);
        },
        // ...
    ]);
};
Now, we need to add extension, which consume Slim\Routing\RouteCollector and Slim\Psr7\Uri instance. Now, we can create middleware on the fly in app/middleware.php, eg: via anonymous class that implements Psr\Http\Server\MiddlewareInterface.
<?php
// app/middleware.php
declare(strict_types=1);

// ...
use Psr\Http\Message\ResponseInterface;
use Psr\Http\Message\ServerRequestInterface;
use Psr\Http\Message\UriInterface;
use Psr\Http\Server\MiddlewareInterface;
use Psr\Http\Server\RequestHandlerInterface;
use Slim\App;
use Slim\Routing\RouteCollector;
use Slim\Views\Twig;
use Twig\Extension\AbstractExtension;
use Twig\TwigFunction;
// ...

return function (App $app) {

    // ...
    $container = $app->getContainer();
    $twig      = $container->get(Twig::class);
    $router    = $app->getRouteCollector();

    $app->add(new class ($twig, $router) implements MiddlewareInterface {

        private $twig;
        private $router;

        public function __construct(Twig $twig, RouteCollector $router)
        {
            $this->twig   = $twig;
            $this->router = $router;
        }

        public function process(ServerRequestInterface $request, RequestHandlerInterface $handler): ResponseInterface
        {
           $uri = $request->getUri();
           $this->twig->addExtension(new class ($this->router, $uri) extends AbstractExtension {

                private $router;
                private $uri;

                public function __construct(RouteCollector $router, UriInterface $uri)
                {
                    $this->router = $router;
                    $this->uri    = $uri;
                }

                public function getFunctions()
                {
                    return [
                        new TwigFunction('base_path', function () : string {
                            return $this->router->getBasePath();
                        }),
                        new TwigFunction('full_url_for', function (string $routeName, array $data = [], array $queryParams = []) : string {
                            return $this->router->getRouteParser()->fullUrlFor($this->uri, $routeName, $data, $queryParams);
                        }),
                    ];
                }

           });
           return $handler->handle($request);
        }
    });
    // ...
};
In its __construct, we inject with Slim\Views\Twig and Slim\Routing\RouteCollector instance. In its process() function, we call Slim\Views\Twig::addExtension() function to add extension, which we can create another anonymous class that extends Twig\Extension\AbstractExtension, injected with Slim\Routing\RouteCollector and Slim\Psr7\Uri (which pulled from object instance of Psr\Http\Message\ServerRequestInterface), which we can add getFunctions() method to add twig functions.
That’s it, in above example, I added base_path and full_url_for function which now can be used in twig view, eg:
    {# display base path url #}
    {{ base_path() }}

    {# display full url for route with name "postpagedetail" with parameter id = 1 and query parameter action = view  #}
    {{ full_url_for('postpagedetail', { 'id': 1 }, { 'action': 'view' }) }}
You are feeling have too much code in
app/middleware.php? Of course, you can create a separate class for it!
Using DDD architecture with zend-db in Slim 4
Slim 4 provides a skeleton that uses DDD directory style. By this, we can implement DDD architecture easier. Let’s try with zend-db for it. In this post, I assume that you already uses Twig as view template engine like in previous post.
Requirements
First, we need to require zend-db via composer:
$ composer require zendframework/zend-db \
    zendframework/zend-hydrator \
    --sort-packages
We are going to make pages to display post table record(s) with the following data:
# create and use database
create database slim;
use slim;

# create table
create table post(id int not null primary key auto_increment, title varchar(50) not null, content text not null);

# insert data
insert into post(title, content) values('first post', 'first post content');
insert into post(title, content) values('second post', 'second post content');
Database Configuration
<?php
// app/settings.php
// ...
return function (ContainerBuilder $containerBuilder) {
    $containerBuilder->addDefinitions([
            // ...
            'db' => [
                'username' => 'root',
                'password' => '',
                'driver'   => 'pdo_mysql',
                'database' => 'slim',
                'host'     => 'localhost',
                'driver_options' => [
                    \PDO::MYSQL_ATTR_INIT_COMMAND => 'SET NAMES \'UTF8\'',
                ],
            ],
            // ...
        ],
    ]);
};
We can register database configuration at app/settings.php, for example, use MySQL database as configured above.
DB Service
We are using service named Zend\Db\Adapter\AdapterInterface, so we can register as follow in app/dependencies.php:
<?php
// app/dependencies.php
declare(strict_types=1);

use DI\ContainerBuilder;
use Psr\Container\ContainerInterface;
use Zend\Db\Adapter\Adapter;
use Zend\Db\Adapter\AdapterInterface;

return function (ContainerBuilder $containerBuilder) {
    $containerBuilder->addDefinitions([
        // ...
        AdapterInterface::class => function (ContainerInterface $c) {
            return new Adapter($c->get('settings')['db']);
        },
        // ...
    ]);
};
Domain
a. Post class:
<?php
// src/Domain/Post/Post.php
declare(strict_types=1);

namespace App\Domain\Post;

final class Post
{
    public $id;
    public $title;
    public $content;

    public const TABLE = 'post';

    public function __construct(Post $post = null)
    {
        if ($post instanceof Post) {
            $this->id      = +$post->id;
            $this->title   = ucwords($post->title);
            $this->content = ucfirst($post->content);
        }
    }
}
b. PostRepository interface:
<?php
// src/Domain/Post/PostRepository.php
declare(strict_types=1);

namespace App\Domain\Post;

interface PostRepository
{
    public function findAll(): array;
    public function findPostOfId(int $id): Post;
}
c. PostNotFoundException class:
<?php
// src/Domain/Post/PostNotFoundException.php
declare(strict_types=1);

namespace App\Domain\Post;

use App\Domain\DomainException\DomainRecordNotFoundException;

class PostNotFoundException extends DomainRecordNotFoundException
{
    public $message = 'The post you requested does not exist.';
}
Infrastructure
We can create a repository that implements App\Domain\Post\PostRepository, eg: named ZendDbPostRepository:
<?php
// src/Infrastructure/Persitence/Post/ZendDbPostRepository.php
declare(strict_types=1);

namespace App\Infrastructure\Persistence\Post;

use function compact;

use App\Domain\Post\Post;
use App\Domain\Post\PostNotFoundException;
use App\Domain\Post\PostRepository;
use Zend\Db\TableGateway\AbstractTableGateway;

class ZendDbPostRepository implements PostRepository
{
    private $tableGateway;

    public function __construct(AbstractTableGateway $tableGateway)
    {
        $this->tableGateway = $tableGateway;
    }

    public function findAll(): array
    {
        $results = $this->tableGateway->select();
        $posts   = [];

        foreach ($results as $result) {
            $posts[] = new Post($result);
        }

        return $posts;
    }

    public function findPostOfId(int $id): Post
    {
        $current = $this->tableGateway->select(compact('id'))->current();
        if (! $current) {
            throw new PostNotFoundException();
        }

        return new Post($current);
    }
}
The Repository class above needs to be registered to app/repositories.php:
<?php
// app/repositories.php
declare(strict_types=1);

use App\Domain\Post\Post;
use App\Domain\Post\PostRepository;
use App\Infrastructure\Persistence\Post\ZendDbPostRepository;
use DI\ContainerBuilder;
use Psr\Container\ContainerInterface;
use Zend\Db\Adapter\AdapterInterface;
use Zend\Db\ResultSet\HydratingResultSet;
use Zend\Db\TableGateway\TableGateway;
use Zend\Hydrator\ObjectPropertyHydrator;

return function (ContainerBuilder $containerBuilder) {
    $containerBuilder->addDefinitions([
        // ...
        PostRepository::class => function (ContainerInterface $c) {
            $tableGateway = new TableGateway(
                Post::TABLE,
                $c->get(AdapterInterface::class),
                null,
                new HydratingResultSet(new ObjectPropertyHydrator(), new Post())
            );

            return new ZendDbPostRepository($tableGateway);
        },
        // ...
    ]);
};
Application
For application, we can create 2 classes to display all posts and display post by id.
a. All posts via PostPage class
<?php
// src/Application/Page/PostPage.php

declare(strict_types=1);

namespace App\Application\Page;

use App\Domain\Post\PostRepository;
use Psr\Http\Message\ResponseInterface;
use Psr\Http\Message\ServerRequestInterface;
use Psr\Http\Server\RequestHandlerInterface;
use Slim\Psr7\Response;
use Slim\Views\Twig;

class PostPage implements RequestHandlerInterface
{
    private $view;
    private $postRepository;

    public function __construct(Twig $view, PostRepository $postRepository)
    {
        $this->view           = $view;
        $this->postRepository = $postRepository;
    }

    public function handle(ServerRequestInterface $request) : ResponseInterface
    {
        return $this->view->render(
            new Response(),
            'page/post/index.html.twig',
            [
                'posts' => $this->postRepository->findAll(),
            ]
        );
    }
}
b. Post By Id via PostPageDetail class
<?php
// src/Application/Page/PostPageDetail.php

declare(strict_types=1);

namespace App\Application\Page;

use App\Domain\DomainException\DomainRecordNotFoundException;
use App\Domain\Post\PostRepository;
use Psr\Http\Message\ResponseInterface;
use Psr\Http\Message\ServerRequestInterface;
use Psr\Http\Server\RequestHandlerInterface;
use Slim\Exception\HttpNotFoundException;
use Slim\Psr7\Response;
use Slim\Views\Twig;

class PostPageDetail implements RequestHandlerInterface
{
    private $view;
    private $postRepository;

    public function __construct(Twig $view, PostRepository $postRepository)
    {
        $this->view           = $view;
        $this->postRepository = $postRepository;
    }

    public function handle(ServerRequestInterface $request) : ResponseInterface
    {
        $id = +$request->getAttribute('id');
        try {
            $post = $this->postRepository->findPostOfId($id);
        } catch (DomainRecordNotFoundException $e) {
            throw new HttpNotFoundException($request, $e->getMessage());
        }

        return $this->view->render(
            new Response(),
            'page/post/detail.html.twig',
            [
                'post' => $post,
            ]
        );
    }
}
Routing
Now, time to register routing:
<?php
// app/routes.php
declare(strict_types=1);

use App\Application\Page\PostPage;
use App\Application\Page\PostPageDetail;
use Slim\App;
use Slim\Handlers\Strategies\RequestHandler;

return function (App $app) {
    $routeCollector = $app->getRouteCollector();
    $routeCollector->setDefaultInvocationStrategy(
        new RequestHandler(true)
    );

    $app->get('/posts', PostPage::class);
    $app->get('/posts/{id:[0-9]+}', PostPageDetail::class);
};
View
a. templates/page/post/index.html.twig:
{# templates/page/post/index.html.twig #}
{% extends "layout.html.twig" %}

{% block body %}

    {% for post in posts %}
        <h3> {{ post.title }} </h3>

        <p> {{ post.content }} </p>
    {% endfor %}

{% endblock %}
b. templates/page/post/detail.html.twig:
{# templates/page/post/detail.html.twig #}
{% extends "layout.html.twig" %}

{% block body %}

    <h3> {{ post.title }} </h3>
    <p>  {{ post.content }} </p>

{% endblock %}
Run PHP Server
php -S localhost:8080 -t public
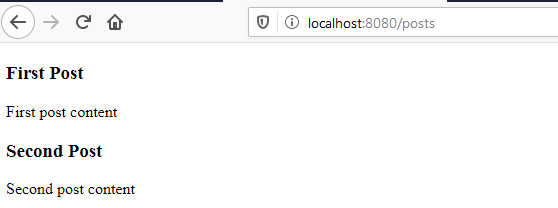
Now, we can see the pages, http://localhost:8080/posts for all posts:
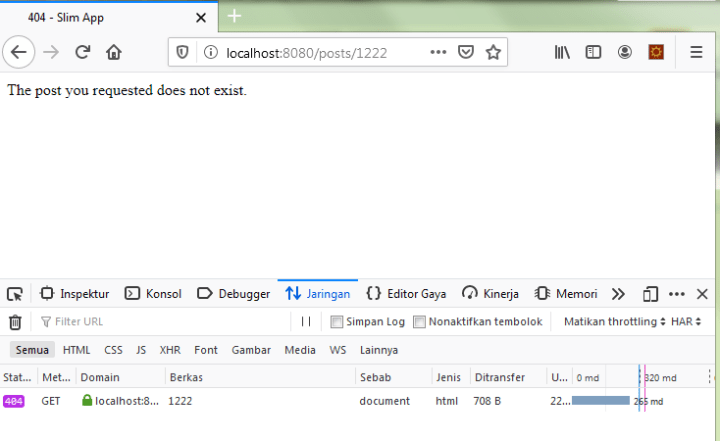
and http://localhost:8080/posts/1 for detail post:


leave a comment