
Pre-requisites
-
Ensure that you have AWS account.
-
Ensure that you have installed Node.js in your machine. Refer to this link if you have not installed it yet.
-
Ensure that you have installed Ionic framework, Android SDK and/or XCode in your machine. Refers to this link if you have not installed Ionic yet.
-
Ensure that you have installed stable version of Serverless framework (version 0.5.6). If not, run this command to install it:
npm install -g serverless@^0.5.6 -
Login into your AWS Management Console, create a new IAM account and attach AdministratorAccess policy into the created IAM Account.

- Ensure that you have written the created IAM account’s ACCESS KEY ID & Secret access key. We are going to use these in later steps.
Prepare a Serverless project
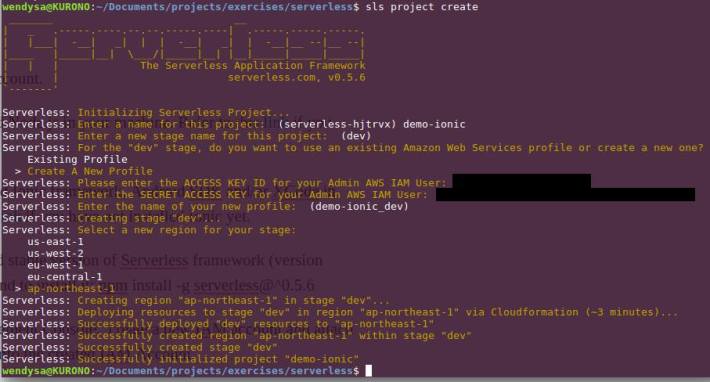
- In a terminal box, run
sls project createcommand. Notice that running this command creates a new Cloud Formation’s template in your AWS account for specified region (in this sample, we choose ap-northeast-1 AWS region) and also created a new folder in your current directory.

-
Change directory to the folder created by running command in prior step, then running this command:
npm install serverless-client-s3 --saveto installserverless-client-s3plugin -
Create folder
client/dist. In mac/linux command shell, we can do this by running this commandmkdir -p client/dist. -
Copy all files inside your Ionic project’s /www folder into
client/distfolder , created in prior step.

- In the serverless project’s root directory, edit & update the
s-project.jsonfile by adding these following changes:

Deploy the Ionic App into AWS S3 Bucket
- In the serverless project’s root directory, run
sls client deploy -s stageName -r regionNamecommand to deploy the Ionic app into AWS S3 bucket for specific stage & region. Example:sls client deploy -s dev -r ap-northeast-1to deploy the app into Tokyo data center and labeled asdevstage. This might take a while to finish.

- Once it’s done, notice your AWS S3 console. There is a new bucket created in the list where its name is matched with the bucketname setting we define in our
s-project.jsonfile. View its content by clicking the folder’s link. Notice that the bucket contains all of files of our Ionic app, we copied in client/dist folder in prior step.

-
Click Properties button on the page, and click ‘Enable Web Hosting’ accordion button to display url link of the deployed web application.
-
Click the url link to display our Ionic app. Ensure that no error happens and our Ionic app’s landing page is displayed successfully.


The Flaw
The latest version of serverless-s3-client plugin (version 2.0) deploys the web app to s3 bucket with no restriction access policy, which mean it is accessible to anyone / public. While this is not a problem to us (the developers), to our customers, this is mostly undesired. Because they might not want people outside the developer team and themselves, to look at our current works on the deployed Ionic app.
At the moment, restricting accesses to the S3 bucket, require us to add access Policy on it manually through S3 web console. There are couple of guys whom created Pull Request on serverless-s3-client plugin’s github page which allow us to define S3 policy bucket inside s-project.json file. Once the serverless maintainers reviewed & merge these Pull Request, I will update this article with steps to add the s3 bucket’s access restriction policy.
