Serverless AWS Lambda – Part 1: A Quickstart for Beginners

This article covers steps for creating your first AWS Lambda service & functions through using Serveless framework. Before following these steps, ensure that you have already had AWS Account.

Pre-requisites:

  • Ensure that you have installed latest LTS version of Node.JS. Visit this link to finding out how to install it in your machine: https://nodejs.org/en/
  • Ensure that you have installed Serverless framework. If not, run this command for installing it:
    sudo npm install serverless -g

    Then, run this command to check whether serverless has been installed successfully or not:

    serverless -v
  • Create a new or reuse existing IAM User account. Ensure that you have given AdministratorAccess to the user account. If you are not sure how to do this, follow the guidance of how to do it in this document
  • Upon created a new IAM User account, take note the displayed API Key & Secret Key of the new IAM Account.
  • Follow the guidance in this document to configure the aws credentials (API Key & Secret Key) that you have noted in prior step. Serverless framework need this information so that it could deploy.

Create your first service:

  • Once we have completed all of required pre-requisites, create a new folder, go into the new folder then run this command to begin creating your 1st service:
    serverless create --template  --path

    . Example:

    serverless create --template aws-nodejs --path blog

    serverless_create_first_service
    Creating 1st Service
  • When creating a new service is finished, we will see file structure in the project folder, as shown in this following screenshot:
    • serverless.yml – a YAML file where we will define configurations for our service, such as AWS Resources (S3, DynamoDB, etc), Region, Nodejs Runtime, we want to use and also our service’s functions configurations.
    • handler.js – Initial Javascript file , created by serverless, that is supposed to be the place where we will write our function’s logic. Rename the file’s name with name of entity that our function interacts with (e.g. blog, product, task, etc).
serverless_initial_project_structure
Initial Project’s Structure
  • Open the serverless.yml file and edit these Configuration sections: lambda function’s name, handler method’s name, associated HTTP path & verb.

serverless_configure_function_1

serverless_configure_function_2
serverless.yml – Configure service’s function
  • Open the handler javascript file. Let’s write code inside the exported function whose the logic is simple – just returning an array of JSON objects
serverless_handler_get_function_1
handler node.js – It retrieves the data, wrap the result in response’s body and return
serverless_handler_get_function
handler node.js code – helper method that is supposed for retrieving the data from storage
  • Before we deploy the lambda function, let’s invoke it in our local machine through executing this command:
    serverless invoke local --function
     e.g. serverless invoke local --function blogs 
    

    Ensure that no error happens and we notice correct result is printed on terminal.

Deploy the service to AWS Lambda

We have implemented simple logic inside Lambda service’s handler and then invoke it locally using serverless invoke command. Now, we need to deploy our lambda through running this command in terminal :

serverless deploy --stage  --region .

Example:

serverless deploy --stage dev --region ap-shouteast-1
15585216_10209556096116675_171074867079464586_o
Deploying Lambda to AWS through calling serverless deploy command
When deployment is successful, we should get the URL Endpoint of our deployed service and there should be no error message appear. If we don’t see the URL Endpoint, there should be a typo inside serverless.yaml (check the events section , if you type it as event, this issue occurs).

This is result that you should get when we browse the endpoint or invoke it using Postman

serverless_invoke_lambda_in_postman
Invoke the Lambda in Postman

How the Serverless deploys our Lambda function to AWS

When we invoked serverless deploy command, serverless zipped our function file(s) and also created a file for configuring AWS CloudFormation stack setting (cloud formation template). Serverless also created a new AWS S3 bucket using our AWS API Key & Secret Key, then upload the zip file & cloudformation setting file into the created AWS S3 Bucket.

serverless_files_in_s3
Lambda files uploaded by Serverless in AWS S3 Bucket
Once the file uploading process is done, Serverless manage the creation of our Lambda function & its API Gateway Endpoint through AWS CloudFormation service. This is done based on the uploaded cloud formation template file. Upon finished the deployment, you could see the created AWS Resources which build up your deployed service through browsing the Lambda , CloudFormation, API Gateway section pages, on your AWS web console.

Removing Deployed Service

In case you need to destroy your deployed lambda service, the common way to do this is through destroying the resources that built your service, through AWS Web console page and then do these procedures: Open S3 page and destroy the Bucket which build the service, Destroy CloudFormation stack, Destroy the Lambda & then the related API Gateway. Serverless provides a quickest way for destroying our service along with its AWS resources. We can do this through invoking serverless remove command, inside the serverless project folder.

serverless_remove_lambda
Removing Lambda function and its claimed AWS Resource

Conclusion

Serverless has simplified the efforts of writing AWS Lambda Function, deploying & hosting the function as an API Gateway resource endpoint. By hosting our node.js-based API on AWS Lambda, we do not need to setup an EC2 instance or other kind of virtual private server just for hosting our code. Through using Serverless & AWS Lambda, we shift this responsibility to AWS and thus, free us from responsibility of setup our own server. In the future article, we will cover steps of how to integrate our Lambda service with AWS Data storage services such as SimpleDB or DynamoDB.

Host an Ionic app into AWS S3 Bucket using Serverless framework

When I was working on a Mobile App’s front end development project, we were asked by our customer to deploy the ionic app into a public server ( as a Web SPA ), so that they could access & playing around with it immediately, in their browsers. Ionic framework comes with a built in web server which allow you to run the app as a Web application ( through invoking `ionic serve` command). Then, this part was not a problem to us. However, we should figure out where & how we were going to deploy the ionic app to. That time, we suggested our customer, to deploy the ionic app into our AWS EC2 Instance/Elasticbeanstalk or into their own on premise server.
Fast forward back to today, we have more options which allow us to deploy an Ionic app (also other web SPA like angular JS or React) into AWS S3 bucket and host the app in there. This is possible since AWS S3 bucket has capability to host static web page. Then, we have several tools to help us doing this: through AWS S3 Web Console, AWS SDK CLI tool or Serverless framework with S3 Client plugin.
In the time I wrote this article, I am working with Backend team which use Serverless framework in our project. Based on this situation, I am curious with this tool’s ability to deploy front end web Single Page Application (SPA) like Ionic, into an S3 bucket. In the next sections, we will cover steps of how to do this in Serverless framework’s way.


Pre-requisites

  • Ensure that you have AWS account.
  • Ensure that you have installed Node.js in your machine. Refer to this link if you have not installed it yet.
  • Ensure that you have installed Ionic framework, Android SDK and/or XCode in your machine. Refers to this link if you have not installed Ionic yet.
  • Ensure that you have installed stable version of Serverless framework (version 0.5.6). If not, run this command to install it: npm install -g serverless@^0.5.6
  • Login into your AWS Management Console, create a new IAM account and attach AdministratorAccess policy into the created IAM Account.

ionic_s3_1

  • Ensure that you have written the created IAM account’s ACCESS KEY ID & Secret access key. We are going to use these in later steps.


Prepare a Serverless project

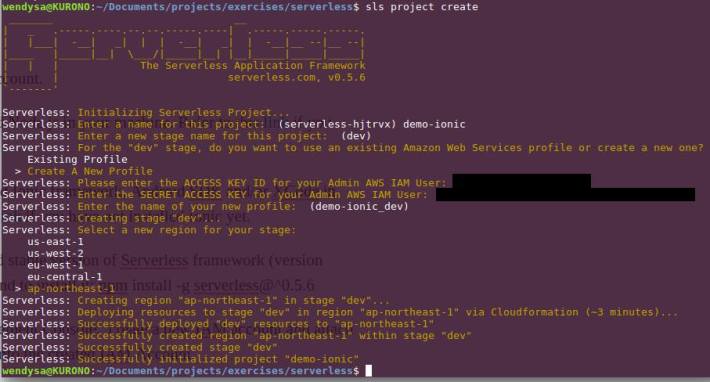
  • In a terminal box, run sls project create command. Notice that running this command creates a new Cloud Formation’s template in your AWS account for specified region (in this sample, we choose ap-northeast-1 AWS region) and also created a new folder in your current directory.

ionic_s3_2

ionic_s3_3

  • Change directory to the folder created by running command in prior step, then running this command: npm install serverless-client-s3 --save to install serverless-client-s3 plugin
  • Create folder client/dist. In mac/linux command shell, we can do this by running this command mkdir -p client/dist.
  • Copy all files inside your Ionic project’s /www folder into client/dist folder , created in prior step.

  • In the serverless project’s root directory, edit & update the s-project.json file by adding these following changes:


Deploy the Ionic App into AWS S3 Bucket

  • In the serverless project’s root directory, run sls client deploy -s stageName -r regionName command to deploy the Ionic app into AWS S3 bucket for specific stage & region. Example: sls client deploy -s dev -r ap-northeast-1 to deploy the app into Tokyo data center and labeled as dev stage. This might take a while to finish.

  • Once it’s done, notice your AWS S3 console. There is a new bucket created in the list where its name is matched with the bucketname setting we define in our s-project.json file. View its content by clicking the folder’s link. Notice that the bucket contains all of files of our Ionic app, we copied in client/dist folder in prior step.

  • Click Properties button on the page, and click ‘Enable Web Hosting’ accordion button to display url link of the deployed web application.
  • Click the url link to display our Ionic app. Ensure that no error happens and our Ionic app’s landing page is displayed successfully.


The Flaw

The latest version of serverless-s3-client plugin (version 2.0) deploys the web app to s3 bucket with no restriction access policy, which mean it is accessible to anyone / public. While this is not a problem to us (the developers), to our customers, this is mostly undesired. Because they might not want people outside the developer team and themselves, to look at our current works on the deployed Ionic app.

At the moment, restricting accesses to the S3 bucket, require us to add access Policy on it manually through S3 web console. There are couple of guys whom created Pull Request on serverless-s3-client plugin’s github page which allow us to define S3 policy bucket inside s-project.json file. Once the serverless maintainers reviewed & merge these Pull Request, I will update this article with steps to add the s3 bucket’s access restriction policy.
