
How to Configure Order Sync Between Sites?
Basically, all you need to do is install the plugin on a sending store(s) and connect a target store(s) to which you’re about to synchronize your orders in the plugin settings.
It is the only required step. All the other plugin configurations are optional.
1. Connect stores in the plugin settings
The plugin integrates into your WooCommerce store seamlessly and has a look and feel like it is a standard WooCommerce functionality.
It means that to find the plugin settings, we need to go to WooCommerce > Settings and then to the Order Sync tab.
Here, let’s continue to the “Stores” section:

You need to get a Consumer Key and Consumer Secret from a target store to which you’re going to sync WooCommerce orders from this initial store. You can create them in WooCommerce settings as well, in the “Advanced” tab; read more about how.
Once a store is added in the plugin settings, by default, orders are going to be synced to it automatically right after either being placed by a customer or created manually via the WooCommerce admin dashboard. But you can turn off the auto mode in the plugin settings. Read more about it below.
2. Order synchronization settings
There is also a page with some basic synchronisation settings:

On this page, you can manage:
- Allowed Order Statuses – by default, the plugin only synchronises orders with “Processing” and “Completed” statuses, but if you want, you can allow other statuses as well.
- Order Deletion – you can also make the plugin automatically delete or move to trash synchronised orders from a target store once they’re deleted from an original store.
- Auto Mode – by default, orders are going to be synced to all the connected stores automatically. However, you can turn it off here and then sync each order individually to a selected store either using order actions or a bulk sync tool.
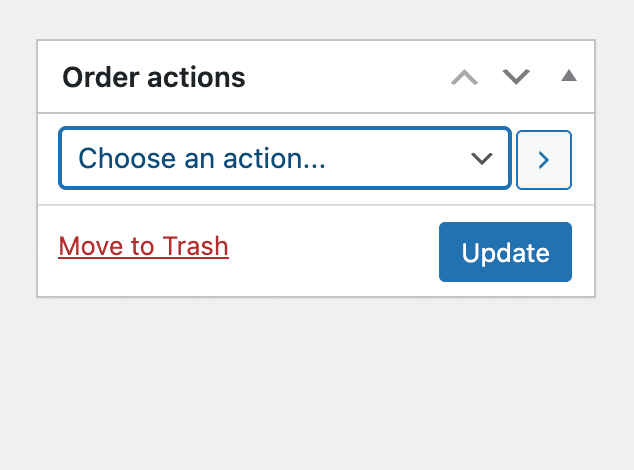
When “Auto Mode” is off, you can find new order actions when editing orders:
If you switch to the “Fields” tab, here, you can allow the plugin to sync customers and products along with the orders:

If you want to automatically create products from synced orders on target stores, you will also need my Simple WP Crossposting plugin installed. It is a completely optional step because the order items will be synced in any way.
3. Both ways order sync configuration
In case you need to sync changes in orders made on the “Store 2” back to the “Store 1”, you can easily do it by installing the plugin on the “Store 2” as well.
For example, you’re syncing orders from multiple stores to a single master store where you manage order statuses, and you need order status updates to be pushed back to every original store.
4. Configure order filter by source
When you sync WooCommerce orders between sites or to a single target site, you may not want to install the plugin and register one more license for the target site as well, and you don’t need to.
The plugin uses WooCommerce order attribution functionality in order to mark orders from which store they were synced (don’t forget to make sure that the Order Attribution feature is enabled in Settings > Advanced > Featured).
You can find this information in the “Origin” column or in the “Order attribution” meta box when editing an order.

However, by default, WooCommerce doesn’t allow you to configure order filters by the order attribution information (by source). But you can easily do it by installing my simple, free plugin Order Filter by Source for WooCommerce from the official WordPress repository.
Bulk import all existing orders
You can also synchronise multiple WooCommerce orders at once using the tool, which is available in “WooCommerce > Status > Tools”.

Logs
The plugin uses the standard WooCommerce logging functionality, so you can find the logs in “WooCommerce > Status > Logs”.
If you noticed that some orders aren’t syncing, first of all, please check the logs, for example:
