Tag Archives: mac

Jenkins Build Scripts For macOS 12 Monterey

I automate part of my macOS builds for new OS releases. I use a simple script (_version_check.sh) that I update with the latest release, ie … 12.2.1. Then I commit it to my repo and fire a webhook to Jenkins. Jenkins takes the version number and checks to see if it’s available via the "softwareupdate" command.

softwareupdate --fetch-full-installer --full-installer-version "$version_to_download"

If it is, it downloads the full installer app, “Install macOS Monterey.app“, to the Applications folder. When that is successful, I have a second Jenkins job that converts the “.app" to a “.dmg" . I archive the “.dmg" and use it in automated workflows with tools like MDS

Scripts are on Github

Check OSX Mavericks Powersettings With Shell Script

Instead of using puppet or profiles to check and set the OS X energy settings. I also wrote a simple script that checks the current status of “Computer Sleep”. If it’s set to anything other then “Never” go to sleep, it runs my pmset command and sets the machine to my desired settings.

#!/bin/sh
#version 1.0

#checks the curret status of "Computer Sleep", if it's not set to 0(never sleep), then it runs the pmset command
# sets display sleep to 30 minutes
# sets computer sleep = never
# sets hard drive sleep - never
# sets wake for network access = true
# sets autorestart after power failure = true


if [[ `pmset -g | grep -w sleep |awk '{print $2}'` -gt 0 ]]; then
    
    echo "Changing Power Settings"
    pmset -c displaysleep 30 sleep 0 disksleep 0 womp 1 autorestart 1

    else
        echo "Settings are correct"
    fi

Backing Up Minecraft on Mac OS X

My son is supper big into Minecraft, and it always comes up whenever there is a new update … How do I backup my Minecraft folder?

I finally got tired of navigating to the Minecraft folder in the User/Library/Application Support folder. So I made a simpe script that can be run just by double clicking an executable shell script.

Using the Command Line to make the Backup

1. First on the desktop select “Go”, “Go to Folder” from the top menu bar

2. type in “~/Library”, click on “Go”. Navigate to the Application Support/minecraft folder

3. Now create a folder to place your Minecraft backups in. I created one called “MineCraft Backups” on my desktop, just to be easy. Then open the folder. You should have the two folders open like below.
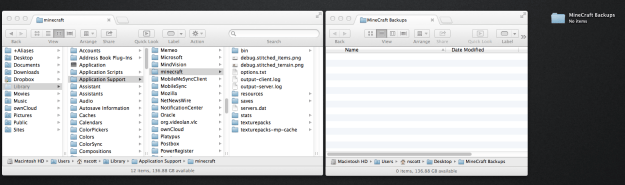
minecraft-02

4. Open the Terminal and run this command. Make sure you substitute your user account name in place of “USER1” in the below command.

ditto -c /Users/USER1/Library/Application\ Support/minecraft /Users/USER1/Desktop/MineCraft\ Backups/minecraft_backup.$(date +%Y%m%d-%H%M%S).zip

If successful you should see a zip file added to your backup folder. Let’s break the command down.

The command is a simple ditto -c “source” “destination” “options”

Example:

ditto -c /Users/USER1/Library/Application\ Support/minecraft /Users/USER1/Desktop/MineCraft\ Backups/minecraft_backup.$(date +%Y%m%d-%H%M%S).zip

Command = ditto
a command that copies directory hierarchies, create and extract archives

options = -c
tells ditto to make an archive

Source = Users/USER1/Library/Application\ Support/minecraft
path of the file or folder that we want to back up

destination = /Users/USER1/Desktop/MineCraft\ Backups/minecraft_backup
path to where we want to put the backup

options: .$(date +%Y%m%d-%H%M%S)
this command is totally optional. It simply appends the year, month, day, hour, minutes, and seconds onto the end of the file name. I like to be detailed and this way no matter how many times I run my script they will always have a different file name and I won’t have to worry about them overwriting each other.

file format to save as: .zip
tells ditto to save the archive as a zip file
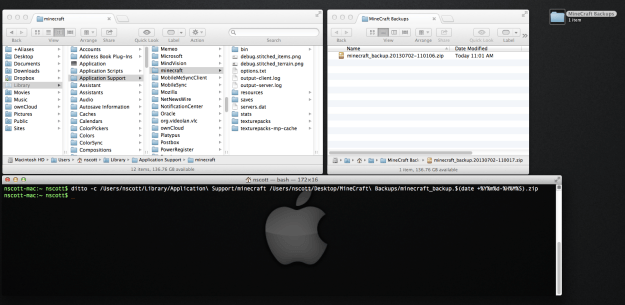
minecraft-03


Creating A script to run the backup

That’s was pretty easy but we don’t want to have to remember that command everytime we want to make a backup. So let’s make that command a shell script.

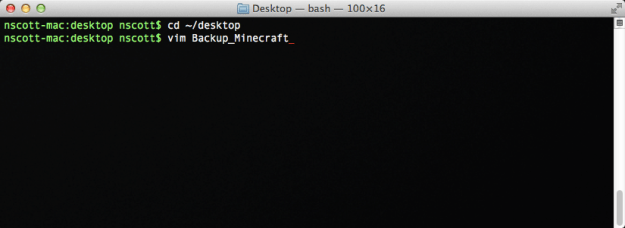
1. In Terminal type:

cd ~/desktop
vim Backup_Minecraft
minecraft-04

This is going to create a file on your desktop call “Backup_Minecraft” that we are going to save our command into.

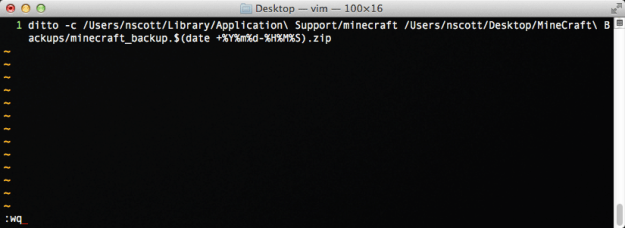
2. It should open a blank window. press “i” to enter insert mode, and paste your command from above into the window.
minecraft-05

3. Then press the ‘esc’ key to exit insert mode.

4. Press :wq to save and close the vim editor.

5. you should now have a new file on your desktop named “Backup_Minecraft”
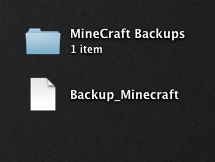
minecraft-07

6. Now we need to make it executable so we can run the command. Back in terminal type the below command, again make sure to substitute your user account name in place of “USER1”.

chmod u+x /Users/USER1/Desktop/Backup_Minecraft
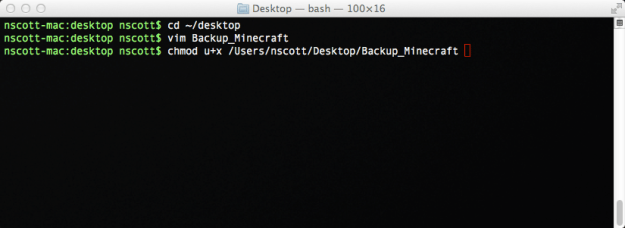
minecraft-06

7. If it was successful you’ll notice the “Backup_Minecraft” file has changed in appearance.
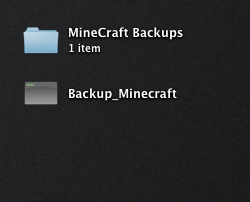
minecraft-08

8. Now let’s verify that the script works. Double click the “Backup_Minecraft” file. You should get a Terminal window that pops up and a new .zip file added to your backup folder. If everything went well the Terminal window should say “Process Completed”
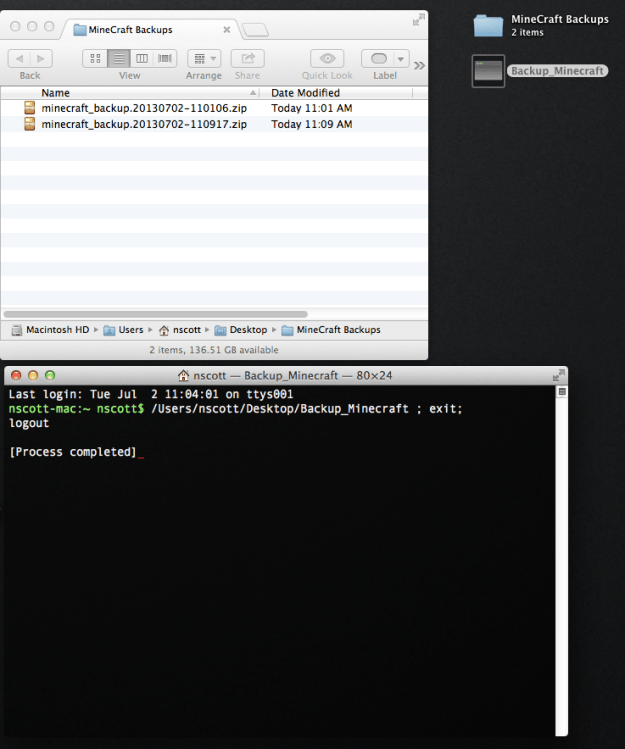
minecraft-09

Now anytime you want to make a backup of your entire minecraft folder you can simply double click your script.


How to automate your backup script

I stopped there, but if you wanted too, you could take this a step forward by creating a launch daemon or crontab. I’ll show you the crontab here.

1. Open Terminal and type the below:

cd ~/desktop
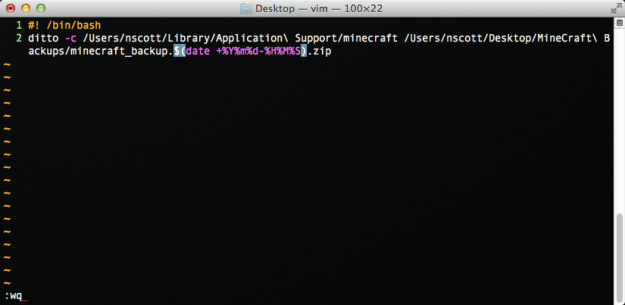
vim backups.sh

2. When the blank terminal windows opens, press “i” to enter insert mode, and paste your command from below into the window. Make sure you substitute your user account name in place of “USER1”.

#! /bin/bash
ditto -c /Users/USER1/Library/Application\ Support/minecraft /Users/USER1/Desktop/MineCraft\ Backups/minecraft_backup.$(date +%Y%m%d-%H%M%S).zip
minecraft-10

3. Then press the ‘esc’ key to exit insert mode.

4. Press :wq to save and close the vim editor.

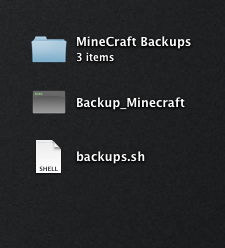
5. you should now have a new file on your desktop named “backups.sh
minecraft-11

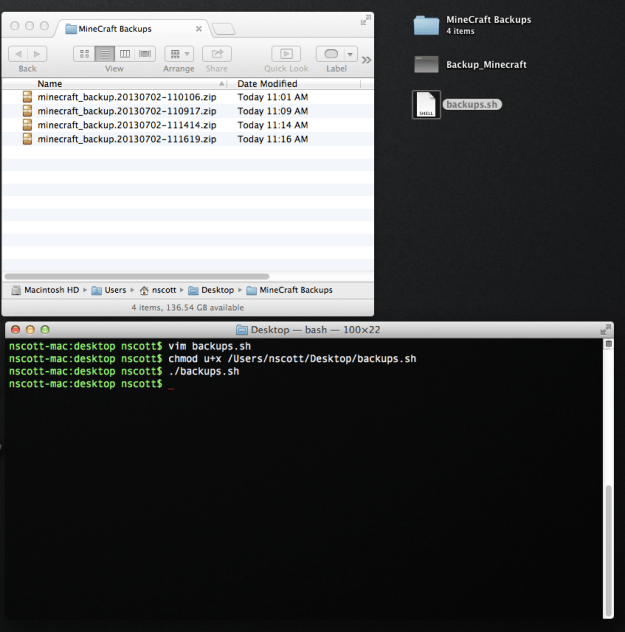
6. Let’s verify the script is working. Open Terminal and type:

cd ~/desktop
./backups.sh

It should create a new backup in your backup folder.
minecraft-12

7. Time to create a crontab which is just a scheduled task. I’m going to set this example up to backup every 2minutes. So we can quickly see if it’s working. Open Terminal and type:

crontabe -e

This will open a blank window so we can create our task.

8. Press “i” to enter insert mode, and paste the command from below into the window. Make sure you substitute your user account name in place of “USER1”

*/2 * * * * /Users/USER1/Desktop/backups.sh

With out going to deep into crontabs, this command tells your computer to run the script backups.sh every two minutes. For more info on crobtabs go here.

9. Then press the ‘esc’ key to exit insert mode.

10. Press :wq to save and close.

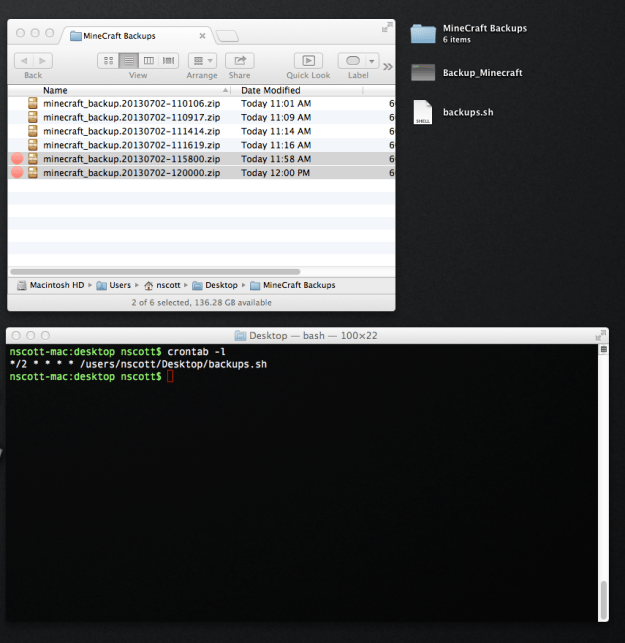
11. To check to see if your crontab was saved run this command or wait 2 minutes to see if a new backup is added.

crontab -l
minecraft-16

12. To remove the crontab run this command. Then you can create a new one and adjust the schedule to run every 24 hours, or what every you prefer.

crontab -r

Set Up Munk Web Admin on Mountian Lion

Munki is a great tool to control software installs and updates and munkiwebadmin is a browser based admin gui to manage and see exactly what’s on your clients machines.

Honestly if you have already setup a munki server, installing munkiwebadmin is a breeze and if you have any issues you should see the instructions here because I’ve noticed a few changes even since installing it myself and the site seems to be updated consistently. It’s pretty straight forward though and most of it can be copy and pasted even if you’re not sure exactly what the commands mean or do. This is a great project for the weekend in a virtual machine.

STEP 1: Install Prerequisites
Xcode

– open App Store and search or xcode, be warned it’s a large download.

– Once it’s download simply drag it to the applicaitons folder, then drag it on to the dock to make a shortcut

Command Line Tools

– open Xcode and go to Preferences > Downloads > command line tools … click install

STEP 2: Setup the Virtual Environment

Open up terminal and copy and paste the commands in red below.

sudo easy_install virtualenv

You’ll see a bunch of lines spit out. That’s normal.

webadmin-1

STEP 3: Create a new virtual environment.

cd /Users/Shared
virtualenv munkiwebadmin_env

webadmin-2

STEP 4: Activate the virtual environment:

cd munkiwebadmin_env
source bin/activate

STEP 5: Install munkiwebadmin and django prerequisites

pip install django==1.4.5
pip install mercurial
pip install -e hg+https://bitbucket.org/cleemesser/django-wsgiserver#egg=django-wsgiserver

STEP 6: Copy and Configure MunkiWebAdmin

git clone https://code.google.com/p/munki.munkiwebadmin/ munkiwebadmin

STEP 7: Edit Settings.py

cd munkiwebadmin
cp settings_template.py settings.py

Time to make some edits to the settings.py file.

Here’s what I do. Open the Settings.py in xcode, that way it’s a little easier to see what’s going on with the syntax highlighting,  and do a copy and paste of the words in red below. This makes it easy to find exactly where you should be making the changes.

Set ADMINS to an administrative name and email
Set TIME_ZONE to the appropriate timezone
Under INSTALLED_APPS uncomment django_wsgiserver
Set MUNKI_REPO_DIR to the local filesystem path to your munki repo. (If you’re using the default repo it would be  /Users/Shared/munki_repo)

Make other edits as you feel comfortable. Save and close the file.

webadmin-3

STEP 8: Initialize the Database

python manage.py syncdb
python manage.py collectstatic

STEP 9: Create a non-admin service account and group

Time to create the “munkiwebadmin” account:

Open System Preferences and go to Users & Groups. Create a Standard user named munkiwebadmin.

To make sure no one can log in with this account interactively, paste the commands below in to terminal to change a few attributes in the user record.

sudo dscl . create /Users/munkiwebadmin home /var/empty
sudo dscl . create /Users/munkiwebadmin passwd *

Now create a munki group and add munkiwebadmin to it.

sudo dseditgroup -o create -n . munki
sudo dseditgroup -o edit -a munkiwebadmin -t user munki

Make sure the munki group can read and write in our munkiwebadmin_env folder.

sudo chgrp -R munki /Users/Shared/munkiwebadmin_env
sudo chmod -R g+rw /Users/Shared/munkiwebadmin_env

Give this group read/write access to the munki repo (MunkiWebAdmin will need permissions to modify manifests). Again if you stuck with the default munki repo just copy and paste the below. Other wise just make sure to substitute the path to your repo in the commands below.

sudo chgrp -R munki /Users/Shared/munki_repo
sudo chmod -R g+rw /Users/Shared/munki_repo

STEP 10: Start the web application and test
Time to see the magic. Switch to the service account we just created:

sudo su
su munkiwebadmin

Start MunkiWebAdmin.

python manage.py runwsgiserver port=8000 host=0.0.0.0

Noe open your browser and go to http://127.0.0.1:8000. If you were successful you should be prompted with a login.

webadmin-5

Use the account you created back in step

Installing Munki On A Mountain Lion Server

munki11-surpised-wandering_eye

These are my “cleaned up” & “streamlined” instructions for how to get munki installed on a Mountain Lion Server, for the definitive instructions you should go to the wiki page here or check out the project home page. These guys are doing awesome things with munki.

You don’t have to install munki on a Mac server, I just happen to have it installed on my Deploy Studio server as an extra tool to help me manage and image clients. Ideally you can push out a thin image to new clients with Deploy Studio, boot into that image that is already configured with munki. Run the Managed Software Updates and download the remaining apps to finish the build out.

 Step1: Building a server repository

We need to setup some folders to keep our config files and actually software for munki. Copy and paste these commands into terminal.

 cd /Users/Shared/
 mkdir munki_repo
 mkdir munki_repo/catalogs
 mkdir munki_repo/manifests
 mkdir munki_repo/pkgs
 mkdir munki_repo/pkgsinfo

munki-01

Step1: Building a server repository

_ _ _ _ _

Step 2: Changing Permissions on Directory

Run this command at the command line, For the specifics of what it does you can run “man chmod”. Basically you want to make sure Apache has the right permissions for this folder.

 chmod -vLR a+rX munki_repo

munki-02

Step 2: Changing Permissions on Directory

_ _ _ _ _

Step 3: Redirect Apache2 to serve the munki_repo directory via HTTP

Direct Apache to the right folder in order to display your repo over http.

sudo ln -s /Users/Shared/munki_repo /Library/Server/Web/Data/Sites/Default

_ _ _ _ _

Step 4: Turn on Web Sharing in the Sharing preferences pane

– open server.app
– turn websites on
– select server websites, click edit button (pencil tool)
– elect edit advanced settings, click ‘allow folder listings’

munki-04

Step 4: Turn on Web Sharing in the Sharing preferences pane

_ _ _ _ _

Step 5: Install munki tools

Download and install the munki tools … YOU WILL HAVE TO RESTART IMMEDIATELY.

http://code.google.com/p/munki/downloads/list

Optional: Adding /usr/local/munki to bash search path

– this step simply adds the path to the bash search path so you don’t have to add the path with every terminal command. For example if you do this step you only need to run: munkiimport –configure instead of /usr/local/munki/ munkiimport –configure

PATH=$PATH\:/usr/local/munki ; export PATH

_ _ _ _ _

Step 6: Configure munki import

Here’s where it starts to get good. We need to set up munki first with some basic information like where we want the folders to be where we are going to put software.

Type this at the command line:

usr/local/munki/munkiimport --configure 

or just

munkiimport - -configure

if you add it to the search path in step 5. From here I”ll only list the actually command and not the usr/local/munki

You should see this:

Path to munki repo [None]: /Users/Shared/munki_repo
Repo fileshare URL [None]: <just hit return>
pkginfo extension [None]: <just hit return>
pkginfo editor [None]: TextEdit.app <substitute your favorite text editor>

_ _ _ _ _

Step 7: Import first app into munki

Time to import something. I downloaded Firefox. Run the munkiimport command and then just drag the Firefox dmg on to the terminal window. It will automatically add the path.

munkiimport ~/Downloads/Firefox\ 18.0.1.dmg

You should then see a list of information after just a few seconds. Just follow the prompts. Don’t worry if you get it wrong, this is just a test, you should do this several times to feel comfortable. My responses are in red.

Item name [Firefox]: FIrefox
Display name []: FIrefox
Description []: web browser
Version [18.0.2]: <just hit return>
Catalogs [testing]:test (you can put in whatever you want to name your catalog)

Item name: Firefox
Display name: Mozilla Firefox
Description: Web browser from Mozilla
Version: 18.0.1
Catalogs: test

Import this item? [y/n] y
Upload item to subdirectory path []: <just hit return> (you could say apps/web_browsers if you wanted to create folders and organize your software)
Copying Firefox 18.0.2.dmg to /Users/Shared/munki_repo/pkgs/Firefox 18.0.2.dmg…
Saving pkginfo to /Users/Shared/munki_repo/pkgsinfo/Firefox-18.0.2…

Rebuild catalogs?[y/n]y
Rebuilding catalogs at /Users/Shared/munki_repo ….

After wards you can go to the munki_repo/pkgs folder and see that munki did actually copy the Firefox installer to the right folder.

munki-09

Step 7: Import first app into munki

_ _ _ _ _

Step 8: Creating a client manifest

The manifest is just the file that tells munki what software to offer. So now that we have Firefox in our repo we need to tell munki to offer it to our clients. First I need to create a manifest

run this command:

manifestutil

(again, my responses are in red, for a list of commands with manifestutil type help)

Entering interactive mode… (type “help” for commands)
> new-manifest test_munki
> add-catalog test –manifest test_munki
Added test to catalogs of manifest test_munki

add-pkg Firefox –manifest test_munki
Added Firefox to section managed_installs of manifest test_munki
> exit

munki-10

_ _ _ _ _

Step 9: Munki Client Configuration

In order for clients to see the munki server you need to install the munki tools on each client. Go here and download the munki tools and install them. This will install the Managed Software Updates app in the clients utility folder.

Now we need to tell ManagedInstalls where to find munki. Type this command.

sudo defaults write /Library/Preferences/ManagedInstalls SoftwareRepoURL "http://localhost/munki_repo"

This is just a test so I am using “http://localhost/munki_repo” , but if I really installed this on a different client I would have to change localhost to the IP of the Munki Server

sudo defaults write /Library/Preferences/ManagedInstalls ClientIdentifier "test"

“test” would be the name of your catalog you created.

To check your settings run this:

defaults read /Library/Preferences/ManagedInstalls

_ _ _ _ _

Step 10: Managed Software update

Now the moment of truth. Go to the Utility folder and double click Managed Software Updates. If everything was successful You should see the below.

munki-12

Create A BootCamp Partition From The Command Line

As a Mac admin in a mixed environment. Most of my users are being boot camped and running windows 7. While I have ways to image machines via Deploy Studio sometimes I just need to do a one off and Boot Camp a partition and then use winclone to install an image.

After Mac OS X 7.1 Boot Camp requires a physical CD to finish, you no longer have the options to “Quit and install later”. That just takes way to longer for administrators. So here’s a hand command for the terminal to partition the drive so you can reboot from an external and use winclone.

diskutil resizevolume /dev/disk0s2 xxG MS-DOS FAT xxG

– replace first xxG with size of the mac partition
– replace second xxG with size of windows partition
– any extra space goes to the windows partition ( 250G drive, 25g for mac, 200 for windows, add’s the left over 25G to windows)

Example:

diskutil resizevolume /dev/disk0s2 30G MS-DOS FAT 200G

– for a 250 GB SSD: creates a 30GB Mac partition, and 200GB Windows partition, anything left over will be added to the windows partition

After running the command, boot off a mac image with winclone installed and image the windows partition as normal.

Use Backupify to export/import Google Apps data back into Apple Mail

I just started this new service called Backupify for our senior management. We are Google Apps users mainly using desktop IMAP clients to access mail. Occasionally users delete things thinking that since they are not in the Google web interface it doesn’t really delete it. As an Administrator we’re always pressed with trying to prevent bad things from happening to our users. Enter Backupify.

I see this service planning a couple of roles. First it’s a complete backup of a users Google Apps account, including calendars, contacts, and drive. Second, it’s hosted by Amazon not Google which from a disaster recovery or business continuity stand point makes a lot of sense. Third it allows administrators to export full backups of the accounts for archives or retention.

This is walk through of how to import delete emails from a Google Apps account back into a users account.

The  Steps
1. Log into Backupify and select your user.
2. Click “Request a zip export”, when the window pops up choose “Google Mail – users account name”

Backupify 02

3. When you receive the email from Backupify that the download is ready, click the link to download

Backupify 04 B

4. Download and install Thunderbird. Setup the users Google Apps account.

5. In Thunderbird, go to Tools > Add-ons

Backupify 06

6. Search for “ImportExportTools”, click install, restart Thunderbird.

Backupify 07

7.In Thunderbird, go to Tools > ImportExportTools > Import mbox file

Backupify 08

8. Select “Import directly one or more mbox files”

Backupify 09

9. Browser to the Backupify download of your user, select the mail box you need to import. In my case, I need the users sent mail that he deleted.

Backupify 10

10. You should see the mailbox added in the left side bar under Local Folders.
11. Select the emails you need to restore and drag them from the archive into the correct folder in your Google Apps account.

Backupify 12 B

12. Waiting for all changes to sync, verify mail has been restored in Google Web interface, then open your desktop client and confirm.

How To Add Colors To Mac Terminal

As I spend more time in Terminal I find myself wishing it wasn’t so boring. luckily there is a way to add some color to that painfully dull screen.

Let’s create a .bash_profile by opening terminal and typing:

vim .bash_profile

This opens up the built in vim editor. Hit the “i’ key to inset text and type this:

# This command tells termical to add color
export CLICOLOR=1
export LSCOLORS=ExFxCxDxBxegedabagacad

# This command changes the terminal login colors
PS1=’\[\e[0;33m\]\h:\W \u\$\[\e[m\] ‘

Screen Shot 2013-02-01 at 4.18.31 PM copy 2

Then hit the “esc” key, this exits “insert” mode so you don’t add any more text to the actual file. To save and close the file type:

:wq

open a new terminal window and type:

ls

you should see that two parts now have color. The user of the session is highlighted before the prompt, and the output from the ls command is colored.

TERM02

To be honest thought the colors aren’t the best choose so lets install a better terminal them. Head over to here and install the peppermint theme.

Open terminal, select preferences and set the default to peppermint and check the colors by typing:

ls

TERM03

This looks better but, type this:

ping google.com

TERM04

Pretty boring standard output. Now lets get some color in the ping command.

Head over to Homebrew and copy this command from under INSTALL Homebrew or just paste it from below:

ruby -e “$(curl -fsSkL raw.github.com/mxcl/homebrew/go)”

TERM06

you should start to see some crazy things happen, that’s normal.

After that’s done run this command:

brew install grc

More crazy text things happening. Next run this command if you already setup a .bash_profile.

echo ‘source “`brew –prefix grc`/etc/grc.bashrc”‘ >> ~/.bash_profile

now the moment of truth. Open a new window in terminal and run this command:

ping google.com

TERM07

you should now see a colorful display of beauty. From here it’s just a matter of playing around with the ANSI colors of the peppermint theme in terminal preferences until you get something that you just love to look at.

TERM08

Support Links:
http://noiseandheat.com/blog/2011/12/os-x-lion-terminal-colours
http://mxcl.github.com/homebrew
http://noahfrederick.com/blog/2011/lion-terminal-theme-peppermint/

Clear The Connection Cache On A Crashplan Server

I have an issue with one of my Crashplan clients. It’s been giving me an “unable to backup …. no connection for xx days” error message. This doesn’t seem to be uncommon if you just spend some time googling the error message. So maybe this will help solve an issue for someone else.

Apparently there is a feature in Crashplan that if you double click the house icon in the upper right corner of the client app, you can enter command line instructions …. I know, who knew right.

01

02

To rescan your file selection simply type:

backup.replace <destination-GUID>

Where the destination GUID is that string of numbers given to each backup job. You can see them by logging into the web gui, or opening the backup folder on the actual store point.In my case the command looks like:

backup.replace 416416992487557064

You can find a list of other commands here