Category Archives: ruby

Jamf Pro API All Applications Installed Report

This is a script for hosted Jamf Pro that returns all the installed apps across your fleet and sorts them by most installed to least. Update the variables $jamfpro_url and $api_pw in the script for your environment. It should return results up to 2000 computers. If you need more, you’ll have to add pagination.

The basic concept is to call the /api/v1/computers-inventory?section=APPLICATIONS endpoint, loop through and add all apps and versions into a hash (dictionary) and then print and sort the results.

It takes your Jamf username and password and converts it to a base64 string that you put in the $api_pw variable and then that generates a bearer token for the additional calls. The invalidateToken function at the very end, revokes the bearer token.

To get the base64 string you just put this into terminal and paste it into the $api_pw

printf "jamfUserName:JamfPassword" | iconv -t ISO-8859-1 | base64 -i -

This script is helpful to get an understanding of all the apps installed in your fleet, including most and least popular Apps. I use this to also help determine what Apps we should prioritize in patch management.

You can download the script from here

Note: Change out jamfUserName and JamfPassword with a user that has at least read only privileges in jamf. Make sure to keep the “:” inbetween the variables.

Installing Certificates on macOS with Puppet

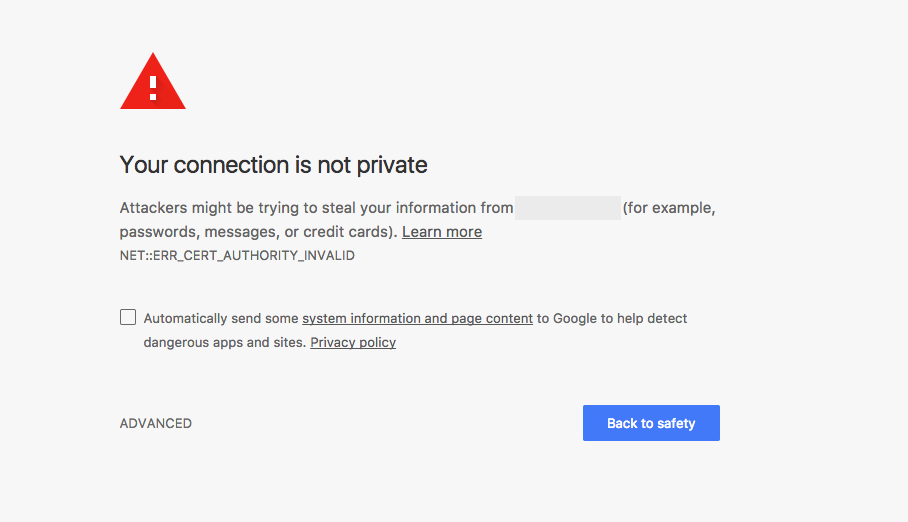
I have lots of internal web servers that use self signed certs for HTTPS encryption. Every time I try to login to theses server I get the “Your connection is not private” message.

Screen Shot 2017-10-13 at 6.41.26 PM.png

It’s not that it’s a big deal, but it’s annoying since I use multiple computers for admin work. Let’s get puppet to solve this problem.

I started with an external fact that I placed in my module, in the facts.d folder (you have to create this folder). It simply checks to see if I can find the certificate in the system keychain and sets a variable … either “cert_installed=true” or “cert_installed=false”.

#!/usr/bin/ruby
check_cert="security find-certificate -a server.company.edu.cer -k /Library/Keychains/System.keychain | grep \"server.company.edu\" >/dev/null"

if system(check_cert) == true
  puts "cert_installed=true"
else
  puts "cert_installed=false"
end

The in the manifest … I check if the cert is installed and if it’s false, I copy the cert to the /tmp folder and then run a command to install it and trust it.

 class cert {
	if $facts['cert_installed'] == 'false' {
		file { "/tmp/server.company.edu.cer":
			mode => "0777",
	  		owner => 'root',
		  	group => 'wheel',
		  	source => "puppet:///modules/cert/server.company.edu.cer",
		}
		exec { "server.company.edu.cer":
	  		command => 'sudo security add-trusted-cert -d -r trustAsRoot -k /Library/Keychains/System.keychain "/tmp/server.company.edu.cer"',
			path	=> ["/bin", "/usr/bin", "/sbin", "/usr/sbin"],
			require => File["/tmp/server.company.edu.cer"]
		}
	}
}

This has been working beautifully.

Using Puppet To Manage License Files

The life of an admin in Higher Ed inevitably means, now that classes have started, your software is expiring. This is an annual problem. So I wanted to see how Puppet can help me.

In order for this to work, you need an application that can be licensed with a static file on the machine. Something that can be updated on a master machine and then copied to the clients. My examples involve Mathematica … insert your software in it’s place.

Puppet is perfect at enforcing configuration, so the idea of enforcing a license file is an ideal task. Take this file and put it there .. no questions asked.

class mathematica_license {
  file { "/Library/Mathematica/Licensing/mathpass":
    ensure => 'present',    
    mode   => "0644",
    owner  => 'root',
    group  => 'wheel',
    source => "puppet:///modules/mathematica_license/mathpass",
  }
}

This works and if that’s all you need, great. You take your new license file, and put it in the files folder in your module, and use a file resource to say .. if this file doesn’t exist on the client … then copy it.

But a simple check would be great. What if I run this on all Lab machines, some of which don’t run Mathematica. An If statement makes a lot of sense. If Mathematica exist in the Applications folder, then copy new license file over.  Sounds simple, but this isn’t always Puppets strongest skill. You can try to use an “unless” statement or “onlyif” … but I usually find myself fighting with the syntax.

class mathematica_license {
  exec {"mathematica_check":
    command => "true",
    path    => ["/usr/bin","/usr/sbin", "/bin"],
    unless  => "ls /Applications/ | grep Mathematica.app",
  }

  file { "/Library/Mathematica/Licensing/mathpass":
    ensure => 'present',
    mode   => '0644',
    owner  => 'root',
    group  => 'wheel',
    require => Exec["mathematica_check"],
    source  => "puppet:///modules/mathematica_license/mathpass",
  }
}

It works, but maybe not in the way you want. The “unless” statement says, if results come back from the “ls” command, and grep finds “Mathematica ,then execute the “command” statement, which just evaluates to true. Then puppet runs the file resource below it. But it only runs the “file” resource if the “require” statement is true .. which is the “mathematica_check” above it.

If you’re just running puppet on the client side, you get the results you want. If the Application is installed, the file gets copied over. But if the Application isn’t installed, nothing happens.

If you’re reporting back to a dashboard like the Foreman … a side effort of a client not having your Application installed, is lots of errors. All those errors get reported back to your dashboard, causing a lot of false positives you need to over look. Your client reports back in an error state, even though it did exactly what you wanted it to do .. not copy the file if Mathematica isn’t installed.

A better solution seems to be, to create a custom fact. A fact that checks for the existence of the application. Then use an “If” to qulalify your resource in the manifest. Now the code only runs, if “Mathematica” is installed. If it can’t find the Application … the code exits and moves on. No errors in your log.

class mathematica_license {
  if $mathematica == true {
    file { "/Library/Mathematica/Licensing/mathpass":
      mode   => "0644",
      owner  => 'root',
      group  => 'wheel',
      source => "puppet:///modules/mathematica_license/mathpass",
    }
  }
}

This does involve you creating a module with custom facts and deploying it to your clients. But to be honest, that can be easier then trying to manage puppets onlyif or unless statement in exec resources. Just my opinion

A practical example of using the ARD ruby gem

Here’s a practical example of using the ARD ruby gem to help organize your Apple Remote Desktop Commands.

Let’s say you already have one saved command, named “command1”.

ard-gem-01.png

existing saved command

But you want to move “command1” into a folder named “Folder1”.


Create a new folder

Let’s create the folder by using the ARD gem, with this command:

#usage
ARD.create_empty_folder("Name of new folder")

ard-gem-04.png

ard-gem-02.png

the results of running the above command


Move a command into a folder

Now lets move “command1” inside “Folder1” with this command:

 #usage
 ARD.move_command("Name of command to move", "Name of folder to move to")
 

ard-gem-05.png

ard-gem-03.png

results of running the above command

“command1” is now inside the folder. You can run this command as many times as you want just replacing the name of the command, until you have everything you want moved into a specific folder. For example .. a folder named “Printer Commands” that has four commands that help you administrate printers.

Best practice is to make sure Apple Remote Desktop is closed while running the commands, then open afterwards to see results. If the “Send Unix Command” window is open in Apple Remote Desktop, you may receive an error while running the command.

ARD gem on Github or Ruby Gems

Disable System Preference Panes In macOS

Occasionally I have a need to disable a System Preference pane on a machine. For example for a lab machine or public shared machine. You can accomplish this by using a configuration profile, which I’ve used in the past. Often times it was originally created by someone else, which means I can’t really edit it or make changes on the fly.

So I wrote Panes. A small Ruby Gem that helps me disable system preference panes. The intent is to run the commands as a postinstall script … either on the end of a DeployStudio workflow or in a payload free package.

Here’s how it works.

Install panes:

 sudo gem install panes 

verify panes installed:

 gem list 

Panes Usage

You must require panes in your ruby script, before you call it.

 require 'panes' 

To list the available system preference panes (though not all maybe available for your hardware):

 puts Panes.List 

That should display a list like this:

Accounts.prefPane
Appearance.prefPane
AppStore.prefPane
Bluetooth.prefPane
DateAndTime.prefPane
DesktopScreenEffectsPref.prefPane
DigiHubDiscs.prefPane
Displays.prefPane
Dock.prefPane
EnergySaver.prefPane
Expose.prefPane
Extensions.prefPane
FibreChannel.prefPane
iCloudPref.prefPane ......

Panes disables preferences by using the CFBundleIdentifier. To list the available CFBundleIdentifier’s:

 puts Panes.CFBundleIdentifier 

Output will look like this:

com.apple.preferences.users
com.apple.preference.general
com.apple.preferences.appstore
com.apple.preferences.Bluetooth
com.apple.preference.datetime
com.apple.preference.desktopscreeneffect
com.apple.preference.digihub.discs
com.apple.preference.displays ....

Once you have the CFBundleIdentifier you want you can disable the pane. Let’s disable the Sharing pane. Here’s the before.

Enabled.png

To disable “Sharing”:

 Panes.Disable("com.apple.preferences.sharing") 

After:

onedisabled.png

To disable multiple panes at once:

Panes.Disable(
 "com.apple.preference.dock",
 "com.apple.preference.energysaver",
 "com.apple.preference.network")

results:

disabled.png

What if you decide later that you need to enable a pane?

To enable one pane:

 Panes.Enable("com.apple.preference.network") 

or to rest and enable all panes:

 Panes.Reset 

Everything goes back to normal.

Enabled.png

For more documentation check out my GitHub or Ruby Gems.

Hashed: generate or compare file hashes

To go alone with my last post about verifying SHA1 hashes. I created Hashed.  Use Hashed.app to generate a file hash for MD5, SHA1, SHA256, or SHA512. You can also use Hashed.app to verify the hash of a file you have downloaded.
Hashed.app does not hash folders or directories, only individual files. If you want to hash a directory, zip the entire directory and hash the zip file.


Usage:

hashed_01.png

To generate a hash, select the hash type on the left. Then select a file and click on “Generate”

hashed_02.png

The hash is returned.

hashed_03.png

To compare hashes. Select the format on the left. Then type or paste the original hash into the “Compare hashes” field. Then select the file with the “File to compare” filed. Click on “Generate”

hashed_04.png

If the hashes match, you’ll see a green check mark.

hashed_05.png

If the hashes do not match, you’ll see a red “X”.

Hashed can be download from my Github.

Verifying SHA1 Hashes

Verifying hashes is something all good admins are suppose to do after downloading a file or app. We know we should, but we don’t. Yet, handbrake being another example of why it’s important to check.

I created a simple way to compare SHA1 hashes. “SHA1 Check.app” is a ruby script wrapped with Pashua, which makes it’s really easy to make desktop apps.


Usage is simple:

When you download a package, like the recent update for Microsoft Word 2016 for Mac, copy the SHA1 hash from the website

Screen Shot 2017-05-18 at 6.06.20 PM.png

Paste it in the “Original hash” filed, then drag or browse to the download package.

Click on “Compare SHA1’s”

Screen Shot 2017-05-18 at 6.29.32 PM.png

If all goes well, you should see this:

Screen Shot 2017-05-18 at 6.29.42 PM.png

If the hashes don’t match, you’ll see this:

Screen Shot 2017-05-18 at 6.30.23 PM.png


SHA1 Check.app is up on my GitHub.

Organizing Commands In Apple Remote Desktop With The Help Of Ruby

My last post was about manually creating and organizing commands in Apple Remote Desktop with the help of Xcode to edit a plist file.

This post is about using Ruby to do the heavy and ugly lifting of editing the nested UnixCommandTask.plist  file. If you’ve ever saved a command the file exist. If it’s not there, click on the “Unix” tab in ARD and save a test command so the file is automatically created. You can find the file at:

 ~/Library/Containers/com.apple.RemoteDesktop/Data/Library/Application Support/Remote Desktop/Presets/UnixCommandTask.plist

There’s a couple of scripts on my github that help to make the process easier and I hope to cover the overview and basic usage here.

ARDplist.rb is the main file that contains the class and methods, and ARDplist_usage.rb contains examples. You can uncomment commands in “ARDplist_usage.rb” and run them, or create another file for your commands and require ARDplist, see the ReadMe file.


Create A New Folder And Command:

Creating a new foler or command is the most tedious part. There’s a syntax that has to be followed.

Example Code:

#sets a folder named "Admin Commands", with a command named "list of users"
newcommand = ARD::Command.new(
  "Admin Commands",#folder name
  "list of users", #command name
  true, #see output in ARD after command runs
  "ls -1 /Users/",#command to run
  "root", # user to run command as
  1) #select user to run command as radio button, must be set to 1 if you want to run as another user

#executes the above information to actually create the folder and command
ARD.create_command(newcommand)

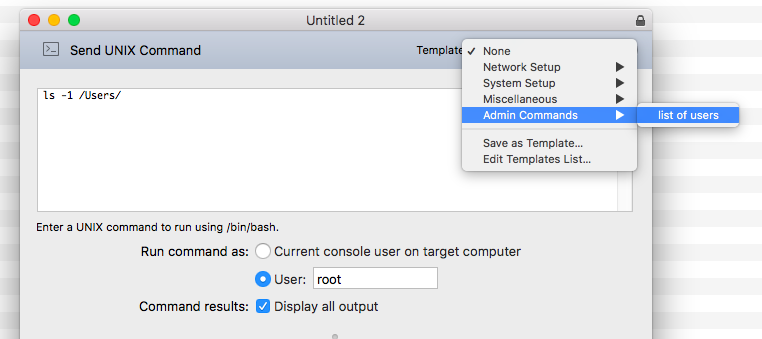
This creates the example below:Screen Shot 2017-05-17 at 3.23.18 PM.png
If you want to add a command to that folder, run the code again but make sure the folder name is the same.

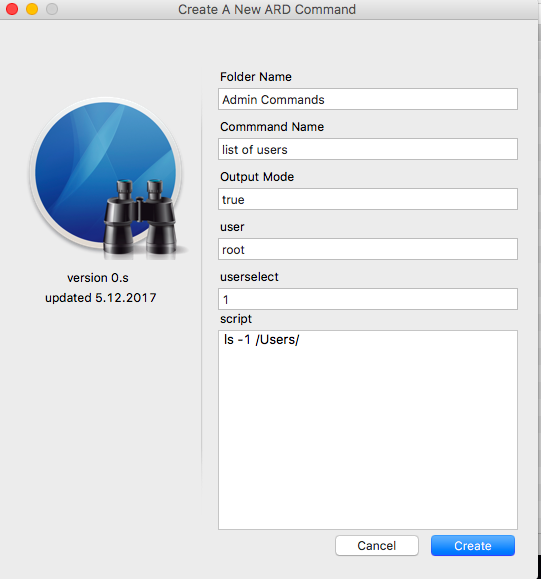
This isn’t too bad if you’re creating a simple command like “ls” but gets a little unsightly if you want to add 6 lines of code. So for the folder and command creation part, I also made a little app with Pashua to give the user a gui. The example code below will make the exact same folder and command as the code example above. The advantage here is you can just paste your code into the “script” field as is, line breaks and all.
ard_13.png


Listing Options:

Once you have folders and commands you can manage and organize them with by using the “ARDplist.rb” file. Just require it in your ruby file and use the command below to see options.

#if ARDplist.rb was in the same directory as your file
#otherwise change the path after require to where ARDplist is
require './ARDplist'
#list of options for use
puts ARD.options

The output will look like this:

- create_command
- create_folder
- create_spacer
- delete_command
- delete_folder
- folder_index
- list_folders
- move_folder
- options
- rename_command
- rename_folder


Moving, Renaming, and Deleting:

I’ll cover some quick and basic examples of the options above.


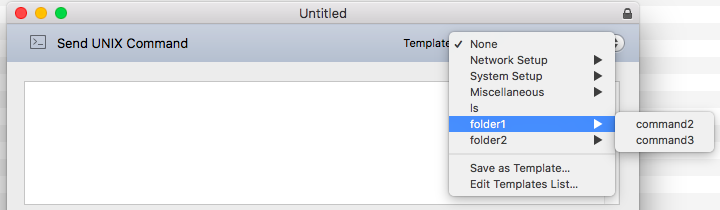
list_folders:

If this is your commands, you can run “ARD.list_folders” to return existing folders and single commands. Beware that the first 4 folders are Apples and do not report back.
ard_1.png
puts ARD.list_folders
#output is a list of folders or single commands that exist
ls
folder1
folder2

folder_index:

Tells you what physical position a folder is in, remember that the first 4 folders don’t count. From the screenshot above, you can see that “folder1” is in the second spot, which in programming language is 1, since counting starts at 0.

puts ARD.folder_index("folder1")

#output below
1


move_folder:

If you want to move “folder1” to position 0
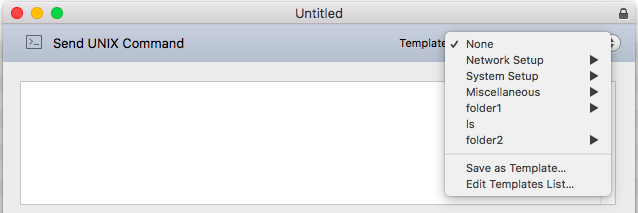
ard_2.png

#move position of existing folder. arguments are (original_position, new_position)
ARD.move_folder(1, 0)


create_spacer:

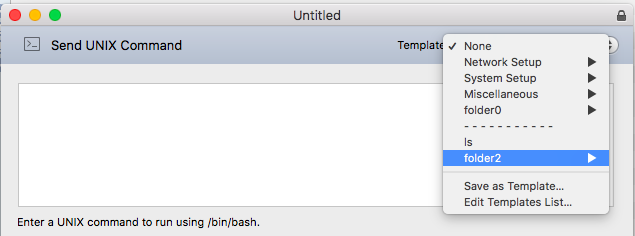
Create a visual line break to separate commands.
ard_6.png

#creates a visual space by using ---------------
#argument is the physical location you want the spacer
ARD.create_spacer(1)


rename_folder:

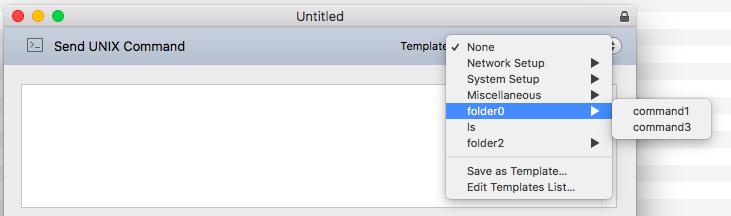
If you want to rename a folder .. example change “folder1” to “folder0”
ard_4.png

#rename an existing folder. arguments are (oldname, newname)
ARD.rename_folder("folder1", "folder0")


rename_command:

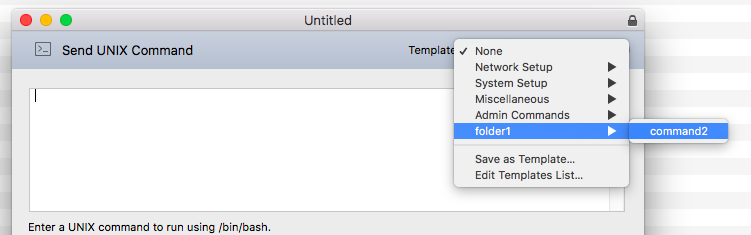
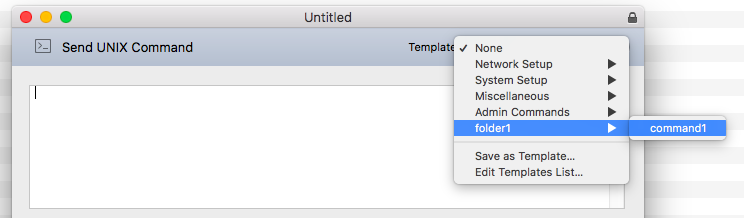
Rename a command inside a folder. Example, change “command1” to “command2”
Screen Shot 2017-05-17 at 4.04.05 PM.png

Before

Screen Shot 2017-05-17 at 4.35.46 PM.png

After

#Rename a command, arguments are ("folder_name", "orignialcommandname", "newcommandname")
ARD.rename_command("folder1", "command1", "command2")


delete_command:

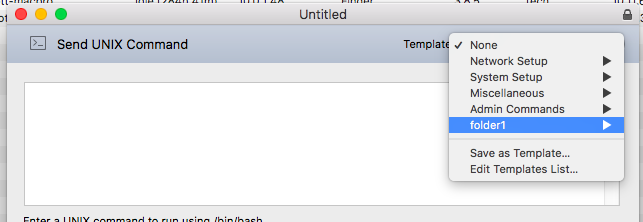
To delete a command inside a folder.
Screen Shot 2017-05-17 at 4.37.51 PM.png

#Delete a command, arguments ("folder_name", "command_name")
ARD.delete_command("folder1", "command2")


delete_folder:

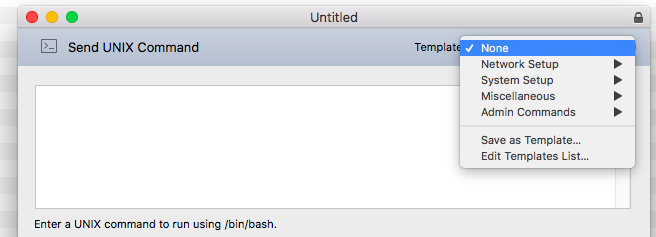
To delete an entire folder. This is the same as using the build in “Edit Templates List” and removing a command in ARD.
Screen Shot 2017-05-17 at 4.44.21 PM.png

#delete an existing folder, arguments are ("foldername")
ARD.delete_folder("folder1")

CookieDough: A Ruby Gem for Mac Applications

CookieDough is a Ruby gem for Mac’s that reports back on Apps in the main Application folder, as well as being able to report back what’s in a user’s dock.

To install:

gem install cookiedough

Then startup an interactive ruby prompt

irb

Load CookieDough by requiring it:

require 'CookieDough'

To list options:

puts CookieDough.options

You’ll see a list of options like this:

all_app_versions
app_version
dock_apps
dock_bundles
list_apps
options
receipts
user_installed_app 

Basic usage is simple, ‘puts CookieDough.your_option’

One thing I always use this for is when I’m going to replace a users laptop. I want to see what’s in their Applications folder and whats in their dock .. these are the things that are important to them right, and what they have installed.

So I’ll run ‘puts CookieDough.user_installed_apps’. It prints a list of what’s in the Applications folder and removes any of the base Apps that come pre-installed in macOS. It makes it easy to see what’s been added to the machine after the user received it.

You can find it on Ruby Gems or on my GitHub