

SVN Server on Raspberry Pi: A Complete Installation Guide
Subversion software also known as SVN is an open-source version control system. Using SVN, your Raspberry Pi can be turned into a database/server for your code and help you collaborate effectively with your team. Your code can then be easily accessed from Linux and Windows PCs.
SVN is available via official repositories and can be installed using a simple apt-get command. Further configuration requires setting up an Apache webserver. Any computer on your network can access the server using an SVN Client.
Installing SVN on Raspberry Pi is straightforward. In this guide, I shall guide you through a step-by-step procedure of setting up SVN and configuring it using Apache webserver. I shall also show you how to use SVN and, some common issues that might be faced during setting up.
If you’re new to Raspberry Pi or Linux, I’ve got something that can help you right away!
Download my free Linux commands cheat sheet – it’s a quick reference guide with all the essential commands you’ll need to get things done on your Raspberry Pi. Click here to get it for free!
Key Differences Between SVN and GIT
SVN is a version control system that helps your team keep track of all changes made to your code. Even if you are working alone, tt can help you maintain a backup/ database of your code. It works very similarly to GIT. However, there are a few key differences.
Following are the key differences between SVN and GIT:
| SVN | GIT |
| Distributed Version Control: Each developer has a full repository copy, including its entire history. | Distributed Version Control: Each developer has a full copy of the repository, including its entire history. |
| Distributed Version Control: Each developer has a full repository copy, including its entire history. | No network is required for GIT operations (Can work on local copy). |
| Performance can get degraded with a large database. | Performance is generally better since network communication is not required. |
| Easier to learn. | More difficult to learn. |
| SVN is configured to assume that the history of the project never changes. | Using GIT rebase, GIT allows you to change previous commits. |
| Branching and Merging are more complex. | Branching and Merging are more fundamental to GITs design. |
| Good GUI tools but the ecosystem is not as rich as GITs. | A good ecosystem with third-party tools like GitHub, GitLab, and Bitbucket, etc. |
| SVN can handle binary files natively and efficiently. | Binary file handling can be a bit inefficient because of the way GIT stores file history. |
Note: If you want to install and set up GitLab on your Raspberry Pi, you can follow this article instead.
You might also like: The Raspberry Pi projects that pay for themselves
Installing SVN on Raspberry Pi
Installing SVN on your Raspberry Pi is straightforward. It is available via the official repositories. However, before installing, there are a few things that you need to do.
Bonus tip: If the terminal still feels confusing, I made a simple cheat sheet with 74 commands explained in plain English. You can grab it here for free..

If you want a clearer path than jumping from tutorial to tutorial, my book gives you a step-by-step roadmap to really understand your Raspberry Pi.
Check the book hereSetting up your system – Installing Raspberry Pi OS
Before going ahead with the installation of SVN you need to follow the following steps:
- Install Raspberry Pi OS on your Raspberry Pi using Raspberry Pi Imager.
- Ensure you have internet connectivity and SSH enabled during the installation using the configuration settings shown in the screenshots below:
 Alternatively, you can follow this tutorial to connect to the internet and enable SSH on your device.
 - Make sure your device is up-to-date using the commands:
sudo apt update && sudo apt full-upgrade
That is it, now you are ready to install SVN on your Raspberry Pi.
You can get answers from real experts in minutes.
Get help with your setup
SVN Package Installation
To install SVN on your Raspberry Pi follow these steps:
- SSH into your Raspberry Pi using the command:
ssh username@hostname
- You can install SVN from official repositories using the command:
sudo apt-get install subversion
- You can verify that SVN has been installed using this command:
svn help
And that’s it you have successfully installed SVN on your Raspberry Pi. Read on as we make our first project available on the network using Apache webserver.
Creating Your First Project with SVN
To create your first project, follow these steps:
- Create a central repository folder using the command:
sudo mkdir -p /srv/svn/repos - We have a folder, now create a project using the command:
sudo svnadmin create /srv/svn/repos/main-project - You can verify the folder using the commands:
ls /srv/svn/repos/main-project -la
- You should see all these files have been generated inside your project folder.
- Now create a Project that we will add to the SVN server:
mkdir -p ~/projects/test-project
sudo nano ~/projects/test-project/app.js - Edit the ‘app.js’ file as shown below and save it:

- Import this Project into SVN using the following command:
sudo svn import ~/projects/test-project file://localhost/srv/svn/repos/main-project - This command should show a nano editor as shown below. Add your comments (shown in the yellow box below) and save and exit the editor.

- It should successfully be committed as revision 1

And that is it, we have created our first project on SVN. Now to make it accessible to other people on the network we will have to install an Apache webserver and configure it.
Tip: Command lines can be a pain to memorize. I put the essential Linux commands on a printable cheat sheet so you don't have to keep googling them. You can grab the PDF here if you want to save some time.
Configuring SVN on Raspberry Pi
You’ll probably need to go a little further with the configuration if you want to access this server from other computers and give access to different users. Let’s see how to do that.
Setting Up Remote Access for SVN using Apache webserver
To configure your SVN so that it can be accessed remotely follow these steps:
- Install the dependencies (SVN server modules for Apache httpd) using the following command:
sudo apt-get install apache2 libapache2-mod-svn
- To edit the dav_svn.conf enter the following command to open the configuration file in Nano:
sudo nano /etc/apache2/mods-available/dav_svn.conf - Enter the following lines towards the end of the configuration file:

- Save and exit the text editor.
- Restart the Apache web server using the command:
sudo /etc/init.d/apache2 restart
- Make sure you have the necessary permissions to read and write your repositories:
sudo chown -R www-data:www-data /srv
sudo chmod -R 755 /srv/svn - Now in a web browser on any computer connected to the network enter the following address to access your Project:
http://<your-ip or hostname>/svn/main-project
Creating Users
To access the SVN from other computers, you need to create users to manage access control. You can create an SVN user using the following command:sudo htpasswd -c /etc/apache2/dav_svn.passwd testuser
Bonus tip: If the terminal still feels confusing, I made a simple cheat sheet with 74 commands explained in plain English. You can grab it here for free..
Note: -c is only for the first time. If you want to add more users, do not include -c or it will delete existing users.
Accessing SVN from other computers
Now that the server is ready, let’s see how to use it from other computers on the network. The steps are slightly different depending on the operating system you are using.
How to Access SVN from a Linux Client
To access your SVN Projects from a Linux Client, make sure you have SVN installed on your PC and follow these steps:
You might also like: The Raspberry Pi I'd actually buy today
- Make a folder to download your Project to:
mkdir -p ~/reposcd ~/repos - Checkout your project from your Raspberry Pi to a Linux Client using the following command:
svn co --username testuser http://<raspberry-pi-ip>/svn/main-project
- You can verify that all files have been downloaded using the following command:
ls ~/repos/main-project
- Open the ‘app.js’ file and edit it using any text editor (e.g Nano):
nano ~/repos/main-project/app.js - I edited the file as shown below:
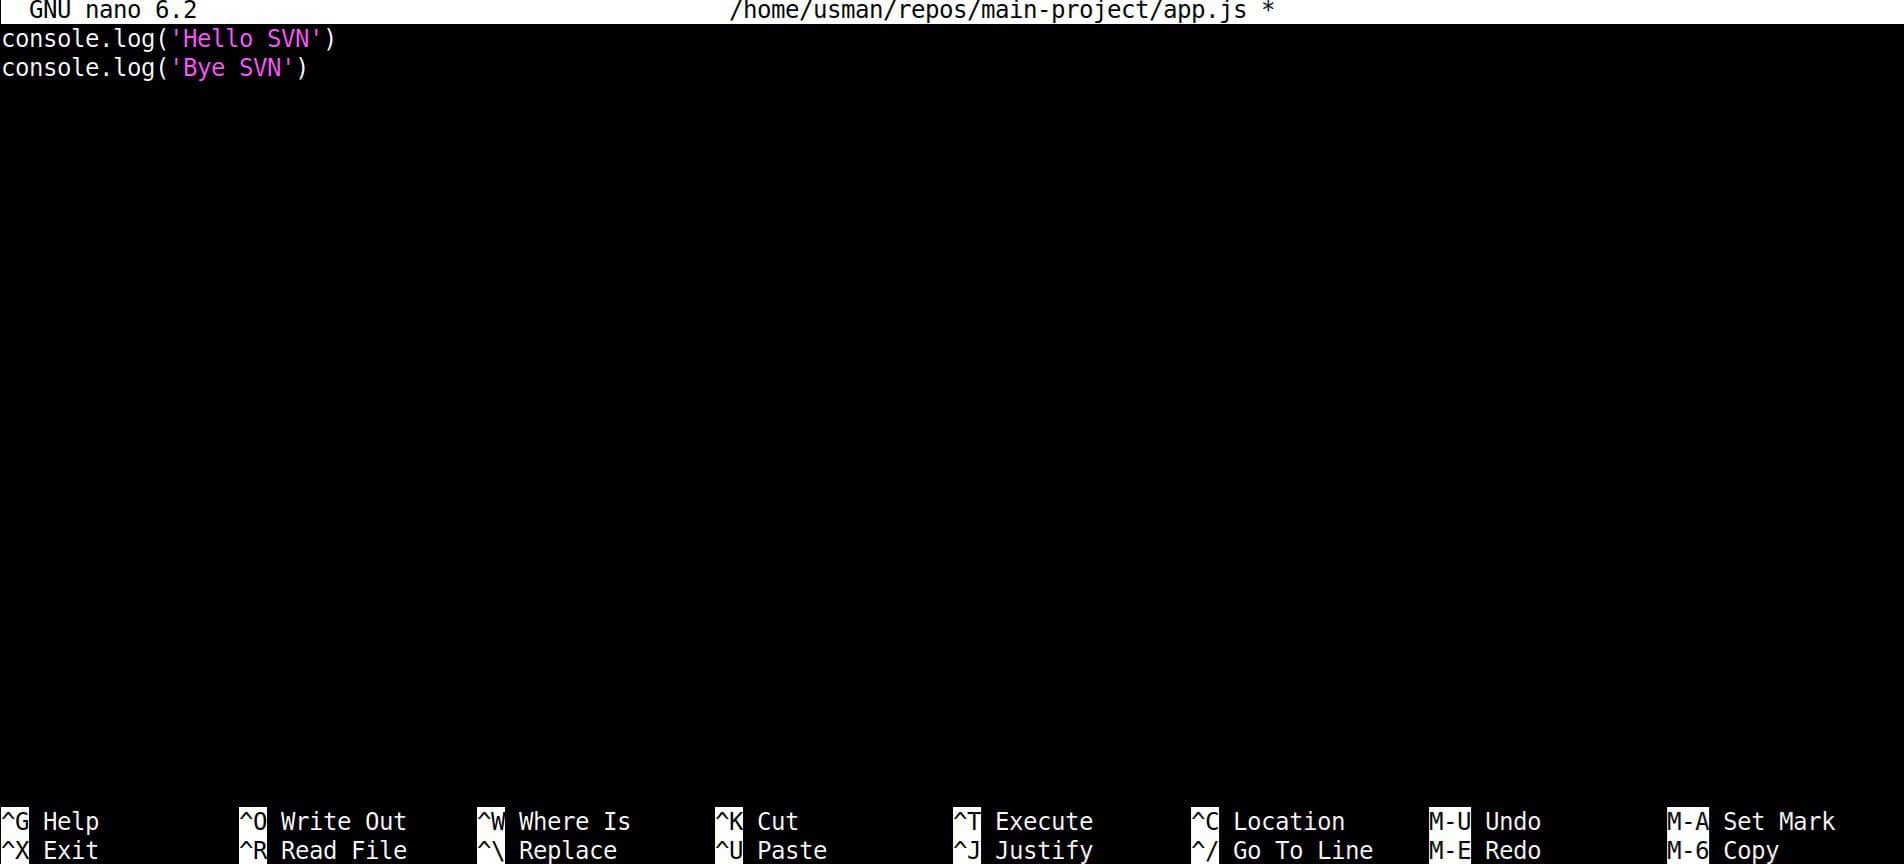
- Save and exit the text editor.
- You can see all the changes made to the ‘app.js’ file using the command:
svn diff ~/repos/main-project/app.js
- Commit the changes to the SVN server using the command:
sudo svn commit -m "Commit from Linux" app.js
- It will ask you for the username and password which we already set.
- You can verify the changes using any web browser:

- You can click on ‘app.js’ file to see its changed contents as well:

That is it, we have successfully created our Project in an SVN server on our Raspberry Pi and edited the project file on a Linux Client. Read on if you want to learn how to connect with a Windows Client as well.
How to Access SVN from a Windows Client (Tortoise SVN)
To access your SVN repos from a Windows Client the recommended tool is to use Tortoise SVN. It is an Apache SVN client implemented as a Windows shell extension. To use Tortoise SVN follow these steps:
Installing Tortoise SVN
- Download the latest version of Tortoise SVN from their website.

- Run the setup file once downloaded and complete the installation wizard.

Downloading Project Files
- To connect to your repositories right click anywhere in the explorer and navigate to TortoiseSVN -> Repo-browser.

- Enter the URL address of your SVN repository in the dialog box.

- This should open your repository in the Repository Browser.

- Right-click on your Project folder and click on Checkout.

- Enter the directory in which you want the working copy to be downloaded.

- Click ‘OK’ to download.

- You can now navigate to the directory and see that Project files have been downloaded.

Making Changes
- Before editing any file, make sure you have the latest copy downloaded. Right-click on the Project folder and click ‘SVN Update’:

- Edit the ‘app.js’ file in any text editor:

- Commit the changes by right-clicking on the Project folder and selecting ‘SVN Commit..’ option.

- Enter a message describing the changes made and click ‘OK’:

- Enter the username and password already configured:

- Click ‘OK’ and the changes will be made.

- You can verify all changes made by accessing your Project through any web browser.

Something not working? Don't waste hours going in circles. Ask in the RaspberryTips Community and get help from people who've already figured it out. Get unstuck now.
Conclusion
By following this guide we have successfully created an SVN server on our Raspberry Pi and learned how to access our Projects on a Linux and a Windows Client.
To see all SVN command line options you can read the official documentation. To expand your understanding of usage of an SVN server you can follow this tutorial. Additionally, to understand more usage options of Tortoise SVN you can follow this official tutorial as well.
Not getting the same result?
Even when you follow every step, small differences in OS version, hardware or config can change the outcome. Instead of wasting time guessing, get help from people who have already fixed the same kind of issue.
- Get help on your exact issue
- Access step-by-step videos for tricky setups
- Browse the website without ads


