
The Raspberry Pi Pico Pinout: Diagram & Coding Guide
The Raspberry Pi Pico is a special model in many ways. It’s not a computer like other models and the GPIO pins are placed differently, with 20 pins on each side of the board. If you want to use the pins, you’ll need some guidance to know what each pin is associated to. To help you through this, I wrote this guide for you.
The Raspberry Pi Pico is a low-cost microcontroller device. It’s powered via USB, includes 40 GPIO pins (like other Raspberry Pi models), and can run MicroPython scripts.
But before building anything with it, you’ll need to know which pins you can use, and how to address them in your code. After reading this article, you’ll know everything you need to.
If you’re like me and sometimes mix up syntax between programming languages, I’ve got just the thing for you. I’ve put together a Python cheat sheet with all the essential syntax in one place, so you can keep it handy and avoid any confusion. Download it here for free!
Raspberry Pi Pico Pinout Diagram

Introduction
The Raspberry Pi Pico currently exists in two main versions:
- Raspberry Pi Pico: The original one.
- Raspberry Pi Pico W: A similar version, with an added wireless module that allows you to connect it to a Wi-Fi network on boot.
Each model can be found with holes, as you an see in the picture below (the standard version), or with headers pins pre-soldered (Pico H or Pico WH). If you are used to the Raspberry Pi Zero names, it’s the same idea.
If you need more details about this model in general, I have a complete introduction to the Raspberry Pi Pico on this website, fell free to read it before going further in this post.
The idea today is to focus on these GPIO pins. If you flip the Raspberry Pi Pico, the pins are mentioned on the back, but it’s not really clear or useful as you’ll use it the other way around:

So, in the next section, I will give you the diagram you can use when programming it with Python (MicroPython in fact, but it’s really close). I will also explain how to use the pin numbers, as it’s not very intuitive if it’s your first time doing this.
Feel free to take notes or print the picture to use it later in your projects.
Bonus tip: : Instead of Googling syntax every time, I keep a small cheat sheet with the main Python elements. Check it here.

Want to build real Raspberry Pi projects with Python? This book starts from scratch and guides you toward practical scripts, automation, APIs, cameras and more.
Learn Python on Raspberry PiYou can get answers from real experts in minutes.
Get help with your setup
Note: The GPIO pinout diagram for other Raspberry Pi models is entirely different. So, if you are not interested in the Raspberry Pi, you should switch to this other post on RaspberryTips: The Raspberry Pi GPIO Pinout: Diagram & Explanation
Simplified Diagram
Let’s start with a simplified version of the Raspberry Pico pinout diagram. If you’ve already checked the official documentation, you may have found something very complicated, with 3 or 4 different indications for each port. I’ll give it to you later, but most of the time, the only thing you need is this:

The pin numbers are pretty logical. 20 pins on each side, starting at 1 on the upper left, counting up to 20 in the bottom left, and then continuing the other side from the bottom to the top of the board (21 in the bottom-right corner, 40 in the top-right corner).
The issue, is that you won’t use the red numbers in your scripts, but rather their names, mentioned on the side in my diagram. There are different types of GPIO pins:
- GPX: The green labels on my diagrams. The number mentioned is the ID you’ll use in your script. For example, you’ll address port 20 with the number 15 (because it’s GP15). I’ll give you an example later.
- GROUND: You’ll need at least one in most circuits, you can find them at different spots on the board (4 on each side).
- VBUS: Power output, corresponding to the micro-USB power voltage (5V).
- VSYS: Another power output, varying from 1.8V to 5.5V.
- 3V3_EN: 3.3V power output, connected to the SPMS enable pin.
- 3V3(OUT): Main 3.3V power supply.
- RUN: A specific pin, that you can use to reset the RP2040.
If it’s your first time, don’t get lost in these details. For most circuits, all you’ll need is a Ground port, some GPX ports and maybe a power output port.
Just remember that not all ports are equal, and you can’t use them at random for your circuits.
Continue reading the second part of this article for more detail.
Full Diagram
If you are an advanced user, know that the Raspberry Pi can also be used via SPI and I2C protocols, so most pins have other ways to be addressed in your code.
You can find the complete Raspberry Pi Pico pinout diagram here:

There is also a specific port for the integrated LED and 3 debug pins that I didn’t include in my previous diagram. The LED can be addressed via the port 25 on the Pico and just “LED” on the Pico W.
For more details, check the Raspberry Pi official documentation here.
How to Use the GPIO Pins of the Raspberry Pi Pico
When coding in MicroPython with a Raspberry Pi Pico, each GPIO pin has a specific number, that can be used in your scripts.
You might also like: The Raspberry Pi projects that pay for themselves
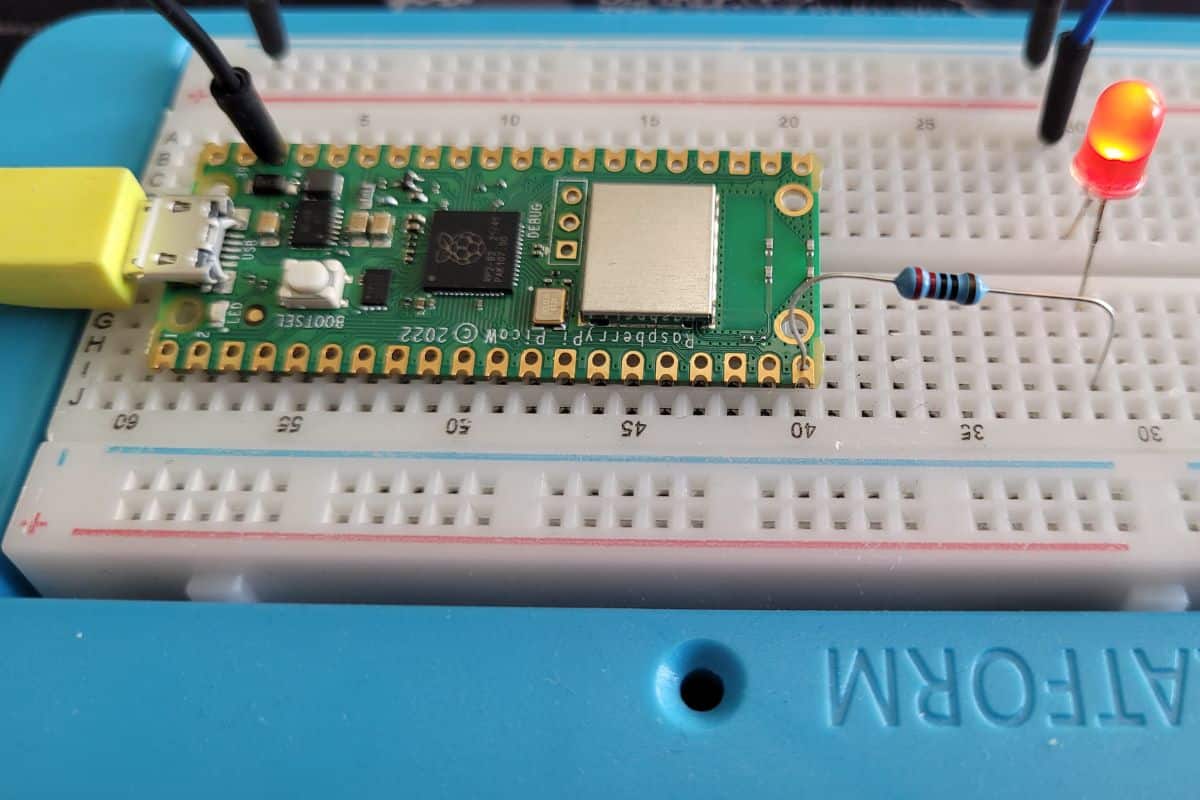
You can use the previous diagram to address them. For example, in a simple circuit like this, with a LED and a resistor plugged to the last pin on the left of the board (pin 20, labelled GP15), I can use the port 15 to put the LED on or off.

Bonus tip: : Instead of Googling syntax every time, I keep a small cheat sheet with the main Python elements. Check it here.
In MicroPython, a simple code can look like this:
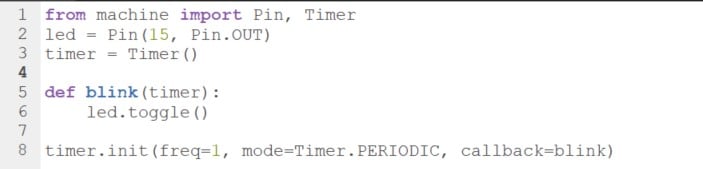
If the wiring is correct, the LED should start to blink at the specified frequency.
Here is the code if you want to try it on your side:
from machine import Pin, Timer
led = Pin(15, Pin.OUT)
timer = Timer()

def blink(timer):
   led.toggle()

timer.init(freq=1, mode=Timer.PERIODIC, callback=blink)
You can also try it with pin 25 to test this with the integrated LED (no wiring required in this case).
It’s a basic example, to get you started, but you’ll use the same concepts with any project. Each GPIO pin has a different number that you can address with the Pin() class in your code to control the I/O pins.
You can find more details in the MicroPython documentation if needed.
We also have a guide to getting started with Pico you can check out.
And for more ideas, read our dedicated article on the best Raspberry Pi Pico projects.
If you want to go further, SunFounder has the perfect kit for the Raspberry Pi, including all the components you might need (sensors, wires, display, etc.). You can find it here on Amazon, or directly on their website. It’s more than 100 projects you can do with it, all documented, in Python, C++ or Piper Make. Don’t miss out!
Something not working? Don't waste hours going in circles. Ask in the RaspberryTips Community and get help from people who've already figured it out. Get unstuck now.
Related Questions
Is there a difference between the Raspberry Pi Pico and Pico W?
The Raspberry Pi Pico W includes a wireless interface, wired internally to pins 23, 24, 25, and 29. So, these pins are not available on the W edition. The main change is that the integrated LED can’t be addressed via the pin “25”, the name “LED” should be used instead.
You might also like: Don't buy a new SD card until your read this.
Something like:led = Pin("LED", Pin.OUT)
Instead of:led = Pin(25, Pin.OUT)
Ports 23, 24 and 29 were already missing on the first Raspberry Pi Pico, so aside from that, it’s the same pinout diagram. Your code should be compatible with both versions.
What is the difference between the Raspberry Pi Pico and Zero?
The main difference between the Raspberry Pi Pico and Zero is that the Pico is a controller while the Zero is a computer, like the other models in the Raspberry Pi family. The Pico is great to run a specific task in an electronic circuit, but it can’t run a full operating system like the Zero can.
You can read more in my comparison between the Pico and Zero models in this article.
Not getting the same result?
Even when you follow every step, small differences in OS version, hardware or config can change the outcome. Instead of wasting time guessing, get help from people who have already fixed the same kind of issue.
- Get help on your exact issue
- Access step-by-step videos for tricky setups
- Browse the website without ads


