
Getting Started with Raspberry Pi Imager: The Ultimate Guide
Raspberry Pi Imager is the ultimate tool for any Raspberry Pi user. When it first came out, I shunned it a little because I preferred Balena Etcher. But lately, I’ve been using it more and more, and the latest add-ons make it even more interesting. I will share everything with you in this article.
Raspberry Pi Imager is a tool created by the Raspberry Pi Foundation to install new systems on the tiny Raspberry Pi. SD cards and USB drives are supported, as well as the most popular operating systems. It’s also possible to flash any custom image for the Raspberry Pi.
Even if you’re already familiar with the basics of Raspberry Pi Imager, you might learn a few things while reading this guide to the end of the article. So keep reading to discover all its secrets.
If you’re feeling lost in all the Raspberry Pi jargon, I’ve got something to help you out. I’ve created a free glossary that explains all the essential terms and abbreviations in a way that’s easy to understand. It’s a great resource to have by your side. Get your free copy here.
How to Install Raspberry Pi Imager
Raspberry Pi Imager is available for all operating systems. The application can be downloaded from the official website and installed on most computers, or even on a Raspberry Pi directly.
Windows
If you have a computer with Windows, follow these steps to install Raspberry Pi Imager:
- Visit this page on the official website.
- Click on the Download for Windows button:

- This will download an executable file on your computer.
Double-click on the file to install the application. - A basic setup wizard will appear to complete the installation:

- Click Install and wait a few seconds.
Then click Finish to complete the installation and start Raspberry Pi Imager for the first time.
Raspberry Pi OS
Raspberry Pi Imager can also be installed on Raspberry Pi OS directly. It’s available in the default repository (the package name is “rpi-imager”). In the latest versions of the OS, it’s even pre-installed by default.
You might also like: 15 Easy Projects for Raspberry Pi Beginners
So, even if you don’t have another PC, you can easily install Raspberry Pi Imager and flash new operating systems to SD cards and USB drives.
Note: A word of caution, though, as there’s only one SD card slot on the Raspberry Pi. So, if Raspberry Pi OS is installed on that SD card, you can only flash a new system to a USB drive, or you’ll have use a USB adapter to flash it to another SD card. If you use a USB drive for the main system (as recommended here), then there isn’t a problem.
Here’s how to install Raspberry Pi Imager on Raspberry Pi OS:
You can get answers from real experts in minutes.
Get help with your setup
- Open a terminal.
- Type the following commands:
sudo apt updatesudo apt install rpi-imager - After a few seconds, Raspberry Pi Imager will be installed and added to the main menu.
You can launch it from the main menu > Accessories > Raspberry Pi Imager.
Tip: Command lines can be a pain to memorize. I put the essential Linux commands on a printable cheat sheet so you don't have to keep googling them. You can grab the PDF here if you want to save some time.
Linux
If you’re using Linux on your PC, especially Ubuntu or any Debian-based distribution, you can download an AppImage file from the official website.
Go to this page and click on “Download for Linux (x86_64)” to get the executable.
It should run automatically if you double-click the file.
If you’re using another distribution not based on Debian, like Fedora or Manjaro, you might need to look for a specific solution, but it should be possible to install it on most systems. For example, with Fedora, a snap package is available, as explained here.
Bonus tip: When I started, the hardest part wasn’t the setup, it was figuring out what to build next. I ended up creating a list of 75+ project ideas with links and difficulty, so it’s easier to just pick something and try it. Grab the list here.

If you want a clearer path than jumping from tutorial to tutorial, my book gives you a step-by-step roadmap to really understand your Raspberry Pi.
Check the book hereFor Ubuntu, I have a step-by-step tutorial here: How to Install Raspberry Pi Imager on Ubuntu (Full Guide).
macOS
A DMG file is available for macOS users directly from the official website.
Once downloaded, just double-click on it and add it to your Applications, as with any other software installation.
Network Boot
The last option is to use the new “network boot” feature, especially useful if you don’t have another PC. You can start Raspberry Pi Imager directly from the network. Check this complete guide about network boot on Raspberry Pi to learn more about this solution.
How to Use Raspberry Pi Imager
Once Raspberry Pi Imager is installed, it can be used to flash any operating system to an SD card or a USB drive. Some operating systems are directly supported and can be installed in one click. Other operating systems can be flashed by using a custom image.
Flash an Operating System From the List
The basic usage of Raspberry Pi Imager is to flash a system available in the “OS List”.
Here is how to do this:
- The default view of Raspberry Pi Imager looks like this:

- There are 4 main steps:
- “Device” – filter the list available for your particular model.
- “OS” – where you’ll see a list of featured operating systems.
- “Storage” – to select the media you’ll use for your new system.
- “Customisation” – a place to optionally configure additional system settings.
The ‘Next’ button will be available after making your selections.
- Under Device, select your Raspberry Pi model.

This step is optional, but I recommend it, so you won’t be overwhelmed with all the OS versions that appear in the next step. If not, you can choose “No filtering” at the very bottom. - After continuing with the Next button, you’ll see the OS list, that looks like this:

The first two options are Raspberry Pi OS with Desktop (64-or 32-bit versions), which you’ll probably use most of the time. But then, you can also browse the different submenus to find other operating systems that are supported by this tool.
For example, in Raspberry Pi OS (other), you’ll find all the other versions of Raspberry Pi OS. Under “Other general-purpose OS,” you’ll find well-supported distributions like Ubuntu or Manjaro, with all submenus for their different flavors.
If you’re lost will all these possibilities, you should probably read my guide about this here: Raspberry Pi OS Versions: All Your Questions Answered. - For the example, let’s click on the “Raspberry Pi OS (64-bit)” option.
Click Next to continue on to the next step. - Insert the storage media you’ll be using to install your new system.
It can be an SD card if you have an SD card reader (integrated or via a USB adapter like this one), or a USB drive (like the flash disk I use all the time or an SSD). - Under the Storage section, you’ll pick your media from the list.

Make sure you don’t select a drive used for something important (the disk used for the current OS is hidden, but if you have a backup drive or anything like that it may be listed there). - After continuing, click SKIP CUSTOMISATION at the bottom for a quick start.
- Under Writing, you’ll get a summary of your choices.
Click the ‘WRITE’ button to start the installation process.
Note: we cover more advanced Customisation settings in a later section below.
The installation will take a few minutes. It may take more time if you’re flashing a specific image for the first time or if you have a slow internet connection.
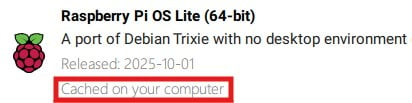
That’s because Raspberry Imager will first download the image from the system maintainer and then flash it on your media storage. The second time you flash the same image, it will already be cached on your disk and will be installed faster (no download required).
It will be mentioned under the image name if the file is already cached on your computer:
Flash a Custom Image
But Raspberry Pi Imager is not limited to the default OS list and can be used to flash any image compatible with the Raspberry Pi. Even some popular distributions like Fedora, DietPi, or Chromium OS are not included in the OS list currently.
But you can still use Raspberry Pi Imager to install these operating systems.
For example, if you have downloaded an image manually from the official website of any distribution, here’s how you can flash it using Raspberry Pi Imager:
- Click OS.
- Select Use custom at the bottom of the list.

- A window will appear, asking you to pick the image you want to use.
All file formats are supported; you don’t even need to extract the file if the system image is compressed. - Then follow the same steps mentioned in the previous section, picking the media you intend to use, and writing to start the installation.
As explained in this video on my YouTube channel, Raspberry Pi Imager tends to be slightly slower than Balena Etcher when you already have the image file on your disk. That’s one of the reasons why I continued using Etcher for a long time, but if you don’t care about 30 seconds, it’s fine.
Here’s the video where I tested this:
Raspberry Pi Imager Advanced Options
Since this tool was first released, the Raspberry Pi Foundation has remained focused on its development and has continued adding new features regularly. Raspberry Pi Imager continues to improve with each new release. It’s a tool I use regularly now for my Raspberry Pis.
Let’s take a look at some additional and interesting features you can try with Imager.
Special Features Available in the OS List
You may have noticed that the OS list not only includes Linux distributions but also other tools:
- Misc utility images: In this subsection, you’ll find ways to update and change the bootloader on your Raspberry Pi, without having to install Raspberry Pi OS first. This can be useful if you want to switch from SD to USB boot or if you want to try the new network boot feature.
You’ll also find PINN OS there, which is a great tool for multi-boot (more details here).
- Erase: Quickly format your SD card or USB drive with this feature. Most systems have a way to do this, but you don’t have to find how to do it on your system, just use this option to erase anything. It’s pretty useful if you have tons of partitions after a multi-boot test.
OS Customisation Settings
Bonus tip: When I started, the hardest part wasn’t the setup, it was figuring out what to build next. I ended up creating a list of 75+ project ideas with links and difficulty, so it’s easier to just pick something and try it. Grab the list here.
I mentioned the “Customisation” menu item earlier, but let’s take a moment to explain what it is. After you make your key selections (Device, OS, Storage), you’ll now be presented with a whole section on ‘Customisation’ options.
This section is completely optional and can be skipped to keep things simple.
But I think it’s quite handy.

In this section, you can change the default configuration for your new system before you boot it for the first time. For example, you can set the local time zone, change the keyboard layout, create a user account, activate a Wi-Fi connection, or turn on remote services.
You can see one subsection on my screenshot, but feel free to explore the other ones, like “Remote Access,” where you can enable SSH on first boot for a headless install.
By the way, if you set a username and password (don’t use ‘pi’), it’ll skip the first boot wizard that has been added for security reasons in the latest versions of Raspberry Pi OS.
You might also like: Are you sure your Pi is secure? Here are 17 simple tips to protect it.
Every time you click NEXT, the options you set will be stored in memory for your current image but also future installations. Every time you install a new system, you can automatically apply the same settings, edit them, or simply use the defaults instead.
I encourage you to use this feature. Personally, I do it almost every day, and it saves me a lot of time setting up new systems.
Note: These customization settings only work if explicitly supported by the operating system you’re installing, like Raspberry Pi OS and other Debian-based distributions, typically. Not all images will support this feature.
Video
Still stuck after following this guide? Drop your question in the RaspberryTips Community — real Pi users answer fast. Post your question here.
Final Thoughts on Raspberry Pi Imager
As a whole, Raspberry Pi Imager is a great tool to have on your computer if you work with Raspberry Pi devices regularly. It will ease the installation process, as you’ll be guided from the selection of your operating system to the selection of the media storage.
It will also avoid many issues, like accidentally erasing an important drive :-).
This tool is not (yet) perfect, though. I mentioned some of the issues in this article. For example, the OS list could be better and is not always up-to-date (in my article about LibreElec, I noticed that the latest release, available for one month already, hasn’t been added to the OS list). There’s also the issue of speed, but it’s not a big deal if you are not flashing 20 SD cards every day.
With new features being added regularly, Imager will only become more and more powerful, so I recommend you start using this useful tool right now. And please let me know if you discover other tips or issues with it.
Read next: Should you wait for Raspberry Pi 6?
Not getting the same result?
Even when you follow every step, small differences in OS version, hardware or config can change the outcome. Instead of wasting time guessing, get help from people who have already fixed the same kind of issue.
- Get help on your exact issue
- Access step-by-step videos for tricky setups
- Browse the website without ads


