

I Tried MX Linux on Raspberry Pi: Here’s How to Install It
I’ve wanted to try MX Linux on a Raspberry Pi for a long time, but until recently there simply wasn’t an official way to install it. Now that that’s changed, it’s finally possible to see if this distribution is a good fit for the Pi. In this guide, I’ll show you how to get it installed.
MX Linux for Raspberry Pi is now available on the official website. It’s based on Raspberry Pi OS, using XFCE for the desktop environment, and it’s supported for Raspberry Pi 3, 4/400, and 5.
In this tutorial, I will walk you through installing and flashing MX Linux onto your Raspberry Pi. I will then walk you through the first setup steps and look at some interactive Desktop interface tools that make this unique.
If you’re new to Raspberry Pi or Linux, I’ve got something that can help you right away!
Download my free Linux commands cheat sheet – it’s a quick reference guide with all the essential commands you’ll need to get things done on your Raspberry Pi. Click here to get it for free!
Getting Ready to Install MX Linux
Before starting, I will list the requirements (both hardware and software) for following this tutorial. This is a Linux distribution, so the process is similar to any other Linux distro installation.
- Raspberry Pi 4, 400, or 5: Being a spin-off of the original Raspberry Pi OS image with key additions, the official website says it’s been tested on Raspberry Pi 4, 400, and 5, but does not work on older Pi models. For context, I’m testing on my Raspberry Pi 4 (2GB).
- Micro-SD card or USB stick: You can pick whichever you have. You will need a storage option with at least 16 GB as the OS image is over 7 Gigs. If you don’t have one handy and need a new SD card for this tutorial, find our current recommendations here.
- Raspberry Pi Imager or Balena Etcher: MX Linux is not available by default in Raspberry Pi Imager, but you can flash a custom image with those tools, so pick the one you prefer.
I have a complete guide for Raspberry Pi Imager here if you need it.
That is all for the requirements. Of course, you will need a power source for your Raspberry Pi and a monitor and keyboard to complete the first setup, as SSH is disabled by default.
Installing MX Linux on Raspberry Pi
I will take you through the process of installing the MX Linux in three easy steps:
- Getting the latest MX Linux image for your Raspberry Pi.
- Flashing this image onto an SD Card.
- First Boot.
Let’s dive deep into each step now.
Step 1: Download the Latest Image for MX Linux
It is easy to obtain the latest image of MX Linux from its website.
First, go to the official downloads page for MX Linux by going to this page.
You will see the different desktop options available for the latest version of MX Linux (25.2 as of this update). There’s a specific Raspberry Pi-supported version (MX_rpi_respin), so we will find the download link for the Raspberry P image under that section.

Clicking on that link will redirect you to SourceForge, where the image is available. The download will automatically start and should take a few minutes to complete depending on your Internet speed as the image is quite large (about 2.3 GB).
You can get answers from real experts in minutes.
Get help with your setup
Next, after it’s done downloading, extract the contents of the .zip file to a folder.
The extracted content will have an .img file, which you’ll need later.

Step 2: Flash the Downloaded Image
Now that you have the latest release, let’s flash the image onto an SD Card or USB Drive.
You can use any flashing software you like (Raspberry Pi Imager, Balena Etcher, etc).
Here’s how to flash MX Linux using Raspberry Pi Imager:
- Launch Raspberry Pi Imager, and make the following selections.
- Device – Choose which Raspberry Pi model you’ll be using.
- OS – Scroll down and choose Use custom.

- When prompted, select the .img file you extracted earlier (e.g., mx25.2_rpi.img).
- Storage – pick your SD card or USB drive.
Make sure you choose the right one, as it will be completely erased by this process. - Writing – click WRITE to begin the flashing process.

Now wait for a few minutes for the process to complete. Once it’s done, you can remove the SD card (or USB drive) from your computer and plug it into your Raspberry Pi.
You might also like: Pi5 vs. Pi4: I tested them, here's the result
Step 3: First Boot Instructions
Once you turn on the Raspberry Pi after inserting the SD card, we will boot into MX Linux for the first time. I recommend connecting your Pi to a monitor, keyboard and mouse, at least for the first boot (SSH is not enabled by default).

Note: As of this update, there’s a bug where your Raspberry Pi can enter an infinite boot loop where you keep seeing the MX Linux logo over and over. The easiest solution is to plug in an Ethernet cable to your router until you complete setup.
After that, you can unplug the cable and setup Wi-Fi instead if needed.
Bonus tip: If the terminal still feels confusing, I made a simple cheat sheet with 74 commands explained in plain English. You can grab it here for free..

If you want a clearer path than jumping from tutorial to tutorial, my book gives you a step-by-step roadmap to really understand your Raspberry Pi.
Check the book hereMX Linux comes with a nice first-time setup wizard that allows the user to customize options and create a new default user. Let’s go through the default setup.
The first screen I got prompted me to choose my preferred language.
After making your choice, click ‘Close’ to continue.

On the second screen, you can change your keyboard layout if needed.
Press the ‘Next button’ to continue.

The following window will allow you to configure your system’s hostname and domain name, and enable/disable the Samba server for MS networking. (Your Pi will show up as a network drive on Windows systems, enabling file sharing).
If you don’t need anything here, you can just keep the defaults and continue.
You might also like: Pi5 vs. Pi4: I tested them, here's the result

The next window allows you to set up the locale and timezone for your system.
Make sure everything looks good and then proceed.

In the final step, you can create a default user and optionally a root user for your system.
For now, I will set up the default user credentials only and then continue.

It will show a loading screen while the system configures all the settings we selected.
It may take a few seconds so just be patient.

Once the setup wizard is complete, you will be taken to the login screen for your MX Linux system. You can login through the credentials you just set and start using MX Linux on your Pi!

Congratulations, you have successfully installed MX Linux on your Raspberry Pi!
Something not working? Don't waste hours going in circles. Ask in the RaspberryTips Community and get help from people who've already figured it out. Get unstuck now.
Getting Started with MX Linux
This section will cover the basics and first experience with this new operating system.
Post Installation Guide: First Steps
In this section, we’ll cover the first essential steps you should perform when you install any new operating system.
You might also like: 7 Surprising Uses for a Raspberry Pi
Connecting to Internet
- To connect our Pi to the Internet, you can either use an Ethernet cable or connect to a Wi-Fi network. Connecting to a Wi-Fi network is very easy with MX Linux. They give a rich GUI for the Network Manager utility.
- From the desktop interface, click the Network icon from the left side panel.
Expand “Available networks” to see the nearby Wi-Fi names.
Select the network you would like to connect to and enter the password for it.
- If everything goes well, you should now be connected to your WiFi Network.
To verify, just type in the following command:ip a
This should show the wlan0 option listed with an inet option, which means that your Pi is now connected to the Internet.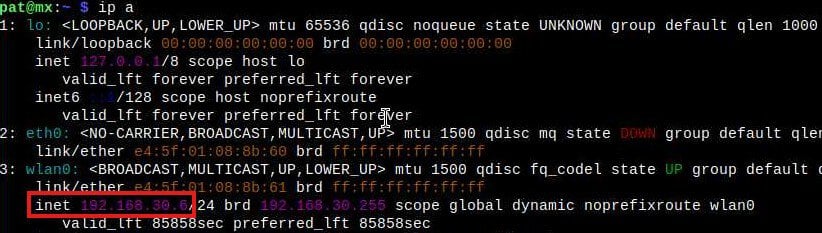
Tip: Command lines can be a pain to memorize. I put the essential Linux commands on a printable cheat sheet so you don't have to keep googling them. You can grab the PDF here if you want to save some time.
Checking for Updates
MX Linux uses the Synaptic Package Manager. It has a user interface for checking and performing updates on packages that is easy to use.
On the left side of the screen, there will be a box-shaped icon for the Synaptic Package Manager. Right-click on it and press the Check for Updates option.

This will open a new window that will run the command to get the list of upgradable packages.
Once this process is complete, the box on the left should be green, indicating that new updates are available. Left-clicking it will open a window that shows the list of upgradable packages.
Mark the checkboxes (so you don’t have to press Y every time) and press Upgrade.

This will start the upgrade process. The initial update will take quite some time so be patient and brew a nice cup of coffee while you wait. The terminal will automatically close (as we ticked that option) once the updates are completed.
MX Linux Features
In this section, we will go through some key features of MX Linux, which makes it stand out in this crowd of Linux Distributions available for the Pi.
MX Tools: Your All-In-One Toolkit
Bonus tip: If the terminal still feels confusing, I made a simple cheat sheet with 74 commands explained in plain English. You can grab it here for free..
MX Tools is a compilation of graphical resources that make this a unique OS compared to other Linux distributions. MX Tools makes it easy to access most system tasks, from customizing boot options to repo management through this unified interface.

You can think of it as the Windows Control Panel on steroids. For instance, one popular task in Linux is to create bootable .iso files for an Operating System you have set up for a particular application. You can do this very easily on MX Linux with MX Snapshot Utility.
This is just one example, the possibilities are endless. MX Linux community continues to develop useful utilities that make this OS easier and more convenient for casual users and developers.
A Customizable Desktop Interface
MX Linux offers rich customization features for the User Interface and Experience.
Let’s explore some of the key distinguishing features it offers.
MX Conky
MX Linux offers various customization options to improve the overall user experience. For instance, one such unique feature is a customizable widget manager. It lets you choose from numerous styled widgets for your desktop.
To try it, click the MX Linux icon on the bottom left of the screen to open the menu, and type “conky” in the search bar. Click MX Conky to launch it.

MX Conky will show various widget options you can choose from. Each widget will be visible on the Desktop and display different amounts of information about the system like the temperature of the CPU (very useful for the Pi!).
Custom Themes
In addition to Conky, you can customize and set various themes for your Desktop UI. To do this, go to the Whisker menu (like the Start menu for Linux) for MX Linux (again, by pressing the logo icon at the bottom) and search for the Appearance item.

This will open a new window, where you can choose any theme of your choice! I prefer a dark and minimalistic theme so I chose the “matcha-dark” theme. All I will say is, choose your theme wisely!

You also have the usual wallpaper customization options that allow you to change your desktop wallpaper to anything you prefer (I choose minimalist wallpapers, but you do you! After all, you have the power).
A Powerful Package Manager
Being a Debian-based system, MX Linux uses the popular APT package manager to manage all software. However, they pride themselves on their user interface, so why not have one for this? Indeed, they have the Synaptic Package Manager.

Synaptic is a graphical package management program.
It provides the same features as the APT command line utility with a GUI front-end.
You can perform and manage every package in your system using this versatile tool through a rich and user-friendly UI. We already used it in this tutorial when we updated our system.
Great! You now know how to install and set up MX Linux on your Raspberry Pi.
Check this: The Raspberry Pi I'd actually buy today
This is just a start. You have a lot more that you can do with your Raspberry Pi. For instance, you can try other popular Linux Operating Systems on your Pi. Here are some articles you will find helpful:
- How To Install And Use Fedora On Your Raspberry Pi?
- How to Start Using CentOS on your Raspberry Pi?
- How to Install Rocky Linux on your Raspberry Pi?
Not getting the same result?
Even when you follow every step, small differences in OS version, hardware or config can change the outcome. Instead of wasting time guessing, get help from people who have already fixed the same kind of issue.
- Get help on your exact issue
- Access step-by-step videos for tricky setups
- Browse the website without ads


