

How to Install VMware ESXi on a Raspberry Pi (Step-by-Step)
I’ve been using VMware ESXi for years as a sysadmin, so when I discovered there was an ARM version for Raspberry Pi, I had to test it myself. I expected a quick setup, but between BIOS tweaks, USB drives, and a few unexpected hurdles, it turned into a much bigger project. Here’s the simplest way I found to get it running.
VMware ESXi Arm Edition is available through the Broadcom support portal, under the VMware Flings files. A free Broadcom account is required to access the download files. Once downloaded, ESXi can be installed on a USB drive and configured to run on the Raspberry Pi.
This setup is a bit more complicated than most Raspberry Pi installations, especially if you’ve never used ESXi before. I’ll walk you through the entire process, including the Raspberry Pi BIOS changes, USB installation steps, and other tips to get everything working properly.
If you’re new to Raspberry Pi or Linux, I’ve got something that can help you right away!
Download my free Linux commands cheat sheet – it’s a quick reference guide with all the essential commands you’ll need to get things done on your Raspberry Pi. Click here to get it for free!
Overview of VMware ESXi on Raspberry Pi
Before going to the installation, let me introduce what we will do, and what you need to know and do in this tutorial.
What is VMware ESXi?

VMware ESXi is a well-known software for virtualization purposes (an alternative to Microsoft Hyper-V, also popular). For example, I use it at work to run several Linux systems and host different services on each one. This avoids having a physical server for each system and allows advanced features like clustering, high availability and full backups.
My goal is not to go too far in the VMware ESXi introduction. If it’s the first time you’ve heard about it, it’s probably a good idea to look for more details before going further. But whatever your current level, I’ll show you how to install it on your Raspberry Pi.
So, VMWare now has an ARM version of the ESXi system. It’s currently available under the Flings brand (like a lab if you want, not complete support in the main product), and it works well on Raspberry Pi (at least on a Pi 4 with 4GB RAM or more).
As a side note, you can also install Proxmox on Raspberry Pi. I tried it too, it’s not there yet, but it’s almost ready.
Prerequisites for VMware ESXi on Raspberry Pi
To sum up, here is what you need to get started:
You can get answers from real experts in minutes.
Get help with your setup
- Raspberry Pi: I recommend a Raspberry Pi 5 with 8GB RAM if you want to use this system for the long term. If it’s just to test, a Pi 4 or 400 is enough, as long as it has a minimum of 4GB of RAM.
- SD card: Any is OK, it’s only to boot the UEFI boot, so we won’t need it once VMWare starts.
- USB flash drive: This one will store the ESXi installation image.
A small flash drive works here, so 8GB is enough. - A second USB drive: The first USB is for the system installation, and the second one is for hosting the virtual machines. For this one, a larger SSD USB disk is probably better here. It needs to hold your virtual machines and will directly impact their performance.
- (Optional) A third USB drive: I find it weird to overwrite the installation USB key with the system. So another option is to have a third USB drive for the final installation of VMware ESXi. It’s useful to keep the installation key intact, in case you need to reinstall it later.
If you’re using two or three full-on USB SSD drives instead of simple USB flash drives, make sure they’re self-powered, with a powered USB hub for instance. The Raspberry Pi will probably not have enough to power two or three USB drives simultaneously.
VMware ESXi Installation Overview
As I mentioned, the installation procedure is difficult for a system install.
These are the big picture steps:
- Prerequisites: you’ll need an SD card as usual, but also at least two USB drives to install VMware ESXi on your Raspberry Pi. I’ll explain why later.
- Step 1 – UEFI Bios: We’ll need to boot the UEFI firmware to use VMware ESXi. This is the main goal of the SD card in this installation. We’ll access the Raspberry Pi BIOS, change a few things and then boot on a USB drive.
- Step 2 – Installation: The installation wizard for VMware ESXi will be on a USB key, we’ll boot on it to install the system somewhere (it can be the same USB key or another one).
- Step 3 – Storage: Once on the ESXi system, you’ll need another USB storage to run the virtual machines. On a standard server, the system and the virtual machine’s datastore are not on the same disk(s). So, step 3 will be to configure this storage space.
- Step 4 – Create a virtual machine: Finally, I’ll show you how to create your first virtual machine. Once everything else is done, it’s the same process as on any server.
Let’s cover each step in detail.
Prepare Disks for VMware ESXi ARM Edition
The first thing we’re going to do is download the files and prepare all of our disks. We’ll be putting the UEFI firmware onto an SD card and the VMware installation image onto our small USB flash drive.
Check this: Should you wait for Raspberry Pi 6?
Update the Raspberry Pi Firmware
You might need to update the Raspberry Pi firmware to enable the USB boot feature.
Bonus tip: If the terminal still feels confusing, I made a simple cheat sheet with 74 commands explained in plain English. You can grab it here for free..

If you want a clearer path than jumping from tutorial to tutorial, my book gives you a step-by-step roadmap to really understand your Raspberry Pi.
Check the book hereThis is only necessary if you haven’t used it before, and for a Raspberry Pi 4. In other cases, it probably already works and you don’t need to do anything. It’s a one-time update for “old” Raspberry Pi.
If you think you might be in this situation, here is the procedure to install the latest firmware:
- Start on a Raspberry Pi OS system if you have one, or flash a new SD card with Raspberry Pi OS on it (the Lite version is enough).
Check this tutorial if you need further assistance on this. - Update the system:
sudo apt update
sudo apt upgrade
sudo apt full-upgrade - Update the firmware:
sudo rpi-update
sudo rpi-eeprom-update -d -a
After a reboot, your Raspberry Pi can now boot on USB.
Prepare the SD Card for UEFI Firmware
Now let’s create the SD card. As I mentioned previously, the only thing we need on this SD card is the Raspberry Pi UEFI firmware, to access the “BIOS” and boot VMware from there.
- Format the SD card in FAT32.
The easiest way to format it is to use Raspberry Pi Imager.
Under the OS step, you’ll find an option to format the SD card as FAT32. Pick this option, select your SD card, and click “Next” to start formatting.
 - Download both of these firmware files:
- The Raspberry Pi firmware files.
- The Raspberry Pi 4 UEFI firmware or this Raspberry Pi 5 UEFI firmware, depending on which board you’re using.
- Extract them, each one in a separate folder.
It may take a while, as there are plenty of tiny files to extract. - Go into the first folder (firmware-master).
Go to the firmware-master/boot subfolder.
Delete all files that start with “kernel” like kernel7.img and others.
Copy everything else inside /boot to your SD card. - Then go into the second folder (UEFI).
Copy all the files to the SD card.
Confirm overwrite when asked.
Below is what the SD card contents look like when you’re all done for the Raspberry Pi 4.
(It looks slightly different for the Raspberry Pi 5, which has no /firmware folder.)

The SD card is ready to use, but don’t start your Pi yet, because we still have to prepare the USB flash drive.
Prepare the USB Drive for the VMware Installation Image
The second step is to create a USB drive containing the VMWare installation image.
Here is how to do this:
Note: VMware is now a part of Broadcom, and you now have to access the Broadcom site to download VMWare software.
- Visit the Broadcom page for Free Downloads.
Although the software is free, you still have to create an account and log in. - Go to Flings > ESXi Arm Edition.
Click on the release version see the downloads available.
- Download the ISO file (e.g., ESXi-Arm-ISO-2_1-dl.zip).
You have to agree to the TOS by checking the box at the top before you can download.
- Once the file is on your computer, you can use a tool like Balena Etcher or Raspberry Pi Imager to flash it to your USB key. Use the smaller drive for this image.
With Imager, choose “Use Custom” for the OS so you can pick the file you downloaded.
After a few seconds, the USB key is ready, you can plug it into your Raspberry Pi.
Install VMware ESXi ARM Edition
Now that you’ve prepared all the files and disks, you’re ready to install VMware ESXi.
Start your Raspberry Pi with the SD card and the USB key plugged in.
BIOS Settings
The next step is to access the BIOS menu to start the installation wizard:
- Just after the rainbow screen, you’ll see a screen you have probably never seen before:

- Press “ESC” to access the BIOS menu.
You can use the arrow keys to move around, ENTER to select, and ESC to go back. - The 3GB RAM Limit should already be disabled by default.
If not, go to Device Manager > Raspberry Pi Configuration > Advanced Configuration and disable it. Then hit ESC a few times to go back to the top level.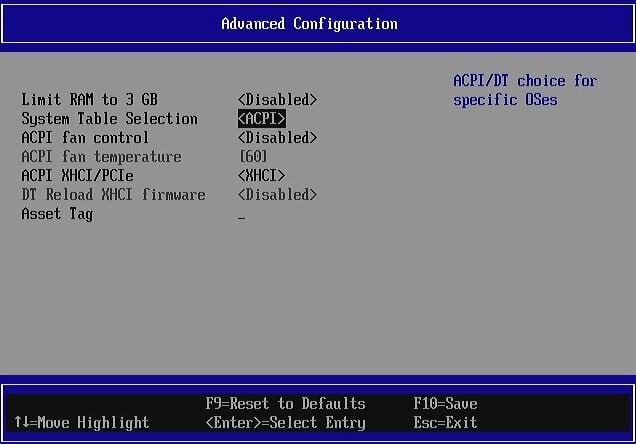
- Go to Boot Maintenance Manager > Boot Options > Change Boot Order.
- Set the USB as the first boot device if needed.
(Press ENTER, then + to move USB to the top, then ENTER again to save the order.)
Mine was already that way, so I didn’t need to change anything here.
If you changed it, hit F10 to save the order permanently. You might also need to select “commit changes” as well.
Press ESC a few times again to return to the top level. - Choose “Continue” to exit the BIOS and start the VMWare installation.

You should see something like this next:
Wait a few minutes for the system to start (it’s time for a coffee break!), and move to the next step.
Read next: 15 Easy Projects for Raspberry Pi Beginners
Warning: As of this update, VMware ESXi Arm Edition will not work on a Raspberry Pi 5 using its default network adapters because they’re not supported. The workaround solution on a Pi 5 is to plug in a USB-Ethernet adapter in order to continue.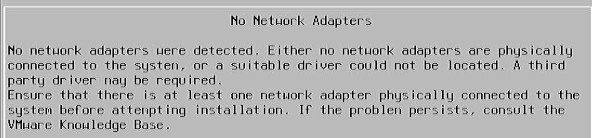
VMWare Installation
If you chose the installation with a third USB drive, you need to plug one now.
Once the yellow screens disappears, you’ll get a setup menu to install the system.
This is straightforward, here are the steps:
- On the first message, press “Enter” to continue.
- Accept the License Agreement with “F11”.
If you are using the same keyboard as me, it’s probably something like “Fn+F9” to do “F11”. - The wizard will scan your locale devices, and display the available USB drives.

If you have only one, it’s easy, press enter to continue.
If you have two or more, select the one where you want to install the system (you’ll need to keep it plugged all the time after that). - Then select the keyboard layout and press “Enter” to continue.

- Finally, enter a root password.
You will need something with several character types, I don’t know exactly the rules, but try something like letters, numbers and special characters. - Now, you need to start the installation by pressing “F11”.

The installation will take more or less time depending on the devices you are using, but it took me about a minute with the official Raspberry Pi Flash Drive.

The wizard asks you to remove the installation media, obviously do this only if you have two USB keys. With one only, the system is now on the USB drive so you need to keep it plugged.
The SD card is also required for the system to start automatically.
First Boot on ESXi
Press “Enter” at the end of the installation to reboot the Raspberry Pi.
The Raspberry Pi should start automatically with the SD card, which will boot the USB key first.
If this is not the case, return to the BIOS menu, you probably need to fix the boot order (especially if you used a different USB key).
After that, you’ll get the yellow screen again, and the VMware ESXi system will start.
There is nothing to do at this step.

Once the system is completely started, you can access the web client at: http://<IP>.
The IP address is visible on your screen.
On first access, you may get an HTTPS warning, which is safe to ignore and proceed.
Bonus tip: If the terminal still feels confusing, I made a simple cheat sheet with 74 commands explained in plain English. You can grab it here for free..
Read next: The Raspberry Pi I'd actually buy today
Going Further with VMware ESXi
Ok, all of this is good, VMware ESXi is now installed on your Raspberry Pi.
But now you’ll probably need help using it and creating your first virtual machine.
If you are used to ESXi, it’s almost the same as usual, there is just a tip I will give you to create the datastore because I had trouble finding the solution.
Create a Datastore
Creating a datastore is not possible by default on ESXi.
When you plug in a USB drive, it will mount automatically, so you can easily use it in a virtual machine. But to create a storage partition on it, you need to follow these steps:
- Log in to the web client.
The username is “root” and the password you chose during the installation.
- Enable SSH.
Right-click on “Host” in the left menu.
Go to “Services” and click on “Enable secure shell (SSH)”.
- Use Putty or any other SSH client to access the Raspberry Pi prompt.
- Log in with the same username and password.
- Enter the two commands:
/etc/init.d/usbarbitrator stop
chkconfig usbarbitrator off
This will stop the USB service that auto-mounts USB drives, and disable it on boot. - Plug your USB drive.
Try to use the USB 3.0 ports (blue), that are faster, for this datastore at least (ideally, both drives should be on them, but it’s not always possible).
- To be sure, convert the USB key to msdos instead of gpt.
It might not be required on your system or drive, but as I’m on Windows, all my USB keys use the GPT format.- Get the device ID in the web client.
Go to Storage > Devices.
Click on the USB drive you want to use (you may need to unplug/plug it to refresh the view, now that the USB arbitrator service is off).
Note the “Path” field. - Switch to msdos with the following command:
partedUtil mklabel /dev/disks/mpx.vmhba32:C0:T0:L0 msdos
The device path might be different on your system.
I didn’t manage to create the datastore before doing this.
- Get the device ID in the web client.
- You can now create the datastore from the web client (the storage disk for your virtual machines):
- Go to Storage > Datastores.
- New datastore.
- Choose a name for this datastore (datastore1 for example).

- Select the USB device you want to use
- Then select the partitioning options.
“Use full disk” would be my recommendation as you’ll keep it plugged in all the time. - Click on Finish to format the drive and create the new datastore.
Wow, that’s it, your datastore is ready to use.
That’s all for the special tricks you need to know about installing ESXi on Raspberry Pi, but if you are new to this system, I’ll also guide you to create the first virtual machine.
Create a Virtual Machine
We have the system installed, and a datastore ready to store virtual machines, now we need to create a virtual machine.
Here is the procedure to create a new virtual machine:
- Click on “Virtual Machines” in the left menu.
- Click on “Create / Register VM”.
- A wizard will appear, asking you if you want to create a new one, deploy a pre-built machine or register an existing one.
I’ll show you the first case, and you can find help easily on the web for the two other ones. - Then, enter the name of the virtual machine and the operating system you will install on it:

- Select the storage you want to use.
It’s probably the “datastore1” we just created. - Then you can customize the virtual machine configuration:

Don’t forget that you are on a Raspberry Pi, so the resources are not unlimited. - For the CD/DVD drive line, choose “Use datastore iso file” and upload an image with the system you want to use.
The easiest one for a first try is to use the Debian ARM64 net installer image (available here).
For other distributions, look at what you can find, or follow the tutorials on the website I link below (you will probably need to use qemu to convert the image file into a VMWare disk file). - Click “Next” and “Finish” to complete the virtual machine creation.

The virtual machine is now available, you need to start it to install the system on it.
To interact with the virtual machine, you can use the HTML viewer, or install the remote console for more features and better keyboard support (especially if like me, you are not using a US keyboard).

Most of the popular Linux distributions should work, and then some. For me, the installation of Debian with XFCE took me about 30 minutes, but I’m not on an optimized setup, so it’s probably better with a decent drive (hopefully).

If you want to go further with ESXi-ARM, I recommend this website. It includes many tutorials to install specific systems on it and advanced configuration tips.
Still stuck after following this guide? Drop your question in the RaspberryTips Community — real Pi users answer fast. Post your question here.
Video Tutorial
You can check this video from my YouTube channel, to watch me install VMware ESXi on my Raspberry Pi:
In conclusion, this VMware ESXi version for the ARM architecture works pretty well. The installation is complicated, as you need to understand the different steps. Hopefully my guide here is easier than the official one.
In real life, I’m unsure if I will use this system as I don’t see a case where it can be useful for me. But if you are hosting different services, want to test x64 systems or anything else, you can now do this on Raspberry Pi directly.
The alternative being to use VMWare Workstation on your PC, and run Raspberry Pi OS on it.
Not getting the same result?
Even when you follow every step, small differences in OS version, hardware or config can change the outcome. Instead of wasting time guessing, get help from people who have already fixed the same kind of issue.
- Get help on your exact issue
- Access step-by-step videos for tricky setups
- Browse the website without ads


