

How to Install On-Screen / Virtual Keyboard in Raspberry Pi
One of the greatest things about the Raspberry Pi is how small a computer it is. But if you want to keep it compact by using a touch screen, or if your Pi doesn’t have a keyboard, how can you type? In this situation, an on-screen or virtual keyboard can be very useful.
On the latest version of Raspberry Pi OS, there’s a built-in onscreen keyboard that can be enabled in the Control Centre. After turning it on, the virtual keyboard can be brought up by clicking the keyboard icon in the top right of the desktop.
It’s particularly convenient for touchscreens, like the RasPad 3 or SunFounder TS-10 I’ve tested. It’s like making an iPad with a Raspberry Pi inside. In this article, I will show you how to install the virtual keyboard, including how to use it and a few extra tips.
If you’re feeling lost in all the Raspberry Pi jargon, I’ve got something to help you out. I’ve created a free glossary that explains all the essential terms and abbreviations in a way that’s easy to understand. It’s a great resource to have by your side. Get your free copy here.
Updating Raspberry Pi OS
In this step, you’ll want to make sure you have a graphical desktop environment.
Install Raspberry Pi OS
Obviously, the first step is to install an operating system on your Raspberry Pi. If you need some help installing Raspberry Pi OS, you can read my detailed tutorial here. The Desktop version is required to install the virtual screen on it.
The most recent Raspberry Pi OS release (Trixie) has improved touchscreen support, so you’ll definitely want to take advantage of it.
But, if you don’t have a keyboard at home, you might get stuck during the configuration. How do you configure the network or complete the welcome wizard without a keyboard?
That’s why this tutorial for a headless installation on Raspberry Pi Zero will probably help.
You’ll learn how to configure the network and enable SSH from your computer, so you don’t need a keyboard. I often use this method when I create a new SD card, even if I have a good wireless keyboard. This saves time on each installation.
You can get answers from real experts in minutes.
Get help with your setup
Update the System
Once your operating system is installed, there’s one more step. As I mentioned, the package is available in the default Raspberry Pi OS repository. So, it’s a good idea to start by updating your system.
Bonus tip: When I started, the hardest part wasn’t the setup, it was figuring out what to build next. I ended up creating a list of 75+ project ideas with links and difficulty, so it’s easier to just pick something and try it. Grab the list here.

If you want a clearer path than jumping from tutorial to tutorial, my book gives you a step-by-step roadmap to really understand your Raspberry Pi.
Check the book hereHere are the commands to update all packages from a terminal:sudo apt update
sudo apt upgrade
sudo reboot
You can also do this in the “Add/Remove Software” tool if you prefer:
Go to the main menu > Preferences > Add/Remove Software.
Then click on Options > Check for Updates and upgrade everything.

Tip: Command lines can be a pain to memorize. I put the essential Linux commands on a printable cheat sheet so you don't have to keep googling them. You can grab the PDF here if you want to save some time.
Check this: Pi5 vs. Pi4: I tested them, here's the result
Enable SSH (Optional)
If you use a touch screen or don’t have a keyboard, it’s probably a good idea to enable SSH on your Raspberry Pi (if you didn’t already do it during the installation, as explained here). This way, you can install and configure new packages from your computer.
This step is optional, but here’s how to do it:
- Open the main menu.
- Go to Preferences > Control Centre.
- Under the Interfaces tab, enable SSH.

You can now connect to your Raspberry Pi from your computer.
On Windows, you need a software like Termius or Putty.
On Linux, you can use a terminal with the command: ssh <username>@<ip>
You’ll find more details on SSH in this tutorial if needed.
Enabling the Virtual Keyboard
Now that you have an updated desktop, we can finally install the virtual keyboard. I will show you how to do this with two methods: directly on Raspberry Pi OS with Desktop or via SSH.
Installation on Raspberry Pi OS Desktop
Good news, the virtual keyboard is installed by default on Raspberry Pi OS Desktop (Trixie).
All you need to do is enable it:
- Open the main menu.
- Go to Preferences > Control Centre.
- Under the Display tab, you’ll find the onscreen keyboard settings.

By default, it’s enabled only if you’re using a touchscreen. - To make the virtual keyboard always available, change the On-screen Keyboard dropdown to Enabled Always.

- Don’t forget to explicitly set the On-Screen Keyboard Location.
Select from the dropdown which monitor you want it to appear on.
(If you’re not sure which monitor, go to the Screens tab to identify them.)
You can now exit this tool and skip directly to the section on using the virtual keyboard.
Installation via SSH
If you don’t have a keyboard available, you can also install the package remotely from a different computer, if SSH is enabled:
- Connect to the Raspberry Pi with SSH.
(check this post if you need some help) - Launch the raspi-config tool:
sudo raspi-config - Navigate to Display Options > Onscreen Keyboard.
- Select Always On and press ENTER to enable it.
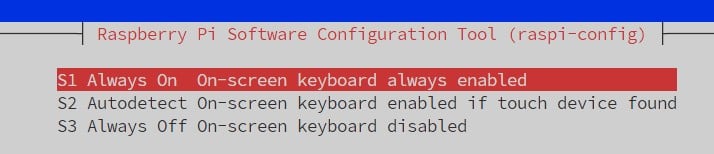
- Go to Finish at the bottom to exit the tool.
That’s it! You can now switch back to the Raspberry Pi screen and read the next section.
Using the Virtual Keyboard
Now that you’ve enabled the virtual keyboard, in this section, I’ll show you how to use it.
Open the Keyboard
Bonus tip: When I started, the hardest part wasn’t the setup, it was figuring out what to build next. I ended up creating a list of 75+ project ideas with links and difficulty, so it’s easier to just pick something and try it. Grab the list here.
Once it’s enabled, a keyboard icon will show up in the top right of the desktop:

Clicking on the keyboard icon will make the virtual keyboard appear at the bottom of your desktop. It also will automatically appear if you’re using any programs that ask for keyboard input.
From there, the usage is intuitive (it’s really similar to a smartphone keyboard).
Autostart with Raspberry Pi OS
In older versions of this tutorial, we had to jump through hoops to get the virtual keyboard to appear again on reboot. Not so anymore with the new Trixie release. Now it’s easy.
If the virtual keyboard is set to Enabled Always, it should start automatically each time you reboot Raspberry Pi OS.
Something not working? Don't waste hours going in circles. Ask in the RaspberryTips Community and get help from people who've already figured it out. Get unstuck now.
Video Tutorial
If you want to follow along as I enable the virtual keyboard on my Raspberry Pi, you can watch this video on my YouTube channel where I do exactly that:
That’s it! You now know how to install an on-screen keyboard on your Raspberry Pi.
In general, I prefer using a wireless keyboard (as explained here), but this solution may help if you have no other choice.
Obviously, you can also use a remote access tool like Anydesk to control your Pi from your computer, or any other remote desktop solutions (I list my favorites one here).
I hope this post was useful for you. Ultimately, it’s probably better to get a keyboard for your Raspberry Pi if you start being serious with it. I tested many of them over the years, and you can find my current recommendations here.
There is no one size fits all for this, the best keyboard for you depends on your needs and how you use your Raspberry Pi, it’s not necessarily the same as mine. Click on the previous link to know which one you should use.
Not getting the same result?
Even when you follow every step, small differences in OS version, hardware or config can change the outcome. Instead of wasting time guessing, get help from people who have already fixed the same kind of issue.
- Get help on your exact issue
- Access step-by-step videos for tricky setups
- Browse the website without ads


There is one big challenge: what if you only have a mouse and a screen? No ssh, no vnc… Start the add/remove programs and find the matchbox on screen keyboard. But wait… the search option does not work without a keyboard… where to find the matchbox installation file… in which category? You can find it in the System catagory, alphabetic under the M…
Click apply and enter your password. Probably the default “raspberry”. But wait… you need a keyboard to enter the password… I am lost!
No you are not: Open the texteditor from the Accessories startmenu. Now find the word “raspberry” (if that is your password) in any of the descriptionfiles from the add/remove program, and copy it. If you have another password, then find the right letters or numbers and copy them to the texteditor in the correct order. When ready, click apply in the add/remove software program and paste your password. After the install you have your virtual keyboard!
Hi Tom,
Ah ah, thanks for your message, it may help other people
If you are in this case, the other idea is to do everything from your computer via SSH
I have a tutorial for the beginning: https://raspberrytips.com/pi-zero-setup-without-keyboard/
Then you can use apt to install the package and find a way to create a shortcut, following tom recommendation or other
My keyboard has only upper and lowercase alphabetic characters, no numbers or punctuation – not a lot of use like that!