

How to Install OBS Studio on Raspberry Pi OS? (Video Capture)
I use OBS Studio on my PC for almost every RaspberryTips video, so I wanted to see if it could also run on a Raspberry Pi. I didn’t expect miracles, but with newer Pi models, basic screen recording and video capture are now possible. If you want to record your Raspberry Pi desktop or stream something, here’s how to install it and get started.
OBS Studio can now be installed directly on Raspberry Pi OS from the default repository by using the package manager. On older Raspberry Pi OS releases, using Pi-Apps is the easiest alternative.
I will guide you through the installation process, and show you how to use it once installed.
But before that, we will start with a quick overview of OBS Studio.
If you’re new to Raspberry Pi or Linux, I’ve got something that can help you right away!
Download my free Linux commands cheat sheet – it’s a quick reference guide with all the essential commands you’ll need to get things done on your Raspberry Pi. Click here to get it for free!
Introduction to OBS Studio
Let me give you a quick primer on OBS Studio before we install it.
What is OBS Studio?
OBS Studio is one of those tools you can use to record a video on your computer. You can manage multiple sources (like a Camera module or a USB device), and include several of them in a recording.
The good news is that it’s a free and powerful tool to do this, and it’s a quick Raspberry Pi project you can do with no extra hardware.

OBS Studio is also often used for live-streaming, as you can manage everything in real time in a drag and drop preview. As I use OBS Studio on my computer to record my YouTube and community videos, I was curious to see how it works on Raspberry Pi OS.
OBS Studio on Raspberry Pi
OBS Studio is available for any operating system. You can find binaries for Windows and macOS on the home page, and it’s available in the default repositories in most Linux distributions.
If you’re using the latest Raspberry Pi OS (trixie), Raspberry Pi OS Legacy (bookworm), or one version older (bullseye), then OBS Studio is available in the default repository, and the installation is pretty straightforward.
You can get answers from real experts in minutes.
Get help with your setup
But if you’re using an older OS release (buster or older), it’s a bit different. One solution was to compile the application from source, but the process was long, complicated, and the instructions became quickly obsolete when the source code changed. Therefore, if you’re using an old Raspberry Pi OS release, the easiest option is to use Pi-Apps to do everything for you.
I’ll be covering installation methods for both new and old releases in this article.
Hardware Prerequisites
OBS Studio is not really optimized for Raspberry Pi, so I strongly recommend a Raspberry Pi 5, Pi 4 with 4 GB memory, or Pi 4 with 8 GB memory to follow this tutorial.
If you want to try on Raspberry Pi 3B+, it could work if you create a swap file (I didn’t use swap in my tests on Pi 4).
Here’s how to create a swap file (in a terminal or via SSH):sudo dd if=/dev/zero of=/var/swap2 bs=1024 count=1000000
sudo chmod 600 /var/swap2
sudo mkswap /var/swap2
sudo swapon /var/swap2
sudo swapon
Even with a Raspberry Pi 4, OBS Studio is pretty heavy and will easily use 100% of your CPU and a big chunk of memory. So be patient if you try it on an older device.
Related: Why is Swap Used In Linux? (Goal, Requirements, and Commands)
Bonus tip: If the terminal still feels confusing, I made a simple cheat sheet with 74 commands explained in plain English. You can grab it here for free..

If you want a clearer path than jumping from tutorial to tutorial, my book gives you a step-by-step roadmap to really understand your Raspberry Pi.
Check the book hereInstall OBS Studio on Raspberry Pi OS (Recent Versions)
If you’re using a recent Raspberry Pi OS Desktop release within the last 5 years (codename trixie, bookworm, or bullseye), then OBS Studio is available directly in the package manager. You’ll need to install some dependencies first, followed by the main OBS package.
Install FFmpeg
The FDK AAC package is a prerequisite for OBS Studio. FDK AAC is the FFmpeg encoder for the AAC format. It’s the successor of MP3, often used in MP4 streams, and required for OBS Studio.
On more recent Raspberry Pi OS versions, you can install it simply with:sudo apt update
sudo apt install libfdk-aac2 libfdk-aac-dev
I gave you the terminal commands, but you can also search for the package names in the “Add / Remove Software” tool if you prefer to use the GUI.
Install OBS Studio From the Official Repository
You can then install the main package for OBS Studio with:sudo apt install obs-studio

Or if you prefer, you can also use the Add / Remove Software tool to install OBS Studio:

All the other dependencies will be installed automatically. You’re done with installation, so you can skip the next section and go down to the usage tips, where I help you to get started with this application.
Tip: Command lines can be a pain to memorize. I put the essential Linux commands on a printable cheat sheet so you don't have to keep googling them. You can grab the PDF here if you want to save some time.
Install OBS Studio on Older Raspberry Pi OS Versions
If you’re still running a very old release of Raspberry Pi OS, such as Buster or older, installing OBS Studio is not as straightforward. But don’t worry, I have an easy solution for you.
You could try to download the sources and compile them manually, but frankly, it’s way easier to use Pi-Apps for this. At least it works all the time, and you only need one command to do this.
Install Pi-Apps
If you don’t know, Pi-Apps is a nice tool that allows you to install many applications in a few clicks, especially those that are not available in the package manager and are difficult to install manually.
To install Pi-Apps, open a terminal and paste this command:wget -qO- https://raw.githubusercontent.com/Botspot/pi-apps/master/install | bash
I have a full video lesson inside the community about Pi-Apps, but I’ll give you the short version here, just to show you how to use it to install OBS.
Use Pi-Apps to Install OBS Studio
Once Pi-Apps is installed, you’ll have a shortcut on your Desktop (and in the main menu). Double-click to launch it, and go to the Multimedia category, where you’ll find OBS Studio:

Select OBS Studio and click “Install”—a terminal window will show up, but you don’t have to do anything. Pi-Apps will automatically install everything for you.

A few minutes later, OBS Studio will be ready to go, and you can read the next part to get started with it.
Getting Started with OBS Studio on Raspberry Pi
Now that you’ve got OBS Studio installed, it might take a little setup to get it working properly.
First Run
However you chose to install it, you can now start OBS Studio from the main menu:
Sound & Video > OBS Studio.
Read next: Make Passive Income with Raspberry Pi

You’ll likely get an error when you start it for the first time. I had it on all versions I tested, so I think it’s the same for everyone :-).
On both Raspberry Pi 4 and Pi 5, I get this error:"Failed to initialize video. Your GPU may not be supported, or your graphic drivers may need to be updated."

Bonus tip: If the terminal still feels confusing, I made a simple cheat sheet with 74 commands explained in plain English. You can grab it here for free..
Let me know if you find another solution, but the only thing that worked for me is to set this variable before starting OBS:
- Open a terminal and run this command:
MESA_GL_VERSION_OVERRIDE=3.3 obs
This should start OBS as expected now.
Create Desktop Shortcut
Of course, we want the program to load correctly every time.
First, let’s make a launch script for it:
- Create a new script:
nano /home/$USER/obs.sh - Add only this line:
MESA_GL_VERSION_OVERRIDE=3.3 obs - Save & exit (CTRL+X).
- Give your script execute permission:
chmod +x /home/$USER/obs.sh
Next, let’s modify the menu shortcut to run our script:
- Open the Pi menu > Preferences > Control Centre.
- Go to the Main Menu tab, where you’ll see your existing menu shortcuts.
- Expand the Sound & Video category, select OBS Studio, and click Edit Item.

- In the Command box, modify the path to point to your script (e.g. /home/pat/obs.sh).

- Click OK to save.
Now, OBS Studio will load from the main menu properly:

On the first run, an auto-configuration wizard is available to set the default settings. If you don’t see it, you can start it by going to Tools > Auto-Configuration Wizard.
I recommend using the wizard so you don’t have to change anything else to get started. Answer the few questions (keep the default values if you have no idea) and OBS will run a test to configure everything. Click on “Apply settings to confirm”.
Screen Capture
Here’s how to capture your screen with OBS:
- By default, the Sources panel is available at the bottom of the screen.
(If you don’t see it, go to the “Docks” menu, and click “Sources” to make it appear.)
- Click Add to bring in a new source.
- Choose Screen Capture.

- A window shows up asking for a source name.
Keep it default or enter whatever you want.
Then confirm with OK. - On the next screen, you can confirm a few things like the monitor to capture or if you want to capture the mouse pointer.
- From here, your screen appears on the default scene:

It would be easier with two screens (one with OBS and the other with the things you want to record), but this way works in any case.
Camera Capture
If you have a camera (Pi module or other), you can add it to the sources almost the same way:
- Enable your camera on Raspberry Pi OS (click the link for more details)
- Click Add in the “Sources” panel
- Choose “Video Capture Device (V4L2)” as new source

- Again, choose a name and confirm
- In the next window, you can configure everything about your camera

For example, mine needed a rotation to display the image in the correct orientation, so I just changed the “Rotation” value and let the other settings by default - Confirm to add it in the source list
Once you have at least one source, you change the image size on the screen. For example, you can use OBS to stream your desktop and use your camera to show your face in a corner.
All these settings can be changed by clicking on the “Settings” button on the right (general, stream to Twitch, output quality and format, shortcuts, etc.). OBS also manages other sources the same way (such as audio, for example).
You might also like: Yes, you can access your Pi from anywhere. Here's how.
Record
Go to the Docks menu at the top, and click Controls.
To record your screen or camera, type “Start Recording” on the right: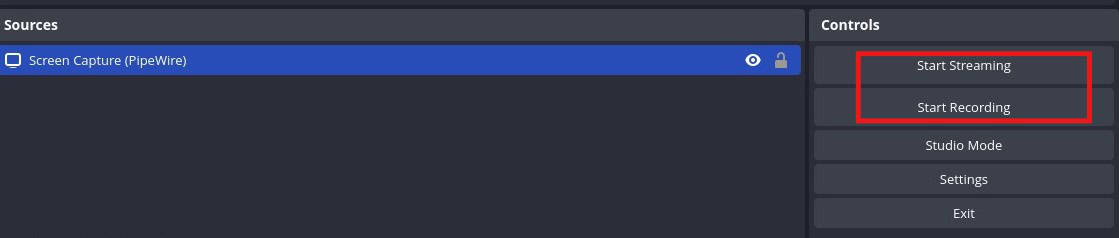
The default output folder is to your home directory, with files in MKV format in 1080p quality.
You can change everything under File > Settings:

Shortcuts
By default, there’s no shortcut so you need to use a mouse to start/stop recording or anything else.
In the settings it’s possible to set a shortcut for each action.

Still stuck after following this guide? Drop your question in the RaspberryTips Community — real Pi users answer fast. Post your question here.
Video
That’s it! You now know how to install and configure OBS on your Raspberry Pi.
I tested on my Raspberry Pi 4, and it works pretty well—no lag, no bugs, so all good news. I’ll probably try it in a future video for our YouTube channel and let you know if I have anything else to add.
Not getting the same result?
Even when you follow every step, small differences in OS version, hardware or config can change the outcome. Instead of wasting time guessing, get help from people who have already fixed the same kind of issue.
- Get help on your exact issue
- Access step-by-step videos for tricky setups
- Browse the website without ads


I made it to the next to last step. The computer could not find “simde-math.h” and terminate with an exception error. Any advice on how to proceed with the OBS-studio install.
Regarding the issue with not being able to run on the Raspberry Pi 4. A one-time fix for this issue is:
After the “sudo make install” command, edit the file
/usr/share/applications/com.obsproject.Studio.desktop
Change the line that reads
Exec=obs
to
Exec=bash -c “MESA_GL_VERSION_OVERRIDE=3.3 obs”
This will permit the desktop menu launcher to correctly launch the app. This is equivalent to running the command line version; however, it is simpler for those people used to menus.
Thanks, Mark 🙂
This version of OBS does not have the Browser source as on the windows version.
My setup is a RPI2 with camera and motioneyeOS. Then instead of a windows station to stream to Youtube with OBS (with ip address of the motioneyeos pi) i was willing to use a RPI4.
I also tried the camera on the pi4 and OBS (no pi2 involved) but no success for now, the camera does not appear in OBS…
ok i saw there is a problem with the plugins
there is a tread about it there:
https://obsproject.com/forum/threads/obs-raspberry-pi-build-instructions.115739/page-5
Thanks
Very helpful!
Particularly the sections “Pre-requisites” and “FFmpeg AAC”, as well as the hint MESA_GL_VERSION_OVERRIDE=3.3 saved me a lot of time.
The section “Build the source code” might be slightly revised:
– “sudo git clone – recursive” should be “git clone –recursive”
– no sudo during build, except for “sudo make install”
Considering today’s interest of youngsters in social media, OBS should be included with the regular release of Raspberry Pi OS. It works nicely for game streaming with a Pi 4 and SD resolution.
as of may 15th 2021 following commands are needed too finish the build:
sudo apt install libwayland*
sudo apt install qtbase5-private-dev
sudo cmake -DUNIX_STRUCTURE=1 -DENABLE_PIPEWIRE=OFF -DBUILD_BROWSER=OFF -DCMAKE_INSTALL_PREFIX=/usr ..
Thanks, I created a video (coming this week) and I have seen there were several changes.
I didn’t update the article yet, but the easiest way is probably to use Pi-Apps now.
This build worked for me, but I also managed to get it installed much faster and in one click using pi-apps (https://github.com/Botspot/pi-apps). I’m sure they borrowed from your good work here!