

How to Watch Netflix and Other Streaming Services on Kodi?
Kodi is a great tool for Raspberry Pi, it allows you to use it as a media center (Videos, Music, Pictures, and Games).
However, it’s not always easy to find the add-on you want to watch your favorite streaming service.
Today, I’ll show you how to install Netflix and other add-ons on Kodi.
In this post, I’ll explain everything, from the operating system (OSMC, LibreElec, or even Raspberry Pi OS), to the main application (Kodi) and the add-ons you need to watch Netflix, YouTube, Amazon, or whatever.
I highly recommend using a VPN as soon as Kodi is installed. It protects your data and identity, but also allows you to access movies not available in your current country. You can read my tutorial here on how to install NordVPN with Kodi.
If you’re new to Raspberry Pi or Linux, I’ve got something that can help you right away!
Download my free Linux commands cheat sheet – it’s a quick reference guide with all the essential commands you’ll need to get things done on your Raspberry Pi. Click here to get it for free!
Kodi Introduction
Let’s start with a background introduction to what Kodi is and how to use it on Raspberry Pi.
What Is Kodi?
Kodi is a media center software that allows us to turn an old TV into a smart TV to play local files and watch streaming services.
In this interface, you get access to your Movies, Pictures, Music, and Games
The default skin on OSMC looks like this:

Many other skins are available if you don’t like this one.
So basically, Kodi turns your TV into a smart TV thanks to the Raspberry Pi. It will be way easier to browse this interface instead of using Chromium to watch something on Netflix or find your MP4 file in a subfolder on Raspberry Pi OS.
Note: Want to see how to get started with Kodi? I have a video on this topic just for community members. Join here to watch, and get access to 30+ other lessons for Raspberry Pi along with many other benefits!
You can get answers from real experts in minutes.
Get help with your setup
And even if you already have a smart TV, it goes further with all the add-ons available.
We’ll discuss how to install the main add-ons later in this post.
Which Operating System Should I Use for Kodi?
- LibreElec: a minimal distribution, built exclusively to run Kodi. It will be the lightest way to get it running. It’s a good choice, especially for an older Raspberry Pi model.
- OSMC: a custom build of Raspberry Pi OS, adding Kodi on top of it. It will automatically start Kodi on boot. It’s a good choice if you are interested in an SSH access to run scripts or automate tasks in the background (to download torrents or whatever).
- Raspberry Pi OS or any other Linux distribution: you can install Kodi like any other app and use it only when needed. It’s not the best experience as a media-center, but works great if you need to use your Raspberry Pi for desktop usage the rest of the time.
In this article, I will show you the installation with OSMC, but most of the tutorials will be the same for any of these options.
If you prefer using Raspberry Pi OS, you can read my installation guide here, and install Kodi manually by following this procedure.
Install OSMC on your Raspberry Pi
To get Kodi on your Raspberry Pi, I recommend you install OSMC as your operating system.
There are 3 ways to install it:
- Use Raspberry Pi Imager, and find OSMC in the OS list.
- Get the installer on the official website.
- Or download the disk image manually and flash it with Etcher or any other tool.
Any method will work, so pick the one you prefer.
Prepare the SD Card
Here’s an example of how to get it onto your SD card manually:
Bonus tip: If the terminal still feels confusing, I made a simple cheat sheet with 74 commands explained in plain English. You can grab it here for free..

If you want a clearer path than jumping from tutorial to tutorial, my book gives you a step-by-step roadmap to really understand your Raspberry Pi.
Check the book here- Visit the OSMC download page.
Select Raspberry Pi, then click the Disk images button.
Download the latest version for your Raspberry Pi model:
- Insert a new SD card in your PC.
If you don’t have any SD card reader on your computer, use an adapter like this one on Amazon. - Use Etcher to flash the image you downloaded onto your SD card.
If you don’t know Etcher, it’s a tool available here to easily flash SD cards.
- Select Flash from file and choose the downloaded OSMC image when prompted.
Go to Select Target and choose your SD card.
And finally, click Flash! to start the SD card creation. - Wait a few minutes for it to write.
Once done, insert the SD card in the Raspberry Pi slot, and continue to the next part.
First Boot
Power on the Raspberry Pi and wait a few minutes for the installation to complete.
You have nothing to do for the moment, the installation process is automatic.
On the first boot, you’ll get a welcome menu.
Select the following parameters when asked:
- Select your default language.
- Then choose your time zone in the list.
- Now, it asks you for a host name, you can keep the default.
- Keep SSH enabled as we’ll use it later:

- Read and accept the license agreement.
- Set up your internet connection.
For Wi-Fi, I had to enable the adapter first.
Then I selected my network name, entered the passphrase, and hit Apply to connect. - Select your favorite theme (only two are available on a fresh installation).
I will choose the default one.
This is also the same on Raspberry Pi OS and LibreElec, I think. There might be slight differences if you pick another theme. So choose the default if you want to follow my instructions in the next sections. - Finally, say if you want to register for the newsletter or not.
- Exit the welcome menu.
You’ll now access the Kodi interface directly.

It should look like this if you were instead running Kodi on Raspberry Pi OS or LibreElec.
So from here on out, the tutorial steps are the same for any of these installation types.
Kodi Upgrade
Now we need to update the system and probably the Kodi version.
OSMC Updates
If you’re using OSMC, you can update everything easily by following this procedure:
- From the left menu, navigate to Settings > My OSMC.
- Click on the Updates icon (the cloud shape).

- Go to Manual Controls > Scan for updates now.

This will download and install all the new packages available. A restart might be required if there are some major updates available, OSMC will ask you to do it.
You might also like: Probably one of the best Raspberry Pi workstations (review)
This will update the system, but also upgrade Kodi to the latest version available. Even if I downloaded the latest image available on the OSMC website, I got a Kodi that was two versions behind. So, it’s a good idea to start by updating everything.
Raspberry Pi OS Updates
If you installed Kodi on Raspberry Pi OS, you’ll receive the new version of Kodi as soon as there are releases in the Raspberry Pi OS repositories. Just update your system regularly by following this procedure:
- Connect to your Raspberry Pi with SSH:
- Find the Raspberry Pi IP address.
You can also see it in Settings > System Info > Network. - Use Putty or another SSH client to connect (read this SSH guide if you need some help).
Default login is osmc / osmc.
- Find the Raspberry Pi IP address.
- Update the repository cache:
sudo apt update - Upgrade the main packages:
sudo apt full-upgrade - Reboot your system:
sudo reboot
It should be quick if you just installed the latest version available, especially if it’s a recent one, but just in case.
Tip: Command lines can be a pain to memorize. I put the essential Linux commands on a printable cheat sheet so you don't have to keep googling them. You can grab the PDF here if you want to save some time.
Netflix Add-On

The first service provider I want to show you how to install is Netflix.
Netflix is a paid service, so you need to have an active account to use it on Kodi, as you would on any device.
Preparation
The Netflix add-on needs some system prerequisites before installation.
- Connect to your Raspberry Pi via SSH.
Check this article if you don’t know how to do this.
-On OSMC, the default login/password is osmc/osmc.
-On Raspberry Pi OS, the login credentials are the user/pw you created. - Install prerequisite packages:
sudo apt update
sudo apt install build-essential python3-pip libnss3
sudo pip3 install setuptools wheel
sudo pip3 install pycryptodomex
sudo pip3 install websocket-client - Download the zip:
wget https://github.com/castagnait/repository.castagnait/raw/kodi/repository.castagnait-2.0.1.zip
Netflix Installation
Let’s reboot now just in case.
After the reboot, we’re ready to install the Netflix addon for Kodi:
- From the Kodi main interface, navigate to Settings > Add-on browser.
- Select Install from a zip file.
You’ll get a security warning the first time. Choose Settings to jump to what you need to do.
Press Enter to enable unknown sources, and choose “Yes” on the warning message.
- Return to Install from a zip file again. This time, it should let you proceed.
- Navigate to Home folder, and choose the only file inside (repository.catagnait-xx.zip).
A notification will tell you that the CastagnaIT repository has been added.
- Now you can choose Install from repository and select this repository:

- Go to Video addons > Netflix to install it and all of its dependencies.

- After the installation, press ESC twice to go back to the main menu.
Netflix Usage
Netflix is now installed on your system, to use it follow these steps:
- In the Kodi main menu, go to Videos > Video add-ons.
- Select the Netflix item:

- Unfortunately, plaintext login has been disabled.
So you’ll have to choose Authentication key at the bottom as a workaround. - Once logged in, choose your profile in the list.
You are now ready to watch your favorites movies on Netflix with Kodi. - On your first movie play, it may ask you to install additional modules like Widevine.
Accept them, but be careful to the additional storage required.
To download Widevine, you need over 2Go of free space on your SD card, for example.
That’s it, Netflix is now available on your Raspberry Pi.
Note: As of this update, Netflix has limited this plugin’s functionality to only 1080p playback.
YouTube Add-on

The YouTube add-on is easier to install because the package is available in the default repository.
YouTube Installation
To install YouTube on OSMC, follow these steps:
- Navigate to the Kodi main menu > Settings > Add-on browser.
- Then go to Install from repository > Kodi Add-on repository > Video add-ons.
- Find YouTube from the list and select it.
(Use the up arrow key to go to the bottom of the list faster) - Choose Install:

That’s it, you installed YouTube and you can use it as explained in the next paragraph.
If you want to change the default language and country, you can run the setup wizard, if not, it’s not mandatory.
YouTube Usage
YouTube is available in the same menu as Netflix:
- From the Kodi main menu, go to Videos > Video add-ons.
- Find YouTube and hit Enter to launch it.
- Sign in to access your feed.
Note: YouTube now requires API keys to use it on Kodi. Please follow my step-by-step tutorial to see how to do this with Kodi on Raspberry Pi.
- Once done, you can now watch your favorite YouTube channel with Kodi:

Amazon Prime Video Add-on
Bonus tip: If the terminal still feels confusing, I made a simple cheat sheet with 74 commands explained in plain English. You can grab it here for free..
Amazon Video Installation
The installation is not the easiest one as Amazon has no package available in the Kodi repository.
To install it, you need to download and install a new repository:
- Connect via SSH to your Raspberry Pi.
- Move to the home folder (if not already there).
cd /home/osmc - Download the Sandmann79 zip file to add the repository from the same name:
wget https://github.com/Sandmann79/xbmc/releases/download/Repository/repository.sandmann79.plugins-1.0.4.zip
If you don’t trust me, the main GitHub website is available here. - Go back to the Kodi main menu, and navigate to Settings > Add-on browser.
- Select Install from zip file.
Click Home folder and then select the zip file you just downloaded to install it. - Next, choose Install from repository > Sandmann79s Repository Matrix > Video add-ons.
- Finally, choose Amazon VOD from the list:
(it’s the only one available)
- Click Install and wait for installation to complete.
Amazon Video Usage
You should already know how to use it if you read the entire article.
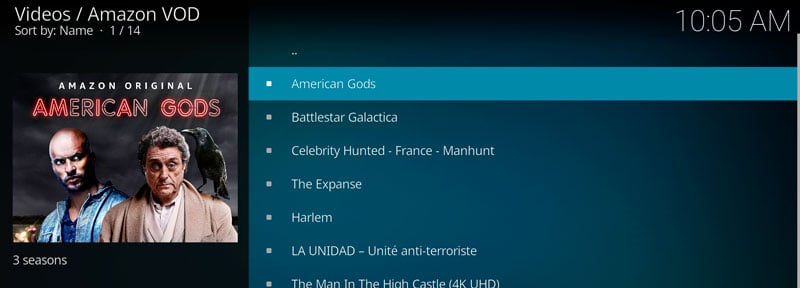
- Go back to the Kodi main menu, and select Videos > Video add-ons.
- And now Amazon VOD is on the list.
- Start and configure the application settings (you need to sign in first).
That’s it, Amazon Video is now available on your new media center.
Twitch, Plex, Popcornflix, & Others
- Twitch: mostly video games streams from worldwide gamers.
By the way, Twitch Prime is also available for free via this link. - Plex: Media center app, with premium pass or not.
- Popcornflix: Free movies.
- Main TV channels: CNN, sports, …
- Main websites & associations.
- Settings > Add-on browser.
- Install from repository > Kodi repository > Video Add-ons.
- And select the plugin you want to install in this giant list.
- Once installed, you can see it from the Kodi main menu > Videos > Videos add-ons.


Using a VPN on Kodi
Before finishing this tutorial, I want to recommend you use a VPN when you’re using Kodi.
As a reminder, a VPN is an encrypting technology, allowing you to keep yourself anonymous and protect your data online.
The other benefit is that you can often use it to watch movies or series that are not available in your country, the same thing for services.
It’s not mandatory, but it’s a great add-on to improve your experience with Kodi.
If you want to give it a try, I have an in-depth tutorial on how to install NordVPN on Raspberry Pi OS or Kodi, that will explain step-by-step how to register and configure everything easily.
Recently, I switched to a cheaper solution, with ExpressVPN.
It’s working very well, you can check your latest offer by clicking here.
I’ll share a tutorial very soon on how to install it on your Raspberry Pi.
Whatever the solution, there is a 30-day money-back guarantee, so you don’t take any risk by trying one of them now:
You might also like: Want to install Windows 11 on your Pi? Here's how
That’s it, you now know how to watch the major streaming providers on your Raspberry Pi, with OSMC and Kodi. OSMC and Kodi are great tools once you know how to use and customize them.
Be careful with your Kodi usage, even if some additional repository and plugins allow you to watch movies for free, it’s not legal. If you can watch a box office hit for free on your Raspberry Pi, there is a big chance you are not watching it legally.
If you like OSMC, tell me in the community, so I can write more tutorials on how to use a Raspberry Pi as a media center.
There is a ton of tips to know to do this correctly.
In any case, you can always read my Kodi guide for beginners to learn more about this.
Stuck on this project? Ask me or other Pi users in the RaspberryTips Community. We help each other out and you'll get answers quick. Join and fix it together.
Related Questions
How do I delete add-ons in Kodi?
If you installed an illegal add-on or simply one that doesn’t work as expected, you can remove it in the Settings > Add-ons browser > My add-ons menu. Select the plugin category and click on it. You’ll get a menu to manage it (Configure, Update, Uninstall, …).
Do I need a VPN to use Kodi?
Not really. If you use only free stuff or paid accounts, you don’t need it. People often add a VPN on Kodi to hide their identity (doing illegal actions on Raspberry Pi) or change their region to get access to blocked content in their country (forbidden too). So keep a safe usage, do only what you can do on your computer, and don’t try to bypass the rules.
Is it possible to install Kodi on Raspberry Pi OS?
Yes, if you want to continue using Raspberry Pi OS on your Raspberry and try Kodi, you can install it directly. It’s available in the apt repository (sudo apt install kodi). You also need to know that OSMC is based on Raspberry Pi OS, so you may migrate your current services on OSMC (there are small changes, but not too much).
You can also watch services like Netflix directly in Chromium, you don’t need Kodi or any other app to use it.
Check this: 15 Easy Projects for Raspberry Pi Beginners
Not getting the same result?
Even when you follow every step, small differences in OS version, hardware or config can change the outcome. Instead of wasting time guessing, get help from people who have already fixed the same kind of issue.
- Get help on your exact issue
- Access step-by-step videos for tricky setups
- Browse the website without ads


Thank you so much this walkthrough to get netflix onto kodi on raspberry pi is just super easy . your automated script is way cool . I was about to move from kodi to android tv , when I discovered your site .
Thank you once again !
Thanks for your feedback!
Thank you for this post and the overall knowledge and effort you put in this site! Amazing work, keep it up! 😀
One small question, I am following your tutorials on VPN and DNS on raspberry as well and I was curious about how kodi performs in terms of privacy when using it. Could you provide some insight about it? =)
Hello,
Thanks for your comment
I may try to write a post about this soon if I find good sources or a way to check it
If someone has more info about this, feel free to share
Just to clarify my last comment, I do not meant to download or play any illegal media with this setup. It was more about what information I am giving to the all-mighty google and how secure my browsing is with osmc 🙂
Thanks …
Tried it and it works… nice.. But my online tv channels do not work. So osmc is not a solution for me.. unfortunately.
Question: is there a way to watch it on kodi for raspbian or in the browser?
Itried to run the script but it only returned with a bunch of errors:
./netflix_prep_install.sh: cd: line 8: can’t cd to /home/osmc
./netflix_prep_install.sh: line 9: dialog: not found
There is no working ‘sudo’.
On debian/ubuntu/all general purpose linux distributions ‘sudo’
allows a permitted user to execute a command as the superuser
or another user, as specified by the security policy
With OpenELEC you have root access by default, so you dont need ‘sudo’
[…]
mkdir: can’t create directory ‘addons’: File exists
./netflix_prep_install.sh: line 22: dialog: not found
There is no working ‘sudo’.
On debian/ubuntu/all general purpose linux distributions ‘sudo’
allows a permitted user to execute a command as the superuser
or another user, as specified by the security policy
With OpenELEC you have root access by default, so you dont need ‘sudo’
./netflix_prep_install.sh: line 35: dialog: not found
There is no working ‘sudo’.
On debian/ubuntu/all general purpose linux distributions ‘sudo’
allows a permitted user to execute a command as the superuser
or another user, as specified by the security policy
With OpenELEC you have root access by default, so you dont need ‘sudo’
Did I download a wrong script? It seems like that it wasn’t written for my OS (OpenELEC -RPi.arm-8.4.0)
What should I do?
@Derisis13
It does seem as though you have the wrong OS. The beginning of this article walks you through installing the correct OS (OSMC) to get all of this working. Check that out.
Thanks for your tips: they’re easy to follow, even for me!
Unfortunately, I need to run Raspbian for a project (the reason I bought this Raspberry). You said it’s possible to use Kodi on it. I think I know how I could install it, but do you think Zjoasan’s script will work even if I’m not running OSMC ?
Hi,
I don’t think so, this is a script for OSMC
But it’s probably possible to watch Netflix on Raspbian
Did you try directly in Chromium? Any error?
You’ve got to do some tweaking of Chromium to watch Netflix on Raspbian – its a little bit of a headache and not as well documented as you’ve done here