

How to Install Eclipse on Raspberry Pi (Updated for 2026)
If you are a developer and used to Eclipse on your PC, you might prefer to play with your Raspberry Pi using the same interface. Eclipse wouldn’t necessarily be my first choice for coding on Raspberry Pi, due to the hardware limitation and cumbersome interface, but it works fine on recent models, and as a developer myself, I understand that using an editor you’re used to can potentially save a lot of time. In this tutorial, I’ll show you how to easily install Eclipse on Raspberry Pi OS.
The popular Eclipse IDE can be installed on Raspberry Pi but requires a 64-bit operating system. A package is then available for this architecture on the official website and can be downloaded and installed manually.
Don’t worry, in this article, I’ll explain how to do this step-by-step. You are at the best place to learn how to install it on your Raspberry Pi, just keep reading to follow my lead.
If you’re like me and sometimes mix up syntax between programming languages, I’ve got just the thing for you. I’ve put together a Python cheat sheet with all the essential syntax in one place, so you can keep it handy and avoid any confusion. Download it here for free!
Prerequisite: Get a 64-bit Operating System
To get Eclipse working on a Raspberry Pi, you need to use a 64-bit operating system. It can be either Raspberry Pi OS, Ubuntu, or any other distribution.
Most tutorials about Eclipse on Raspberry Pi I’ve seen are obsolete because Eclipse is no longer available in the default repository and only offers downloads for 64-bit operating systems.
So, first, let’s make sure that your OS is a 64-bit system:
You might also like: Make Passive Income with Raspberry Pi
- Open a terminal.
- Type the command:
uname -a - You’ll get something like:
Linux raspberrypi 5.10.63-v7l+ #1459 SMP Wed Oct 6 16:41:57 BST 2021 armv7l GNU/Linux
In this example, it’s “armv7”, so that’s 32-bit, which is NOT compatible with Eclipse.
On a 64-bit operating system, you’ll get something like this instead:Linux raspberrypi 6.1.0-rpi8-rpi-2712 #1 SMP PREEMPT Debian 1:6.1.73-1+rpt1 (2024-01-25) aarch64 GNU/Linux
The ‘aarch64’ tag is what we’re looking for, so if you see it, you’re ready to go.
So, first, if you’re not on a 64-bit operating system, you need to start from scratch on Raspberry Pi OS 64-bit, Ubuntu, or any other alternative that offers a 64-bit version. I have an article here about Raspberry Pi OS that will explain everything you need to know.
Bonus tip: : Instead of Googling syntax every time, I keep a small cheat sheet with the main Python elements. Check it here.

Want to build real Raspberry Pi projects with Python? This book starts from scratch and guides you toward practical scripts, automation, APIs, cameras and more.
Learn Python on Raspberry PiOnce done, make sure your system packages are up-to-date, by using the commands:sudo apt update
sudo apt upgrade
Tip: Command lines can be a pain to memorize. I put the essential Linux commands on a printable cheat sheet so you don't have to keep googling them. You can grab the PDF here if you want to save some time.
You can get answers from real experts in minutes.
Get help with your setup
Eclipse Installation on Raspberry Pi
Here are the required steps to get Eclipse running on a Raspberry Pi:
- Download the Eclipse package from the official site.
- Extract the files from the downloaded archive.
- Run the Eclipse application for the first time.
- Create a shortcut in the main menu.
I’ll now explain each step in detail.
Download the Eclipse Package
Here is the procedure to download the correct Eclipse version for your Raspberry Pi:
- Go to the Eclipse downloads page.
By default, it will give you a download link for the x86_64 architecture, which doesn’t work on Raspberry Pi. - So first, you need to click on “Download packages” to view the other options.

- Then, you can either download the “Eclipse Installer”, which will let you choose which Eclipse version to install, or directly download the version you want by scrolling a bit.
I’ll do it the manual way to show you the process. I chose to install “Eclipse IDE for Java Developers”, but it’s the same steps for the other languages (PHP, C++, etc.). - Click the “AArch64” link to get the correct download for your Raspberry Pi:

- Finally, you’ll have a download button to get the file.
If you are doing this directly on your Raspberry Pi, you can click on it.
If you’re on your PC, it’s a bit tricky. There’s a “Direct link to file” link in the right menu:
But it’s not actually a direct link. To get the direct link, start the download on your computer, and then copy the direct link while the download is in progress.
Then you can use wget via SSH or in a terminal to get the file on your Raspberry Pi, something like:wget https://eclipse.mirror.rafal.ca/technology/epp/downloads/release/2026-03/R/eclipse-java-2026-03-R-linux-gtk-aarch64.tar.gz
Don’t use the exact command above; the file version will change all the time, so get the correct link from their website directly.
Once the download is complete, you can move to the next step.
Extract the Eclipse Files
Downloading the Eclipse package on the official website will give you an archive, a .tar.gz file. You now need to extract the files before starting the installation:
- In your file explorer, go to the Downloads folder (or where you downloaded the file).
- Find the Eclipse file (should be something like “eclipse-java-VERSION.tar.gz”).

- Do a right-click on it and choose “Extract files here”.

A few seconds later, a new folder named “eclipse” will appear, and you are ready to start the application.
Run Eclipse for the First Time
- Go into the new “eclipse” folder where you extracted the files.
- Find the “eclipse” application and double-click it.

- When the popup window appears, click Execute.

- The Eclipse IDE Launcher will start, and ask you for the workspace folder.
You can keep the default value for now. Click Launch. - You should now get access to the application that you are used to.

Create a Shortcut for Eclipse in the Main Menu
Bonus tip: : Instead of Googling syntax every time, I keep a small cheat sheet with the main Python elements. Check it here.
As we are starting the application directly from extracted files, Eclipse is not really “installed” on your system, so there’s no shortcut in the main menu.
You can add a menu shortcut on Raspberry Pi OS by following these steps:
- Open the Pi menu > Preferences > Control Centre.
- Go to the Main Menu tab.
- Click the New Item button on the right to create a shortcut.

- A form shows up, fill it in like this:
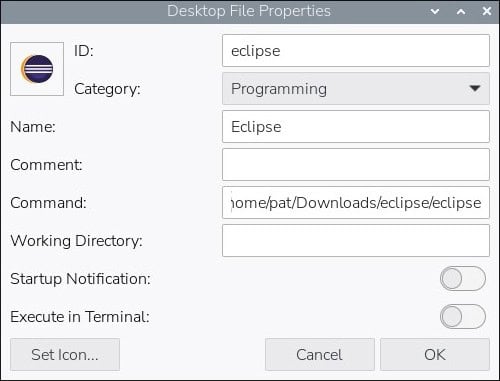
- ID: eclipse
- Category: Programming
- Name: Eclipse
- Command: put the path to the extracted executable file.
(For me, it’s /home/pat/Downloads/eclipse/eclipse). - Click Set Icon, choose From File…, and select “icon.xpm” in the same folder.
- Click “OK” to confirm.
Eclipse is now available in the main menu, under the “Programming” category.

Stuck on this project? Ask me or other Pi users in the RaspberryTips Community. We help each other out and you'll get answers quick. Join and fix it together.
Alternatives to Eclipse on Raspberry Pi
Eclipse is a heavy solution, that is not always the best fit for the Raspberry Pi limitations. Many other code editors are available on Raspberry Pi, and most of them don’t require a 64-bits operating system. For example, you can use Visual Studio Code, PyCharm, or Geany.
I have a complete article where I compare all the options available, explaining the advantages and disadvantages of each solution and how to install them on your Raspberry Pi. You can find the article here: The 7 Best Text Editors for Programming on Raspberry Pi.
Read next: Should you wait for Raspberry Pi 6?
You’ll also find links to specific tutorials to get more tips for some of them, like Geany, which I’ve used for years at my job, Visual Studio, or PyCharm, which might be the best alternative to Eclipse, even if it’s not really a light application either.
I also made a video if you prefer, you can watch it directly here:
Not getting the same result?
Even when you follow every step, small differences in OS version, hardware or config can change the outcome. Instead of wasting time guessing, get help from people who have already fixed the same kind of issue.
- Get help on your exact issue
- Access step-by-step videos for tricky setups
- Browse the website without ads


Great content! Keep up the good work!