

SSH (Secure Shell) is quite important when using a command-line Debian 12 server remotely and not having physical access, for example, a Linux server running in Cloud. Currently, SSH is one of the secure ways to access a remote system for administration, file transfer, and remote command execution. Although the cloud server comes by default with SSH enabled, the locally installed one needs to be configured manually for that.
SSH in Debian 12
SSH provides encrypted communication between two systems, allowing you to manage your Debian machine from anywhere in the world securely. By default, Debian 12 doesn’t have an SSH server installed or enabled, which is a security measure to prevent unauthorized access on systems that don’t need it.
However, if you want to manage a Debian 12 server installed in your office or set up remote access to your desktop, enabling SSH is often one of the first configuration tasks you’ll need to complete.
In this article, we not only provide the steps for installing SSH on Debian 12 (Bookworm) but also explain how to enable it to start automatically with system boot-up, and further, how to secure it.
What do we need to follow this tutorial?
- A Debian 12 system with internet connectivity
- Administrative (sudo) privileges
- Physical or console access to install and configure SSH initially
- Basic knowledge of Linux commands
Step 1: Installing OpenSSH Server
First, update your package list to ensure you’re getting the latest version:
sudo apt updateInstall the OpenSSH server package:
sudo apt install openssh-serverWhen we install the OpenSSH server on Debian 12, the system will automatically configured the SSH service and start it. However, to further confirm the same we can use the given command to check the status of the service.
sudo systemctl status ssh --no-pager -l
The status command will provide an output showing the SSH service is active, enabled and running without any error, indicated with a green active status. If it is not then use the following command to enable and activate it:
sudo systemctl start --now sshStep 2: Basic SSH Configuration
The main SSH configuration file on Debian 12 is located at /etc/ssh/sshd_config. We can edit and change its values to make the SSh work as per our requirements, however, before making any changes, create a backup:
sudo cp /etc/ssh/sshd_config /etc/ssh/sshd_config.backupTo open the configuration file for editing we can use the default text editor is Nano.
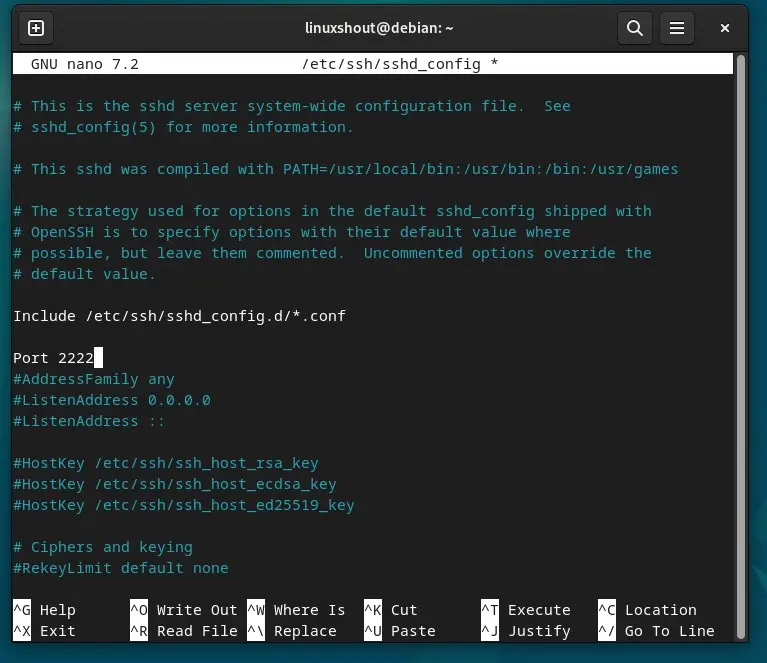
sudo nano /etc/ssh/sshd_configChanging the Default SSH Port on Debian 12
Well, by default the SSH uses 22 port number, to improve the security one can consider the changing the default port from 22 to something else such as 2222. So, in the file remove the # given before “Port 22” line and then replace 22 with one you want.
Port 2222Choose a port number between 1024 and 65535 that isn’t used by another service.
Disable Root Login
Those who want to prevent direct root access via SSH on their Debian 12 they need to just uncomment the following line.
PermitRootLogin noSpecify Allowed Users
To limit the SSH access to specific users add the following line and don’t forget to replace username1 and username2 with actual usernames who should have SSH access.
AllowUsers username1 username2After making changes, save the file by pressing Ctrl+X, type Y and press Enter key. Once exit, that restart the SSH service:
sudo systemctl restart sshStep 3: Configuring the Firewall
If you’re using UFW (Uncomplicated Firewall) on Debian 12 then to access the SSH on the configured port we need to allow it though it, however let’s, first check if UFW is active:
sudo ufw statusIf UFW is active, allow SSH connections:
# For default port 22
sudo ufw allow ssh

# Or for custom port (example: 2222)
sudo ufw allow 2222/tcp
For iptables users, add a rule to accept SSH connections:
# For default port 22
sudo iptables -A INPUT -p tcp --dport 22 -j ACCEPT

# Save iptables rules
sudo iptables-save > /etc/iptables/rules.v4
Step 4: Testing SSH Connection
From another computer on your network, test the SSH connection:
ssh username@debian-ip-addressIf you changed the port, specify it with the -p flag:
ssh -p 2222 username@debian-ip-addressYou’ll be prompted to accept the server’s fingerprint on first connection. Type “yes” to continue, then enter your password.
Step 5: Setting Up SSH Key Authentication
Password authentication is convenient but less secure than SSH keys. Here’s how to set up key-based authentication:
On your local machine (not the Debian server), generate an SSH key pair:
ssh-keygen -t ed25519 -C "[email protected]"Press Enter to accept the default file location, and optionally set a passphrase for extra security.
Copy your public key to the Debian server:
ssh-copy-id username@debian-ip-addressNow you can log in without a password:
ssh username@debian-ip-addressStep 6: Hardening SSH Security
Once key authentication is working, enhance security by disabling password authentication. Edit the SSH configuration:
sudo nano /etc/ssh/sshd_configAdd or modify these lines:
PasswordAuthentication no
PubkeyAuthentication yes
ChallengeResponseAuthentication no
UsePAM no
Additional security settings to consider:
# Limit authentication attempts
MaxAuthTries 3

# Disconnect after 5 minutes of inactivity
ClientAliveInterval 300
ClientAliveCountMax 1

# Disable empty passwords
PermitEmptyPasswords no

# Use strong ciphers only
Ciphers [email protected],[email protected],aes256-ctr,aes192-ctr,aes128-ctr
Restart SSH to apply changes:
sudo systemctl restart sshStep 7: Managing SSH Service
Here are essential commands for managing the SSH service:
Enable SSH to start automatically at boot:
sudo systemctl enable sshStart SSH service:
sudo systemctl start sshStop SSH service:
sudo systemctl stop sshRestart SSH service:
sudo systemctl restart sshCheck SSH service status:
sudo systemctl status sshDisable SSH from starting at boot:
sudo systemctl disable sshTroubleshooting Common SSH Issues
Connection Refused Error
If you get a “Connection refused” error, verify:
- SSH service is running:
sudo systemctl status ssh - Firewall isn’t blocking the connection
- You’re using the correct port number
- The server’s IP address is correct
Permission Denied
This usually indicates:
- Incorrect username or password
- SSH keys not properly configured
- User not allowed in SSH configuration
Check the SSH logs for more details:
sudo journalctl -u ssh -fSSH Service Won’t Start
If SSH fails to start, check for configuration errors:
sudo sshd -tThis command tests the configuration file and reports any syntax errors.
Monitoring SSH Access
Keep track of SSH login attempts by monitoring the auth log:
sudo tail -f /var/log/auth.logTo see successful SSH logins:
sudo grep "Accepted" /var/log/auth.logTo see failed login attempts:
sudo grep "Failed" /var/log/auth.logAdditional Security Tools
Consider installing these tools for enhanced SSH security:
Fail2ban
Fail2ban automatically blocks IP addresses after multiple failed login attempts:
sudo apt install fail2ban
sudo systemctl enable fail2ban
sudo systemctl start fail2ban
SSH Guard
An alternative to Fail2ban:
sudo apt install sshguardConclusion
Enabling SSH on Debian 12 can be done with just one command, however, further setting related to make it secure is needed or not, is upon you. Neverthless, using SSH for remote system is highly recommended.


