Java Script Basic operators, maths

Exploring JavaScript Basic Operators and Math Functions

JavaScript is a versatile language that powers much of the interactivity on the web. At its core are fundamental operators and math functions that allow developers to manipulate data and create dynamic web applications. Whether you’re just starting with JavaScript or looking to expand your knowledge, understanding these basics is essential. Let’s dive into JavaScript’s basic operators and math functions.

Basic Operators

JavaScript provides several basic operators for performing operations on variables and values. These operators include arithmetic, assignment, comparison, logical, and more.

1. Arithmetic Operators

Arithmetic operators perform mathematical operations on numeric operands.

  • Addition (+): Adds two operands.
  • Subtraction (-): Subtracts the second operand from the first.
  • Multiplication (*): Multiplies two operands.
  • Division (/): Divides the first operand by the second.
  • Modulus (%): Returns the division remainder.

Example:

let num1 = 10;
let num2 = 5;
let sum = num1 + num2; // 15
let difference = num1 - num2; // 5
let product = num1 * num2; // 50
let quotient = num1 / num2; // 2
let remainder = num1 % num2; // 0
2. Assignment Operators

Assignment operators assign values to JavaScript variables.

  • Assignment (=): Assigns the value of the right operand to the left operand.
  • Addition Assignment (+=): Adds the right operand to the left operand and assigns the result.
  • Subtraction Assignment (-=): Subtracts the right operand from the left operand and assigns the result.
  • Multiplication Assignment (*=): Multiplies the left operand by the right operand and assigns the result.
  • Division Assignment (/=): Divides the left operand by the right operand and assigns the result.

Example:

let x = 10;
x += 5; // x is now 15
x -= 3; // x is now 12
x *= 2; // x is now 24
x /= 4; // x is now 6
3. Comparison Operators

Comparison operators compare two values and return a Boolean result.

  • Equal (==): Returns true if the operands are equal.
  • Not Equal (!=): Returns true if the operands are not equal.
  • Strict Equal (===): Returns true if the operands are equal and of the same type.
  • Strict Not Equal (!==): Returns true if the operands are not equal or not of the same type.
  • Greater Than (>): Returns true if the left operand is greater than the right operand.
  • Less Than (<): Returns true if the left operand is less than the right operand.
  • Greater Than or Equal (>=): Returns true if the left operand is greater than or equal to the right operand.
  • Less Than or Equal (<=): Returns true if the left operand is less than or equal to the right operand.

Example:

let a = 5;
let b = 10;

console.log(a == b); // false
console.log(a != b); // true
console.log(a === b); // false
console.log(a !== b); // true
console.log(a > b); // false
console.log(a < b); // true
console.log(a >= b); // false
console.log(a <= b); // true
4. Logical Operators

Logical operators are used to combine or negate Boolean values.

  • Logical AND (&&): Returns true if both operands are true.
  • Logical OR (||): Returns true if at least one of the operands is true.
  • Logical NOT (!): Returns the opposite of the operand’s Boolean value.

Example:

let x = 5;
let y = 10;
let z = 15;

console.log(x < y && y < z); // true
console.log(x < y || y > z); // true
console.log(!(x > y)); // true

Math Functions

JavaScript also provides a built-in Math object with a variety of useful mathematical functions.

1. Math.abs()

Returns the absolute (positive) value of a number.

let num = -10;
let absNum = Math.abs(num); // 10
2. Math.pow()

Returns the base to the exponent power.

let base = 2;
let exponent = 3;
let result = Math.pow(base, exponent); // 8 (2^3)
3. Math.sqrt()

Returns the square root of a number.

let number = 16;
let squareRoot = Math.sqrt(number); // 4
4. Math.max() and Math.min()

Returns the maximum or minimum value from a list of numbers.

let maxNumber = Math.max(10, 20, 30); // 30
let minNumber = Math.min(10, 20, 30); // 10
5. Math.round(), Math.floor(), and Math.ceil()
  • Math.round() rounds a number to the nearest integer.
  • Math.floor() rounds a number down to the nearest integer.
  • Math.ceil() rounds a number up to the nearest integer.
let decimal = 5.7;
let rounded = Math.round(decimal); // 6
let floored = Math.floor(decimal); // 5
let ceiled = Math.ceil(decimal); // 6
6. Math.random()

Generates a random number between 0 (inclusive) and 1 (exclusive).

let randomNum = Math.random(); // 0.12345 (example)

Conclusion

JavaScript’s basic operators and math functions are foundational to building dynamic and interactive web applications. By mastering these concepts, you gain the ability to perform arithmetic operations, make comparisons, and utilize powerful math functions. Whether you’re creating a calculator, handling user input, or developing complex algorithms, understanding these fundamentals is key to becoming a proficient JavaScript developer. As you continue your JavaScript journey, these tools will serve as valuable building blocks for creating innovative and functional web experiences.
Java Script Type Conversions

Demystifying JavaScript Type Conversions: A Comprehensive Guide

JavaScript, as a dynamically-typed language, performs type conversions behind the scenes to accommodate various operations and comparisons. While this flexibility is powerful, it can lead to unexpected behavior if not understood properly. In this guide, we’ll delve into the world of JavaScript type conversions, exploring implicit and explicit conversions, coercion, and best practices.

What are Type Conversions?

Type conversion, also known as type coercion, is the process of converting data from one type to another. JavaScript performs these conversions automatically, either implicitly (done by the language) or explicitly (done by the developer).

Implicit Type Conversion

Implicit type conversion occurs when JavaScript automatically converts a value from one type to another during an operation. This often happens in situations like arithmetic operations or comparisons involving different types.

Example 1: Arithmetic Operations
let num = 10;        // num is a number
let str = "20";      // str is a string

let result = num + str;
console.log(result); // Outputs: 1020 (num is coerced into a string and concatenated)

In this example, num (a number) is implicitly converted to a string to perform concatenation with str.

Example 2: Comparison
let num = 10;       // num is a number
let str = "10";     // str is a string

if (num == str) {
  console.log("Equal");   // Outputs: Equal (str is coerced into a number for comparison)
}

Here, str (a string) is implicitly converted to a number for the comparison operation.

Explicit Type Conversion

Developers can also explicitly convert types using JavaScript’s built-in methods. This gives more control over how conversions occur and is often used to ensure expected behavior.

Example 1: Convert to Number
let str = "10";       // str is a string

let num = Number(str);
console.log(num);     // Outputs: 10

Here, the Number() function explicitly converts the string "10" to a number.

Example 2: Convert to String
let num = 10;         // num is a number

let str = String(num);
console.log(str);     // Outputs: "10"

The String() function converts the number 10 to a string.

Common Conversion Functions

JavaScript provides several functions for explicit type conversions:

  • Number(): Converts to a number.
  • String(): Converts to a string.
  • Boolean(): Converts to a boolean.
  • parseInt() and parseFloat(): Convert strings to integers or floating-point numbers.

Truthy and Falsy Values

Understanding type conversions is crucial when dealing with truthy and falsy values in JavaScript. JavaScript treats certain values as “falsy” (evaluating to false in a boolean context) and others as “truthy” (evaluating to true in a boolean context).

Falsy Values:
  • false
  • 0
  • "" (empty string)
  • null
  • undefined
  • NaN (Not a Number)
Truthy Values:
  • Any non-empty string
  • Any number other than 0
  • Objects (including arrays and functions)

Best Practices

To avoid unexpected behavior and write more predictable code:

  1. Know Your Operators: Understand which operators perform implicit type conversions, such as + for concatenation and == for loose equality.
  2. Use Strict Equality: Prefer === (strict equality) over == (loose equality) to avoid unintended type coercion.
  3. Explicit is Better Than Implicit: When in doubt, use explicit type conversion functions like Number(), String(), or Boolean().
  4. Consider Context: Be aware of the context in which type conversions occur, especially when dealing with conditional statements or function arguments.
  5. Be Consistent: Stick to a consistent approach to type conversions in your codebase to improve readability and maintainability.

Conclusion

JavaScript’s type conversions add flexibility to the language, but they can also lead to subtle bugs if not handled carefully. By understanding implicit and explicit type conversions, knowing common conversion functions, and following best practices, you’ll write more robust and reliable JavaScript code. Whether you’re a beginner or an experienced developer, mastering type conversions is essential for building efficient and bug-free applications in JavaScript.

Java Script Data types

Exploring JavaScript Data Types: A Comprehensive Guide

JavaScript, the language of the web, provides a rich set of data types to work with. Understanding these data types is essential for writing efficient and bug-free code. Whether you’re new to programming or looking to deepen your knowledge, this blog will serve as a comprehensive guide to JavaScript data types.

What are Data Types?

In programming, data types are classifications that specify the type of data a variable can hold. They determine the values that can be assigned to a variable and the operations that can be performed on those values. JavaScript supports several primitive data types, along with the object and function data types.

Primitive Data Types

JavaScript has six primitive data types:

1. Number

The number data type represents both integer and floating-point numbers.

let age = 30; // Integer
let pi = 3.14; // Floating-point
2. String

The string data type represents a sequence of characters enclosed in single or double quotes.

let firstName = "John";
let lastName = 'Doe';
3. Boolean

The boolean data type represents a logical value of either true or false.

let isStudent = true;
let hasAccount = false;
4. Null

The null data type represents the intentional absence of any value.

let data = null;
5. Undefined

The undefined data type represents a variable that has been declared but has not been assigned a value.

let username;
console.log(username); // Output: undefined
6. Symbol

The symbol data type represents a unique and immutable value that may be used as an identifier for object properties.

const sym1 = Symbol('description');
const sym2 = Symbol('description');
console.log(sym1 === sym2); // Output: false (symbols are unique)

Object Data Type

JavaScript also has the object data type, which is a collection of key-value pairs. Objects are used to store complex data and are defined using curly braces {}.

let person = {
  firstName: "Alice",
  lastName: "Smith",
  age: 25
};

Working with Data Types

Typeof Operator

The typeof operator is used to determine the data type of a variable or expression.

let num = 10;
let str = "Hello";
let bool = true;

console.log(typeof num); // Output: "number"
console.log(typeof str); // Output: "string"
console.log(typeof bool); // Output: "boolean"
Type Conversion

JavaScript also allows for type conversion between data types.

let x = "10";
let y = "5";

let sum = x + y; // Concatenation
console.log(sum); // Output: "105"

// Using parseInt or parseFloat for arithmetic operations
let num1 = parseInt(x);
let num2 = parseInt(y);
let total = num1 + num2;
console.log(total); // Output: 15
NaN (Not a Number)

NaN is a special value in JavaScript that represents an unrepresentable value resulting from an invalid mathematical operation.

let result = "Hello" / 5;
console.log(result); // Output: NaN
Infinity and -Infinity

JavaScript has special numeric values Infinity and -Infinity, representing positive and negative infinity, respectively.

let largeNumber = Infinity;
let smallNumber = -Infinity;

console.log(largeNumber); // Output: Infinity
console.log(smallNumber); // Output: -Infinity

Best Practices

  • Use the appropriate data type for your variables to ensure clarity and efficiency.
  • Be aware of type coercion, where JavaScript automatically converts data types during operations.
  • Practice checking data types using the typeof operator for debugging and validation.

Conclusion

JavaScript’s data types are the building blocks of any program. Whether you’re working with numbers, strings, booleans, or more complex objects, understanding data types is crucial for writing effective and reliable code. By mastering JavaScript’s data types, you gain the ability to create dynamic and versatile web applications.

As you continue your JavaScript journey, remember to explore more advanced topics such as object-oriented programming, arrays, and functions. The versatility of JavaScript’s data types empowers you to create innovative solutions, from simple web pages to complex web applications. So, embrace the diversity of data types, practice regularly, and unlock the full potential of JavaScript in your development projects.

Java Script Variables

Understanding JavaScript Variables: A Beginner’s Guide

JavaScript is the language of the web, providing interactivity and dynamic functionality to websites worldwide. One of the fundamental aspects of JavaScript programming is working with variables. Whether you’re new to coding or looking to refresh your knowledge, understanding variables in JavaScript is essential for writing effective and efficient code.

What are Variables?

In simple terms, a variable is a named container for storing data values. These values can vary (hence the name “variable”) as the program runs. Variables allow developers to manipulate data, perform operations, and create dynamic applications. Before we delve into how to use variables, let’s explore the different types.

Types of Variables in JavaScript

JavaScript variables can be broadly categorized into three types based on how they are declared: var, let, and const.

  • var: Historically used for variable declaration in JavaScript, var has some quirks that let and const were introduced to address. Variables declared with var are function-scoped or globally scoped, which means they are visible throughout the function they are declared in (if declared inside a function) or visible globally (if declared outside any function).
  • let: Introduced in ES6 (ECMAScript 2015), let allows block-scoping, which means the variable is only accessible within the block it’s defined in. Block-scoping helps prevent unintended variable hoisting and makes code more predictable.
  • const: Also introduced in ES6, const is used to declare variables whose values should not be reassigned. It’s important to note that while the value of a const variable cannot be changed, if the value is an object or an array, the properties or elements of that object or array can still be modified.

Declaring Variables

Let’s look at how each type of variable is declared:

  • Using var:
  var greeting = "Hello, World!";
  • Using let:
  let count = 0;
  • Using const:
  const PI = 3.14159;

Rules for Naming Variables

  • Variable names must begin with a letter, dollar sign $, or an underscore _. They cannot begin with a number.
  • Subsequent characters can be letters, numbers, underscores, or dollar signs.
  • Variable names are case-sensitive (myVar is different from myvar).
  • Avoid using JavaScript reserved words like let, const, var, function, etc., as variable names.

Assigning Values

Once a variable is declared, you can assign values to it. Here’s how:

let name = "Alice";
let age = 30;
let isStudent = true;

Reassigning Variables

Variables declared with var and let can have their values reassigned:

let score = 85;
score = 90; // Reassigned score to 90

Using Variables

Variables can be used in various ways within your JavaScript code:

  • Printing to Console:
  let message = "Hello, World!";
  console.log(message); // Outputs: Hello, World!
  • Performing Operations:
  let num1 = 10;
  let num2 = 5;
  let sum = num1 + num2;
  console.log(sum); // Outputs: 15
  • Concatenation (for strings):
  let firstName = "John";
  let lastName = "Doe";
  let fullName = firstName + " " + lastName;
  console.log(fullName); // Outputs: John Doe

Scope of Variables

Understanding variable scope is crucial for writing bug-free and maintainable code. Scope refers to the visibility and accessibility of variables within different parts of your code.

  • Global Scope: Variables declared outside of any function or block have global scope and can be accessed anywhere in the script.
  • Local Scope: Variables declared inside a function have local scope and are only accessible within that function.
  • Block Scope: Variables declared with let and const have block scope, meaning they are only accessible within the block (enclosed by {}) in which they are defined.

Best Practices

  • Use const for variables that should not be reassigned.
  • Use let for variables that will be reassigned.
  • Always declare variables before using them.
  • Choose descriptive variable names for clarity.
  • Be mindful of variable scope to avoid unexpected behavior.

Conclusion

Variables are the building blocks of JavaScript programming, allowing developers to store and manipulate data dynamically. By understanding the different types of variables, how to declare and use them, and their scope, you’re equipped to write cleaner, more efficient code. Whether you’re creating a simple webpage or a complex web application, mastering variables is a foundational step towards becoming a proficient JavaScript developer.

Java Script Hello World

This part of the tutorial is about core JavaScript, the language itself.

But we need a working environment to run our scripts and, since this book is online, the browser is a good choice. We’ll keep the amount of browser-specific commands (like alert) to a minimum so that you don’t spend time on them if you plan to concentrate on another environment (like Node.js). We’ll focus on JavaScript in the browser in the next part of the tutorial.

So first, let’s see how we attach a script to a webpage. For server-side environments (like Node.js), you can execute the script with a command like "node my.js".

The “script” tag

JavaScript programs can be inserted almost anywhere into an HTML document using the <script> tag.

For instance:

<!DOCTYPE HTML>
<html>

<body>

  <p>Before the script...</p>

  <script>
    alert( 'Hello, world!' );
  </script>

  <p>...After the script.</p>

</body>

</html>

You can run the example by clicking the “Play” button in the right-top corner of the box above.

The <script> the tag contains JavaScript code which is automatically executed when the browser processes the tag.

Modern markup

The <script> the tag has a few attributes that are rarely used nowadays but can still be found in old code: The type attribute: <script type=…>

The old HTML standard, HTML4, required a script to have a type. Usually, it was type=”text/javascript”. It’s not required anymore. Also, the modern HTML standard totally changed the meaning of this attribute. Now, it can be used for JavaScript modules. But that’s an advanced topic, we’ll talk about modules in another part of the tutorial. The language attribute: <script language=…>

This attribute was meant to show the language of the script. This attribute no longer makes sense because JavaScript is the default language. There is no need to use it. Comments before and after scripts.

In really ancient books and guides, you may find comments inside <script> tags, like this:

<script type="text/javascript"><!--
    ...
//--></script>

This trick isn’t used in modern JavaScript. These comments hide JavaScript code from old browsers that didn’t know how to process the <script> tag. Since browsers released in the last 15 years don’t have this issue, this kind of comment can help you identify ancient code.

External scripts

If we have a lot of JavaScript code, we can put it into a separate file.

Script files are attached to HTML with the src attribute:

<script src="/path/to/script.js"></script>

Here, /path/to/script.js is an absolute path to the script from the site root. One can also provide a relative path from the current page. For instance, src="script.js" would mean a file "script.js" in the current folder.

We can give a full URL as well. For instance:

<script src="https://cdnjs.cloudflare.com/ajax/libs/lodash.js/4.17.11/lodash.js"></script>

To attach several scripts, use multiple tags:

<script src="/js/script1.js"></script>
<script src="/js/script2.js"></script>
…

Please note:

As a rule, only the simplest scripts are put into HTML. More complex ones reside in separate files.

The benefit of a separate file is that the browser will download it and store it in its cache.

Other pages that reference the same script will take it from the cache instead of downloading it, so the file is actually downloaded only once.

That reduces traffic and makes pages faster. If src is set, the script content is ignored.

A single <script> tag can’t have both the src attribute and code inside.

This won’t work:

<script src="file.js">
  alert(1); // the content is ignored, because src is set
</script>

We must choose either an external <script src="…"> or a regular <script> with code.

The example above can be split into two scripts to work:

<script src="file.js"></script>
<script>
  alert(1);
</script>

Summary

  • We can use a <script> tag to add JavaScript code to a page.
  • The type and language attributes are not required.
  • A script in an external file can be inserted with <script src="path/to/script.js"></script>.

There is much more to learn about browser scripts and their interaction with the webpage. But let’s keep in mind that this part of the tutorial is devoted to the JavaScript language, so we shouldn’t distract ourselves with browser-specific implementations of it. We’ll be using the browser as a way to run JavaScript, which is very convenient for online reading, but only one of many.

Tasks

Show an alert

importance: 5

Create a page that shows the message “I’m JavaScript!”.

Do it in a sandbox, or on your hard drive, doesn’t matter, just ensure that it works.

Demo in a new window solution

Show an alert with external script

importance: 5

Take the solution of the previous task Show an alert. Modify it by extracting the script content into an external file alert.js, residing in the same folder.

Open the page, and ensure that the alert works.

Java Script Developer Console

Code is prone to errors. You will quite likely make errors while writing the codes… Oh, what am I talking about? You are absolutely going to make errors, at least if you’re a human, not a robot read what Wiki tells about coding. 

But in the browser, users don’t see errors by default. So, if something goes wrong in the script, we won’t see what’s broken and can’t fix it.

To see errors and get a lot of other useful information about scripts, “developer tools” have been embedded in browsers.

Most developers lean towards Chrome or Firefox for development because those browsers have the best developer tools. Other browsers also provide developer tools, sometimes with special features, but are usually playing “catch-up” to Chrome or Firefox. So most developers have a “favorite” browser and switch to others if a problem is browser-specific.

Developer tools are potent; they have many features. To start, we’ll learn how to open them, look at errors, and run JavaScript commands.

Google Chrome

Open the page bug.html.

There’s an error in the JavaScript code on it. It’s hidden from a regular visitor’s eyes, so let’s open developer tools to see it.

Press F12 or, if you’re on Mac, then Cmd+Opt+J.

The developer tools will open on the Console tab by default.

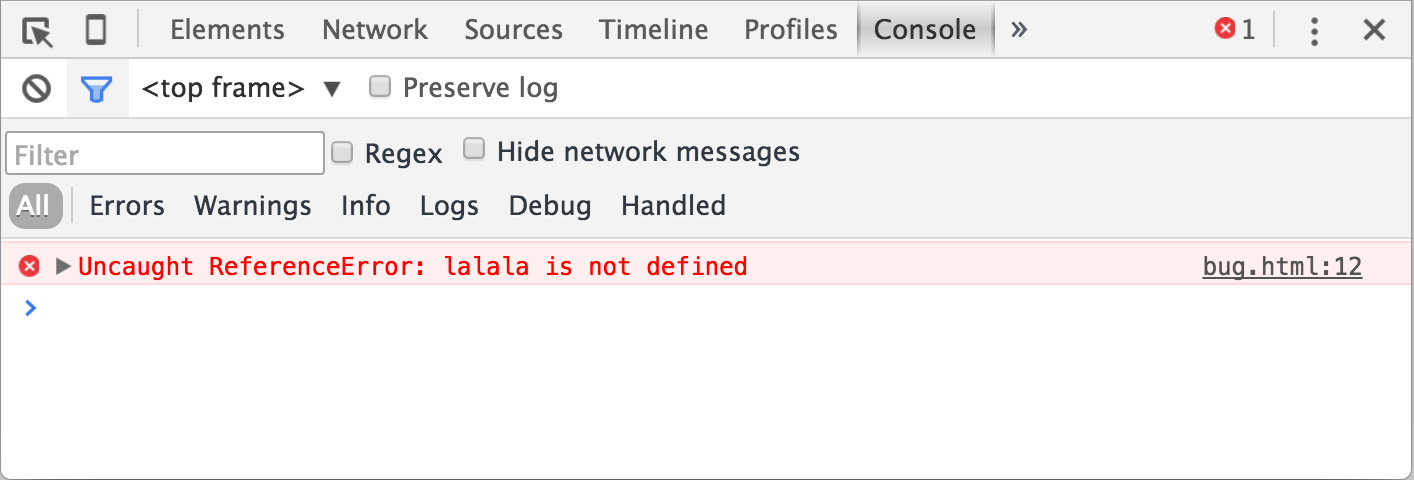
It looks somewhat like this:

The exact look of developer tools depends on your version of Chrome. It changes from time to time but should be similar.

  • Here we can see the red-colored error message. In this case, the script contains an unknown “lalala” command.
  • On the right, there is a clickable link to the source bug.html:12 with the line number where the error has occurred.

Below the error message, there is a blue > symbol. It marks a “command line” where we can type JavaScript commands. Press Enter to run them.

Now we can see errors, and that’s enough for a start. We’ll come back to developer tools later and cover debugging more in-depth in the chapter Debugging in Chrome.Multi-line input

Usually, when we put a line of code into the console, and then press Enter, it executes.

To insert multiple lines, press Shift+Enter. This way one can enter long fragments of JavaScript code.

Firefox, Edge, and others

Most other browsers use F12 to open developer tools.

The look & feel of them is quite similar. Once you know how to use one of these tools (you can start with Chrome), you can easily switch to another.

Safari

Safari (Mac browser, not supported by Windows/Linux) is a little bit special here. We need to enable the “Develop menu” first.

Open Preferences and go to the “Advanced” pane. There’s a checkbox at the bottom:

Now Cmd+Opt+C can toggle the console. Also, note that the new top menu item named “Develop” has appeared. It has many commands and options.

Summary

  • Developer tools allow us to see errors, run commands, examine variables, and much more.
  • They can be opened with F12 for most browsers on Windows. Chrome for Mac needs Cmd+Opt+J, Safari: Cmd+Opt+C (need to enable first).

Now we have the environment ready. In the next section, we’ll get down to JavaScript.

Java Script Code Editors | Writing first Java Script Program

Unveiling JavaScript Code Editors: Writing Your First JavaScript Program

JavaScript, the language of the web, is the driving force behind interactive and dynamic web applications. Whether you’re a seasoned developer or just starting your coding journey, having the right tools at your disposal can make all the difference. In this blog, we’ll explore JavaScript code editors and guide you through writing your first JavaScript program.

JavaScript Code Editors

A code editor is a fundamental tool for any developer. It provides a workspace for writing, editing, and organizing code. JavaScript, being a versatile language, can be written in any plain text editor. However, dedicated code editors offer features that streamline development, such as syntax highlighting, auto-completion, and built-in terminal support.

Popular JavaScript Code Editors:
  1. Visual Studio Code (VS Code):
  • Developed by Microsoft, VS Code is one of the most popular code editors.
  • Features include IntelliSense for code completion, debugging support, and an extensive library of extensions.
  • Available for Windows, macOS, and Linux.
  1. Sublime Text:
  • Known for its speed and simplicity, Sublime Text is a lightweight code editor.
  • Offers a distraction-free mode, multiple selections, and a powerful search and replace feature.
  • Available for Windows, macOS, and Linux.
  1. Atom:
  • Created by GitHub, Atom is a customizable and open-source code editor.
  • Features a built-in package manager, smart autocompletion, and a vibrant community creating plugins.
  • Available for Windows, macOS, and Linux.
  1. Brackets:
  • Built for web development, Brackets offers a clean interface and live preview features.
  • Provides preprocessor support, inline editing, and a robust extension library.
  • Available for Windows, macOS, and Linux.

Writing Your First JavaScript Program

Now that you have a code editor set up, let’s write a simple “Hello, World!” program in JavaScript.

Step 1: Set Up Your Environment
  • Install a JavaScript code editor like Visual Studio Code.
  • Ensure you have Node.js installed if you want to run JavaScript outside the browser.
Step 2: Create a New File

Open your code editor and create a new file named hello.js.

Step 3: Write Your JavaScript Code

In hello.js, type the following code:

// Our first JavaScript program
let message = "Hello, World!";
console.log(message);
Step 4: Save and Run Your Program
  • Save the file (Ctrl+S or Cmd+S).
  • Open the terminal within your code editor.
  • Navigate to the directory where hello.js is saved.
  • Run the following command to execute your JavaScript program:
node hello.js
Step 5: See the Output

You should see Hello, World! printed in the terminal. Congratulations! You’ve written and executed your first JavaScript program.

Understanding the Code

Let’s break down the code you just wrote:

  • let message = "Hello, World!";: This line declares a variable named message and assigns it the value "Hello, World!". In JavaScript, let is used to declare variables.
  • console.log(message);: This line logs the value of the message variable to the console. console.log() is a built-in JavaScript function used for debugging and printing output.

Next Steps and Resources

Now that you’ve taken the first step into the world of JavaScript programming, there’s a wealth of resources to help you deepen your knowledge:

  • Mozilla Developer Network (MDN) JavaScript Guide: A comprehensive guide to JavaScript, covering everything from basic syntax to advanced topics.
  • FreeCodeCamp JavaScript Course: An interactive and free course covering JavaScript fundamentals and practical projects.
  • YouTube Tutorials: Video tutorials can be an excellent way to learn JavaScript. Channels like Traversy Media, The Net Ninja, and Programming with Mosh offer high-quality tutorials.
  • JavaScript Books: Books like “Eloquent JavaScript” by Marijn Haverbeke and “You Don’t Know JS” by Kyle Simpson are highly recommended for learning JavaScript in-depth.
  • Online Coding Platforms: Platforms like Codecademy and LeetCode offer interactive coding challenges and exercises to practice JavaScript skills.

Conclusion

JavaScript is a powerful language that fuels the modern web. With the right code editor and a bit of practice, you can create dynamic, interactive web applications. Writing your first JavaScript program is just the beginning of an exciting journey into the world of web development.

Whether you’re building simple scripts or complex web applications, JavaScript’s versatility and wide adoption make it an invaluable skill for any developer. So, grab your code editor, unleash your creativity, and start crafting innovative solutions with JavaScript!

An Introduction to JavaScript

Unveiling JavaScript: The Language of the Web

In the vast landscape of web development, one language stands out as the cornerstone of interactivity and dynamism: JavaScript. From simple web page enhancements to complex web applications, JavaScript is the force driving much of the modern web experience. In this blog, we’ll unravel the mysteries of JavaScript, exploring its origins, features, and importance in the digital realm.

Origins and Evolution

JavaScript was created by Brendan Eich in 1995 while he was working at Netscape Communications. Initially named “Mocha,” it was later renamed “LiveScript” and eventually settled on “JavaScript” to ride on the popularity of Java at the time. Contrary to its name, JavaScript has little to do with Java and was developed independently as a scripting language for web browsers.

Over the years, JavaScript has evolved significantly. The standardization process led by ECMA International resulted in ECMAScript, the official specification for the language. This has seen several versions, with ECMAScript 6 (ES6) in 2015 being a major milestone, bringing numerous enhancements and modern features to the language.

What Exactly is JavaScript?

JavaScript is a high-level, interpreted programming language that allows you to implement complex features on web pages. Unlike languages such as HTML and CSS, which are used for markup and styling, respectively, JavaScript adds interactivity and behavior to web pages.

  • High-Level: JavaScript is considered high-level because it abstracts away the complexity of machine code, making it easier for developers to write and understand code.
  • Interpreted: Unlike languages like Java or C++, JavaScript doesn’t need to be compiled. Instead, it’s interpreted by the browser’s JavaScript engine.
  • Dynamic: JavaScript is dynamically typed, meaning you don’t have to declare the data type of a variable explicitly. It also supports dynamic changes to the structure of an object, making it versatile.

Features and Capabilities

JavaScript is versatile and offers a wide range of features that make it invaluable for web development:

  1. Client-Side Scripting: JavaScript runs on the client side (in the user’s web browser), allowing for dynamic content updates without requiring a page reload.
  2. DOM Manipulation: The Document Object Model (DOM) represents the structure of a web page. JavaScript enables developers to manipulate the DOM, changing elements, styles, and content dynamically.
  3. Event Handling: JavaScript allows developers to define how a web page should respond to user actions like clicks, scrolls, and keyboard inputs.
  4. Asynchronous Programming: With features like Promises and async/await, JavaScript supports asynchronous programming, essential for handling tasks like fetching data from servers without blocking the user interface.
  5. Cross-platform Compatibility: JavaScript is supported by all major browsers, making it a cross-platform language. With Node.js, JavaScript can also be used for server-side programming.

Why JavaScript Matters

JavaScript has become an integral part of web development for several compelling reasons:

  • Enhanced User Experience: JavaScript allows developers to create interactive and responsive web applications, improving user engagement and satisfaction.
  • Rich Web Applications: From single-page applications (SPAs) to dynamic forms and animations, JavaScript empowers developers to create rich and interactive web experiences.
  • Widespread Adoption: JavaScript’s popularity has led to a vast ecosystem of libraries and frameworks such as React, Angular, and Vue.js, simplifying web development and speeding up the development process.
  • Career Opportunities: Proficiency in JavaScript opens doors to a wide range of job opportunities in web development, front-end engineering, full-stack development, and more.

Getting Started with JavaScript

If you’re eager to dive into JavaScript, there are numerous resources available:

  • Online Courses: Platforms like Udemy, Coursera, and freeCodeCamp offer comprehensive JavaScript courses for beginners and advanced learners.
  • Documentation: The Mozilla Developer Network (MDN) provides detailed documentation and tutorials on JavaScript features and best practices.
  • Code Editors: Tools like Visual Studio Code, Sublime Text, and Atom are popular choices for writing and testing JavaScript code.
  • Community: Joining developer communities on platforms like Stack Overflow, Reddit, and GitHub can provide valuable insights and assistance.

In Conclusion

JavaScript is the backbone of modern web development, enabling developers to create dynamic, interactive, and user-friendly web applications. Its evolution from a simple scripting language to a versatile powerhouse has revolutionized the way we interact with the web.

Whether you’re building a personal website, an e-commerce platform, or a social media app, JavaScript empowers you to bring your ideas to life. So, if you’re looking to embark on a journey into the world of web development, JavaScript is undoubtedly a language worth mastering. With its endless possibilities and ever-growing ecosystem, JavaScript continues to shape the digital landscape, making the web a more vibrant and engaging place for all.