The WalMart Atomic Clock

In the realm of first-world problems, your cheap wall clock doesn’t keep time, so you have to keep setting it. The answer? Of course, you connect it to NTP and synchronize the clock with an atomic time source. If you are familiar with how these generic quartz clock movements work, you can probably guess the first step is to gut the movement, leaving only the drive motor.

The motor is somewhat like a stepper motor. The ESP8266 processor can easily control the clock hands by sending pulses to the motor. The rest is simple network access and control. If the network time is ahead, the CPU gooses the clock a little. If it is behind, the CPU stalls the clock until it catches up.

Continue reading “The WalMart Atomic Clock”

Trace Line Clock Does It With Magnets

We love a good clock project, and [byeh_ in] has one with a design concept we don’t believe we have seen before. The Trace Line Clock has smooth lines and a clean presentation, with no sockets or visible mechanical fixtures.

Reading the clock is quite straightforward once one knows what is going on. At its heart, the unmarked face is much like any other analog clock face, and on the inside is a pretty normal clock movement. The inner recessed track on the face represents hours, and the outer is minutes. The blue line connects the two, drawing a constantly changing line.

Continue reading “Trace Line Clock Does It With Magnets”

Clock Mechanism Goes Crazy For Arduino

You’ve doubtless seen those ubiquitous clock modules, especially when setting clocks for daylight savings time. You know the ones: a single AA battery, a wheel to set the time, and two or three hands to show the time. They are cheap and work well enough. But [Playful Technology] wanted to control the hands with an Arduino directly and, in the process, he shows us how these modules work.

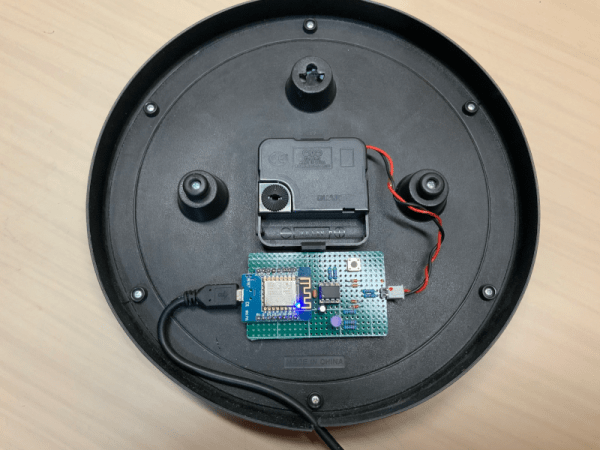
If you’ve never studied the inside of these clock modules, you may be surprised about how they actually work. A crystal oscillator pulses a relatively large electromagnet. A small plastic gear has a magnetic ring and sits near the electromagnet.

Each time the polarity of the electromagnet flips, the ring turns 180 degrees to face the opposite magnetic pole to the electromagnet. This turns the attached gear which is meshed with other gears to divide the rotation rate down to once per 24 hours, once per hour, and once per minute. Pretty clever.

That makes it easy to control the hands. You simply detach the electromagnet from the rest of the circuit and control it yourself. The module he used had a mechanical limitation that prevents the hands from moving well at more than about 100 times normal speed.

We wondered how he made the hands reverse and, apparently, there is a way to get the drive gear to move in reverse, but it isn’t always reliable. Of course, you could also replace the drive mechanism with something like an RC servo or other motor and it sounds like he has done this and plans to show it off in another video.

We’ve seen the opposite trick before, too. If you really want an easy-to-control analog clock, try this one Continue reading “Clock Mechanism Goes Crazy For Arduino”

Hidden Shaft And Gears Make This Hollow Clock Go

[shiura]’s Hollow Clock 3 is a fantastic 3D printed take on a clock movement that uses a hidden mechanism to pull off its unusual operation. The Hollow Clock has no face, just an open space with an hour and minute hand that move as expected. Only the longer minute hand has any apparent connection to the rest of the clock body, with the rest appearing to hang in the air.

Hidden shaft and gearing.

This is how it works: the longer minute hand is connected to the white ring, and it is in fact this ring that rotates, taking the attached minute hand with it. But how does the hour hand remain stationary while the rest turns? A concealed shaft and gear assembly takes care of that. For every full rotation of the minute hand (actually the white ring), the hour hand is only permitted a relative advancement of 1/12th of a rotation. It’s a clever system, and you can see the insides in the photo here.

Unlike clock projects that showcase their inner workings, the Hollow Clock works hard to conceal them. If you decide to make your own, [shiura] warns to expect to do a bit of tweaking to fine-tune the amount of friction between moving parts so that operation is smooth, and provides useful guidelines for doing so. Take a few minutes to watch the clock in action in the video, embedded below.

Continue reading “Hidden Shaft And Gears Make This Hollow Clock Go”

Gaze Upon This Intricate Victorian-Era Time Lock

The concept of a time lock is an old one, and here you can see an example of the clockwork and gears version that kept vaults sealed against unauthorized openings. Even if the correct combination was known, these devices prevented opening until a pre-arranged amount of time had passed. The fine folks at [Industrial Alchemy] got a copy of a Yale Triple L mechanical time lock, and like other devices of its kind it required manual winding to function. Since the device as a whole was sealed against tampering, winding and setting was done with a key via the small holes in the front.

These devices were mounted on the inside of a vault door, and worked by mechanically interfacing with the lock mechanism in a variety of different ways depending on make and model. While the time lock was engaged, opening the door was prevented even if the correct combination was used. You may notice the multiple movements; this was for redundancy. The movements were interfaced in a mechanical OR arrangement, meaning that the first one to count down to zero would disengage the time lock. In the case of a malfunction, the backup movements would be responsible for preventing a total lockout — a condition as inconvenient and embarrassing as it would be costly.

Embedded below is a video that focuses on swapping movements in a time lock, but happens to also do a good job of showing off the mechanical design and components. Clockwork was the high technology of its time, and interest in it has seen something of a resurgence now that 3D printing is commonplace.

Continue reading “Gaze Upon This Intricate Victorian-Era Time Lock”

Rotating Lithophane Box Turns With Time

If you wanted to make a rotating display box, what would you use to make it spin? A servo? A stepper motor? [ChrisN219] didn’t need his to move quickly by any means, and this opened up his options to something we probably wouldn’t have thought to use: a clock movement. Specifically, the hour minute part of the shaft.

Rotating lithophanes of your loved ones makes for a pretty cool project, and there isn’t a whole lot to this build to make it difficult. Much of it is 3D printed, including the tube in the center that the LED strip is wrapped around. The base is just big enough to hold the clock movement and the LED strip controller, so it would fit nicely on a desk or a mantel.

This is version two of [Chris]’ lithophane box, which gave him a chance to perfect the frame and design a thicker center post to withstand the heat from the LED strip. All the files are available if you want to print your own panels and take them for a spin. Since it’s so easy to change them out, you may end up with a big pile to choose from.

Repairing Vintage Clock Movements

It’s obvious that [Matthew] cares a great deal for vintage electric clocks. He is especially fond of the bedside alarm variety, which in our experience cast a warm orange glow on the numbers and emitted a faint, gentle hum. [Matthew] has written up a thorough treatment of Sunbeam movements in particular that covers identification, disassembly, cleaning, and repair.

These workhorse timepieces are cheap and fairly plentiful if you work the estate sale or thrift store circuit. Sometimes there is a bit of trouble with motor pinions disintegrating or the teeth wearing down on the nylon gears. The decades-old petroleum lubricant combined with heat from the spinning rotor can eat away at the motor pinion, causing it to crumble if disturbed.

Wishing to save some of these clocks from landfills, [Matthew] designed motor pin replacements specifically for Sunbeam electric movements, the relatively  inexpensive alternative that graced many a mid-century household clock. He only had the shaft and a broken original to work with, but was able to design a sturdy acrylic replacement using this involute spur gear builder to generate a DXF file. Then it was just a matter of creating an STL file with Rhino 3D and shipping it off to Shapeways.

If you’ve ever wanted to get into clock or watch repair, this looks like a great way to get your feet wet unless you’re ready for some serious vintage watch repair. There’s no need to reinvent the pinion because [Matthew] sells them through his site. If you have a printer, the STL files await you.