Make Your Ceiling Disappear With ADS-B And Short-Throw Projector

If you’re into airplanes, you’ve probably had the experience of hearing an unusual aircraft and rushing outside to try and catch a glimpse of it, all while fumbling with a smartphone to open a flight-tracking app. If your home was equipped with [cpaczek]’s Skylight project, which combines ADS-B data with a short throw projector, that little dance would have been totally unnecessary.

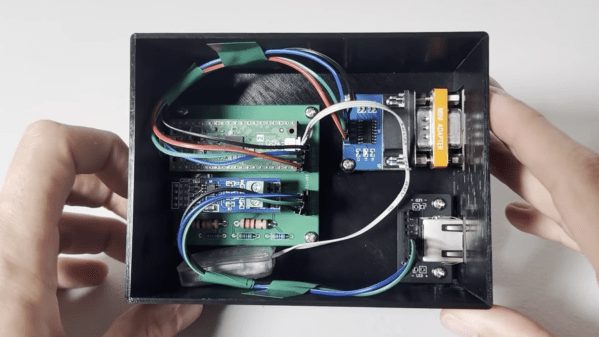
ADS-B or the “Automatic Dependent Surveillance-Broadcast”, is the standard by which aircraft broadcast their position and other flight information from onboard transponders. In most of the world, every commercial aircraft has an ADS-B transmitter, and they’re slowly creeping into general aviation as well. The signals aren’t hard to pick up with software-defined radio — like perhaps this RP2040 based unit we featured — or the RTL-SDR v4 this project calls for.

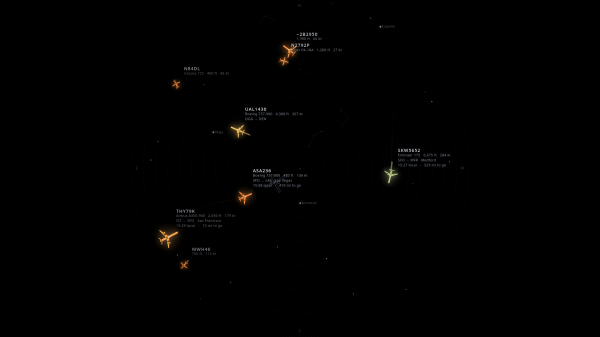
Using data from ADS-B, the Skylight software runs on Raspberry Pi 5 and renders icons of the aircraft exactly where they would appear above you, if that pesky ceiling wasn’t in the way. You get the flight’s code, destination and flightplan with a nice icon representing what type of airplane it is. Thanks to specifying a Pi 5, the projection is a smooth 60 FPS at 1080p. Airplanes aren’t the only things plotted, though — this is also a planetarium, giving you a full view of the stars and any satellites passing overhead. That’s obviously via an API, not SDR, and if you like you can configure it to track aircraft that way to — allowing you to set your Skylight for anywhere in the world, if you aren’t near an interesting airport.

ADS-B isn’t just for pilots and plane nerds — if you’re flying drones, you probably should keep an eye on it, too. In that case, though, you probably won’t be looking at your ceiling.

Thanks to [Thinkerer] for the tip!

A black plastic box is shown, with a green circuit board inside. The circuit board is wired to an RS-232 connector and an RJ-45 connector.

A High-Vacuum Controller For An Eventual Electron Microscope

[Chris Doble] has high ambitions: he’s making his own scanning-electron microscope, and as the first step he’s built a high-vacuum system. This required its own controller to manage the various electronics involved in the system, which he’s documented and open-sourced.

The vacuum system itself starts with a rotary-vane roughing pump, which can bring a chamber down from atmospheric pressure to about 10-3 millibar. This is still too high a pressure, so the second stage is a turbomolecular high-vacuum pump, which can operate from 18 millibar down to 10-7 millibar. To protect the turbomolecular pump in case the roughing pump suddenly stops, it includes an anti-suckback valve. Connected to these pumps is a pressure gauge which uses a pair of sensors to sense the entire pressure range. All this setup worked well, but the turbomolecular pump and the pressure sensor each used their own interfaces, while [Chris] wanted a single interface for the eventual microscope.

[Chris] therefore designed his own controller based on the Raspberry Pi Pico 2, with firmware written in Rust. The pressure gauge uses an RS-232 interface, which he connected to the Pico’s UART pins using an RS-232 level shifter, with a null modem to swap over the transmitting and receiving pins. The turbomolecular pump used an RS-485 interface, which required a converter circuit and some level-shifting resistors. A custom PCB and 3D-printed case hold the final circuit, which provides a host computer with a single USB interface. When [Chris] tested the controller, the vacuum chamber reached a pressure of 10-6 millibar, and was still slowly falling when he ended the test.

This isn’t the first vacuum chamber controller we’ve seen. Of course, this assumes that the pressure gauge already has a controller; if not, we’ve also covered one of those. To see the inspiration for [Chris]’s project, check out [Ben Krasnow]’s scanning-electron microscope.

Bilingual E-paper News Feed Helps Brush Up Language Skills

[Bob] recently completed LanguageLearner, a desktop device that increases his exposure to a second language by offering up bite-sized news items in Italian, with a complementary English translation. Even better, it’s a project made almost entirely from inexpensive parts he had on hand; it consists of little more than a Raspberry Pi Pico W, a 4.2″ E-paper display, and a 3D-printed stand.

Here’s how it works: once every few hours, the system wakes up and uses its WiFi connection to fetch news from an Italian RSS feed. Having chosen a slice of current events, it translates to English with an API call then displays both versions on the display: original Italian up top, translated English below.

Consisting of little more than a Raspberry Pi Pico W, an E-paper display, and a 3D-printed stand, it’s a great use of spare parts.

E-paper is ideal for a semi-passive project like this because once data is written to the display, there it remains without needing power or upkeep of any kind. Perfect for a device that only wakes up every few hours for an update before going right back to sleep.

Due to the limited RAM of the Raspberry Pi Pico [Bob] has to be purposeful about fetching data, so he relies on text from a simple RSS feed to avoid running out of memory while making web requests. The other minor quibble is that the driver for the display only handles plain ASCII; characters that cannot be rendered are displayed as grey boxes, which you can see in the image up top. Still, it gets the job done.

Increasing exposure to a language one is learning is beneficial, and people like to experiment. From trying to optimize human wait times by inserting language micro-lessons to a calculator that works in Toki Pona, technology offers new ways for folks to experiment with how we learn and play with language.

VTech Toy Becomes PinkPad, The DIY Linux Laptop

Originally envisioned as a simple DIY laptop project, [kati]’s PinkPad V1 ended up being considerably more involved than expected. But the end result is a perfectly usable, stunningly pink, and remarkably sturdy portable laptop that looks nothing like a hack job.

Originally a VTech toy, the PinkPad is a perfectly functional DIY laptop.

The PinkPad V1 started as a toy laptop for toddlers, repurposed into a DIY laptop running Linux while keeping the original clamshell design and cute aesthetic. As [kati] herself points out, while it may not seem particularly difficult to yank out a toy’s insides and stuff it with a Raspberry Pi, most of the real challenges were related to actually getting all the necessary parts and connectors and wiring to actually fit in a useful way. As anyone with experience in building something knows, working around existing enclosures or hardware almost always brings unexpected challenges.

The original toy laptop? Produced by none other than VTech, whose products have been hacked to create things like a punch card-reading cyberdeck and Z80 hacking station. Our own [Tom Nardi] has also shared his fondness for these devices in several teardowns over the years.

In the end, [kati]’s PinkPad ended up sporting a mini keyboard (whose black keys were turned pink with a little nail polish) and a 5 inch touchscreen LCD. Combined with a rechargeable power supply, it provides all the comforts of an Arch Linux ARM mini laptop.

Thanks [alex] for the tip!

A Raspberry Pi-powered glitch camera, with adjustable glitch.

Easy-ish Glitch Camera? There’s A Pi 4 That

Usually, when you want to make glitchy images with lots of colors and things, you have to poke around inside a camera and successfully circuit-bend the thing without bricking it. But [sharkbiscuit101] proves that this isn’t necessary, provided you have a Raspberry Pi 4 and a few other components.

Now we don’t have a lot of detail here, but [sharkbiscuit101] is being heavily encouraged to share the relevant files and a component list. What we do know is that the there’s a screen for previewing images, a portable battery, a shutter button, a rotary encoder to dial in the weirdness, and a game pad for controls. Using the script and a slider, you can tweak different aspects of the image to basically break it down in real time. If you find a nifty combination, you can use the rotary encoder to save and then recall presets.

If you’re wondering about the grip, that’s a Sharge battery from the Bezos Barn. Per [sharkbiscuit101], it is a good size, and since Pi 4 doesn’t have a power button, it can be turned on and off at the battery.

Of course, you can always mess with JPGs on a raw, textual level instead, or produce standard photographs with a pinhole camera.

Digital Signal Processing On The Pi Pico

If you want to dabble in audio digital signal processing, you would probably think of grabbing a dedicated DSP chip. But thanks to [WeebLabs], you could just pick up a Pi Pico and use this full-featured DSP library.

The system supports plug-and-play USB audio interface that enumerates on Windows, Linux, macOS, and iOS. It can handle 16- or 24-bit inputs at up to 96 kHz. You can output up to four channels of 24-bit S/PDIF or I2S, or switch to an RP2350 to get eight channels. This lets you drive a DAC easily. There is also a direct output for a subwoofer that doesn’t require a DAC.

Each channel has a pre-amp, and a matrix mixer allows routing with different gains and phases for each input. An equalizer allows ten bands per channel. There are also modules to do volume leveling, loudness compensation, and headphone cross-feed.

The library uses both cores of the CPU and manages up to ten preset configurations. The Pico does get an overclock and uses a fixed-point representation. The Pico 2 (RP2350) doesn’t need overclocking and uses single-precision floating point.

Overall, this looks like a great base for any sort of soundcard-like project. We’ve seen DSP stunts on the Pico before. This might also make a nice base for other audio projects.

A man's hand is holding a thin wooden board, which runs between two vertical metal plates. On the board are two glasses, one filled with water. A computer screen is behind all this, showing a series of white bars. The series of bars shows two peaks.

Using Capacitance For Extremely Sensitive Proximity Sensing

Capacitive displacement sensors span a wide range of resolution, from the touchscreen sensors which can only detect displacement as a binary state, all the way to the sensors in semiconductor fabs which measure down to nanometers. The sensor [Matthias Wandel] built with a Raspberry Pi Pico lands somewhere in the middle, providing both sensitive measurements and an absolute scale.

The idea is that the amount of overlap between two metal plates should be detectable by measuring the capacitance between them. Reaching any kind of usable resolution would require a very precise measure of capacitance, around the picofarad range. [Matthias] realized that the Pico’s GPIO pins have an inherent capacitance, and can have a pull-down resistor set, essentially creating an RC circuit. [Matthias] would set a pin to a high-level output, then switch it to an input. The amount of time the pin takes to switch from high to low indicates the RC constant, which includes the capacitance attached to the pin.

When attached to a metal plate, the Pico was sensitive enough to detect the plate’s capacitive coupling to [Matthias]’s hand through a thick wooden floor. To measure capacitance between two metal plates, the Pico measured how well a voltage signal applied to one plate was coupled to the other plate. This was sensitive enough to measure the slight change in the dielectric constant when [Matthias] waved a piece of ABS pipe between the two capacitor plates. Making actual position measurements was tricky, since capacitance changed with both X- and Z-axis shifts in the plates.

Digital calipers use similar capacitive sensors to make their measurements, as [Matthias] knows from his experiments in hacking them. If you’re interested in more details, check out this teardown of some cheap digital calipers.

Continue reading “Using Capacitance For Extremely Sensitive Proximity Sensing”