Vanguard: Stealth alpha draft rules

The action in Kings of War: Vanguard kicks off when both sides have become aware of each other, and the Lightning Bolts and arrows start flying quick. But there’s something to be said about the build-up to these firefights, the calm before the storm, where the tension ratchets up as your scout inches forward towards the unwitting guard, hoping to slit another throat before the alarm is raised. That sort of experience really drives home the elite, small unit action – fantasy special operations, if you will – that Vanguard sells itself on.

Introduction

Vanguard: Stealth is me trying to add that feeling into the Kings of War: Vanguard game. Where Vanguard focuses on elite, small unit warbands in fierce head-to-head skirmishes, this variant introduces stealth and infiltration mechanics, adding to the variety of exciting missions you can play.

These rules are ALPHA. They are completely untested. More of a brainstorm, really.

Acknowledgements

This variant adapts some of the core mechanics from a fun board game, Nuns on the Run, and is heavily indebted to the creator.

What’s Needed

Each scenario specifies the components needed, but in general you will need:

  • Alarm Track: Use a die
  • Patrol Markers: Markers numbered 1-3, in several different colors
  • Suspicious & Alarmed Tokens
  • Casualty Markers

And lots of terrain. In general, most Vanguard: Stealth missions should have even more terrain than usual. Aim for at least 33% coverage.

Stealth_path

Patrol Markers dictate the paths that defenders follow until alerted.

Core Mechanics

In Vanguard: Stealth, the Attackers are able to act normally, but the Defender’s models are much more limited in their actions until they are Suspicious to the presence of enemies, or a general alarm has been raised.

Unit Types

Defender Patrols

When deployed, Patrol models are placed on a Patrol Marker, facing directly towards the next Patrol Marker in their path. Unless Suspicious or Alarmed, when activated Patrol models may only be given a Walk, Run, or Search actions and must be moved as close as possible towards the next Patrol Marker of that color, in ascending order. When the last Patrol Marker in a sequence is reached, the model turns around and backtracks in reverse order. Patrol models may not take Fatigue or Force Fatigue actions unless Suspicious or Alarmed.
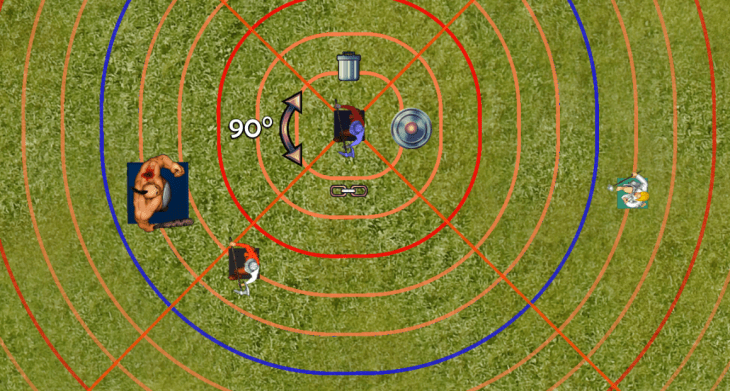
Defender Sentries

Unless Suspicious or Alarmed, when activated Sentries may rotate in place and take Search actions. Sentry models may not take Fatigue or Force Fatigue actions unless Suspicious or Alarmed.

Attackers

Attacker models are activated as per normal Vanguard rules. However, Attackers may choose to take fewer actions during their turn to minimize Noise risk.

Casualties

Models that have been killed are replaced with a Casualty Marker.

Suspicious/Alarmed Defenders

If a Defender model is Suspicious at the start of its activation, remove the Suspicious token and then activate the model as per normal Vanguard rules – the Defender may move in any direction, Brace, etc.

If a Defender model is Alarmed, then it may be activated as per normal Vanguard rules. (Unlike Suspicious, Alarmed tokens do not get removed. Once Alarmed, models tend to stay Alarmed!)

Returning to Position

If not Suspicious or Alarmed, when activated, Defender models that have left their Sentry positions or Patrol paths must Walk or Run (player’s choice) as close towards their Sentry position or next Patrol Marker as they can with that action.

Becoming Suspicious/Alarmed

Defenders can become Suspicious or Alarmed in five ways: Visually at *any* time, Searching with a Defender model, Noise after moving an Attacker model, being attacked, and the Alarm Track.

Visual

If at any time during an Attacker’s turn an attacking model enters a Defender model’s line-of-sight, mark that Defender as Suspicious.

If at any time during the Defender’s turn, if an Attacker’s model, a Casualty Marker, or an Alarmed model is within the Defender’s line-of-sight, mark that Defender as Alarmed.

Searching

The Defender may take a Short Action to search. Roll 2D8, modified as follows, and keep the lowest. If any Attacker model is within that many inches of the Defender, mark that Defender as Suspicious.

  • -1 per terrain feature between the Defender and Attacker
  • -2 if the Attacker has Stealthy
  • + Attacker Height

Noise

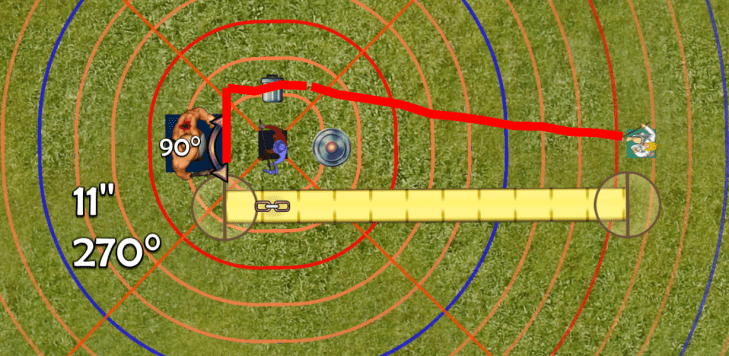
At the end of an Attacker’s activation, roll 2D8, modified as below, and keep the lowest. If a Defender model is with that many inches of the Attacker, mark that Defender as Suspicious.

  • -2 if the Attacker was stationary
  • +2 for a Run, Melee or Ranged Attack action
    • Note this stacks to +4 for a Charge + Melee Attack!
  • +1 per other action
  • +1 per obstacle or difficult terrain moved through, unless the Attacking model has Pathfinder
  • -2 if the Attacker has Stealthy
  • + Attacker Height

NS_Reaper

Example: A Nightstalker Reaper bursts out from its hiding place behind a low wall and tackles a guard, rending him to pieces. The Reaper then makes a Fatigue action to walk into a new hiding place. At the end of the activation, the Reaper player rolls 2D8 and keeps the lowest. The Reaper Ran (+2), Attacked (+2), and Walked (+1), crossed an Obstacle (+1), and is Height 2 (+2). With all those penalties, the ambush is unlikely to be very quiet, but the Reaper does have Stealthy (-2), so who knows!

Being Attacked

If a Defender is attacked and survives, mark it as Alarmed.

Alarm Track

Some scenarios call for an Alarm Track. When certain conditions are met, the track is adjusted and particular events may trigger at particular thresholds, including marking Defenders as Alarmed.


Additional Considerations / Next Steps

The above core rules set out the basic dynamics, but it’s important to note there are a few key features not included here:

Deck of Powers

It might seem like the Defender player is pretty passive – until a model is Suspicious or Alarmed, all they can do is Walk or Run their models on defined paths. However, the intention is to have a deck of Powers and a card drawn every turn that would allow them to change paths, give Suspicious tokens, or otherwise present complications for the Attacker. (And a few of those cards, like “False Alarm” and “Call of Nature” will help the Attacker.)

Equipment Options

Chameleon Cloak, Potion of Invisibility, Illusion Scroll, Boots of No Trace, Lanterns… Equipment, particular Unique Equipment in campaign play, is meant to play an integral part.

Terrain Options

Defenders might also be able to purchase Obstacles, Caltrops, Tripwires, and other terrain features.

Longer Games

Regular Vanguard is 5-6 Rounds, but Vanguard: Stealth scenarios may modify that a bit.

Example Scenario

blow_the_bridge

So many exploding bridges!

Blow the Bridge

Clutching vials of alchemist fire, the saboteurs slip through the forest, avoiding pickets. The dark silhouette of their target, a large wooden bridge, is outlined against the glimmering river below, illuminated by a bright full moon. A voice shouts out a challenge from the bridge: “Halt! Who goes there?”

Warband Preparation

The Attacker warband chooses a 125 pt warband as normal. Designate two of the models to carry Alchemist Fire Satchels.

The Defender warband chooses a 200 pt warband as normal. 5 models are designated as Sentries/Patrols – at least 3 must be Grunts, the remainder can be Grunts, Warriors, or Supports. The rest of the warband are set aside as Reinforcements.

Setup

10” from the Defender player’s edge, place a 6” wide river running across the width of the table with a bridge at the center. The river is difficult terrain for movement purposes. A road leading two and from the bridge across the table should be clear of area terrain, but otherwise the table should have about 33% coverage.

Bridge_Burn

The Defender then places 3 sets of Patrol Markers on the table. Each Patrol Marker must be more than 6” from the bridge, the Attacker deployment zone, or a Patrol Marker of another set.

Beginning with the Attacker, players alternate deployment.

The Attacker deployment zone extends 4 inches from their table edge.

The Defender may deploy two Sentries on or within 3” of the bridge and, for each Patrol Marker set, a single Patrol model on the Marker of their choice.

Scout: Do not use the Scout rule in this scenario. Instead Attacking (only) models with Scout may make a free Walk or Run action after deployment, testing for Noise as normal, but may not Engage enemy models.

The Winner

5 full Rounds after the Alarm Track reaches 3, roll a D8. On 1-5, the game ends. On a 6+, one more Round is played and then the game ends.

If the Attacker blows up the bridge, they score 5 VPs. Attackers earn 1 VP for every full 10 points of models they kill, Defenders earn 1 VP for every full 5 points of kills.

Scenario Rules

Alarm Track

Whenever a Defender becomes Suspicious or Alarmed, increase the Alarm Track by 1. If the Alarm Track reaches 3, all the Defenders are Alarmed. If the attackers blow the bridge, set the Alarm Track to 3 automatically.

Reinforcements

The Round after the Alarm Track reaches 3 the Defender may start bringing their Reinforcements onto the table. On their turn the Defender may Run a model onto the table, entering from any point along the Defender’s table edge.

Alchemist Fire Satchels

A model with the Alchemist Fire Satchel must be in contact with the Bridge, not Engaged, and use a long action to set the charges. At the end of that model’s next activation, the bridge is blown – deal 1D6 automatic hits with Piercing (1) to any model in contact with it and then remove the bridge from the table.

If a model carrying a Satchel is killed, place a marker on that spot. A friendly model in contact with that marker, not Engaged, may spend a short action to pick up the Satchel.

Feedback?

Thoughts? Or even better, playtesting feedback? So far it feels a bit fiddly, but that also might be OK if it allows for more narrative and immersive gameplay. And by keeping both sides very small until the alarm is raised, I hope to keep the game shorter.

Have you seen other stealth/infiltration mechanics that seem fun? Maybe replace the Alarm Track with a Jenga tower? Or use a battle board and dice pool mechanic? Let me know! I’m definitely looking for ideas.

Sittin’ on the Dock of the Bay

I was thinking back on our club and what we’ve done over the last year, and one of the coolest things was our first campaign finale, back in August. Three tables, each with a different theme.

To the south, the invasion is going poorly and a new shipment of supplies is desperately needed. Supply ships have gathered in the harbors of Senfrenco the Grey and are being loaded up to relieve the army. To prevent this from happening, stealthy elite warbands have infiltrated the city to wreak havoc and sabotage the war effort. But an equally elite force has been stationed in the city to prevent just such an occurrence.

Table One – the Main Harbor

The main harbor with the supply fleet. Half of this table should be densely covered in large docks and boats, the other half should have waterfront structures like warehouses and market stalls. The attacker is trying to set fire to the supply ships and destroy the supplies in a daring raid on the harbor, while the defenders attempt to drive them off and douse the flames.

t1

All of the tables were two scenarios in one. There was a main scenario worth 2 Tournament VPs, and a tie-break scenario worth 1. The Main Harbor was a mash-up of Baggage Train (secondary) and a slightly modified Burn the Stores (primary). While on ships models could Swashbuckle and gain Crushing Strength (1), Fly, and Smash as they swung from the ropes – at the risk of falling flat on their back!

All the club mates scrounged up all the ships, buildings, and scatter terrain we had to assemble these tables, and I scratchbuilt some additional bits.

I made the docks out of scored hobby foam and basswood. I thought this would be much faster than it was, but I couldn’t find 3rd-party docks for the size and layout I had in mind. I then spent hours carefully adding birdshit everywhere. I don’t know why that detail was so important, but I was convinced it needed more birdshit.

docks

The netting, ropes, and pylons followed Vee’s tutorial on The Crafting Muse channel.

nets

Table 2 – Armory Harbor & Lighthouse

A secondary harbor where gunpowder and cannonshot are stored. These are currently being loaded onto skiffs and other smaller boats to be ferried to the warships offshore. The attackers have snuck into the lighthouse and doused the flame to prevent reinforcements from coming ashore. The defenders need to drive them out and relight the beacon. Preventing the munitions from falling into enemy hands is also critical. 1/3rd table is harbor with small boats, and 2/3rds loosely filled with buildings, scrub, etc.

This table was a combination of Light the Beacon (primary) and Supply Grab (secondary). In addition, there were gunpowder kegs scattered about that could be detonated with incendiary attacks.

I didn’t get many good pics of this table, but the catalyst for the whole finale theme was this guy:

t2

One of our players had started scratchbuilding their own boats and casting them! (You can buy them here on Etsy.) He actually made several of the boats on our tables, including this brown one, too:

boat2

On both tables 1 and 2, there were rules for knocking models into the water, but this only happened on Table 2. Guess what showed up?

sharks

Table 3 – Street Fight!

During the raid, a spy was supposed to make their escape from the city with some precious secret plans, but he never made it out. Why? Among many other valuable things, the spy had discovered a secret weapon had been constructed in Senfrenco – an arcane battery that could unleash destructive power. Two opposing warbands pick through the city looking for the spy’s last known whereabouts near the arcane weapon, in a dense, populous section of town. This battle is 100% inland, and should feature dense, multi-level urban structures, barricades, fires, etc. plus some sort of sinister magic portal/weapon/macguffin.

t3

This table had, by far, the best special rule: Mobs of panicked civilians. Inspired by the Gangs of Rome skirmish game, these large-base roving packs moved about randomly every turn, but if you Engaged them they would run directly 1d8″ away from you. And if a model should happen to be in their path, they got trampled by the fleeing crowd and took an automatic hit.

So of course a game of “panicked people ping-pong” ensued!

mobs

Note the (ultimately victorious) dwarfs in the back-right cowering behind a building, hiding from the hordes being herded their way!

Wrap-up

It took a lot of people coming together to pull off a finale like that, but it’s a wonderful change of pace from the usual pick-up games at the FLGS. Really grateful to the club for making it happen!


A Finny Thing Happened on the Way to the Forum

So I’ve done a shite job of posting updates to the KOW Forum, or even keeping this blog up to date. In my defense, I’m a goddamn sloth.

However, I’ve finally finished up my Trident Realm warband! That’s actually a pretty big deal for me, even for something that was supposed to be just a table-top quality speedpaint project.

OK, not entirely finished. Gotta clean up the base edges, and I want to gloss or satin coat some of the minis to look more ‘wet’. And there’s always more layering and clean-up to do. But I’m going to call it here – realistically these aren’t going to hit the table much in the near future as our Vanguard campaign is ending soon, and I’m already feeling the draw to build a new warband. (Preferably tanky, as all I’ve really played are squishy finesse factions. Abyssal Dwarfs, maybe?)

Anywho, here’s how they ended up:

20200116_111843

Naiad Heartpiercers

20200116_112431

Naiads – Centurion, Envoy, Standard Bearer, two Lurkers, six Initiates

20200116_113458

Water Elemental (not Mantic), Mythican/Aquamancer, two Thuuls

20200116_113748

Treeleaper and two Riverguard

A sizeable chunk of these were painted by my buddy MattP (I traded him a bunch of neglected Cadians). We independently landed on very similar color schemes, so that worked out nicely!

FYI, I’m in the market for one more Heartpiercer so I can at least have an MMC troop on hand for regular Kings of War! Ping me if you have a spare.

Vanguard and the Art of Chump Blocking

“Chump blocking” is a term I picked up from Magic the Gathering for when someone attacks you with a giant goddamn 6/6 creature and you’re like, whatever, I’ll just block it with this little 1/1 weenie dude who is totally going to get murderlized. But that’s fine if it buys you time to focus on other stuff that’ll hopefully win you the game.

I’ve started thinking about Vanguard tactics in a similar way. Vanguard games always last 5 or 6 rounds, so if you can make your opponent’s key models waste a turn or two dealing with chump blockers, that can be a huge tempo swing in your favor.

(If you play regular Kings of War, this will all be conceptually similar to chaff, however thanks to the extreme mobility of Vanguard units and the smaller base sizes they play a bit differently.)

Ogre sacrifice

23 points of Ogre wasting a turn killing 7 points of Foot Soldier. (Graphics thanks to Universal Battle.)

The simplest tactic is to just run up and engage a foe with a cheap grunt. If the Ogre player wants to attack something behind the grunt, they have to Disengage, take an automatic hit, sidestep a little over 1″, and move in to engage. And since it’s not a straight line, it doesn’t count as a charge, so they’d need to Fatigue to attack. Or they can spend a turn killing the grunt. Either way, that’s a decent use of 7 points.

I mean, if there was an artifact that cost 7 points and it said “once per game prevent an opponent’s model from charging” you’d buy that magic item, right? That’s kind of what a chump blocker is.

All models also have a 1″ zone of control around them, which enemies cannot move through unless they are engaging your model or another one very close. So you can use this 1″ bubble to prevent a direct charge, or even put a model out of charge range entirely.

Ogre_charge_wizard_setup

“I’m not touching you!”

By jamming up 1″ in front of the enemy, it now takes an extra ~2.3″ for the Ogre to reach the Wizard – well out of the Ogre’s charge range, while still leaving the Wizard safely able to lob spells at the Ogre.

Ogre_charge_wizard_conclude

canttouchthis

Ogre_charge_wizard_multiple_blockers.png

And, of course, it gets even better with multiple chump blockers. There’s no getting through that screen.

Ogre_charge_wizard_terrain

And it plays nicely with terrain, too.

And there’s no reason to limit this to protecting your models – this is a great tactic for denying your opponent access to objectives, too!

The biggest mistake I often see is putting blockers too close to the target you’re trying to protect. The rules say attackers can ignore the blocker’s 1″ zone of control if their engage move leaves them within 1″ of the blocker. So a good rule of thumb is to keep your blockers more than 2″ away. More if you are trying to screen against a Large or cavalry-based attacker.

Chump_Drake_meme

This is a little unintuitive, as it feels like you should be able to “bodyguard” a model. And if you come from Kings of War and think of these models as chaff, it’ll definitely feel weird – you can run effective screens pretty close to other units in KoW, but not in Vanguard.

Secondly, grunts aren’t entirely disposable in Vanguard – every casualty counts against your warband morale, so you can’t be cavalier about chump blocking. But if it’s a choice between losing a 7 point grunt and a 24 point support model, well… morituri te salutant!

The other problem is where exactly you put your models and how big the bases of the attacker, the blocker, and the target are, as that can change the math.

For example, if a 20mm attacker and a 20mm target are 10″ apart, and you run a 20mm model exactly into the middle, that’ll cost your opponent ~0.6″ of movement to go around. But if you get right up 1″ from the would-be charger’s face, that takes up 1.9″. If the attacker is on a 40mm base, it actually costs them 2.3″.

You get the idea. There’s no easy rule of thumb – you’ll need to measure it out each time, and it requires a fair bit of precision to get right. That said, it’s definitely doable and, if your opponent is reasonably chill, you can just agree on the approximate position and intention and move onto the fun bits.

I mean, I’m assuming you don’t find trigonometry fun, but clearly I’m not one to judge.

A Riverguard Runs Through It (WIP)

It’s been two weeks since my last Vanguard “Your Club, Your Story” update. After all the things that went wrong while preparing my Riverguard models – spotty primer, too dark Contrast paint, even darker wash – I had been dreading picking them back up.

The cure for procrastination? Dreading something else even more and procrastinating on *that*. So rather than deal with some frustrating, scary, and looming deadlines I picked up my Riverguard again. So… progress?

Riverguard_2

Skin was layered up 3 shades of green and I think I salvaged that fiasco alright.

Went with bronze weapons and armor that I will discolor with verdigris – something I’ve never painted before and I’m super-excited to try out!

I’m not happy with the shields. The “dusty” spotty primer job and my drybrushing really show up here. Hoping an Agrax Earthshade wash evens it out.

Started on the leather bits. Liking where it’s going, will give it a highlight or two. Really, everything needs a few more layers and a wash at this point.

No clue what to do with the cloth areas, like the loincloths. Most of the other models in the warband will have pale blue skin or other splashes of blue, so maybe that?

Ice & Iron: a chilly reception

Our club has been eagerly anticipating the Ice & Iron summer campaign supplement but now that it’s in my hands, I’m a bit frosty about it.

Ice & Iron is basically Vanguard 1.5. It’s the first major update to the game since it came out a year ago, with a large amount of rebalancing and tweaks. The changes all seem really good. I’m actually a big fan of annual updates, so this is all great so far.

The book costs $25 USD and is 80 pages, about 50 of which are updated warband profiles. But the reason I need to take a chill pill is that it’s incomplete – it only lists the basic units found in the free PDFs, and the few non-basic units that received updates. So only 8 of the 14 Basilean models are in the book, 10 of 17 Trident Realm, etc.

coldshoulder

This means the book is fucking useless as a reference. I still have to use cards or Easy Army as a reference for those units not in the book, and since they have all the other units as well, I might as well just use them exclusively. Why on Earth would I want to pay $25 for a partial list of units in print? This was a great opportunity to release an up-to-date compendium useful for veteran and new players alike, and it was totally botched.

The core issue is Mantic can’t make up its mind whether it wants Vanguard to be free or not, and is experimenting in this limbo of “almost-but-not-quite free, we’ll be just inconvenient and aggravating enough that you’ll pay”. Which is a terrible goddamn business model. Let’s be abundantly clear: If I did not really, really, really like Vanguard’s gameplay, I would absolutely not tolerate this. When I recruit new people into Vanguard, I actually kinda wince in embarrassment over having to explain that they’ll need to navigate this bullshit:

No photo description available.

This is an abomination. (Source)

OK, enough of that rant. How about I give a review of the other ~30 pages?

There are four pages of fluff stories, which is nice. I’m not into the Mantic fluff yet, myself, but believe that it’s important to the game and glad to see it there. There’s also a couple pages of nice full page art and lots of great looking photos and illustrations sprinkled throughout. The art is very good, though while Mantic is generally pretty good about avoiding tits-and-ass chainmail bikini shit, the half-elf snow bunny berserker is not cool.

berserker_boobage

Nothing says “I dwell in the land of snowstorms and glaciers and bitter cold” like underboob.

I look forward to the rest of the Northern Alliance models being redesigned to look like Zardoz to match.

The remaining pages introduce a Weather Table, a new Exploration Table, 7 new scenarios and guidance on how to string them together for a campaign, and some tips on running bigger, smaller, or multiplayer games.

This is the meat of the book, and if it wasn’t for the missed opportunity with the warband section, I’d be pretty pleased. The scenarios are flavorful, and the Weather Table adds more variability and replayability. The revised Exploration Table is much smaller than the original, but it’s much more tightly themed. These are all nice touches and show how by tweaking a few simple levers players can bring a setting and story to life through the mechanics.

Overall verdict: The overall updates are really great. Vanguard 1.5 is going to be even better. But the book itself? Not worth the $25, Mantic can do better. If you want to play the campaign, get one copy for your club so you can get the like 10 pages that are needed, but it’s otherwise skippable.

Once we get playing, I’ll post more thoughts about the scenarios. Until then, stay frosty.

chill

I Pity the Thuul (WIP)

Thanks to my buddy Matt, I finally got past my Trident Realm painting block. He organized a painting get-together in his basement with 4 other people, and it gave me a much-needed deadline.

Inspired by a commentator and Matt’s own Naiads, I decided to do colored metallic armor on my Naiads. My goal for the painting party was to test a couple versions of armor, along with some skin colors. I took a bunch of spare heads and arms and methodically tested different colors, diluted at different ratios.

Naiad_bits

I settled on a very pale blue skin tone (1:1 Contrast Aethermatic Blue w/ Contrast Medium over Wraithbone) and a bright blue metallic armor (1:1 Contrast Talassar Blue w/ Contrast Medium over Chainmail).

While those were drying, I slapped some Contrast Camo Green on the Riverguard.

Disaster!

That paint did not work like Contrast is supposed to: It didn’t leave a smooth gradient, but left everything in a monotone green. I had some old Citadel Green Wash, so I figured I could just slap that on and it’d at least give me some shading.

Double disaster!

The wash massively darkened everything. I’ll have to layer it all back up the hard way.

Riverguard

I love how dynamic these models are. Doubly so because in Vanguard they have special jump/attack abilities, and the kinetic poses really reinforces that.

What *did* go well were the Thuuls. The warriors got doused in purple, with highlights built up with a gray-blue.

The spellcaster was first covered in Aethermatic Blue, then wet blended with some white mixed at the extremities, and purple in the recesses and on the head.

Thuul

All of these still need a lot more work but I hope to at least finish the Thuul this week.

Lead a Centaur to Water…

I am stalling for time on my Trident Realm warband. I’m not gonna lie.

I’m used to painting flesh, armor, leather, fur and like, normal shit, so I’m suuuuper intimidated by these octopus- frog- fish-men, what with their fancy coral armor, strange anatomies, and weird colors. So while I’m trying to come up with a game plan, I’m procrastinating with my Herd/Forces of Nature force.

A while back, my buddy gave me some Tehnolog Centaurs. They’re hugely overmuscled gigantic horsemen, about 2.5″/65mm tall. You can find them on eBay or Amazon for ~$9 for a set of 4, including shipping. The sculpts have some really soft details and hilarious proportions, but have a certain charm and come out looking pretty good with a little effort.

Here’s the latest addition:Painted_Based

For Vanguard, he’s way too beefy-looking to be a Centaur Tenderhoof, so I’ll run him as a Centaur Bray-Strider:
Centaur_Bray-Strider_Stats

Under optimal-but-reasonable conditions (Cavalry bonus and 2 extra dice from some combination of charge/outnumber/power) and a Heavy Weapon, this model has pretty good odds of taking down most Warriors.
Bray-Strider_1With Smash he even threatens elite models. And Headstrong is going to let him Fatigue and Retaliate much more aggressively.

And he’s no slouch on Defense, either. 3 Wounds @ Ar 5+ means it takes 6 hits on average to bring him down. It’s not amazing, but with FoN’s easy access to Inspiring and Healing, the Bray-Strider could be pretty frustrating.

As for Kings of War, here’s the unit so far:
Unit

Most of the Tehnolog Centaurs face sideways, and they barely fit in 25x50mm bases, so positioning is a challenge. I’ve got one more left to paint, and I might be able to fit them all into one Troop. More likely, I’ll go MMC and use the bow-armed centaur separately as a Chief instead.

I honestly have no idea how useful a Troop of Bray-Striders will be, but the stats seem alright to me for 100pts:
Bray-Strider_KoW

They’re fast, can reliably shut down shooting, can’t be ignored in the flank or rear, and, at least in difficult terrain, might be able to actually survive for a turn. Can’t ask for much more than that…

Mathguard 2: Electric Boogaloo

So last post I talked about getting my new shiny Trident Realm miniatures from the “Your Club, Your Stories” promotion, and now I can actually start making a warband out of them, right?

Nope! My brain doesn’t work like that. I have to sit down an analyze things first.

As I’ve noted before, Vanguard – the excellent skirmish wargame from the folks that brought you Kings of War – can be a little opaque to me. The number of attack dice can be modified, the to-hit number varies, there’s armor checks, Nerve “saving throws”, special abilities, etc. And it’s all on d8s. And they explode on ‘8s’.

All this means is when I look at this:

I look like this:

Don’t get me wrong, it’s easy to tell if something is good or not by the stats, but what I really want to know is:

What are the exact odds that this model will fuck up Matt‘s Elf Prince?
Because seriously, fuck that guy. (The Prince, I mean. Matt’s great.)

TTL and AHA are convenient rules-of-thumb, but I wanted to go deeper. I was also learning some Python scripting, so I wrote a combat simulator which you can grab here. (You’ll need Python to run it. I am not a coder, and it’s probably ugly code, but it works.)

What does it do? It runs 100,000 combat simulations between two models and spits out a chart of how often the model deals X amount of wounds with an attack. It also tells you the % chance of an “alpha strike”, which I define as any attack that brings a model down to 0 wounds.

So here we have the above Riverguard Dambuster attacking that @&^#% Elf Prince with a Charge (+ bonus die) and the Cavalry (+1 to-hit) bonus:

Dambuster_v_Prince_1

Goddammit.

On average, I’ll do about 1.3 wounds, with a 27% chance of whiffing completely, and only a negligible 3% chance of taking the Elf out.

Alright, let’s bring out the big guns! Let’s add a Power die to that charge!

Dambuster_v_Prince

Well, shit.

On average, that’ll do 1.6 wounds, with a 22% whiff and a meager 7% chance of taking down that frickin’ Elf.

OK, that does it! We’re giving this Dambuster the works: Cavalry (+1 to hit), Charge (+1 die), Outnumber (+1 die), Power (+1 die), AND a Heavy Weapon (+1 Crushing Strength)!

Dambuster_v_Prince_3

Now that’s more like it!

Yeah! 2.5 wounds on average, 9% miss chance, and a decent 24% alpha strike!

That’s an extreme example, but this tool starts to let you answer some tough questions: How much spare Power do you need for boosting attacks? Which is better – another Grunt, or two Mounts? Is a Heavy Weapon an auto-include for your best models?

(The answer to that last one is ‘yes’.) Image source

Next post I’ll actually (finally!) dive into my warband options and start planning. After I’ve crunched the numbers, of course.

Mighty Morphin’ Army Lists

It all started so innocently… First, it was just a Salamander army.

The susurrus of the wind whispered to me through the leaves of the forest “You can usssse them in Forcesss of Nature.”

And so I made a Nature army.

Then, the baying wolves called on Nature’s Centaurs “Come, brothers, join us in the hunt!”

And so I made a Herd army.

But the sea, the sea in darkness calls “You should get some Naiads, they can be used in Trident Realm or Nature lists.”

And so…

fist_shaking

Damn you, Mantic! Damn yoooouuuu!!!!

Actually, I love this kind of list-morphing. I think it’s brilliant. If I had my way, the entire allies system in Kings of War would get tossed in the bin, and instead each faction gets access to a couple other core units from two other factions. I want to be able to daisy chain all the way from the Abyss to the Trident Realm! The armies will practically sell themselves.

Now, I’m not actually 100% sure that I want a Trident Realm army, but an interesting opportunity fell into my lap:

loot_box

This giant box showed up on my doorstep one day, filled to the brim with Vanguard goodness.

It was the Your Club, Your Story giveaway! Six clubs received six warbands each, plus books, dice, and objective Terrain Crates to help them grow their communities and promote Vanguard. Our little group, BAKOW (that is, the Bay Area Kings of War club centered around San Francisco, CA) was one of those lucky recipients.

I am absolutely floored by this haul, and it’s really fantastic to see Mantic supporting their fans, and empowering them to promote the game! Our group has been running Vanguard demos at cons and local game stores and playing in a regular campaign for months now, but I am embarrassed to say a lot of those games haven’t been with official Mantic miniatures. Our club can now put our best foot forward in the community.

We tore into the box with gusto and, when the dust settled, I clutched in my greedy tentacles:

20190728_095501

So, I ended up with the Trident Realm for three reasons:

  1. Image result for no dwarves signI would have been happy with any so I picked last. I’ve really enjoyed playing every faction I’ve run so far — they’ve all been fun to pilot and each feels distinctive – so I was pretty open to whatever. (Except Dwarves. Sorry, Ronnie, I just dont like Dwarves!)
  2. They seem like a finesse faction which, even though I absolutely suck at finesse play, I’m irresistibly drawn to it like salmon to their home stream.
  3. It lets me get my feet wet with the Trident Realm before I decide to dive in with a whole army.

So that’s how I ended up awash in Neriticans. In the next post, I’ll get into my planning process and analyzing the warband and making more aquatic wordplay.

I’m thrilled to be part of the “Your Club, Your Stories” promotion and over the next couple weeks, I hope to get in a whole lot of thinkin’, paintin’, and bloggin’ about my new Trident Realm warband. Stay tuned!