Search the Community
Showing results for tags 'sega'.
-
.thumb.png.9332e12cab6cec0213b9ffd456a9a968.png)
Version 1.0.4
24,847 downloads
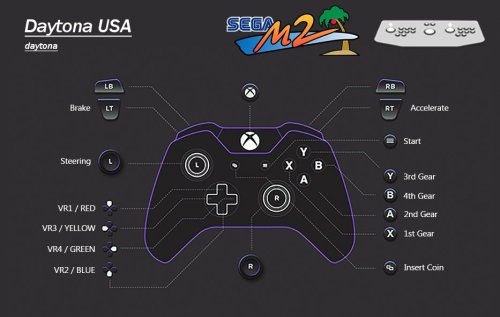
UPDATE: Added cheats to the table below. Another huge thanks to @Joejoe for providing these. UPDATE 2: Fixed ManxTT lack of engine sound and Danger Screen at startup. Dynamite Deka 2 Added. UPDATE 3: Using new LUA scripts that include cheats, a scanline option and more refined widescreen scripting. Added DINPUT control configuration using a PS4 controller. More fixes in change log. You can use F5 to toggle between 16:9 and 4:3 when using widescreen scripts. UPDATE 4: Quite a Big One A whole bunch of inputs moved for better play. Gears are on the face buttons now, fighters have had some inputs moved. Images updated of course. All of the other Daytona USA versions/hacks have been added. ManxTT fixed properly properly. I promise. Changed the rom to the twin version 'manxttc' and set to twin in test menu. No more stupid error every time you turn, which caused a Japanese voiced error audio sample to be played...every time you turned. Very annoying....but it's gone now. ManxTT and Over Rev should now track straight when not holding the stick. This was an error on my part. Now fixed. Full Fat 1440x1080 60FPS 30s Videos have been added. Freshly made by me, clean high quality videos. Clear Logos & Flyer Fronts. I made the other Daytona clear logos up to match the normal one, came out nice actually. Also made up some flyers for some of the Daytona hacks and Sega Rally. Every game has a bespoke clear logo & flyer. No doubles. Custom Platform XML provided. In the description of every game will be my emulation notes for that game & any cheats. Genres/categories/no. of players had been adjusted so auto playlists with catch them correctly. DINPUT better configured. I'm not gonna lie, after looking at what I had previously done I was disgusted. This is now configured just as good as the xinput version. So you know the drill with these releases. The intention is to take these awkward to set up emulators, and make them as plug and play as possible for those using a PC, controller, mouse and light guns. Here is the follow up to the Supermodel project I completed a little while ago. The Model 2 setup was far more forgiving and didn't make me want to trash my computer. That's not to say there aren't some interesting and awkward things going on that needed some attention, however these were far more easy to fix. As per usual many hours have been put into this project with much testing and in the case of getting 2 Player Mouse support, a lot of calibrating. This has only been configured for the parent rom versions only. 1G1R Instructions - Super Simples -Download Model 2 Emulator -Use MERGED ROMS. imma say it again MERGED ROMS. -Download Pre Config File Folders On This Page (Make sure you select your correct input type) -Place in Model 2 folder and replace any files. -Widescreen scripts are being used as default. If you only want 4:3, replace the scrips with the 4:3 ones provided in Scripts Folder. -DONE!!!!! What this configuration will give you: 2 Player Mouse Support for Light Gun Games - Resolution Specific 1920x1080 - If You Change Resolution It Will Be Inaccurate I cant tell you how awkward and difficult it was to get this to work. Due to RawInput being a must for 2 mice, the calibration doesn't scale into different resolutions. This means you can't calibrate it using the auto calibration (shooting targets) in its test menu, as it'll be inaccurate no matter how perfectly you shoot those calibration targets. You can't even calibrate at native resolution to make it 1 to 1 and then increase the resolution. Thankfully Virtua Cop 1 & 2 both have a manual adjustment feature meaning I could off set the adjustment to get PERFECT pin point accuracy. Behind Enemy Lines was awkward but not impossible to get accurate, as it doesn't display where your actual in game cursor position is on screen. Only X and Y coordinates are displayed, which was just enough info to get it accurate. Gunblade on the other hand gives you absolutely no on screen info at all when calibrating, it's as accurate as I can get it. What is really weird is that some of these games are accurate out the box with RawInput off, but needed recalibrating when I enabled RawInput. But now if you turn off RawInput it is still accurate after calibrating for RawInput. That's great as switching between the two is seamless and retains accuracy. Best of both worlds, as having RawInput off for single player gives you more mouse sensitivity. No Screen Flash for Virtua Cop 1 & 2 and House of the Dead LUA scripts are included as standard to remove the screen flash that would happen every time you pull the trigger. All the other Light Gun Games don't have screen flash by design so all of these shooters do not flash. Controls Configured with Images for Every Game All controls have been pre configured for both players. I have also made images for the layout of every game. Controls were tested the most. I found some strange/broken controls that needed some thought. Sky Target has a broken up and down analogue input, however simply mapping this as a digital input to the left stick up and down is a perfect workaround. Desert Tank benefits from no analogue inputs also, I have got it to control exactly like the vehicles in Halo which is neat. Aside from that there are various racing games that have inverted pedals that needed the Invert option checked in the control calibration options. All Games In English - All Games Free Play This speaks for itself. All test menus adjusted to let these games play in English and in Free Play mode. Test Menu Fixes and Unlocked Hidden Game Modes Network Board Not Present.....Done. Unlocking all game modes in Virtua Striker....Done. Calibrating analogue inputs in 'Volume Adjustment' (Yeah I thought it was to do with audio too) so controls are correct and use the entire travel of the analogue range so racing games aren't twitchy....Done. A whole bunch of tweaks from CRT modes giving better brightness to extending game times among a shed load of other crap that enhances the experience in some way.....Done. Optional 16:9 Anamorphic Widescreen LUA Scripts Put these in the scripts folder and boom...proper widescreen no stretching. These work way way way way better than the temperamental widescreen option in the EMULATOR.INI file, which only works half the time depending on how your graphics are scaling etc etc etc etc. Just use the LUA scripts instead for better results and no headaches, I command it. I love this feature, House of the Dead and Gunblade even allow you to shoot into the 16:9 space. DOCUMENTATION / CHECKLIST. THIS HAS BEEN DONE FOR YOU Behind Enemy Lines bel -Calibrated and WORKING. -Calibrated for RawInput 2 Players -Set to Free Play Gun Adjustment Values for Accuracy When Using RawInput at 1920x1080: 29 MIN GUN 1 X 0e MIN GUN 1 Y d5 MAX GUN 1 X f2 MAX GUN 1 Y Daytona USA daytona -Link ID set to 'SINGLE'. Default is 'MASTER' which causes the game to give the Network Board Not Present error preventing you from playing the game. -Country set to 'USA', this changes the language to English. 'Japan' is the Default. -Set to Free Play -Apparently setting Cabinet Type to Deluxe displays correct colours due to it's display type. Dead or Alive doa -Nation set to 'USA', this changes the language to English. 'Japan' is the Default. -Set to Free Play Desert Tank desert -Country set to 'USA', this changes the language to English. 'Japan' is the Default. -Controls took a while to figure out. It is actually better to use digital inputs and NOT use analogue input with this game. Turning the turret is on the right stick with accelerate being up on the left stick. -Set to Free Play Dynamite Baseball 97 dynabb97 -No English option that I know of. -Innings Per Credit set to MAX (3) -Analogue 'Bat' input calibrated in 'Volume Settings'. Which is actually analogue calibration, I assumed it was audio settings, not realising analogue range is expressed in 'volume' also. -Set to Free Play Dynamite Cop dynamcop -Set to Free Play Dynamite Deka dyndeka2 -Japanese version of Dynamite Cop. This version varies with character models and is even more insane than the English Version. Even though this is 1G1R, I consider this to be a separate game due to its differences. -Set to Free Play Fighting Vipers fvipers -Country set to 'USA', this changes the language to English. 'Japan' is the Default. -Display Type looks best set to 'Projector'. Although this is darker, using 'CRT' increases the saturation to the point blacks are -Set to Free Play Gunblade NY gunblade -Country set to 'USA', this changes the language to English. 'Japan' is the Default. -Calibreted both analogue guns in 'Aim Set'. RawInput is on to allow for 2 player mouse support. Due to RawInput implementation this calibration is RESOLUTION SPECIFIC - 1920x1080 -Set to Free Play Gun Adjustment Notes - Resolution Specific 1920x1080: Due to no x or y coordinates being shown it is almost impossible to get this pin point getting the on screen crosshairs to line up. I gave it my best shot. You are welcome to try. House of the Dead hotd -Country set to 'USA', this changes the language to English. 'Japan' is the Default. -Calibrated both guns in 'Aim Set'. RawInput is on to allow for 2 player mouse support. Due to being RawInput this calibration is RESOLUTION SPECIFIC - 1920x1080 -Blood set to 'Red'. The Default is 'Green' -Set to Free Play Manual Gun Adjustment Values for Accuracy When Using RawInput at 1920x1080: ADXMIN = 259 ADYMIN = 119 ADXMAX = 581 ADYMAX = 438 Cheats: NOTE: LEFT refers to player 1's gun RIGHT refers to player 2's gun New Costumes (2 players): At title screen after entering at least 1 credit (2 credits for 2 players game), pull the triggers: LEFT, RIGHT, LEFT, RIGHT, LEFT, RIGHT, START Player 1 Plays as Super G: This code must be done at the title screen, after entering at least one full credit. The following code must be entered very quickly in order to work properly. LEFT, LEFT, RIGHT, LEFT, LEFT, START. Sophie Costumes (2 players): At title screen after entering at least 1 credit (2 credits for 2 players game), pull the triggers: LEFT, RIGHT, RIGHT, LEFT, LEFT, RIGHT, START Show Your Score: Put your coins in and press Left x3 Right x2 then press the start button... remember this has to be done very quickly. Have fun. LEFT, LEFT, LEFT, RIGHT, RIGHT, START Indianapolis 500 indy500 -Steering, Gas & Brake analogue inputs calibrated in 'Volume Settings'. Which is actually analogue calibration, I assumed it was audio settings, not realising analogue range is expressed in 'volume' also. -Set to Free Play Pace Car: Hold the start button, blue view button and brake until you chose your start your race. If you are holding the buttons, the door of your trailer will go up. Reversed Tracks: Hold the shift lever down while starting a game. Secret Camera View: When in the fourth view during a race, press any two view change buttons simultaneously Super-Charged Engine When selecting your transmission, select Manual. Head toward the pit in gear 6. when you exit, you will be in gear 1. DO NOT CHANGE GEAR! From now on, you will have a super charged engine Last Bronx lastbrnx -Set to Free Play -Display set to 'CRT'. This looks brighter and better than 'Projector'. ManxTT Superbike manxtt -Cabinet Type changed to TWIN. This skips the Danger screen and fixes the lack of engine sound. -Country set to 'USA', this changes the language to English. 'Japan' is the Default. -Start is View Change -Set to Free Play Motor Raid motoraid -Country set to 'USA', this changes the language to English. 'Japan' is the Default. -Bank, Accelerate and Brake analogue inputs calibrated in 'Volume Settings'. Which is actually analogue calibration, I assumed it was audio settings, not realising analogue range is expressed in 'volume' also. -Set to Free Play Change Bike Colour to CPU Bike Colour: In order to use the CPU Bike Colour, enter the following code at the Select Player screen: Punch, Kick, Kick, Punch, Punch, Kick, Kick, Punch. Note: The Select Player screen is monochrome, so you will not be able to see the colour change until the game starts. Extra Stage: Segal First play the Practice Mode. The easiest stage. ''Yenda,'' will then be selectable. Next, highlight Yenda at the stage-select screen and enter the following code with handlebar button: Punch, Kick, Kick, Punch, Kick, Kick, Punch, Punch, Kick, Kick. The ''Segal'' stage will now be selectable. Ues Segal Weapons in Any Stage Ordinarily, the Needles and Hammer weapons can only be used in the Segal stage. To access these weapons in any other stage, enter either of the following codes at the Select Player screen: Needles - Kick, Kick, Punch, Kick, kick, Punch, kick, Punch, Punch, Kick. Hammer - Punch, Kick, Punch, Kick, Punch, Punch, Kick, Punch, Punch, Kick. Over Rev overrev -Country set to 'USA', this changes the language to English. 'Japan' is the Default. -Steering, Gas & Brake analogue inputs calibrated in 'Volume Settings'. Which is actually analogue calibration, I assumed it was audio settings, not realising analogue range is expressed in 'volume' also. -Set to Free Play Three Additional Cars: At the 'car selection' screen, press the brake. Pilot kids pltkids -Set to Free Play Rail Chase rchase2 -Country set to 'USA', this changes the language to English. 'Japan' is the Default. -Set to Free Play Gun Calibration Notes: Due to how this game works no calibration is needed or available. Sega Rally Championship srallyc -Country set to 'USA', this changes the language to English. 'Japan' is the Default. -Set to Free Play Sega Rally Pro Drivin' (HACK) srallyp -Think "Sega Rally Remix" with a turbo button when playing this hack. That is exactly what it feels like. -Country set to 'USA', this changes the language to English. 'Japan' is the Default. -Set to Free Play Sega Ski Super G skisuprg -Country set to 'USA', this changes the language to English. 'Japan' is the Default. -Swing and Inclining analogue inputs calibrated in 'Volume Settings'. Which is actually analogue calibration, I assumed it was audio settings, not realising analogue range is expressed in 'volume' also. -Incline inputs were foot pedals on the OG HW intended to be worked independently for jumping and doing tricks. I have set these to the triggers as it's by far the best place for them. -Set to Free Play Sega Touring Car Championship stcc -Country set to 'USA', this changes the language to English. 'Japan' is the Default. -Set to Free Play Sega Water Ski segawski -Country set to 'USA', this changes the language to English. 'Japan' is the Default. This needed the following engineers code to be input into the main test menu -Slide analogue input calibrated in 'Volume Settings'. Which is actually analogue calibration, I assumed it was audio settings, not realising analogue range is expressed in 'volume' also. Set to Free Play Sky Target skytargt -Country set to 'USA', this changes the language to English. 'Japan' is the Default. -Analogue inputs calibrated in 'Volume Settings'. Which is actually analogue calibration, I assumed it was audio settings, not realising analogue range is expressed in 'volume' also. -This game when using an analogue input for up and down is broken. You will ascend only to drop down when you go past a certain threshold with the analogue input. Setting this to a digital input solved the issue. -Set to Free Play Sonic Championship schamp -Set to Free Play -Display set to 'CRT'. This looks brighter and better than 'Projector'. Super GT 24h sgt24h -Country set to 'USA', this changes the language to English. 'Japan' is the Default. -Steering, Gas & Brake analogue inputs calibrated in 'Volume Settings'. Which is actually analogue calibration, I assumed it was audio settings, not realising analogue range is expressed in 'volume' also. -I/O Type left on Default (C) which has inverted pedals. I inverted the controls in the emulator to compensate. You can set I/O Type A which doesn't use inverted pedals but I opted for the former. -Set to Free Play Top Skater topskatr -Analogue inputs calibrated in 'Volume Settings'. Which is actually analogue calibration, I assumed it was audio settings, not realising analogue range is expressed in 'volume' also. -Set to Free Play Play as a Surfer: Press the Left Select button three times, Right select button three times, and then the Left Select button thirteen times. Hidden Track: First chose Advanced Level (doesn't matter which character). Then, right before the board is unlocked, move the board up. Then when the game starts going, miss the first jump on purpose and crash right into the fence on the left side of the church. If you do it right you'll find yourself in the hidden track. Play as Body Boarder: At the course select screen press and hold down the start button. Then at the character select screen press the Right select button six times, the Left select button six times, Right three time, Left three times, Right four times, and the finally let go of the Start button. Super Deformed Mode: At the stage select screen, press the Left select button nine times, the Right select button nine times, the Left select button four times, the Right select button four times, and the Left select button five times. Now lean the board forward and press the Left and Right select buttons simultaneously three times. Virtua Cop vcop -Country set to 'USA', this changes the language to English. 'Japan' is the Default. -Calibrated for RawInput 2 Players. Due to being RawInput this calibration is RESOLUTION SPECIFIC - 1920x1080 -When using RawInput this game must be recalibrated for accuracy. However the 'Gun Adjustment' option didnt work correctly (inaccurate). So I had to use 'Manual Gun Adjustment' instead, using the ability to offset to get pin point accuracy. If RawInput is turned off it will be inaccurate. -Set to Free Play Manual Gun Adjustment Values for Accuracy When Using RawInput at 1920x1080:: ADXMIN = c1 ADYMIN = 24 ADXMAX = 234 ADYMAX = 1a3 Virtua Cop 2 vcop2 -Country set to 'USA', this changes the language to English. 'Japan' is the Default. -Calibrated for RawInput 2 Players. Due to being RawInput this calibration is RESOLUTION SPECIFIC - 1920x1080 -When using RawInput this game must be recalibrated for accuracy. However the 'Gun Adjustment' option didn't work correctly (inaccurate). So I had to use 'Manual Gun Adjustment' instead, using the ability to offset to get pin point accuracy. If RawInput is turned off it will be inaccurate. -Set to Free Play Manual Gun Adjustment Values for Accuracy When Using RawInput at 1920x1080: ADXMIN = 210 ADYMIN = 36 ADXMAX = 582 ADYMAX = 422 Virtua Fighter 2 vf2 -Version set to 2.1 -Display type set to 'Projector'. 'CRT' looks undersaturated and washed out. -Country set to 'USA', this changes the language to English. 'Japan' is the Default. -Set to Free Play Virtua Striker vstriker -Country set to 'USA', this changes the language to English. 'Japan' is the Default. -Match Time set to MAX 3min -G Goal Mode (IF THERE'S A DRAW BY THE END OF THE MATCH) = (EXTRA TIME, NEXT GOAL WINS) Set to MAX Time 1m. OFF is the default. (If extra time goes 1m with no goals the match will go to a Penalty Knockout.) -P K Mode (PENALTY KNOCKOUT) Set to REAL. OFF is the default. (This will let penalties go on until there is a clear winner.) -Set to Free Play Play as FC Sega: Press start on teams starting with the letters of F-C Sega France; Colombia; Spain; England; Germany; Argentina Virtual On von -Time set to 'Deathmatch' (no timer) -Set to Free Play Wave Runner waverunr -Country set to 'USA', this changes the language to English. 'Japan' is the Default. -Analogue inputs calibrated in 'Volume Settings'. Which is actually analogue calibration, I assumed it was audio settings, not realising analogue range is expressed in 'volume' also. -Set to Free Play Zero Gunner zerogun -Set to Free Play- 58 comments
- 12 reviews
-
- 52
-

-

-

-

-
- sega
- sega model 2
- (and 1 more)
-
Version 1.0.5
34,951 downloads
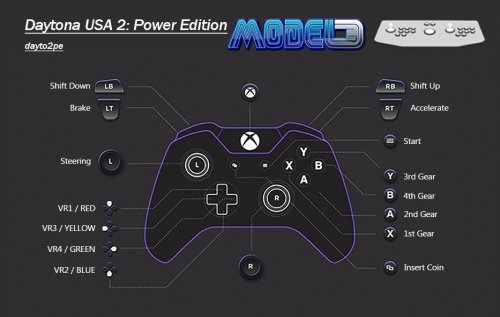
IMPORTANT: I am not working for the Supermodel Team. This is in no way official. It's just me, admiring Ian and the teams amazing hard work. Presenting it in a way that is usable for PC, Controller and Mouse with minimal effort. A lot of people are turned away from this emulator because of the setup. Thinking it's broken or too much hard work. I want to change that and make things easy so people realise just how good Supermodel is. Thank you to @Joejoe for a bunch of cheats and unlocks and checking everything as it's progressed. Thanks to @Baggio for providing the AHK script for Light Guns. Thanks to @Johnny T for various stuff, and @Headrush69 for something I can't remember. Much has changed with this emulator over the past 2 and a bit years. With new features, fixes and the emergence of a new UI, it's safe to say Supermodel has never looked better. So, it's time to flatten everything and create a new standard for the project, at least with it's setup and usage. It's time to strip out what ain't needed. With 2 permanent solutions to the fabled 'light gun indexing' issue, light gun users should no longer need to ask 'why my light gun no worky?' Also, thanks to @Joejoe we now have all unlocks for every game. The last one to fall was Dirt Devils with it's extra track and truck. The main update is the Light Gun AHK script and extra stuff for Dirt Devils. With this pre configuration you will get: Controls Pre Configured. Please see the images provided for button layouts. I have spent many hours on figuring out the best layouts to ensure no clashing inputs and intuitive controls, I could go into detail but again it would need a video an hour long to cover it all. Just know a 'dead zone' of 7% has been added to the analogue sticks to prevent saggy sticks from steering your car for you, or randomly entering directional inputs when you don't want. Also, some games will use force feedback to vibrate your controller. 2 Player Mouse Light Gun Support. The Lost World, The Ocean Hunter, L.A. Machineguns and Start Wars Arcade (yes I have calibrated for both players). By default the mouse indexes have been set to MOUSE1 and MOUSE2. For mouse only users this is generally fine, but light gun users may find their mouse index set to a higher/different MOUSE number. Supermodel also LOVES to make windows switch mouse indexing, more than other emulators, causing your Light Guns just stop working. The new UI has a solution for this, where you essentially shoot/click a box before booting the game, when RAWINPUT is set. This sets the correct indexing and light gun controls for you, ensuring a seamless light gun experience every time you play. However, the UI solution is not currently deployable into LaunchBox. But...thanks to @Baggio we now have an AHK script which will fix your light gun index permanently with LaunchBox (and without). It does require some setup, but once it's done, it's done. It's pretty much a bullet proof solution, pardon the pun. Test Menu Fixes. Every game that needed a test menu fix has had it done. For E.g. the Network Board Not Present issue in Daytona 2, and Feedback Lever issue in Star Wars. This includes setting many of these games Cabinet Type to 'normal' rather than leaving them set to Deluxe. Most of the Deluxe variants have more input options (clutch, fishing line etc) that aren't used or emulated, especially for use with a controller. All games are set to Free Play, Japanese language set to English, and regions have been changed to USA where possible. Analogue Steering Saturation & Analogue Calibration. All of the racing games except Sega Rally 2 have very twitchy steering. I have spent hours sorting out the Analog Saturation to make them more playable. However, the fact is these arcade racers use 1:1 Analog steering. This is TOTALLY NOT how console racers work, unless using a proper analog steering wheel. As the steering is 1:1, it reacts as fast as the stick moves, which again is NOT how console racers work with controllers. If you have the analog stick fully locked to the left and release the stick, the steering will return to centre at the same speed as the stick moving, REALLY really fast. Again... console racers don't do this. There is no current way around this, I have mitigated it, but not removed it. You will have to ease the stick back to centre like you would an analog steering wheel to be able to play effectively. Just be gentle. Sega Rally 2 is fine tho. Enhancements. Some games benefit from having different modes activated. For e.g. Sega Rally 2 'Game Type' set to 'Special' enables 3 laps per stage rather than just the one. Virtua Striker has Golden Goal and Penalty Shootout modes that are off by default, having a longer play time is also preferable in this type of game. There's also little changes like setting Speedometers to MPH from KPH. Please see the table below for more info. Audio Configured (sorta) Left at default the audio is quiet/loud and not balanced for most games as the baseline (not bassline) is not known. It's actually a god damned mystery how these cabs were balanced for audio. Supermodel simply sets it all to max by Default leaving some games really loud and others really quiet. Apparently that's how it was with OG hardware. Meaning the service technician would have balanced these depending on the setup. As you can link certain games like Daytona, audio would have needed to be balanced in accordance, manually. Is there some kinda document or guide out there that's missing, or did the techs just do it by ear? Who fuckin' knows man! There is NO official audio balance standard for Model 3 games, that we know of! So, Audio has been adjusted on a per game basis. This took ages and would probably need a video an hour long to explain. Just know that it was super confusing with the Balance option doing different things per game. I adjusted every games volume to be 'about' the same db. This aspect of the project is the last piece of the puzzle. The audio emulation seems to be getting some attention recently, so gonna hold off to see what happens. I have provided a pre configured Supermodel.ini file for XINPUT and DINPUT. XINPUT (Xbox/Windows) is by far the preferred input method. This is because all XINPUT controllers are the same between controllers with their input IDs. This is great for making pre configurations because it's the same for everyone. If you are unsure as to what input system your controller uses a quick google search should tell you, or this should tell you https://gamepad-tester.com DINPUT is not so great for making pre configs as their input IDs can vary between controllers. So, now here comes a... DISCLAIMER: FOR THE DINPUT PRE CONFIG I USED A PS4 CONTROLLER. IF YOU ARE USING A DIFFERENT DINPUT CONTROLLER YOUR INPUTS COULD BE WRONG AS DINPUT CONTROLERS CAN VARY WITH INPUT IDs. Use X360CE if your DINPUT controller inputs are incorrect, and use the Xinput ini instead - https://www.x360ce.com/ So with that out of the way. SETUP INSTRUCTIONS Download the most recent Supermodel Git version from the official website here - https://www.supermodel3.com/Download.html Download the Sega Model 3 UI from the official GitHub page here - https://github.com/BackPonBeauty/Sega-Model-3-UI-for-20240128-/tree/Segamodel3UIver1122 Download NVRAM & Correct INI file for your controller from this page. Unzip all of this. Transfer/copy all the files from the UI folder into the Supermodel folder. Transfer/copy the correct Supermodel.ini into the Config folder of Supermodel and replace the one already there. Transfer/copy NVRAM files into NVRAM folder of Supermodel. Place ROMs into the ROMs folder in the root of Supermodel. You can use a custom location, but this location will mitigate issues. Start the UI, set your settings to your preference and PLAY! Roms INFO Use as recent as possible MAME NON-Merged ROMS. DON'T USE MERGED ROMS. Split will work but will be missing files needed for controller rumble/FFB. Supermodel is now kept in line with MAME rom updates, if they are to do with Model 3 Games. You can use as old as 0.236. Supermodel is "backwards compatible" to this point. However, 0.263 or newer is best, the reasons why are below: magtruck was updated 0.249 oceanhun was updated 0.253 scudxo was added 0.263 ONLY THESE VERSIONS HAVE BEEN CONFIGURED FOR. dayto2pe daytona2 dirtdvls eca fvipers2 getbassur (Best version for controller usage. It lacks the 'fishing line tension input'. This version was ported to Dreamcast and the only version here) harley lamachin lemans24 lostwsga magtruck (Better dump as of 0.249. Fixes Attract Mode. This is a better dump so it will be the new parent. With the old 'magtruck' parent becoming the clone 'mgtrkbad') oceanhun (New dump as of 0.253. This is a newer version so it will be the new parent. With the old 'oceanhun' parent becoming the clone 'oceanhuna') scud scudplus scudxo (This was found as of 0.263. This is an earlier version with MAJOR gameplay differences and different attract modes) skichamp spikeofe spikeout srally2 srally2dx swtrilgy vf3 vf3tb von2 vs2 vs298 vs2v991 LB PLATFORM XML INSTRUCTIONS Download Sega Model 3 XML from this page. Make sure LaunchBox is closed and not running in the background. Place XML into 'Platforms' folder. It is located in the 'Data' folder. Start LaunchBox Sega Model 3 Platform should appear on the left. Set ROMS Path - Click on any Model 3 game - Press Ctrl + A to select all games - Go to Tools->File Management - Click on 'Change Roms path for selected games' - Select folder where your ROMs are located. Make sure the Emulator is setup and is the default for Sega Model 3 under Associated Platforms. PLAY!!! LIGHT GUN INDEX FIX AHK SCRIPT INSTRUCTIONS You will need to install AHK, or use it portably. Just install it, it's easier. The script uses version v1 / v1.1, but you can just download the new one, v2, and let it prompt to download the older version in addition, on the first load attempt of the script. Download here https://www.autohotkey.com/ Download & unzip the AHK script from this page. Best Practice is to move the Light Gun AHK Script folder with the ahk script inside, into the root of Supermodel Download ControllerRemap Utility v0.0.11.0 here - https://forum.arcadecontrols.com/index.php/topic,108767.0.html (Download is at the bottom of the first post. Before you can unzip it, you will need to rename the file from ControllerRemap.zip.txt ...to... ControllerRemap.zip. Just take the .txt off the file name. THEN UNZIP) Place the ControllerRemap.exe you just unzipped into the Light Gun AHK Script folder next to the LightgunIndexRemap.ahk In LB, right click on a SM3 light gun game and select 'Edit Metadata/Media' Select 'Additional Apps' on the left. Select 'Add Application' at the bottom. Name Application 'Supermodel Light Gun AHK Script' To set Application Path, click 'browse' and select the LightgunIndexRemap.ahk in the Light Gun AHK Script folder you downloaded. Check 'Automatically Run Before Main Application' Hit OK! Repeat above steps (from step 6) for the other 3 Light Gun Games in LaunchBox. But Wait! Theeere's more! You need to set the VID/PID id's of your specific light guns in the AHK script. So we need to... Launch a Game you have set the AHK to with LB, with both light guns connected. If you only have AHK v2, you should get a prompt telling you the script is for v1. It will then ask if you want to download the latest v1.1 version in addition to v2. SAY YES. Wait for it to download. If you need to do this, RESTART YOU PC/DEVICE after v1.1 has installed. Otherwise the script wont work. If you already have v1 or v1.1 you won't get the prompt or need to restart. Now you have (or already have) v1/v1.1 the game should boot up with no script warnings. You wont be able to control anything as the PID/VID is not set. However, by simply booting with the script we have made a log of what they are so you can set them. Exit the game. Open Light Gun AHK Script folder. Inside you will find a list.txt file. Open this and you will see the VID/PID number for the connected light guns, plain as day. Now Right Click & Edit the LightgunIndexRemap.ahk script, with a text editor like WordPad. At the top you will find: *********************************** ; Insert guns ID/PID here *********************************** P1DeviceGunID = VID_0000_PID_1111 P1DeviceGunPID = 1111 P2DeviceGunID = VID_0000_PID_1111 P2DeviceGunPID = 1111 *********************************** Simply replace/edit the ID's in the .ahk script (reference e.g. above) to how they appear in the list.txt file. It's obvious what part of the string you need to use. Don't forget to SAVE the ahk! You should now be able to play with no indexing issues. PHEW! Awesome Feature: Try using WideScreen at the same time as WideBackround. This is essentially a widescreen hack giving a true anamorphic widescreen image. It works really well with most games, apart from Virtua Striker 2 and Sega Bass Fishing. Any questions feel free to ask. Below is a list of everything that I have done per game. YOU DON'T NEED TO DO ANY OF THIS. Consider this the documentation for this pre configuration. Please give this a read! A lot of hard work went into this. Not only have I listed everything that I have done I have also listed any cheats, region change codes and important information. Daytona USA 2: Battle on the Edge daytona2 Daytona USA 2: Power Edition dayto2pe Test Menu Changes: -Language/Game Region set to English/USA. Only achievable by using the Region Change Code. Japan is the default. -Link ID set to SINGLE. Fixes Network Board Not Present. -Setting Region to USA removes the option to switch between the Dennis St. James and the Takenobu Mitsuyoshi soundtracks. (Dennis) is the default when set to USA. However, you can still play the alternate soundtrack version with a really easy cheat that is listed below. Analogue Steering Saturation & Calibration: -Steering was very twitchy due to the Analogue Saturation. The analogue steering is technically 1 to 1 however, there is actually quite a lot of 'dead zone' when you have the steering fully turned. I found you can ease off the control stick about a quarter of the way, from fully locked, before it actually started effecting the steering. I confirmed this in 1st Person view where you can see the drivers hand and steering wheel. I eased of the steering about a quarter of the way before the steering wheel moved and the steering started to react. The 'Input Test' within the test menu did not reflect this, giving values for the entire range of the left stick XAXIS. -So after some extensive testing I have changed the InputJoy1XSaturation to 155% for Daytona 2:BOTE and 165% for Daytona 2:PE, to compensate for this 'dead zone'. This makes the area of the analogue steering XAXIS wider giving way better control, without losing any actual in game steering 'range'. As soon as you ease of the stick the steering will react. -This 'kinda dead zone' would have been present on the original arcade machine hardware, but due to the amount of travel/range left and right on the steering wheel it wouldn't have been noticed (arms don't twist that far). This adjustment is more of a "trueish" 1 to 1 and is much more appropriate for use with a controller. General Info: -Controller will vibrate with this game if you have that functionality. -More racing modes and 'number of laps customisation per difficulty' are available in the test menu when set to USA. Alternate Camera Views (you won't be able to do some of these due to the VR buttons NEEDING to be mapped to the D-Pad): -Press VR1 and VR2 at the same time to get a view from just behind the front left wheel well. -Press VR2 and VR3 at the same time to get a view from just behind the front right wheel well. -Press VR2 while already in VR2 to get a cockpit view. -Press & Hold VR4, and while you are holding it press the other three at the same time to get a sky cam view. -Hold VR2 or VR3 or VR4 and repeatedly tap Start for other alternate views. Cheats: -Hold Start when selecting a transmission for 'Time Lap' mode. No other cars on the track. -Hold Start when waiting for the race to start/load to play the alternate soundtrack. -Hold Start when selecting a track to play the mirrored version. -Light Up Fantasy Amusement Park - Rapidly tap Start during Lap 3 or Lap 4 to light up the road. Unlock Hornet Car - Battle on the Edge Version Only (you won't be able to pull this off due to the VR buttons NEEDING to be mapped to the D-Pad. However, I have provided a save state of just after inputting the code, so you can adjust the stats and use this car): -Before starting the game, move the gear stick into first gear. -At the course selection screen, move the stick into fourth gear. -Then Press View Buttons in this Order: VR1, VR4, VR2, VR4, VR1, VR2, VR2+VR3 (together), and VR1. You only have 8 seconds to pull this off and then quickly select a track, if you don't want to play the beginner course. -If done correctly, you'll get the Hornet in place of the usual selection of cars. The cars stats can be modified using the view buttons and the steering wheel. Again, you only have 8 seconds to do this. Region Change Code: -In the main test menu, Push and Hold Start, then with Start Held, Press GREEN/VR4, GREEN/VR4, BLUE/VR2, YELLOW/VR3, RED/VR1, YELLOW/VR3, BLUE/VR2. -This brings you to a hidden region select screen where you can change to USA and other regions. Dirt Devils dirtdvls Test Menu Changes: -Oversteering issue fixed via calibrating the analogue controls with the 'Calibrate Control Devise' function in the test menu. Gas and Brake have also been correctly calibrated. -Speedometer set to MPH. KPH is the default. General Info: -Region dictated by rom. The parent rom 'dirtdvls' is Export region with no option to change to USA. This is fine as its in English. For USA use rom 'dirtdvlsu'. -Controller will vibrate with this game if you have that functionality. -Hold Shift UP in the Vehicle Select screen to toggle to Manual Transmission. Unlocks: -Additional Track & Truck pre unlocked. This required completion of the game on all tracks. Analogue Steering Saturation & Calibration: -As the analogue controls have been calibrated in the 'Calibrate Control Device' to fix the oversteering issue in the test menu. Even though the steering is 1 to 1 it's still super twitchy so InputJoy1XSaturation = 118 has been added to take the edge off. Emergency Call Ambulance eca Test Menu Changes: -Siren Volume set to 1. It's really annoying otherwise. Default is 7. -Distance set to MILE. METRE is the default. Although, because its the Export version Mile is actually Ft in game because of the metric system or something. ("you's a smart mother f***er") They just didn't label it correctly for the Export version. -Analogue Controls calibrated in the 'Volume Setting' function. Analogue Steering Saturation & Calibration: -As the analogue controls have been calibrated in the 'Volume Setting' within test menu there is NO need to adjust the InputJoy1XSaturation. 4-Way Gear Shifting -By default this game is set to a simple Up / Down gear setup. However, it also has a proper 4 way gear input. You need to edit the Games.xml to activate this. -Under ECA in the Games.xml change the line <input type="shiftupdown" /> to <input type="shift4" /> General Info: -Region dictated by rom. The parent rom 'eca' is Export region with no option to change to USA. This is fine as its in English. Cheat Code to Play as an EMT on Foot with a Stretcher: -On transmission select screen, highlight Manual Transmission -Push Gear shift Up, Up, Down, Down, Up Fighting Vipers 2 fvipers2 Test Menu Changes: -Language/Game Region set to English/USA. Only achievable by using Region Change Code. Japan is the default. General Info: -Controls are set to the Dreamcast port defaults. P=(X), K=(Y), G=(A). The Left Stick and D-Pad are usable at the same time. -A full moves list can be found here https://strategywiki.org/wiki/Fighting_Vipers_2/Moves Region Change Code: -Go to test menu then go into 'Game Assignments' -Set cursor at 'Country' line then press Left, Left, Left, Right, Right, Left. -This will then allow you to change the 'Country' to USA and others. Harley-Davidson & L.A. Riders harley Test Menu Changes: -Game Region set to USA. Only achievable by using Region Change Code. Export is the default. -Cabinet Type set to STANDARD. -Engine Volume set to 5. The default is 8. -Number of Stages set to 5. The default is 4. -Analogue Controls calibrated in the 'Volume Setting' function. Analogue Steering Saturation & Calibration: -As the analogue controls have been calibrated in the 'Volume Setting' in the test menu there is NO need to adjust the InputJoy1XSaturation. Cheats: Extra Music Track -When you select your bike press and hold the foot/rear brake (A). -Then select your transmission with the Start button. Hold the foot/rear brake (A) and the Start button until the race starts. -Now scroll through the music tracks and you'll find one called ''Jingle Bells''. Region Change Code: -Go to test menu then go into 'Game Assignments' -Press Shift Up, Shift Up, Shift Down, Shift Down, View, Music, View, Music -This brings up an additional region select option where you can select USA and other regions. L.A Machineguns: Rage of the Machines lamachin Test Menu Changes: -Language/Game Region set to English/USA. Only achievable by using Region Change Code. Japan is the default. -Cabinet Type set to STANDERED. (Not a typo, it's spelled like this in the test menu) -Calibrated for Accuracy in the 'Aim Set' function. Region Change Code: -In the main test menu push Start, Start, Service, Start, Start, Start, Service, Test. -This brings you to a hidden region select screen where you can change to USA and other regions. Le Mans 24 lemans24 Test Menu Changes: -Language/Game Region set to English/USA. Only achievable by using Region Change Code. Japan is the default. -Special Car set to SKYLINE. The default is NONE Analogue Steering Saturation & Calibration: -Steering is very twitchy due to the Analogue Saturation. Controls are a perfect 1 to 1 however it's still really difficult to control. -So after some extensive testing I have changed the InputJoy1XSaturation to 120%. This makes the area of the analog steering XAXIS 'wider' giving way better control. -You do lose some steering range but the trade off is more than worth it and barely noticeable. Region Change Code: -In the main test menu press Start, Start, Service, Service, Start, Test. -This brings you to a hidden region select screen where you can change to USA and other regions. Lost World, The lostwsga IMPORTANT: -So, I'm bringing the hammer down on this one as I have discovered the issue everyone (inc. myself) has been having. This game has 2 input methods which can only be changed in the Games.xml. 1-The default, which is analog input, so x and y coordinate based. This one doesn't flash as it's analog based (<input type="analog_gun1" />). 2-The alternative light gun input method which flashes the screen and detects where the light gun is pointed, like a traditional light gun game (<input type="gun1" />). -In the Supermodel.ini file the inputs labeled for The Lost World ONLY APPLY when the game has been set to Light Gun input (<input type="gun1" />). When set to the default analog input type (<input type="analog_gun1" />), the inputs are actually the ones labelled as Ocean Hunter, L.A. Machineguns, NOT the inputs labelled as Lost World. With 'InputAnalogTriggerLeft' being the trigger for Lost World, and 'InputAnalogTriggerRight' being the off-screen/reload button for Lost World, under the "Analog Inputs" for Ocean Hunter, L.A. Machineguns input section. Not confusing as shit at all. -This does make sense after the fact, as when set to analog input..... the analog inputs apply.... not the light gun inputs derrrrr. But because of the frankly appalling labelling in the ini file, it has spun me (and seemingly everyone else) till now. As a result of all this confusion I have labelled these inputs correctly in the ini file. I swear this emulator is out to get me..... -InputAutoTrigger in the .ini is ON. This allows you to simply press the reload button to reload. If this is OFF you'd need to hold reload and then press fire to reload. Test Menu Changes: -Language/Game Region set to English/USA. Only achievable by using Region Change Code. Japan is the default. -Calibrated for Accuracy in 'Gun Setting' option. General Info: -Crosshairs are ON in the .ini file. Region Change Code: -In the main test menu press Start, Start, Service, Start, Service, Test. -This brings you to a hidden region select screen where you can change to USA and other regions. Magical Truck Adventure magtruck Test Menu Changes: -Language/Game Region set to English/USA. Only achievable by using Region Change Code. Export is the default. -Christmas Mode is ON. Changes outfits of players. -Analogue Controls calibrated in the 'Device Settings' function. Region Change Code: -In the main test menu press Start, Start, Service, Start, Service, Test -This brings you to a hidden region select screen where you can change to USA and other regions. Ocean Hunter, The oceanhun Test Menu Changes: -Language/Game Region set to English/USA. Only achievable by using Region Change Code. Japan is the default. -Cabinet Type set to STANDARD. The default is DELUXE. -Analogue Controls calibrated for Accuracy in 'Volume Setting' function. Region Change Code: -Go to test menu then go into 'Game Assignments' and press 1P Start, 2P Start, 1P Start, 2P Start, 1P Start, 2P Start, 2P Start -This brings up an extra option. Select USA or other regions. Scud Race / Sega Super GT scud scudxo Scud Race Plus / Sega Super GT Plus scudplus Test Menu Changes: -Language/Game Region set to English/USA. No Region Change Code. USA and other regions selectable from 'Game Assignments'. Japan is the default. -SETTING TO USA CHANGES GAME TITLE TO SEGA SUPER GT. -Link ID set to SINGLE. Fixes Network Board Not Present. General Info: -Controller will vibrate with this game if you have that functionality. Analogue Steering Saturation & Calibration: -Steering is very twitchy due to the Analogue Saturation. The analogue steering is 1 to 1 however there is quite a lot of 'dead zone' when you have the steering fully turned, despite the values the test menu gives you. I found you can ease off the stick about a quarter of the way before it actually started affecting the steering. I confirmed this in 1st Person View where you can see the drivers hand and steering wheel, I eased of the steering about a quarter of the way before the steering wheel moved and the steering started to react. The 'Input Test' did not reflect this, giving values for the entire range of the control stick XAXIS. -So after some extensive testing I have changed the InputJoy1XSaturation to 165%, to compensate for this 'dead zone'. This makes the area of the analog steering XAXIS wider giving way better control, without losing any actual in-game steering 'range'. As soon as you ease of the stick the steering will react. -This 'kinda dead zone' would have been present on the original hardware, but due to the amount of travel from left to right on the steering wheel it wouldn't have been noticed. This adjustment is more of a 'kinda true 1 to 1' and is much more appropriate for a controller. Sega Bass Fishing / Get Bass getbassur IMPORTANT: -Use 'getbassur' over every other version of Sega Bass Fishing. -This version lacks the tension input which is better for controllers. Test Menu Changes: -Language/Game Region set to English/USA. Only achievable by using Region Change Code. Japan is the default. -Analogue Controls calibrated in the Volume Setting function within the test menu. -Game Time and Continue Time have been set to the maximum '3m50s'. Region Change Code: -In the main test menu, select CRT TEST and move to screen 2/2. -Push the Service Button 4 times, exit the CRT TEST. -Go into Game Assignments, push Service Button 3 times, then press and hold Service Button and then press Test. -This brings you to a hidden region select screen where you can change to other regions. Sega Rally 2 srally2 Sega Rally 2 DX srally2dx Standard and DX differences: -The DX version has a different livery (car decals) and some other minor "under the hood" updates. IMPORTANT: -This game will run slow and have graphical glitches if the PowerPCFrequency is left on 49. -Setting to a higher number will fix this. However if set too high the emulator will start to run slow. -PowerPCFrenquency set to 69 in the ini file. This fixes the issue. It's the sweet spot. Test Menu Changes: -Game Region set to USA. Only achievable by using Region Change Code. Export is the default. -Game Mode set to SPECIAL. This enables 3 Laps per stage. The default is NORMAL (1 Lap per stage). -Default View set to BEHIND. The default is Driver. -Speedometer set to MPH. Default is KMH. -Cabinet Type set to TWIN. The CLUTCH and other stuff are NOT used when set to TWIN, which is what we want. The default is DELUXE. -Coin Assignments set to Free Play. This helps with a bug where if you restart the game with credits loaded it may not display any graphics. Setting to Free Play helps with this. Analogue Steering Saturation & Calibration: -Steering is very twitchy due to the Analogue Saturation being 'short'. The analogue steering is 1 to 1 however there is quite a lot of 'dead zone' when you have the steering fully turned, despite the values the test menu gives you. I found you can ease off the stick about a quarter of the way before it actually started affecting the steering. -So after some extensive testing I have changed the InputJoy1XSaturation to 155%, to compensate for this 'dead zone'. This makes the area of the analog steering XAXIS 'wider' giving way better control, without losing any actual in-game steering 'range'. As soon as you ease of the stick the steering will react. -This 'kinda dead zone' would have been present on the original hardware, but due to the amount of travel from left to right on the steering wheel it wouldn't have been noticed. This adjustment is more of a 'kinda true 1 to 1' and is much more appropriate for a controller. General Info: -Controller will vibrate with this game if you have that functionality. Cheats: -Unlock the Delta and Celica Cars - Press View Change and the Handbrake (A+Y) at the same time on the car select. -Better Time Display - Put in your name then hold View Change and Handbrake (A+Y) at the same time until the game starts. -Turn Off Music - Put in your name then hold Start until the game starts. Region Change Code: -In the main test menu using the Service Button:- -Do 4 short presses, 2 long (about 2 seconds per press), 2 short presses, then 1 long press (about 2 seconds). -This brings you to a hidden region select screen where you can change to other regions. Ski Champ skichamp IMPORTANT: -This game has an InputSkiY AXIS Input. Despite this being designated as a Y axis it's actually used for movement on the X axis. -IT'S NOT USED FOR UP AND DOWN MOTION. -It is for turning harder, like digging in the edges of the skis. This is how the original arcade hardware works. -This is assigned to the Right Stick. Move the Right Stick in the same direction as the Left Stick to turn harder. Test Menu Changes: -Language/Game Region set to English/Export. Setting to USA kept crashing the game for me. Only achievable by using Region Change Code. Japan is the default. -Extend Time set to 25s. The game is pretty much impossible to complete otherwise. The default is 20s. -Analogue Controls calibrated in the Volume Setting function within the test menu. -Force Feedback MUST be enabled otherwise you'll get the 'Check Drive Board' error. Preventing you from playing the game. -Setting to Free Play forces a 1st Person perspective. Set to 1coin = 1play. General Info: -Controller will vibrate with this game if you have that functionality. Region Change Code: -In the main test menu press Blue, Green, Blue, Green, Service, Service. -This brings you to a hidden region select screen where you can change to USA and other regions. Spikeout spikeout Spikeout Final Edition spikeofe Test Menu Changes: -Game Region set to USA. Only achievable by using Region Change Code. Export is the default. General Info: -To pick up an item press Beat+Charge+Down (X+A+Down, at the same time). I couldn't figure this out for ages. -There is a surprising amount of moves and combos. Here is a full list https://gamefaqs.gamespot.com/arcade/574616-spikeout/faqs/414 Spikeout Region Change Code: -Set cursor on Game Assignments. -Then press Button3(Charge), Start, Button4(Jump), Start, Start, Start, Button1(Shift), Start, Start. -This brings you to a hidden region select screen where you can change to USA and other regions. Spikeout Final Edition Region Change Code: -Set cursor on TIMER TEST. -Then press and hold the Service Button and enter the following: -Button4(Jump), Start, Button4(Jump), Start, THEN RELEASE SERVICE BUTTON, Button1(Shift), Start, Start, Start, Button3(Charge), Start, Start, Button1(Shift), Start, Test. -This brings you to a hidden region select screen where you can change to USA and other regions. Star Wars Trilogy Arcade swtrilgy IMPORTANT: -Coin Assignments set to Free Play. This helps with a bug where if you restart the game with credits loaded from a previous play session, it may not display any graphics. Setting to Free Play helps with this. Test Menu Changes: -Cabinet Type set to U/R. This prevents an issues with the 'Feedback Lever'. The default is DELUXE -Lever set to Up---Down - Down---Up. This aligns the main game and bonus stages Y axis control inversion. General Info: -The parent rom 'swtrilgy' is USA region. This game has a Region Change Code available but not needed for this version/set. It will be listed below anyway just for reference. Region Change Code: -In the main test menu using the Service Button, -Do 3 short presses, 2 long presses (about 2 seconds per press), 2 short presses then 1 long press (about 2 seconds). -This brings you to a hidden region select screen where you can change to USA and other regions. Virtua Fighter 3 vf3 Virtua Fighter 3 Team Battle vf3tb Test Menu Changes: -Language/Game Region set to English/USA. No Region Change Code, USA and other regions selectable from 'Game Assignments'. Japan is the default. -Show Command set to ON. -Stage Select set to CHALLENGER. The default is OFF. General Info: -Controls set to Dreamcast port defaults. The Left stick and D-Pad are usable at the same time. -A full moves list is here https://virtuafighter.com/commands/?ver=3tb Cheats: Different Costumes - Hold Start and then select your character with any button. Virtua Striker 2 vs2 Virtua Striker 2 '98 vs298 Virtua Striker 2 '99.1 vs2v991 Test Menu Changes: -'vs2 and 'vs2v991'Language/Game Region set to English/USA. No Region Change Code, USA and other regions selectable from 'Game Assignments'. Export is the default. -'vs298' Game Region set to USA. Only achievable by using Region Change Code. Japan is the default. -Game Time set to maximum 3m00s. Default is 2m00s -G Goal Mode (IF THERE'S A DRAW BY THE END OF THE MATCH) = (EXTRA TIME, NEXT GOAL WINS) set to 1m. OFF is the default. (If extra time goes 1m with no goals the match will go to a Penalty Knockout.) -P K Mode (PENALTY KNOCKOUT) Set to REAL. OFF is the default. (This will let penalties go on until there is a clear winner.) Virtua Striker 2 '98 Region Change Code: -Go to test menu then go into 'Game Assignments'. -Then press the Service Button once for about 5 seconds, then press the Service Button three times shortly, then press the Service Button one time for about 5 seconds again. -This brings you to a hidden region select screen where you can change to USA and other regions. Virtual On 2: Oratorio Tangram von2 Test Menu Changes: -Language/Game Region set to English/USA. Only achievable by using Engineers Code. Japan is the default. -Play Time for all options is set to DEATHMATCH (No Timer). The default is 80 secs. General Info: -Using Macro Controls, Turn Left & Right are set to the right stick. Engineers Region Change Code: -In the main test menu press Start, Start, Service, Start, Start, Start, Service, Service, Test. -This brings you to a hidden region select screen where you can change to USA and other regions. -
.thumb.png.76df1099bfb85a772f3e7b7cbc70cff0.png)
Version 1.0.0
719 downloads
This is a complete collection of Sega Mega CD 2D Covers for the Europe region. All boxes have been squared off to make them as neat as possible except in the case of the 7 long boxes in the collection. A 2D Cover pack for the Japan Region can be downloaded here: GAMES LIST: -
(SegaNet).thumb.png.77c66cd7d0323611e91124b325af9fad.png)
Version 5-4-18
409 downloads
3D Boxes for all known Japan Exclusive games, some bootlegs, customs I created for prototype games, and a custom box variant for the games that were provided with the Sega Toshokan internet service! Enjoy!!!- 3 comments
- 1 review
-
- 11
-
-
-
-
-
- sega
- mega drive
- (and 4 more)
-
Version 1.0.1
273 downloads
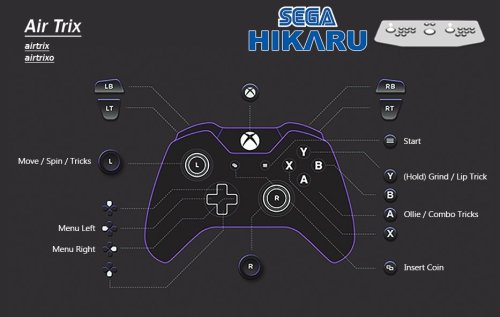
UPDATE: 2 11/01/26 -All missed inputs added to the images, inis and documentation updated -Better instructions -Additional help for the padDemul popup error END OF UPDATE UPDATE: 1 Using Demul with LaunchBox needs a specific setup. I've added some clear instructions on how to do so. Furthermore, using the bat files provided in LaunchBox requires you to uncheck 'use an emulator'. Which is an easy job. However, doing that will restrict you from using the 'Running Script' which allows you to Exit the Emulator with Esc. Booo. I want to be able to have per game controls AAAND Esc as exit when using LaunchBox. So, again I have done just that. There are now some LB specific bat files that need be integrated into the 'Additional Apps' part for all 6 games. It's a quick job I promise. This allows the per game configs to be used while retaining the 'Esc to exit' functionality in the 'Running Script' of the emulator. I have also added the control inputs to the documentation. This makes it easy if you for some reason need to set it yourself. The LaunchBox side of this requires a bit of setup, so the whole procedure will be below. ENF OF UPDATE Get the Emulator here. Link may become out of date over time but you'll be in the right place for the new versions. https://www.emu-france.com/?wpfb_dl=7038 With the release of the new Demul emulator specifically for Hikaru, a pre config is deserved. No messing with this one. It was complicated for me, but for you it's stupid easy. Demul doesn't support per game control configs, which is a pain as these Arcade games require bespoke configs. Meaning you'll have to constantly change the defaults each time you change game. Boooo. So, I have made some per game ini files with the correct controls set. Just figuring out the controls was a nightmare. Anyway, along with these per game ini files, I have made some .bat files to launch said games with their respective per game control ini file. Forcing per game controls into Demul. There are 2 versions. The bat files you can use standalone or anywhere else, and the ones that are LB specific. LB needs different ones as the Running Script needs to be active for Esc to be exit, and this can't be used if 'Use emulator' is checked, which is required for the normal bats to work and apply per game setting. Booo! Anyway, here are the bat examples, they are super simple. Normal, general bat launcher that you can use standalone or anywhere else. @echo off cd /d "%~dp0.." copy /Y "controls\padDemul_airtrix.ini" "padDemul.ini" start "" demul.exe -run=hikaru -rom=airtrix exit LaunchBox Specific Bat @echo off cd /d "%~dp0.." copy /Y "controls\padDemul_airtrix.ini" "padDemul.ini" exit INSTRUSCTIONS: SETUP DEMUL WITH LAUNCHBOX -Add emulator as normal, add application path to demul.exe as normal -Check (turn on) 'Remove quotes' & 'Remove file extension and folder path' & 'Remove space before rom' -Go to Associated Platforms and add Sega Hikaru as a platform (if not already there) -In Default Command Line Perimeters IN THE ASSOCIATED PLATFORM you MUST ADD: -run=hikaru -rom= -Go to Running Scripts and replace the one that's already there with this more reliable one: SetKeyDelay, 0, 50 $Esc::Send !{F4} That's the emulator done! PER GAME CONTROLS AND LB BAT FILES INSTALL: -Download and unzip the pre config files. -Place 'lb bat launchers', 'bat launchers' and 'controls' folders into the root of your Demul folder. -Right click on a Hikaru game, Edit, Metadata and Media -Go to Additional Apps on the left and hit Add Application -Name it whatever but I go with "Romname Per Game Controls" -Hit browse next to Application Path -Then select the .bat file for the game you are configuring FROM THE 'LB BAT LAUNCHERS' FOLDER PROVIDED that should be in the root of Demul, after you put it there. -Leave Command line blank. -Check (turn on) 'Auto Run Before Application' and 'Wait for Exit' -Hit ok to save -Repeat from step 3 for the other 5 games. You'll then have per game controls aaand esc as exit. Yaaaay! If you aren't using LB, use the non LB bat launchers. These work standalone or with other front ends. But, Alt+F4 will be exit unless a solution is deployed. Additional HELP: Some users, particularly Steering Wheel users, have been reporting this error message. Despite getting this message, users have been reporting everything still works when they close the popup. This may or may not be the case for you. padDemul Error! (HRESULT = 80070057) |DirectInputDevice8 Create Effect FAILED IF everything still works after closing this, you'll have to close it every time it pops up with whatever controller is causing the issue. To get around this, you can use a basic AHK to close the popup automatically. Simply add it to the Running Script of the emulator, under the one already there. WinWait, padDemul WinClose Keep in mind this will auto close ANY padDemul error popups. Be mindful if you are troubleshooting. My Patreon Link if you wanna help out and for more goodies https://patreon.com/warpedpolygon As is tradition, here is the documentation. There was some really tricky stuff despite being only 6 games. Air Trix airtrix airtrixo -The 'Roll' input is surplus to requirements when using a controller. It was barely functional on the OG cab, just looked cool. -Digital Up & Down is Ollie and Nollie (Grind). This confused the crap outa me until I looked at the owner's manual. -Configured in the Alternate Settings due to the regular one splitting the analog axis for some reason. Rather than just binding some inputs to the alt ones, all have been bound to alt settings to save confusion. -Calibrate in the test menu for the best analog coverage. HOW TO PLAY: This game has been setup to play like Tony Hawks. X/A is Ollie/Tricks, Grinds are Triangle/Y. There is no "nollie" despite the board making that motion on the OG cab. Standing on the nose is just Grind/Lip Trick. -Left Stick to move and spin -X/A is Ollie. Press this again multiple times while in the air to do combos. -Triangle/Y is Grind. You MUST be turning at the same time to do a grind. -Spinning you have 2 options: 1-Simply hold left or right when hit the lip and you'll automatically do a basic spin trick. 2-Ollie at the lip while holding left or right, to do a "better" spin trick than if you hadn't ollied at all. Doing Different Tricks: -When doing an "combo air" (no spinning) you can use left and right on the left stick, as well as ollie, to do tricks while in the air. Key To Getting Good -If you are still holding a spin direction on re-entry you'll slow down. Remember to let go of the stick before you go back in the ramp. -Combos can only be performed when not spinning. As long as you aren't holding a direction at the same time as doing an ollie, you'll be doing a 'combo air'. -However, you can still spin AND combo in the same air. As long as you let go of the direction, you can combo at any time. So, you can spin at the start of an air, let go of the stick and spam X/A to combo for the rest of the air. DEMUL CONTROL CONFIG. ONLY WHAT THE GAME USES WILL BE LISTED. THIS IS TO HELP IF YOU NEED TO MAP CONTROLS YOURSELF. JOY 1, Use "Alternative Settings": -Digital UP = Nollie / Stand on Nose (Grind) -Digital DOWN = Ollie / Tricks -Digital LEFT & RIGHT = Character Select / Menu Left & Right Analog 1 LEFT & RIGHT = Turn / Spin / Swing Boad Analog 2 LEFT & RIGHT = Roll (This input is not required for controller use. No need to map it) Planet Harriers pharrier -Nice and easy controls to configure. Nothing bizzare of annoying here. -Calibrate in the test menu for the best analog coverage. DEMUL CONTROL CONFIG. ONLY WHAT THE GAME USES WILL BE LISTED. THIS IS TO HELP IF YOU NEED TO MAP CONTROLS YOURSELF. JOY 1 -Analog 1 UP, DOWN, LEFT, RIGHT = Move (If you want inverted controls set up to down, down to up) -Digital LEFT = View 1 -Digital RIGHT = View 2 -PUSH 1 = Shoot -PUSH 2 = Lock-On -PUSH 3 = Bomb NASCAR Arcade sgnascar sgnascaro -So, most controls were easy to figure out...except gears. This ended up being looooong.... -Gears are bound to the JOY 2 slot of the configuration, despite being a 1 Player instance. Confusing to say the least. -Now more confusion. It's a 4 way H Gear system with a Neutral position, 5 inputs technically. This is set to the Up/Down/Left/Right digital inputs of the JOY 2 config. -Strange thing is Up is 3rd gear and Down is 4th gear, with Left and Right being inputs, just not on their own. 1st & 2nd gear are combination inputs.... FOR SOME GOD FORSAKEN REASON. 1st Gear = Digital Up/3rd Gear with DIGITAL LEFT at the same time. 2nd Gear = Digital Down/4th Gear with DIGITAL LEFT at the same time. What digital left actually is, is a mystery. It doesn't register as a gear on its own, only in combination with 3rd and 4th gear. It's a miracle I even caught this to be honest. Maybe on the OG cab the physical gear lever would pressed have multiple inputs when in 1st and 2nd. It's the only explanation I can think of. Aaanyway, I have macro these inputs to actually work thanks to the 'Alternative Settings'. These allow multiple inputs to be bound, helping me to get the gears in sequence on the face buttons. DEMUL CONTROL CONFIG. ONLY WHAT THE GAME USES WILL BE LISTED. THIS IS TO HELP IF YOU NEED TO MAP CONTROLS YOURSELF. Demul Gear Settings to Macro/Combine Stupid Shit Gear Inputs (xbox buttons, just for reference): MUST BE DONE IN JOY 2 CONFIGURATION -In 'normal config' (not Alternative) Digital UP = X Digital DOWN = B Digital LEFT = Y -In Alternative Settings Digital UP = A Digital DOWN = Y Digital LEFT = X This means the gear controls are as below. Just like a H transmission. X = 1st Y = 2nd A = 3rd B = 4th The rest of the controls you want to set in normal settings (not alt) IN JOY 1 -Analog 1 LEFT & RIGHT = Steering -Analog 1 UP = Accelerate -Analog 1 DOWN = Brake -Digital UP = View Change Despite this effort, the gears still aren't usable, unless you constantly hold the button for that gear. The age old issue of 'gears not sticking' has been around forever. This needs to be tackled at the emulation development level, or with something like joytokey. Now that I have identified them, perhaps someone can do something about it so we can have gears that stay in position. Star Wars: Racer Arcade swracer -Nice and easy to configure. -Nice and easy to play, this game AUTO ACCELERATES. Kid friendly. Braking is still manual. No option for manual acceleration at all. -Test Menu is fine at default. Calibration is correct out of the box! DEMUL CONTROL CONFIG. ONLY WHAT THE GAME USES WILL BE LISTED. THIS IS TO HELP IF YOU NEED TO MAP CONTROLS YOURSELF. JOY 1 -Analog 1 LEFT & RIGHT = Steering -Digital LEFT & RIGHT = Character Select / Menu Left & Right -PUSH 1 = Boost -PUSH 2 = Brake Cyber Troopers Virtual-On 4: Force von4 -Another one that is a 1 player game but has inputs bound to JOY 2 config slot. Yay! -All of the Right Stick controls are the same as the left in JOY 1, just in JOY 2. Because of course they are! -Mapped exactly the same as the original. Watch the tutorial as it takes some getting used to. DEMUL CONTROL CONFIG. ONLY WHAT THE GAME USES WILL BE LISTED. THIS IS TO HELP IF YOU NEED TO MAP CONTROLS YOURSELF. JOY 1 (Left in game stick, shoot, boost, P.I.B) -Digital UP, DOWN, LEFT, RIGHT = Move -PUSH 1 = Left Shoot -PUSH 2 = Left Boost -PUSH 3 = P.I.B / Command JOY 2 (Right in game stick, shoot and boost) -Digital UP, DOWN, LEFT, RIGHT = Move -PUSH 1 = Right Shoot -PUSH 2 = Right Boost Brave Firefighters braveff -This "light gun game" only supports mouse control with Demul. As far as I know. -Mouse controls are kinda hard coded to the emulator. So there's nothing really for me to provide. All the .bat does is launch the game with default controls. This is just fine for 1 player. -2 Players requires RAW input. This is done in various ways with demul, mainly DemulShooter, which at this time doesn't support this build of Demul. -Normally I provide some kind of RAW input support for 2 players, but, everyone has their preferred way with Demul. So, it's up to you -If you have a suggestion to provide something for 2 player Raw input, let me know!- 12 comments
-
- 12
-
-
-
- sega hikaru
- sega
- (and 1 more)
-

Version 1.0.0
78 downloads
This is a pretty niche project that took way longer than I wanted it too. I have an arcade cabinet with a monitor for marquee with 1920x340 resolution. The Naomi marquee's are trapezoidal in nature and don't fit well on such a monitor. In addition, most of the marquee images on the internet are of poor quality. Consequently I decided to make my own marquee's. For the most part I would try to grab a logo and some artwork and call it a day. it turned out to be easier said than done for too many of these. My photoshop skills are very amateur so I was very liberal with generative AI. Since these are "fanart" marquees I thought submitting them here would be more appropriate than uploading to the game database as I didn't want to confuse people. Hope this collection is useful to those with arcade cabinets. Edit: I accidentally included some Sammy Atomiswave images. Sorry for the confusion. I'm going to be uploading the Atomiswave collection separately. -

Version 1.0.0
614 downloads
168 Clear Logos! I was looking around, and didn't see that anyone else had done this. I pulled all the clear logos from TeknoParrot's compatibility page and renamed them so that LaunchBox would pick them up properly. This package is complete as of 7/1/22. I'm not clear as to whether or not their compatibility page lists everything in their scope or if there are others. Enjoy!- 1 comment
- 1 review
-
- 6
-
-
-
- teknoparrot
- taito type x
- (and 4 more)
-
Version 3.0.0
733 downloads
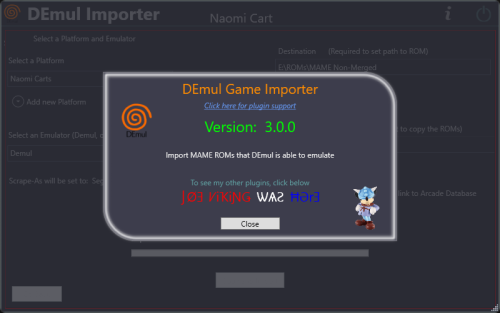
Import games for use with Demul (Sega * Emulator). Purpose: This purpose of this plugin is to import only the MAME machines that can be emulated in Demul. A sort of MAME machine ‘filtered’ importer to supplement LaunchBox’s Import Tool. Why: LaunchBox can already import these machines (games) for you using the built-in Tools - Import - MAME Arcade Full Set. All you need to do is un-check the skip games unplayable in MAME checkbox. The concern is this results in over 6000 additional entries imported (even more if you uncheck any other boxes and include clones). And as in most cases, more is NOT always better. Alternatively you can also simply drag-and-drop the roms into LaunchBox. Which is great when you already have them sorted out. Included Systems: The list of machines included for this plugin was generated by running the command “demule.exe –listroms” using Demul v0.7 (Apr 28, 2018). The systems included are Naomi, Naomi 2, Atomiswave, Hikaru, Gaelco, Cave3rd (CV1000) and System SP. (Sega Dreamcast, though emulated, is not included in the list. [It’s not a MAME machine]) Naomi and Naomi 2 are each broken into 2 separate systems: Cartridge System (rom only) and GDROM (chd). Requirements: LaunchBox v13.19 or newer DEmul already set up as an emulator in LaunchBox What this plugin will do: Import games for a selected system. Import into an existing Platform or create a new one. When creating a new Platform, assigns “Scrape as” per the associated system. Attempt to automatically detect/select your Demul emulator. (Required to exist as an emulator) (optional) Copy ROMs to a new location for the games you’re importing. What this plugin won’t do: Add DEmul as a new emulator. Add the required command line to the emulator (**see below). Feature added v3.0 ‘Bulk’ import into separate Platforms. Add metadata and media to the imported games. If copying ROMs (optional), only the games main rom file is copied. It will not look for nor copy any required BIOS, Device or chd files. Installing the plugin: After downloading the zip file, extract the contents of the zip into your \LaunchBox\Plugins\ folder. e.g. D:\LaunchBox\Plugins\DemulImporter\ If updating from a version prior to 3.0, "DemulGames.xml" is no longer needed and can be deleted from the plugins folder. Using the plugin: Click Tools and select Demul game Importer Select a system This will populate a list of all the games for that system. (optional) Check View Parent ROMs Only When checked, only the parents ROMs will be imported When you select a game, a "globe" and the ROMs filename will appear Click the globe to navigate to the Arcade Database for the selected game Click Import Games Select a platform to import the games into You can select an existing platform from the dropdown list or click on Add New Platform to create a new one. Select an emulator The plugin will attempt to automatically select your DEmul emulator. If it isn’t already selected, look for it in the dropdown list. Select the folder where your ROMs are located (or will be if you select Copy) This is required to set each games Application Path (optional) Check Copy ROMs to another location Browse to the folder [Source Folder] where they’re located. (optional) Check Add Additional App with link to Arcade Database (New v3.0) The Additional App will be a hyperlink to the Arcade Database for that game Select Import (or Copy and Import) to complete the process NOTES: **Default Command-Line Parameters System Command Line Parameter Naomi -run=naomi -rom= System SP -run=naomi -rom= Gaelco -run=gaelco -rom= Atomiswave -run=awave -rom= Hikaru -run=hikaru -rom= Cave -run=cave3rd -rom= Medalusion -run=alien -rom= Once import is completed, simply select the newly imported games and click Tools, Download Metadata and Media.... Information on getting these systems to run in Demul can be found here: https://forums.launchbox-app.com/topic/30622-sega-naomi-demul-in-launchbox/ After importing into a newly created platform, be sure to Edit the platform and check "Disable ROM Auto-Import". Disclaimer: I personally only have a few of these games on my cab. So I’m not very familiar with the systems mentioned here. Also, I have no idea if DEmul is even “the best” emulator for these systems. -
(MegaDrive4).thumb.png.534b494a7b8aeddbf8fd8acf676c63ad.png)
Version 1.0.0
16 downloads
2D boxes and clear logos made by me, along with screen title screenshots taken from segaretro.org. Includes the 16 games found in latest No-Intro set: Acerte o Alvo Bolas e Cores Bolhas Bombeiros Cava-Cava Creature Capture Domino Fabrica de Chocolate Memoria Master Mina Terrestre Minerador Os Doze Trabalhos de Jongo Palhacos Senha Sudoku Tangram More infos here: https://segaretro.org/Mega_Drive_4_(Tectoy)-
- 2
-
-
-
- sega master system
- box art
- (and 5 more)
-
So I'm not trying to emulate a Naomi Arcade game, however I am trying to extract models from a game called World Kicks. Unfortunately for some reason every guide online has me use a .chd or .gdi file however the rom I have has: -A couple of .bin files -.ic31 file -a .bios file -A bunch of .ic27 files -.ipl file -A few files with the .4(varied letter) files Dunno what to do with these or how to get to what I want to achieve.
-
 These custom console themed overlays were edited and assembled by me to play your retro console games with a unique nostalgic bezel on Retroarch. Please enjoy and have fun. Please give me credit and the others involved if you use it on your Youtube channel. Thanks. The Mega Bezel Reflection Shader is by Hyperspacemadness Some of the original artwork came from ReignStumble Credit is given to RetroKenesis for the bezel frames Here's a Tutorial on how to add them to Retroarch. Older versions...
- 179 replies
-
- 13
-
-
-
-
- video
- orionsangel
- (and 14 more)
-

Version 1.0.0
38 downloads
This is a collection of around 900 arcade marquee's for the Sega Genesis/Mega Drive. A lot of the marquees out there were a little cluttered (to my taste at least) and didn't stretch to my marquee very well (1920x340). So I decided to try my hand at it. My photoshop skills are very basic, but I thought it came out okay for my skill level. There's a subtle CRT screen effect that adds a nice retro effect. The lens blur effect is kind of cool when looking at the marquee at a distance. Hopefully others find this useful -
 Hey guys, Y'all know a store where I can find replacements for my old Sega 32x Cartridge labels? (or someone who sells them)? I'm new here, and I don't know much about how this forum works, but I'm getting started, so if I missed anything, I apologize.
-
Version 1.0.0
635 downloads
To commemorate the upcoming Genesis Mini, I created some new 4K overlays. Some of these will be fine for other systems, but they match the 80s / 90s Genesis style best. These are inspired by the official overlays, but by no means exact copies. To use, enable integer scaling, and use 4:3 apect ratio. -
Hope you like it! Sega Triforce.mp4
-
- 1
-
-
- sega
- sega triforce
- (and 4 more)
-
.thumb.png.597faca3807571dee4f05b6843ae288d.png)
Version 1.0.0
372 downloads
Happy Holidays everyone, Its been quite some time since I shared a set with everyone. I have been working on several sets and have a bunch more still cooking. Just slower and more picky these days with what's shared. I have created a new Master System/Genesis/Mega Drive "2.5 D" Box art template from scratch using scalable vector shapes and Adobe Photoshop layer styles for realism. This box template is accurate to the original as I used my own box as a source. Comparing this to what else is out there this is both the highest in resolution and the most accurate. While I am personally not a fan or have any nostalgia for the Master System it was looking a bit sad in my collection with a lot of low quality cover art. This set is extremely high quality and large files hence the size of this download. This is all 114 released NTSC Master System games following the no-intro naming scheme. When dropping these in your Launchbox build there may be a few boxes that do not autoload due to the name differences between how Launchbox scrapes the games and what no-intro names them. Therefore you may have to manually update a few image names to your liking or use an alternate name within Launchbox itself. As always any issues with any images please reach out. If there are any errors or something does not seem right please reach out! Stay tuned in 2025 for more art work sets! (The wait is worth it as there are some very good sets to be coming out!)- 12 comments
- 2 reviews
-
- 20
-
-
-
-

-
-
- sega master system
- box art
- (and 3 more)
-

© RCX Media
-

© RCX Media
-
© RCX Media
-

© RCX Media
-
© RCX Media
-
RCX Games_Sample Photo 16_GamePlex Sub.png
shredalive587 posted a gallery image in Collection Screenshots
© RCX Media
-
.thumb.png.d8248f4f7e6ac686eebb9c1c4d1c451a.png)
Version 2.1
31 downloads
This is a set of standardized 2D Sega SG-1000 cartridge arts. If you found this download to be useful and would like us to upload more of our high quality art packs, consider making a contribution at our crowd-funding page! -
(Disc1)(KeyDisc)(SegaCD).thumb.png.f871615d9008153c8073315db041de44.png)
Version 3.0
118 downloads
This pack is ideal for fe's running in 1080p resolution, but is also sufficient on 4K displays if sized appropriately. If you found this download to be useful and would like us to upload more of our high quality art packs, consider making a contribution at our crowd-funding page! -
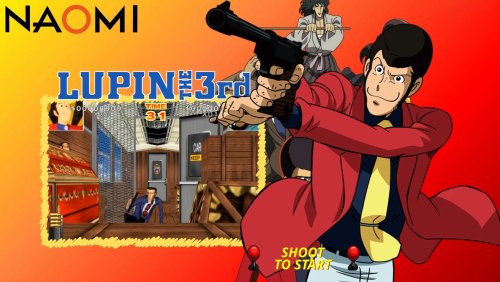
Version 1.0.0
23 downloads
Lupin the shooting sega naomi custom video theme by sosuke91 Credits to original creators for artworks and music theme Lupin3ENG.mp4
.thumb.png.9332e12cab6cec0213b9ffd456a9a968.png)


.thumb.png.76df1099bfb85a772f3e7b7cbc70cff0.png)

(SegaNet).thumb.png.77c66cd7d0323611e91124b325af9fad.png)


.thumb.png.c9faf450e4d2b690a819048b18173f61.png)


(MegaDrive4).thumb.png.534b494a7b8aeddbf8fd8acf676c63ad.png)


.thumb.png.597faca3807571dee4f05b6843ae288d.png)


.thumb.png.d8248f4f7e6ac686eebb9c1c4d1c451a.png)
(Disc1)(KeyDisc)(SegaCD).thumb.png.f871615d9008153c8073315db041de44.png)

