Search the Community
Showing results for tags 'retroarch'.
-
 These Realistic Arcade Bezels were made by Orionsangel and tested on Windows 10 with Mame and Retroarch. Thanks to HyperSpaceMadness, Mr. RetroLust, ArsInvictus, Duimon, Dreamstate & MQC. As well as Mr. Do. Most of these realistic arcade bezels could not have been made without them. Check out my youtube channel here - https://www.youtube.com/orionsangel
- 830 replies
-
- 18
-

-

-

-

-

-
Version 6.6
85 downloads
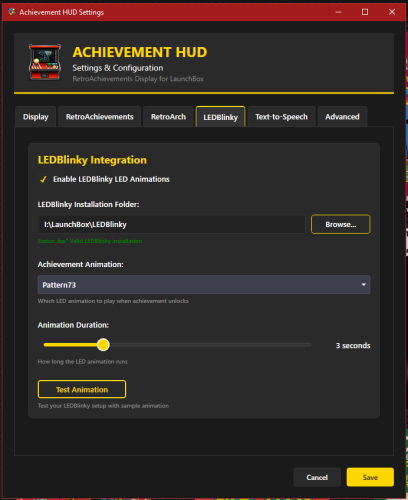
# AchievementHUD_V6.6.1 Display Plugin ### Core Features **Live Achievement Tracking** - Shows all achievements for the current game with unlock status - Displays achievement icons, descriptions, and point values - Shows how rare each achievement is (percentage of players who've unlocked it) - Instant detection when you unlock achievements (<100ms via RetroArch log monitoring) **Dynamic Achievement Celebrations** - Full-screen gold celebrations when you unlock achievements - Text-to-speech announcements (optional, fully configurable) - LEDBlinky integration for RGB button/joystick animations (optional) - Audio ducking - game audio drops during announcements so you don't miss anything **Profile Display** - Your RetroAchievements profile with avatar, username, and rank - Total points and "true points" (weighted by difficulty) - Currently playing status - Recently played games with completion percentages **Smart Features** - Configurable sort modes - sort achievements by popularity, points, or alphabetically - Auto-scroll - smoothly scrolls through long achievement lists during gameplay - "Next achievement" suggestion - shows you the most common locked achievement - Multi-monitor support with DPI awareness - Home screen when no game is running --- ## Why a Second Monitor? Checking achievements mid-game means pausing, opening menus, breaking immersion. With a second screen, you always know: - What you just unlocked - What achievements are available - How close you are to completion - Which achievement to go for next It's like having the RetroAchievements website open next to you, but live-updated and game-aware. --- ## Technical Highlights **Instant Detection** - Monitors RetroArch logs for achievement unlocks in real-time - No polling delays - detections happen the moment RetroArch records them - Falls back to API polling for non-RetroArch emulators **LaunchBox Integration** - Fully integrated with LaunchBox's game launch/exit lifecycle - Uses LaunchBox's RetroAchievements configuration (no duplicate setup) - Pulls game metadata directly from LaunchBox's database - Supports Clear Logos via LaunchBox's image system (handles MAME ROM name mismatches automatically) **Customizable Display** - Choose your target monitor - Adjust celebration duration - Configure TTS voice, speed, and volume - Enable/disable individual features (LEDBlinky, TTS, audio ducking) - Sort achievements your way - Auto-scroll for hands-free browsing --- ## Requirements - LaunchBox (tested with latest versions) - RetroAchievements account configured in LaunchBox (Tools > Options > RetroAchievements) - RetroArch for instant achievement detection (optional - API polling works with any emulator) - .NET 9.0 runtime - Second monitor recommended (works on single monitor but best experience is dual-screen) **Optional Integrations:** - LEDBlinky for RGB lighting effects - Text-to-Speech (built into Windows) --- ## How It Works 1. **Launch a game** through LaunchBox 2. **Display appears** on your configured second monitor showing: - Game's Clear Logo or title - Your achievement progress - Full achievement list with icons and descriptions 3. **Unlock achievements** - instant celebration on screen 4. **Track your progress** without ever pausing the game 5. **Game exits** - display returns to home screen showing your profile and recent games --- ## Installation 1. Download the plugin 2. Extract to `LaunchBox\Plugins\AchievementHUD\` 3. Restart LaunchBox 4. Configure in Tools > Options > Achievement HUD 5. Set your target monitor and preferences 6. Launch a game and enjoy! --- ## Credits by: TrailerVert Built with love for the LaunchBox and RetroAchievements communities. Special thanks to the LaunchBox plugin API and RetroAchievements for making this possible. --- **Current Version:** 6.6.1 **Status:** Beta **License:** Free to use ---- 7 comments
- 1 review
-
- 2
-
-
-
- retroachivements
- retroarch
- (and 1 more)
-
Hey, just sharing a quick tutorial because, I spent a few hours making this work. Basically I'm using Retroarch for most of my emulators and shaders. Especially the koko-aio crt shaders that are in my opinion the most immersive and realistic. The issue is that some consoles doesn't have a retroarch core yet making it impossible to add shaders. Fortunately someone called mausimus created an open-source app, ShaderGlass, which overlays any glsl or slang shaders on top of pretty much anything. Sounds fun, but it doesn't work as simply as you'd want. Here's how I made it work : 1. First you need a working Xemu emulator configurated. 2. Now let's modify some Xemu parameters : First, under Display tab, you need to disable fullscreen and fullscreen on startup : A little further down the page you'll want to set the display mode to Stretch and set the aspect ratio on Native : 3. Now you'll want to install the latest stable version of ShaderGlass from their official GitHub : https://github.com/mausimus/ShaderGlass/releases You can then import any missing RetroArch shaders like the missing koko-aio that are fullscreen : Set the input mode to Clone : Save your setup as a custom profile, call it something like xemu.sgp : 4. Now in Launchbox modify your Xemu emulator and remove the -fullscreen flag in the command-line parameters. Should be looking like this now : 5. Now, still in LaunchBox's Xemu emulator options, replace the Running Script by (update paths accordingly) : WinWait, ahk_exe xemu.exe WinWaitActive, ahk_exe xemu.exe Run, D:\LaunchBox\ThirdParty\ShaderGlass\ShaderGlass.exe -f D:\LaunchBox\ThirdParty\ShaderGlass\presets\xemu.sgp Sleep, 1000 WinActivate, ahk_exe xemu.exe WinWaitActive, ahk_exe xemu.exe WinWaitClose, ahk_exe xemu.exe WinClose, ahk_exe ShaderGlass.exe Basically what it does is simply : Wait for Xemu emulator to be ready Run ShaderGlass fullscreen with your profile Give back the focus to Xemu so that your controller works When Xemu end, exit ShaderGlass You would think it's done but unfortunately you still require borderless gaming to get Xemu fullscreen without being actually fullscreen. Otherwise your shader will clip on both sides and look like this : 6. Install the legacy open source version of Borderless Gaming which is still working great up to this day on Windows 11 : https://legacy.borderlessgam.ing 7. Add Xemu to your Favorites which means it's going to fullscreen window the app automatically : 8. Check Run on Startup under Options dropdown. Now everything is automated and working! You might wonder why I'm not using ResizeRaccoon which does the same thing? I tested it and it's working if you're not using BigBox as Windows shell instead of explorer.exe. In my case I'm shelling bigbox.exe so Resize Raccoon doesn't work because it's a system tray only app. It would be great if the dev fix this but I don't have time right now to raise an issue on their Github. It would be best in the future because it's open source compared to borderless gaming which is now paid. By the way this is working perfectly in BigBox. Enjoy!

-
.thumb.png.f238d0c9587f24b7c504a0ad449f515b.png)
Retro Achievements HUD
TrailerVert posted a topic in Third-Party Applications and Plugins (Released)
Retro Achievements HUD View File # AchievementHUD_V6.6 Display Plugin ### Core Features **Live Achievement Tracking** - Shows all achievements for the current game with unlock status - Displays achievement icons, descriptions, and point values - Shows how rare each achievement is (percentage of players who've unlocked it) - Instant detection when you unlock achievements (<100ms via RetroArch log monitoring) **Dynamic Achievement Celebrations** - Full-screen gold celebrations when you unlock achievements - Text-to-speech announcements (optional, fully configurable) - LEDBlinky integration for RGB button/joystick animations (optional) - Audio ducking - game audio drops during announcements so you don't miss anything **Profile Display** - Your RetroAchievements profile with avatar, username, and rank - Total points and "true points" (weighted by difficulty) - Currently playing status - Recently played games with completion percentages **Smart Features** - Configurable sort modes - sort achievements by popularity, points, or alphabetically - Auto-scroll - smoothly scrolls through long achievement lists during gameplay - "Next achievement" suggestion - shows you the most common locked achievement - Multi-monitor support with DPI awareness - Home screen when no game is running --- ## Why a Second Monitor? Checking achievements mid-game means pausing, opening menus, breaking immersion. With a second screen, you always know: - What you just unlocked - What achievements are available - How close you are to completion - Which achievement to go for next It's like having the RetroAchievements website open next to you, but live-updated and game-aware. --- ## Technical Highlights **Instant Detection** - Monitors RetroArch logs for achievement unlocks in real-time - No polling delays - detections happen the moment RetroArch records them - Falls back to API polling for non-RetroArch emulators **LaunchBox Integration** - Fully integrated with LaunchBox's game launch/exit lifecycle - Uses LaunchBox's RetroAchievements configuration (no duplicate setup) - Pulls game metadata directly from LaunchBox's database - Supports Clear Logos via LaunchBox's image system (handles MAME ROM name mismatches automatically) **Customizable Display** - Choose your target monitor - Adjust celebration duration - Configure TTS voice, speed, and volume - Enable/disable individual features (LEDBlinky, TTS, audio ducking) - Sort achievements your way - Auto-scroll for hands-free browsing --- ## Requirements - LaunchBox (tested with latest versions) - RetroAchievements account configured in LaunchBox (Tools > Options > RetroAchievements) - RetroArch for instant achievement detection (optional - API polling works with any emulator) - .NET 9.0 runtime - Second monitor recommended (works on single monitor but best experience is dual-screen) **Optional Integrations:** - LEDBlinky for RGB lighting effects - Text-to-Speech (built into Windows) --- ## How It Works 1. **Launch a game** through LaunchBox 2. **Display appears** on your configured second monitor showing: - Game's Clear Logo or title - Your achievement progress - Full achievement list with icons and descriptions 3. **Unlock achievements** - instant celebration on screen 4. **Track your progress** without ever pausing the game 5. **Game exits** - display returns to home screen showing your profile and recent games --- ## Installation 1. Download the plugin 2. Extract to `LaunchBox\Plugins\AchievementHUD\` 3. Restart LaunchBox 4. Configure in Tools > Options > Achievement HUD 5. Set your target monitor and preferences 6. Launch a game and enjoy! --- ## Credits by: TrailerVert Built with love for the LaunchBox and RetroAchievements communities. Special thanks to the LaunchBox plugin API and RetroAchievements for making this possible. --- **Current Version:** 6.6 **Status:** Beta **License:** Free to use --- Submitter TrailerVert Submitted 02/22/2026 Category Third-party Apps and Plugins- 2 replies
-
- 1
-
-
- retroachivements
- retroarch
- (and 1 more)
-
3.jpg.742da72ac43a94705002c210c5b6f7fd.thumb.jpg.f8fc1cacc611a7156fb5cc60847b357f.jpg)
Version 0.5.0
2,390 downloads
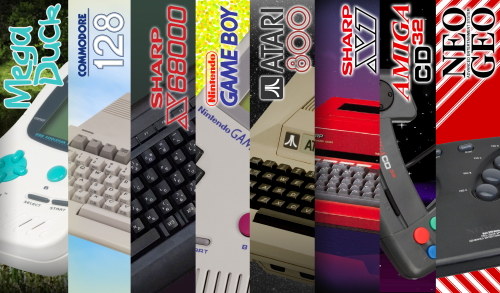
These are from my very-far-from-being-finished Retroarch overlay project. I've been meaning to put these up for a while now, but was waiting to cover more systems but... who knows how long it'll take to get through more, so I figured I'd put up what I have so far. Originally I was just going to create some for Arcade stuff, but then decided to branch out into some other platforms as well. Like I said, this has a really long way to go before it's anywhere close to done. Current platforms covered: CPS1 (5 overlays; 4 horizontal / 1 vertical) CPS2 (4 overlays; 2 horizontal / 2 vertical) MAME (4 overlays; 1 horizontal / 3 vertical) Neo Geo (1 overlay) NES (6 overlays) Sega Dreamcast (1 overlay) Sega Genesis (4 overlays) Sega Saturn (2 overlays) Sharp X68000 (2 overlays) SNES (3 overlays) Sony Playstation (3 bezels of differing widths) Other image/video projects:- 3 comments
-
- 14
-
-
-

-

Version 1.2.0
2,371 downloads
First of all i wanna thank @Mr. RetroLust, you can find the official post here Mr. RetroLust's - Mame 4K - Lights Out - Realistic Bezels with his awesome work. This is just a mass scripted conversion of Mr. Retrolust work added a Mega Bezel shader and some manual tweaks for retroarch, all credits to @Mr. RetroLust and Mega Bezel Community. First a warning, this is for 4K and 1080P resolutions only!! it wont work as intended in other screen resolutions. Instructions: 1- Choose and unzip your config.zip (1080p or 4k) to the retroarch folder, it has the individual game cfgs for finalburn neo and mame cores already has the "mega bezel shader pack" included. regardless of what core run what, the rom names are shared, so for the sake of simplicity, with the exception of the core main .cfg files (MAME.cfg / FinalBurn Neo.cfg) all the other game individual .cfg files are exactly the same. 2. extract "shaders_v110.zip" to the shader folder, it has the default retroarch ":\shaders\shaders_slang\" shaders and the mega bezel special shaders in ":\shaders\shaders_slang\bezel\Mega_Bezel\Presets\", this pack presets in the klyze folder Or you can go to Mega Bezel Community and add the latest version manually, just dont forget to add my presets. Games with flat overlay have a dedicated flat shader, but some look good with either flat or curved, so its up to you. 2a. if you think the mega bezel shader is too taxing for your pc just download "Normal Shaders pack" and overwrite the megabezel ones. 3. unzip all the "overlays_partX.zip" files and place them in the overlay folder ":\overlays\Arcade4k\" This was tested in a clean retroarch install, so if you have a retroarch with some weird settings you may have to adjust the main core cfgs yourself. Again, this was a mass conversion, so you may find some unexpected issues i missed, so just give me some feedback.- 16 comments
- 1 review
-
- 11
-
-
-
-
- real bezels
- 1080p
- (and 2 more)
-
 Mo' Colors for your Game Boy Color - Lights Out! Retroarch Bezels View File I have edited some alternate colors to go along with Mr. RetroLust's platform bezels for Retroarch (specifically the GBC ones), which you can find here: I liked the idea of having different colored GBC bezels per game, so I added a bunch of basic colors not present in the original variants. This includes new flat and transparent colors, de-saturated versions, and a simple black one... totaling to 27 new overlays. Because why not. You can use the save game override option in Retroarch to save the bezel per game, and/or you can pick one to use by default for your GBC core, using the save core override option. The files are in the folder structure: overlays/_MR.RETROLUST, so you can simply drop overlays into your Retroarch directory. GIMP .xcf file is also included separately for convenience. ┏(^0^)┛ CREDITS: Mr. RetroLust for the original overlays! Submitter d66dle Submitted 01/08/2026 Category Platform Bezels/Overlays
 -
Version 1.0.0
44 downloads
I have edited some alternate colors to go along with Mr. RetroLust's platform bezels for Retroarch (specifically the GBC ones), which you can find here: I liked the idea of having different colored GBC bezels per game, so I added a bunch of basic colors not present in the original variants. This includes new flat and transparent colors, de-saturated versions, and a simple black one... totaling to 27 new overlays. Because why not. You can use the save game override option in Retroarch to save the bezel per game, and/or you can pick one to use by default for your GBC core, using the save core override option. The files are in the folder structure: overlays/_MR.RETROLUST, so you can simply drop overlays into your Retroarch directory. GIMP .xcf file is also included separately for convenience. ┏(^0^)┛ CREDITS: Mr. RetroLust for the original overlays! -
Version 1.5
1,587 downloads
Some bezels in style of "nosh01" to work with retroarch cores fullscreen Amstrad-CPC-Bezel-16x9-2560x1440 APF-Imagination-Machine-Bezel-16x9-2560x1440 Apple-II-Bezel-16x9-2560x1440 Apple-MacOS-Bezel-16x9-2560x1440 Atari-800-Bezel-16x9-2560x1440 Atari-Lynx-Bezel-16x9-2560x1440 Casio-PV-1000-Bezel-16x9-2560x1440 Commodore-16-Bezel-16x9-2560x1440 Commodore-128-Bezel-16x9-2560x1440 Commodore-Amiga-CD32-Bezel-16x9-2560x1440 Commodore-CDTV-Bezel-16x9-2560x1440 Commodore-PET-Bezel-16x9-2560x1440 Commodore-Plus4-Bezel-16x9-2560x1440 Commodore-VIC20-Bezel-16x9-2560x1440 Epoch-Game-Pocket-Computer-Bezel-16x9-2560x1440 Epoch-Super-Cassette-Vision-Bezel-16x9-2560x1440 Fairchild_Channel_F-Bezel-16x9-2560x1440 FM-Towns-Marty-Bezel-16x9-2560x1440 Funtech-Super-Acan-Bezel-16x9-2560x1440 GCE_Vectrex-Bezel-16x9-2560x1440 Mattel-Intellivision-Bezel-16x9-2560x1440 MegaDuck-Bezel-16x9-2560x1440 Microsoft-MSX-Bezel-16x9-2560x1440 Microsoft-XBOX-Bezel-16x9-2560x1440 (Not yet in Retroarch) MS-DOS-Bezel-16x9-2560x1440 NEC-PC9800-Bezel-16x9-2560x1440 Nintendo-3DS-Bezel-16x9-2560x1440 Nintendo-3DS-horizontal-Bezel-16x9-2560x1440 Nintendo-DS-Bezel-16x9-2560x1440 Nintendo-DS-horizontal-Bezel-16x9-2560x1440 Nintendo-Game-Boy-Advance-Bezel-16x9-2560x1440 Nintendo-Game-Boy-Bezel-16x9-2560x1440 Nintendo-Game-Boy-Color-Bezel-16x9-2560x1440 Nintendo-Gamecube-Bezel-16x9-2560x1440 Nintendo-Virtual-Boy-Bezel-16x9-2560x1440 Nintendo-Wii-Bezel-16x9-2560x1440 Sega-Dreamcast-Bezel-16x9-2560x1440 Sega-Game-Gear-Bezel-16x9-2560x1440 Sega-Pico-Bezel-16x9-2560x1440 Sharp-1x-Bezel-16x9-2560x1440 Sharp-x6800-Bezel-16x9-2560x1440 Sinclair_ZXSpectrum-Bezel-16x9-2560x1440 SNK-Neo-Geo-AES-Bezel-16x9-2560x1440 SNK-Neo-Geo-Pocket-Color-Bezel-16x9-2560x1440 Sony-Playstation-2-Bezel-16x9-2560x1440 Texas_Instruments_TI-994a-Bezel-16x9-2560x1440 Tiger-Game-Com-Bezel-16x9-2560x1440 Watara-Supervision-Bezel-16x9-2560x1440- 9 comments
-
- 12
-
-
-
Version 1.0.1
1,000 downloads
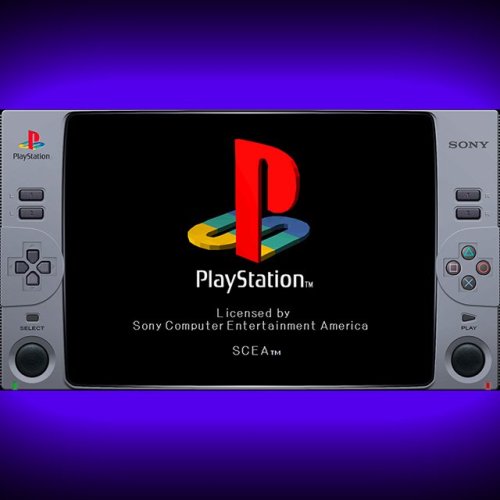
Created this idea , of an hybrid animated control with a Classic Playstation 1 console style. Full HD 1920x1080 Resolution 16:9 Screen Ratio Animated Buttons Recommended Video scale settings: (for a 16:9 screen ratio monitor) SETTINGS >> VIDEO >> SCALING INTEGER SCALE: OFF ASPECT RATIO: 4:3 CROP OVERSCAN: ON Use this setting on fullscreen and you should be good to go. NOTE: Buttons should be responsive to touch/mouse clicks, But was intended to be used as a decorative/cosmetic overlay/border. DO NOT use on systems without hard controls (joypads/keyboards) as it doesn´t have access to the retroarch menu, you'll be stuck! (Mobile compatibily coming in the future) See it in action: -
 I've recently been setting up PS2 emulation in launchbox, using retroarch as emulator. There's a bit of an oddity that I wasn't sure whether was a Launchbox or a Retroarch issue; when I attempt to launch roms, I'm told that a dependency isn't satisfied. When I check the dependency (screenshot) It shows that the bios can't be found... except that I DO have the correct bios in the correct location, and that 'Play anyway' will correctly launch the ROMs. I'm posting so that the Launchbox team can have a look - it's reporting the bios folder name as bios' instead of bios (see pic) in the first half of the text - the \system\pcsx2\bios location specified contains my bios files, but I think the verification might be using an incorrect name (with a ' appended) when trying to verify. Note that 'Open Location' opens my pcsx2 folder, not my pcsx2/bios folder. So I'm assuming that there's some sort of path issue confusion due to the ' (maybe)?
-
These custom console themed overlays were edited and assembled by me to play your retro console games with a unique nostalgic bezel on Retroarch. Please enjoy and have fun. Please give me credit and the others involved if you use it on your Youtube channel. Thanks. The Mega Bezel Reflection Shader is by Hyperspacemadness Some of the original artwork came from ReignStumble Credit is given to RetroKenesis for the bezel frames Here's a Tutorial on how to add them to Retroarch. Older versions...
- 179 replies
-
- 13
-
-
-
-
- video
- orionsangel
- (and 14 more)
-

Version 1.0.0
301 downloads
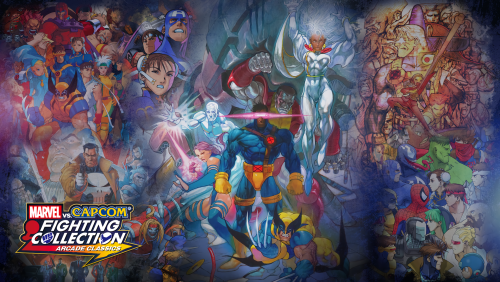
Hi guys, I´ve made the overlay set for the new game Marvel vs. Capcom Fighting Collection: Arcade Classics for use in Retroarch or that plugin on Launchbox (don´t remember the name). Please let me know if you like it! -
Version 1.0.1
1,152 downloads
My desktop resolution is 2560x1440 Shader crt-geom.glsl Retroarch resolution Aspect Ratio 19:14 Credits for the original Bezel/Overlay Super Mario World & Secret of Mana By nadonate- 4 comments
-
- 11
-
-
-
-
- super nintendo
- bezel
- (and 3 more)
-

Version 1.0.0
496 downloads
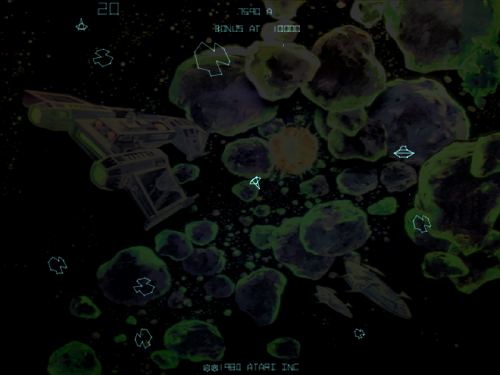
Background artwork for the MAME games Asteroids Deluxe (astdelux.zip) and Space Invaders (invaders.zip). The backgrounds are made for the RetroArch core "Arcade (MAME - Current)", which is the latest version of MAME. Older RetroArch cores are NOT supported! Place the files inside the artwork folder: RetroArch\system\mame\artwork Do not change the name of the files and don't unpack them, otherwise MAME will not recognize the files correctly! MAME should use the backgrounds automatically. If not, press TAB on your keyboard to open the MAME menu, navigate to Video Options >> Screen #0 and select "Upright_Artwork". -
What would be the best way of setting the vertical games to use a different shader in RetroArch when I load those? I am currently using a MAME romset in Launchbox (Arcade Platform) set to launch RetroArch MAME 0.170 core. The shader I like to use for horizontal games is crt-royale-kurozumi.cgp. This shader does not work for vertical but I found one that does. I just don't really know the best way of going about configuring all the vertical games to use another shader. If anyone knows, Thanks for the help!
-
figured out how to copy the post I'm going to post this answer in a few different areas on the forum. I have been trying to figure out how to launch retroarch mame for the systems that don't have a stand alone core. I have finally found a mostly elegant solution 1) Add a New Emulator - I have named mine RetroArch MAME console cores Add your retroarch.exe Make sure to check "Don't use quotes..." 2) Tab over to the Associated Platforms Here's the magic sauce example 1 "neocdz -cdrm \"%romfile%\"" example 2 "a5200 -rp \"F:\Roms\Atari 5200\" -cart \"%romfile%\"" example 3 "coleco -rp F:\Roms\ColecoVision\ -cart \"%romfile%\"" The reason for the "Don't use quotes" and adding this as a new emulator is because of the special thing we have to do to the command line using mostly the same arguments has standalone mame/mess you have to have all the arguments in double quotes " but because of how Windows handles long file names with spaces the locations have to be in quotes to. This throws retroarch/the windows commandline off. This is where the \ before the double quote at the beginning and the \ before the closing double quote per directory/location. Also we can use the launchbox variable %romfile% to help make this work. 3) On top of all that you also have to specify the rompath if the mame core hasn't generated an ini with the rompath. This is needed for the bios of the core you are loading. If all your mame console bios files are in the same dir you could just use that for each entry The core will generate ini files for each system after first run. 4) I also edited my retroarch core options file. I probably enable boot to bios but I don't at the moment. There is my setup for launching roms through retroarch mame. I hope this helps
-
Version 1.0.0
635 downloads
To commemorate the upcoming Genesis Mini, I created some new 4K overlays. Some of these will be fine for other systems, but they match the 80s / 90s Genesis style best. These are inspired by the official overlays, but by no means exact copies. To use, enable integer scaling, and use 4:3 apect ratio. -
Version 1.0.0
80 downloads
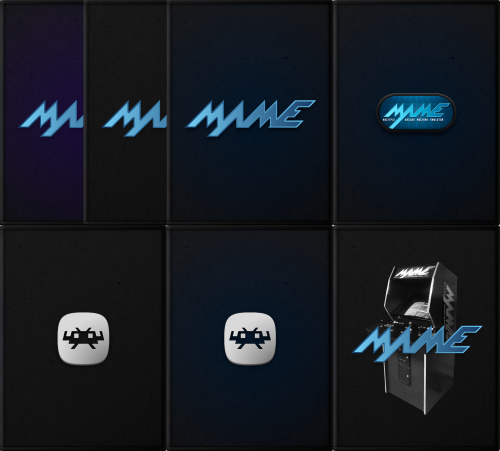
Very simple default boxes with MAME/Retroarch logos, similar to the Launchbox ones I posted earlier. I didn't make so many variants this time, but the included GIMP files now have some more stuff in there to work with, if anyone wants to make their own boxes with them (ex. use the plastic wrap layer, recoloring). It's not the cleanest 'template' in the world... but one can play around with it if they wish ^^; You can see a preview of what those look like in the screenshots. So far I'm content using the 'Default Boxes - [Name]' version of the files rather than the alternates just for my own use, but if get bored with them I may add more alt variants, more platforms, cart images, etc... For now, I'll just leave this here as is. Default 3D Box and Default Box folders go into Launchbox\Images\Platforms\PlatformName\ Alternatively, you can add the default image by selecting the desired platform in the left sidebar, and clicking Edit. This will create the folder automatically and copy the selected image into it. Credits: MrRetrolust for the base box images, and to the creators of the MAME/Retroarch logos 👾└(^o^)┐-
- 5
-
-
-
-
- default box
- default image
- (and 4 more)
-
Simple Default Boxes for MAME/Retroarch + XCF Files (Updated) View File Very simple default boxes with MAME/Retroarch logos, similar to the Launchbox ones I posted earlier. I didn't make so many variants this time, but the included GIMP files now have some more stuff in there to work with, if anyone wants to make their own boxes with them (ex. use the plastic wrap layer, recoloring). It's not the cleanest 'template' in the world... but one can play around with it if they wish ^^; You can see a preview of what those look like in the screenshots. So far I'm content using the 'Default Boxes - [Name]' version of the files rather than the alternates just for my own use, but if get bored with them I may add more alt variants, more platforms, cart images, etc... For now, I'll just leave this here as is. Default 3D Box and Default Box folders go into Launchbox\Images\Platforms\PlatformName\ AND/OR Platform Categories\CategoryName\ Credits: MrRetrolust for the base box images, and to the creators of the MAME/Retroarch logos 👾└(^o^)┐ Submitter d66dle Submitted 08/21/2025 Category Platform Default Image Packs
-

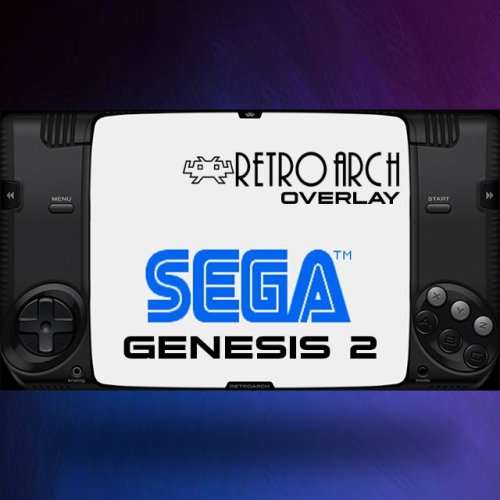
overlay SEGA GENESIS 2 - RETROARCH ANIMATED OVERLAY
fercho posted a file in Platform Bezels/Overlays
Version 1.0.0
151 downloads
RESOLUTION 1080P (THE VIDEO IS 720P) MINIMUM RETROARCH VERSION RECOMMENDED 1.20.0 (the android playstore version is too old) get the latest one from retroarch.com RECOMMENDED OVERLAY OPTIONS quick menu // on-screen overlay - overlay opacity: set to 1.0 - set inputs on overlay: set to physical if you're using a controller or to touched if youre using a mobile device - auto-rotate overlay: se to ON- auto-scale overlay set to ON TO ENABLE TE REWIND FUNCTION: quick menu // rewind (set to enable) ENABLE SEGA EMULATOR-CORE 6 BUTTON quick menu // controls // change joypad auto to MD JOYPAD 6 BUTTON ASSIGN REWIND AND FAST-FORWARD TO CONTROLLER BUTTONS/TRIGGERS L2 AND R2 settings// input // hotkeys // - fast-forward (HOLD) set it to the R2 button/trigger on your controller - rewind - set it to the L2 button/trigger on your controller -
Could someone do a NEW YouTube tutorial for installing Launchbox, and then RetroArch (and other gaming installs) on a Nvidia ShieldTV please? I ask because right now the tutorials I’ve search are different from the interface I’m using forcing me into an impasse because I don’t know how to install RetroArch because the steps on the tutorials are different from what actually see and therefore what I can actually do.
-
Version 1.0.0
125 downloads
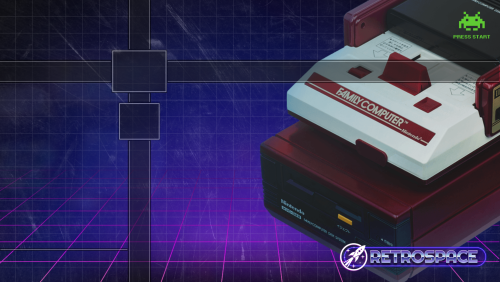
Hi Guys, I would like to share my Dynamic wallpaper - RETROARCH - RETROSPACE Modern Pack that I created for use on the Nintendo Switch. It can also be used on other platforms where Retroarch is accepted. Hope you like it Special thanks to @viking and @niglurion to share they media to us, then I can create these Dynamic Wallpaper and share with you Guys.- 1 comment
-
- 5
-
-
-
- retropspaceos
- dynamic wallpaper
- (and 2 more)
-
Hello! I'm working on getting a Phillips cdi system to launch through Launchbox via RetroArch using the same cdi core. I’ve followed a few tutorials from JustJamie and ETAprime on YouTube, and it seemed like I had it right. The opening screen loaded, but when when I pressed the play button, I got the following message (also see screenshot): “you do not have your video cartridge loaded. Please switch off your CDI player, insert the cartridge and restart” I am trying to play the games “Christmas Crisis,” and Christmas Country” respectively, and I can confirm that I have the correct cdimono1 bios (the one with 5 files). In the screenshot, you can see a Christmas style font, so it seems like the system knows what I am trying to load, but does anyone know what I am missing here?
-
Hello, I know that Lanchbox has a feature for changing the emulator on the fly at launch. But is there anyway to change the core per launch? Some of my n64 and psx games run better with different cores, it would be awesome if i could change them on the fly as well.
.thumb.png.f238d0c9587f24b7c504a0ad449f515b.png)


3.jpg.742da72ac43a94705002c210c5b6f7fd.thumb.jpg.f8fc1cacc611a7156fb5cc60847b357f.jpg)


