Search the Community
Showing results for tags 'configuration'.
Found 14 results
-
.thumb.png.9332e12cab6cec0213b9ffd456a9a968.png)
Version Updated at 0.283
10,408 downloads
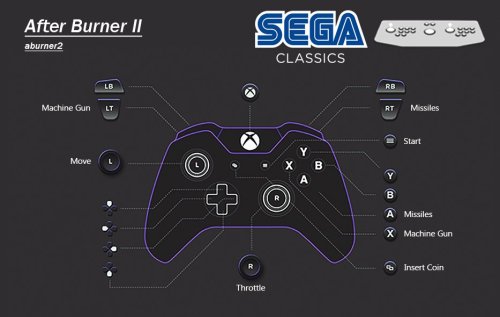
UPDATE 09/01/2026 All of Namco System 12 had it's controls updated at some point. This caused the map files to be incorrect. This has now been sorted. Only the .cfg have been updated, so just grab those if updating! Also, War: Final Assault has had digital analog applied so the crosshair doesn't snap back to centre. It plays like a proper FPS now. UPDATE: Its been 2 years since I "finished" this, and its taken until now for the MAME burnout to lift. But it's back to add some more games and overall improvements. Thanks to past me futureproofing the project, now me only needed to add 35 games. Stuff I missed first time around and stuff that's been added to MAME over the past 2 years. However, about 100 games need fixing. Thanks to help from the community I was able to easily identify which ones I messed up with double inputs or left the test menu on like a dumbass! MAME of course have changed some stuff and hopefully I've caught everything that pertains to this project. Improved platform xml, with almost all games now having a DB entry. I've also made a bunch of Hardware Playlists! Most of the popular ones beyond what LB creates. Stuff like Capcom ZN, Cave 68000, Seta 1st Generation and a bunch of Sega stuff just to name a few. Open to suggestions to add more! This is the bit you really want to pay attention to with the update! CHDs and the size of this build when culled. So, just to break this down: 3571 Non-Merged Roms (No CHD's) = 15.5GB 3571 Games in Merged Roms (No CHD's) = 16.7GB A culled Non-Merged set is actually smaller in size than a culled merged set. Due to merged including "all versions in one zip", independently, they are overall larger in size. Despite non-merged roms including bios files per rom, making it larger for a full set, a non-merged set ends up being overall smaller when culled like this. Not by much! But, I still fully recommend non-merged as they "just work", being overall smaller in size is an unexpected but added bonus. Now, CHD's. Exactly what is needed is in the documentation. For a full set, for this list of games, it's 110GB! However, 65GB (OVER HALF) of this is Rhythm games. Only 48 of them, Beatmania being the main offender. Another 12GB is occupied by ONE GAME....Fire Fox. A LaserDisc game that probably isn't wort the 12GB. These have been configured and added to the project for completeness. But, I have added these to a playlist (also in documentation) so you can easily delete/not use/exclude these Rhythm games from your build. They don't translate well to a controller anyway, so ya really not missing out on much, but saving 65GB across 48 games. Fire Fox is in that playlist also, do what you want. However.... A Non-Merged Culled set with all CHD's for this list (excluding Rhythm + Fire Fox) = 49 GB I had to double take the first time I calculated this. Almost all of MAME Arcade, 1G1R "ish", excluding games better emulated outside of MAME and oversized CHDs, fits into just under 50GB. Amazing! These figures will of course increase as time goes on, this is just a snapshot of now! Namco System 23 and Model 2 will be added once they are in a better state. They are really, really close to running well enough to add. --END OF UPDATE-- If you want show your appreciation and support the project and myself please check put my Patreon https://www.patreon.com/warpedpolygon No need to use the importer with the provided custom platform xml. I fully recommend using this to get the most out of what's been done. If you have been following along you know what the score is. If you are new here, let me explain what all this is. MAME is awesome, however like many other emulators it doesn't know what your use case is, how can it. So, it's defaults are more of a 'one size fits all... but not perfectly' kind of deal. As a result getting things setup can be a mine field. This isn't just down to MAME defaults, plenty of games present you with a bunch of hoops to jump through just to play the damn thing. This, on top of figuring out controls, (which is the main point here) can be a very frustrating experience. Even google can come up short sometimes leaving you to fumble around in the dark. Removing this frustration is the whole point of the project. I see lots of github requests for MAME that aren't emulation issues, they're configuration and setup issues. This project should alleviate the rage of most users. FOR CONTROL PAD USERS. So, let's just get into the stuff you wanna hear. To keep it simple I'm gonna list what IS here and what ISN'T here: WHAT IS HERE Every working Parent ROM has been configured. Although, some games listed as NOT WORKING do indeed work to some degree. These have also been configured to future proof the project. Clones and/or preferred versions have been identified, configured and added in ADDITION to their parent counterparts. This could be an uncensored Japanese version, control hack, translation or even a sequel. In some instances an entirely different game can be a clone version. This is such an important part of the project. All English region Names/Versions have been configured. You may know a game by a completely different name depending on your region. All English versions with different names have been configured. So, if it's Buck Rogers: Planet of Zoom, or just Zoom 909 to you, you'll be able to find it. It'll have that title in game also. I haven't just duplicated the parent version and changed the name in LB. All games have been tested and controls configured for XINPUT Controllers. This has been done per game. Some games needed ages spent on them to figure what the hell was going on. Robocop 2 has diagonals that need mapping to the second player joystick, despite being a one player game. So, you can imagine the time and testing that went in. Multiplayer games set to work with maximum players. Pretty much 70% of 4 player games were setup for 2 players by default. Games that remove the character selection for 4 players have had their 2 player versions also added so you have the choice. Multi screen games set for both one and two screen use. You will have the choice to launch the 1 screen or 2 screen version without having to set everything up. These maybe listed a 1 and 2 player variants. All analog games have had their sensitivity checked and changed if needed. Yes, the trackball Sonic game works just fine despite what people say. Every configured game has a control layout image. Working Prototypes are here. English set for Japanese only games wherever possible. There's more than you think. Unlockable/hidden content pre unlocked. Keep in mind some cheats for hidden content are a one time use and don't save to NVRAM. Fighting game button layouts are setup to all be the same. Exactly the same as Street Fighter 2 on SNES for 6 button fighters. Light gun games set for controller AND mouse usage. Inaccurate games have been calibrated. Widescreen games set to pixel aspect. Technical hoops already jumped through. Much, much, much more. WHAT ISN'T HERE Mah-jong games that use a Mah-jong panel. These simply have too many inputs to map to a controller. Mah-jong games that use a joystick are here. Japanese quiz games. Gambling and video poker games. Basically anything with a BET, HOLD input system. Japanese clone versions, UNLESS they are preferred or have additional content. Truly non working games that simply black screen. Any arcade platforms better emulated outside of MAME for e.g. Sega Model 2 & 3. ABOUT THE PLATFORM XML A lot of work has gone into making sure these games are all accounted for in the xml. There were a bunch of roms that weren't recognised by the importer or games that simply haven't yet been added to the Database. I have made sure that these have been added and named correctly before I start changing/updating the database. Also, I have gone the extra mile and added version info in the title of the game if there are multiples of the same game. So, you will see The Simpsons (2 Player) and The Simpsons (4 Players) as separate versions for extra convenience. PlayChoice-10 games and mega play games have also had this info added to the title so you know exactly what version is being selected, despite sharing the same name as other versions/games. MAME SET ADVICE AND MERGED ROMS Despite my previous statements, Non-Merged is the best for sooo many reasons. I plead with you, just go non merged and you'll have a better time. However, merged will work just fine as long as you have your bios setup correctly. INSTRUCTIONS Download CFG, NVRAM and Control Layout Images Put CFG and NVRAM files in the cfg and nvram folders of MAME Use Images however you want. I like to put these in the Screenshot - Gameplay images folder so they display in the side bar. If you don't use a gameplay screenshots this is a nice solution outside of BigBox. This has been made for use with XINPUT controllers. If you aren't using an XINPUT controller you can use DS4windows or it's alternative. USING THE ARCADE PLATFORM XML Download the Arcade.xml Backup your old xml just in case if you have one. Make sure LaunchBox is not running Place Arcade.xml into Data->Platforms folder in LaunchBox Start LaunchBox. The Arcade platform should be showing now. Select all games in the Arcade platform (Ctrl+A), then go to Tools->File Management->Change ROMs Folder Path for Selected Games (Merged Only) It will say some roms are missing, they're not, just in other zips. Make sure to change paths for these also, when asked. Find your ROMs folder and select it. Don't forget to set your emulator path and set it as the default for Arcade platform. PLAY!!! This project will be kept up to date moving forward. If you have any info, suggestions or whatever just holler in the comments. -
SteamLauncher View File SteamLauncher A LaunchBox plugin designed to allow roms/emulators to easily be launched with Steam, directly from the LaunchBox/BigBox interface, without any complicated setup or technical know-how. Simply enable SteamLauncher and all LaunchBox/BigBox game/rom launches will be intercepted and launched via Steam. This will provide access to the Steam overlay, custom controller configurations, and will display the game/rom your are currently playing to any of your Steam friends. Features Here are a few of the features provided by SteamLauncher: Allow LaunchBox to do what its good at - be the sole organizer and maintainer of your rom/game collection, without having to duplicate its functionality in Steam (something it was not designed for). Keep the Steam library clean and uncluttered by hundreds of emulator/rom shortcuts. Get all of the benefits of Steam's excellent overlay system while playing any rom or emulator. Take advantage of Steam's infinitely customizable controller configuration (bindings) for both the Steam Controller and nearly all other DirectInput/XInput controllers. Use per-rom/per-emulator/per-game controller configurations that are automatically remembered between gaming sessions (without having to create convoluted Steam shortcuts for every rom). Bypass or improve upon many emulators' extremely limited controller bindings and hotkey options. Share the game/rom currently being played with Steam friends (ex: JohnDoe is currently playing 'Super Metroid (SNES)'). Requirements .NET Core 3.1 Steam for Windows LaunchBox/BigBox Getting Started Installation Download the latest plugin release from the LaunchBox forum plugin download page. This GitHub repository is meant as more of a resource for developers. While test builds and other pre-release packages may occassionally be posted on GitHub, the latest public release builds will always be posted on the LaunchBox forum plugin download page first: LaunchBox Plugin Download: https://forums.launchbox-app.com/files/file/972-steamlauncher/ Extract the 'SteamLauncher' directory from the compressed package into your LaunchBox plugins directory. Example: If LaunchBox is located at 'C:\LaunchBox', you would copy the 'SteamLauncher' directory to 'C:\LaunchBox\Plugins'. This would result in 'SteamLauncher.dll' and any additional files being inside the directory 'C:\LaunchBox\Plugins\SteamLauncher'. How to Use Note: Obviously, Steam must be running to launch games via Steam so one can either manually start Steam before opening LaunchBox/BigBox or SteamLauncher will automatically launch Steam when needed. To launch a game/rom/emulator in LaunchBox/BigBox via Steam: Ensure SteamLauncher is enabled by using 1 of the 2 following methods: Selecting the 'Tools' menu item and clicking 'Use SteamLauncher'. When SteamLauncher is enabled the menu item will be labeled '(ON)'. This menu item can also be found in BigBox. Selecting the 'Tools' menu item and clicking 'SteamLauncher Settings', resulting in the SteamLauncher settings dialog being displayed. By then checking the checkbox labeled 'Enable SteamLauncher' and clicking the 'Save' button, SteamLauncher will be enabled. The SteamLauncher settings dialog cannot be accessed in BigBox. Once SteamLauncher is enabled, all games/roms/emulators will be intercepted by SteamLauncher and launched through Steam. Customize Platform Names When games/roms are launched with SteamLauncher enabled, the title and platform of the game/rom will be displayed in one's Steam status in the format of: 'Game Title (Platform Name)'. Example: Super Mario Bros. (Nintendo Entertainment System) Friends on Steam will see this title in one's status whenever a particular game/rom is being played. If desired, the platform name displayed can be customized. For example, the platform 'Nintendo Entertainment System' can be changed to 'NES'. This customization can be performed by navigating to the 'Platform Names' tab in the SteamLauncher settings dialog. Note: To entirely omit a platform name from one's Steam status, leave the 'Custom Platform Name' entry blank (as seen in the 'Windows' entry in the screenshot below). Selective Use The 'Selective Use' feature allows one to precisely customize the circumstances under which SteamLauncher will be enabled/disabled. The settings for this feature can be found in the 'Selective Use' tab in the SteamLauncher settings dialog. Filter Mode 'Filter Mode' defines how the entries in the 'Filter List' will be applied. Blacklist: SteamLauncher will always be enabled except when a matching filter is found. Whitelist: SteamLauncher will always be disabled except when a matching filter is found. Off: Disable the 'Selective Use' feature entirely. Filters List The 'Filters List' is a list of user defined filters that control when SteamLauncher will be enabled/disabled. Enable: This checkbox must be checked for a particular filter list entry to be enabled. If not checked, it will be completely ignored. Description: Used purely as a means of helping the user describe what the filter list entry does. It is entirely optional and has no impact on the actual functionality of the entry. Filter String: This is the string which is matched against the target 'Filter Type', dictating whether or not this entry matches a particular game title, platform name, etc. The filter string is not case sensitive and it supports 2 types of wildcards: '*' Wilcard: matches one or more of any character. '?' Wildcard: matches any single character. Filter Type: Dicates what field the 'Filter String' is compared against. The 'Filter Type' options are: Game Title: Title of the game or rom (ex: Celeste, Super Mario World, Donkey Kong Country, etc). Platform Name: Name of the platform (ex: Windows, Nintendo 64, Sony Playstation, etc). Emulator Title: Title of the emulator (ex: Retroarch, Dolphin, Cemu, etc). Exe Path: The path of the game or emulator EXE file (ex: 'C:\PC_Games\GOG\*', 'D:\*', '*\DOSBox\*', etc). Additional Application Name: Name of an 'Additional App' (a LaunchBox feature which allows you to specify additional commands to run for a game). Status: A field in LaunchBox's metadata for games (right click game, 'Edit' -> 'Edit Metadata') which specifies what platform/launcher/store a game was imported from (ex: '*Xbox*', '*Microsoft Store*', '*GOG*', etc). Ignore Custom Fields: Enabling this feature causes SteamLauncher to ignore all 'SLEnabled' custom field entries. What are 'SLEnabled' custom field entries? Right click on a game in LaunchBox, click 'Edit' -> 'Edit Metadata', and then select the 'Custom Fields' menu item. By adding a new entry named 'SLEnabled' and setting its value to '1' or '0', SteamLauncher can be made to always be enabled for this game (1) or always be disabled for this game (0). This custom field value will always take precedent over all other filtering features (filter strings, filter modes, etc). The only exception to this is when 'Ignore Custom Fields' is enabled (which will cause all 'SLEnabled' custom field entries to be ignored). VTables 'Automatic Online Updates' 'Automatic Online Updates' of vtables definitions can be enabled/disabled in the 'Miscellaneous' tab of the SteamLauncher settings dialog. For SteamLauncher to properly work it has to access internal Steam features that are not meant to be accessed by developers outside of Valve. To access these undocumented, unexported functions, SteamLauncher uses a set of definitions which define what these functions are, their function signatures (their parameters, return values, and how to call them), and where to find them within the Steam client DLL. These definitions can change whenever Valve releases a new Steam update and if they change significantly, they can cause SteamLauncher to stop working correctly. In order for SteamLauncher to continue working properly, without the author manually patching the plugin and releasing a new SteamLauncher update every time this happens, an online database was created that can be updated when one of these changes happens, allowing SteamLauncher to continue functioning normally. If 'Automatic Online Updates' is enabled, SteamLauncher will automatically check for new updates every time LaunchBox/BigBox is launched. If new definitions are available, it will silently update and continue working normally. If automatic updates are not enabled, one can manually check for new updates by clicking the 'Force Update' button. Support If you have ANY problems with the plugin, I want to know about them. If you need help with any technical issue (see 'Logs'), want to suggest a new feature (I'm very open to any ideas), just want to chat, or anything else related to the plugin, visit the support thread at the link below. I am also available to chat on Steam for any urgent issues or if more direct help is needed. Plugin Support Thread: https://forums.launchbox-app.com/topic/43142-steamlauncher/ Logs To provide help with any technical problems or to investigate a bug, I will need a copy of the debug log that is generated whenever 'Log Level' is set to 'Verbose'. To enable and collect 'Verbose' debug logs, do the following: Open the SteamLauncher settings dialog. Click the dropdown box under 'Log Level' and select 'Verbose'. Click the 'Save' button. Restart LaunchBox/BigBox. Now simply repeat whatever behavior was causing the issue and/or bug, and after you're sure you've replicated the behavior, close LaunchBox/BigBox. Look inside of the SteamLauncher directory for a file named 'debug.log' (there may be more than one sequentially named log file if there was an enormous amount of output but this is unlikely if verbose logging was turned on just briefly). Open this 'debug.log' file in a text editor, copy its entire contents, and paste/upload it to pastebin.com. In the SteamLauncher support thread, provide the PasteBin URL, the details of the problem you encountered, and the particulars of your setup (Windows version, 32-bit or 64-bit, LaunchBox version, Steam version, SteamLauncher plugin version, etc). The more information the better. Contact Information Alias: Lahma Email: [email protected] Steam Alias: lahma0 Friend me on Steam: You can click on my alias above or you can copy/paste the following URL into your address bar: steam://friends/add/76561198237461630 GitHub Project URL: https://github.com/lahma0/SteamLauncher LaunchBox Community Forums Profile: https://forums.launchbox-app.com/profile/89710-lahma/ Plugin Support Thread: https://forums.launchbox-app.com/topic/43142-steamlauncher/ Credits ChippiHeppu: Logo m4dengi: steamclient_tracker (unfortunately, no longer updated) cammelspit: Help with developing the idea and direction for the project Nielk1: Initial inspiration for the project and just a talented programmer to bounce ideas off of Helpful members of the LaunchBox community: The_Keeper86, JedExodus, FromLostDays, HTPCei, Corgana, Benuno, Neil9000 (sorry for anyone I'm forgetting) Known Issues MAME Compatibility Fix It has been observed that MAME crashes when launched through a non-Steam shortcut. This problem is not directly related to SteamLauncher, but since SteamLauncher relies on non-Steam shortcuts, launching MAME via SteamLauncher was no longer working. After a lot of investigation and tinkering by some dedicated users on the LaunchBox forums (cammelspit and JedExodus), a fix was eventually found for the issue. Whether launching MAME directly via a non-Steam shortcut or via SteamLauncher using LaunchBox/BigBox, the fix is simply to modify the launch parameters to include the following: -joystickprovider xinput -keyboardprovider win32 If one of these parameters already exists when modifying MAME within LaunchBox, you will obviously need to replace it (don't just add a 2nd instance of '-joystickprovider' or '-keyboardprovider'). You can safely ignore any popups/warnings that LaunchBox displays about pause screen compatibility. Legal Stuff ©2022 Valve Corporation. Steam and the Steam logo are trademarks and/or registered trademarks of Valve Corporation in the U.S. and/or other countries. Submitter Lahma Submitted 02/11/2018 Category Third-party Apps and Plugins
-
Version NETCore 0.9.8.5
3,010 downloads
SteamLauncher A LaunchBox plugin designed to allow roms/emulators to easily be launched with Steam, directly from the LaunchBox/BigBox interface, without any complicated setup or technical know-how. Simply enable SteamLauncher and all LaunchBox/BigBox game/rom launches will be intercepted and launched via Steam. This will provide access to the Steam overlay, custom controller configurations, and will display the game/rom your are currently playing to any of your Steam friends. Features Here are a few of the features provided by SteamLauncher: Allow LaunchBox to do what its good at - be the sole organizer and maintainer of your rom/game collection, without having to duplicate its functionality in Steam (something it was not designed for). Keep the Steam library clean and uncluttered by hundreds of emulator/rom shortcuts. Get all of the benefits of Steam's excellent overlay system while playing any rom or emulator. Take advantage of Steam's infinitely customizable controller configuration (bindings) for both the Steam Controller and nearly all other DirectInput/XInput controllers. Use per-rom/per-emulator/per-game controller configurations that are automatically remembered between gaming sessions (without having to create convoluted Steam shortcuts for every rom). Bypass or improve upon many emulators' extremely limited controller bindings and hotkey options. Share the game/rom currently being played with Steam friends (ex: JohnDoe is currently playing 'Super Metroid (SNES)'). Requirements .NET Core 3.1 Steam for Windows LaunchBox/BigBox Getting Started Installation Download the latest plugin release from the LaunchBox forum plugin download page. This GitHub repository is meant as more of a resource for developers. While test builds and other pre-release packages may occassionally be posted on GitHub, the latest public release builds will always be posted on the LaunchBox forum plugin download page first: LaunchBox Plugin Download: https://forums.launchbox-app.com/files/file/972-steamlauncher/ Extract the 'SteamLauncher' directory from the compressed package into your LaunchBox plugins directory. Example: If LaunchBox is located at 'C:\LaunchBox', you would copy the 'SteamLauncher' directory to 'C:\LaunchBox\Plugins'. This would result in 'SteamLauncher.dll' and any additional files being inside the directory 'C:\LaunchBox\Plugins\SteamLauncher'. How to Use Note: Obviously, Steam must be running to launch games via Steam so one can either manually start Steam before opening LaunchBox/BigBox or SteamLauncher will automatically launch Steam when needed. To launch a game/rom/emulator in LaunchBox/BigBox via Steam: Ensure SteamLauncher is enabled by using 1 of the 2 following methods: Selecting the 'Tools' menu item and clicking 'Use SteamLauncher'. When SteamLauncher is enabled the menu item will be labeled '(ON)'. This menu item can also be found in BigBox. Selecting the 'Tools' menu item and clicking 'SteamLauncher Settings', resulting in the SteamLauncher settings dialog being displayed. By then checking the checkbox labeled 'Enable SteamLauncher' and clicking the 'Save' button, SteamLauncher will be enabled. The SteamLauncher settings dialog cannot be accessed in BigBox. Once SteamLauncher is enabled, all games/roms/emulators will be intercepted by SteamLauncher and launched through Steam. Customize Platform Names When games/roms are launched with SteamLauncher enabled, the title and platform of the game/rom will be displayed in one's Steam status in the format of: 'Game Title (Platform Name)'. Example: Super Mario Bros. (Nintendo Entertainment System) Friends on Steam will see this title in one's status whenever a particular game/rom is being played. If desired, the platform name displayed can be customized. For example, the platform 'Nintendo Entertainment System' can be changed to 'NES'. This customization can be performed by navigating to the 'Platform Names' tab in the SteamLauncher settings dialog. Note: To entirely omit a platform name from one's Steam status, leave the 'Custom Platform Name' entry blank (as seen in the 'Windows' entry in the screenshot below). Selective Use The 'Selective Use' feature allows one to precisely customize the circumstances under which SteamLauncher will be enabled/disabled. The settings for this feature can be found in the 'Selective Use' tab in the SteamLauncher settings dialog. Filter Mode 'Filter Mode' defines how the entries in the 'Filter List' will be applied. Blacklist: SteamLauncher will always be enabled except when a matching filter is found. Whitelist: SteamLauncher will always be disabled except when a matching filter is found. Off: Disable the 'Selective Use' feature entirely. Filters List The 'Filters List' is a list of user defined filters that control when SteamLauncher will be enabled/disabled. Enable: This checkbox must be checked for a particular filter list entry to be enabled. If not checked, it will be completely ignored. Description: Used purely as a means of helping the user describe what the filter list entry does. It is entirely optional and has no impact on the actual functionality of the entry. Filter String: This is the string which is matched against the target 'Filter Type', dictating whether or not this entry matches a particular game title, platform name, etc. The filter string is not case sensitive and it supports 2 types of wildcards: '*' Wilcard: matches one or more of any character. '?' Wildcard: matches any single character. Filter Type: Dicates what field the 'Filter String' is compared against. The 'Filter Type' options are: Game Title: Title of the game or rom (ex: Celeste, Super Mario World, Donkey Kong Country, etc). Platform Name: Name of the platform (ex: Windows, Nintendo 64, Sony Playstation, etc). Emulator Title: Title of the emulator (ex: Retroarch, Dolphin, Cemu, etc). Exe Path: The path of the game or emulator EXE file (ex: 'C:\PC_Games\GOG\*', 'D:\*', '*\DOSBox\*', etc). Additional Application Name: Name of an 'Additional App' (a LaunchBox feature which allows you to specify additional commands to run for a game). Status: A field in LaunchBox's metadata for games (right click game, 'Edit' -> 'Edit Metadata') which specifies what platform/launcher/store a game was imported from (ex: '*Xbox*', '*Microsoft Store*', '*GOG*', etc). Ignore Custom Fields: Enabling this feature causes SteamLauncher to ignore all 'SLEnabled' custom field entries. What are 'SLEnabled' custom field entries? Right click on a game in LaunchBox, click 'Edit' -> 'Edit Metadata', and then select the 'Custom Fields' menu item. By adding a new entry named 'SLEnabled' and setting its value to '1' or '0', SteamLauncher can be made to always be enabled for this game (1) or always be disabled for this game (0). This custom field value will always take precedent over all other filtering features (filter strings, filter modes, etc). The only exception to this is when 'Ignore Custom Fields' is enabled (which will cause all 'SLEnabled' custom field entries to be ignored). VTables 'Automatic Online Updates' 'Automatic Online Updates' of vtables definitions can be enabled/disabled in the 'Miscellaneous' tab of the SteamLauncher settings dialog. For SteamLauncher to properly work it has to access internal Steam features that are not meant to be accessed by developers outside of Valve. To access these undocumented, unexported functions, SteamLauncher uses a set of definitions which define what these functions are, their function signatures (their parameters, return values, and how to call them), and where to find them within the Steam client DLL. These definitions can change whenever Valve releases a new Steam update and if they change significantly, they can cause SteamLauncher to stop working correctly. In order for SteamLauncher to continue working properly, without the author manually patching the plugin and releasing a new SteamLauncher update every time this happens, an online database was created that can be updated when one of these changes happens, allowing SteamLauncher to continue functioning normally. If 'Automatic Online Updates' is enabled, SteamLauncher will automatically check for new updates every time LaunchBox/BigBox is launched. If new definitions are available, it will silently update and continue working normally. If automatic updates are not enabled, one can manually check for new updates by clicking the 'Force Update' button. Support If you have ANY problems with the plugin, I want to know about them. If you need help with any technical issue (see 'Logs'), want to suggest a new feature (I'm very open to any ideas), just want to chat, or anything else related to the plugin, visit the support thread at the link below. I am also available to chat on Steam for any urgent issues or if more direct help is needed. Plugin Support Thread: https://forums.launchbox-app.com/topic/43142-steamlauncher/ Logs To provide help with any technical problems or to investigate a bug, I will need a copy of the debug log that is generated whenever 'Log Level' is set to 'Verbose'. To enable and collect 'Verbose' debug logs, do the following: Open the SteamLauncher settings dialog. Click the dropdown box under 'Log Level' and select 'Verbose'. Click the 'Save' button. Restart LaunchBox/BigBox. Now simply repeat whatever behavior was causing the issue and/or bug, and after you're sure you've replicated the behavior, close LaunchBox/BigBox. Look inside of the SteamLauncher directory for a file named 'debug.log' (there may be more than one sequentially named log file if there was an enormous amount of output but this is unlikely if verbose logging was turned on just briefly). Open this 'debug.log' file in a text editor, copy its entire contents, and paste/upload it to pastebin.com. In the SteamLauncher support thread, provide the PasteBin URL, the details of the problem you encountered, and the particulars of your setup (Windows version, 32-bit or 64-bit, LaunchBox version, Steam version, SteamLauncher plugin version, etc). The more information the better. Contact Information Alias: Lahma Email: [email protected] Steam Alias: lahma0 Friend me on Steam: You can click on my alias above or you can copy/paste the following URL into your address bar: steam://friends/add/76561198237461630 GitHub Project URL: https://github.com/lahma0/SteamLauncher LaunchBox Community Forums Profile: https://forums.launchbox-app.com/profile/89710-lahma/ Plugin Support Thread: https://forums.launchbox-app.com/topic/43142-steamlauncher/ Credits ChippiHeppu: Logo m4dengi: steamclient_tracker (unfortunately, no longer updated) cammelspit: Help with developing the idea and direction for the project Nielk1: Initial inspiration for the project and just a talented programmer to bounce ideas off of Helpful members of the LaunchBox community: The_Keeper86, JedExodus, FromLostDays, HTPCei, Corgana, Benuno, Neil9000 (sorry for anyone I'm forgetting) Known Issues MAME Compatibility Fix It has been observed that MAME crashes when launched through a non-Steam shortcut. This problem is not directly related to SteamLauncher, but since SteamLauncher relies on non-Steam shortcuts, launching MAME via SteamLauncher was no longer working. After a lot of investigation and tinkering by some dedicated users on the LaunchBox forums (cammelspit and JedExodus), a fix was eventually found for the issue. Whether launching MAME directly via a non-Steam shortcut or via SteamLauncher using LaunchBox/BigBox, the fix is simply to modify the launch parameters to include the following: -joystickprovider xinput -keyboardprovider win32 If one of these parameters already exists when modifying MAME within LaunchBox, you will obviously need to replace it (don't just add a 2nd instance of '-joystickprovider' or '-keyboardprovider'). You can safely ignore any popups/warnings that LaunchBox displays about pause screen compatibility. Legal Stuff ©2022 Valve Corporation. Steam and the Steam logo are trademarks and/or registered trademarks of Valve Corporation in the U.S. and/or other countries. -
I did this in Windows, but something similar can definitely be changed to run in *nix environments. I was having issues with the Singe 2 keybindings not reading my controls.cfg so, I installed Hypseus and with a few modifications and tweaks I got All of the games setup within a couple of hours of work. The end goal was to have it launch the Batch File from LaunchBox, but it had to run JoyToKey as a separate command, then start the hypseus in a normal sequence, but when it exits it kills the JoyToKey executable so as not to interfere with other games if I switch to a non-laser disc title. Example of a batch file for Time Traveler start <Path To JoyToKey>\JoyToKey.exe ping -n 2 127.0.0.1>NUL hypseus.exe singe vldp -framefile singe\timetraveler\timetraveler.txt -script singe\timetraveler\timetraveler.singe -fullscreen -volume_nonvldp 5 -volume_vldp 20 -js_range 5 Taskkill /IM JoyToKey.exe /F EXIT I ran JoyToKey (v6.5 at the time of writing) and setup a profile for "Hypseus" Edit: Buttons were just pressed and highlighted what ones I wanted to set to what default. I had the default ini file open that tells you what key is what, and that's what I set it to in JoyToKey. Very straight forward. In the profiles association in JoyToKey I setup the profile to link to where my Hypseus was installed to so it would switch automatically as they are different than the DaphneSinge that I still use for the original Dragon's Lair: I also set one up for DaphneSinge so that the buttons were mapped accordingly: All you have to do is add the ROMs using the Import Wizard, and select the batch file for the Hypseus and as long as your data files are in the appropriate folders, the batch file above will function inside the same directory that the hypseus.exe executable resides. The line: ping -n 2 127.0.0.1>NUL Is there for a 'delay' because I found that while I had JoyToKey running in the foreground, it will go in front of the game because it loads slower ever so slightly sometimes, and the game does not get focus. So I added it there. You can change JoyToKey to run minimized in the settings and delete that line if you wish.

-
Hey, I'm trying to manage my game files using a combination of Launchbox and SyncThing to manage games between my phone and tablet, I'd like the tablet to mirror the phone however I run into file path errors. My tablet uses an SD card. Here's the process: Use Launchbox desktop to create an game export pack > place the export package in a folder that syncs between my phone and desktop (This is necessary due to syncthings bidirectional syncing -I rather avoid the whole ignore delete stuff since the devs are not a fan of it) > After package syncs to phone I move the package out of the synced folder to the proper place on my phone > Have the Launchbox folder on my phone sync to my tablet's Launchbox folder that is located on an SD card. I can launch games perfectly fine on my phone, however when attempting to launch a game on the tablet it throws an error about the game's file path not matching what it has indexed (which make sense). With that said, what file is this game path info stored? With that info I can tell SyncThing to ignore that file. Thanks
-
Hello, I have a delicate issue which i have tried get my head around for some time now, ive tried googling a solution but allways end up nowhere or generally something about one end of the issue, I have a little Intel Nuc with bluetooth LMP 8 core 4.2 and i have connected 2 Playstation 4 controllers to this NUC, i use retroarch for emulating most of the emulators and two specific ones for gamecube and ps2 (dolphin and pcsx2) I also use Ds4windows Ryochan7 version 3.0.1 currently. Now to my issue, ive been trying to get my ps4 controllers to act as when i start either one of the controller in random order i want the first controller starting up to act as player 1 which i have created a profile named "player 1" in ds4windows and a "player 2" profile aswell, my problem is that whenever i switch to the other controller in one situation because of low battery example, that controller gets profile "player 1" as it should in ds4windows, but in retroarch i will have to remap buttons and reconfigure that controller as "input 1" if i switch controller. Maybe this is an easy configuration or its impossible to get it to work this way, does anyone have some thoughts on approach or ideas to make this happen? Br Flinkken
-
 Description: Tables for Pinball FX2 on Steam are treated similarly to DLC for other games. Therefore, the tables do not have their own launchers in Steam, and are chosen after starting up the main game. However, the following will describe how you can enter each Pinball FX2 table as an individual game in LaunchBox. Note: You may need to get a code from Zen Studios to enable command line support with Pinball FX2. There is a link within the game that will send you to the appropriate form, or you can go to it directly, here: https://blog.zenstudios.com/?page_id=5981 I don't know if this step is necessary, as I had already received a code before I imported the tables to LaunchBox. So check there first if the command line arguments aren't working. Steps: Optional: Navigate to Tools -> Manage Platforms from the LaunchBox menu bar and click the + Add... button to add a new platform. Optional: Enter the following metadata: Title: Pinball FX2 Release Date: 05/10/2013 Developer: Zen Studios Category: Pinball or Arcade Images: (See Image 1 for Clear Logo) Optional: Click the ✔ Ok button and you now have a platform for your Pinball FX2 tables. Note: The previous steps may not be necessary, depending on how you organize your platforms. The Pinball FX2 tables can be added to the platform of your choice — this is just the setup that worked well for me. Navigate to Game -> Add from the LaunchBox menu bar, or press Ctrl+N. Enter any necessary metadata in the Details section (Image 2). Since these titles do not exist as separate games, they are not currently in the LaunchBox Games DB, so I'm unaware of an easy way to scrape metadata at the moment. Beneath the Details section, within the Launcher tab, click the Browse... button next to the Application Path textbox. Note: If you see ROM File (Emulation is enabled) instead of Application Path, you will need to navigate to the Emulation tab, and uncheck Use an emulator to play this game. Navigate to your Steam install folder, select the file named Steam.exe, and click the Open button. The Application Path setting should now be set to something like: ..\Steam\Steam.exe Next, in the Application Command-Line Parameters textbox, enter the following text: -applaunch 226980 "TableName.pxp" Replace TableName in the sample text above with the name of the table you are adding (See below for the list of table names and command line parameters). This parameter will tell Steam to launch the app with the id of 226980, which happens to be Pinball FX2, and it will pass the name of the table we want to run to Pinball FX2. Click the ✔ Ok button and you should now see the game added to your selected platform. Note: Since we are passing the name of the table file to Pinball FX2 through the command line, and not the table file itself, we cannot use the usual Tools -> Import -> ROM Files... method. Images: Pinball FX2 Platform Clear Logo: Adding a Pinball FX2 Table: Table Names and Command-Line Parameters: Note: The names of the tables can be found by navigating to your Pinball FX2 directory within your Steam directory. It will be at the following location: Steam -> SteamApps -> common -> Pinball FX2 -> data_steam Ignore any of the files that are in lower case (game_cfg.pxp, gui.pxp, etc.), as well as the PTSData.dat file, as these are not table files.
- 9 replies
-
- 5
-

-
- pinball fx2
- steam
- (and 1 more)
-
Retroarch Version: 1.3.6 Mame Core: MAME 0.174 (The core labeled Arcade (MAME) in the Core Updater) Steps: Open Retroarch and pull up the Main Menu (Press F1 if you are in-game). Load the Mame Core if it is not already loaded (check the bottom left of the screen for the currently loaded core). Navigate to Main Menu -> Quick Menu -> Options. In the Options menu, turn ON the following options (Image 1): Hide nag screen Hide gameinfo screen Hide warnings screen Navigate back to the Main Menu and select Save Current Config. Now, when you play an Arcade game with Retroarch, it will begin loading the rom immediately. Note: The nag screens, warning screens, and info screens are the screens that display before the rom is actually loaded (Image 2). These screens usually require a button press before the process is allowed to continue. These settings will not remove the arcade startup screens, display test screens, RAM check screens, hard disk load screens, etc. Images: Settings to change: Nag screen and gameinfo screen example:
-
I was wondering if anyone has the Daphne core in Retroarch working? I have the daphne program working as a stand alone emulator in my launch box build, but it would be nice to see how this retroarch version works. I don't even know if the same files I'm using with the daphne emulator work with the retroarch core, or if it wants the arcade files.
-

dolphin [Dolphin] Configure Xbox 360 Controller as Classic Wiimote
MijacOnAir posted a topic in Noobs
Hi guys, I have just watched the tutorial on how to play Game Cube and Wii games on LaunchBox and what I don't get is the way to layout the xbox 360 controller. I have done it as in the video but I suspect maybe when selecting "classic" instead of nunchuk you go under a sub-setup, not the main layout on the controller section? I have attached a couple of pics showing my configuration. Hope you guys can help Many thanks in advance!
-
Hey guys, I have a PS4 controller and a Gamecube controller. I like to play Dolphin with the Gamecube controller, but once it's wired sometimes I give up to play to avoid the chance to fall, hit my head, and die when connecting the cable (or just to avoid fatigue). So I like to play with the wireless PS4 controller sometimes as well. For now I have two separated folders for dolphin (using the portable.txt) and I have 2 emulators set on Launchbox, each one with one config for controller. The problem is: I couldn't figure out how to merge the save files. Does anyone knows any other way that can I have 2 controller settings for dolphin and use on Launchbox/BB quickly?
-
Please vote for this option here VOTE HERE Enable the ability to assign button combinations Enable assigning multiple buttons to the same hotkey I would like to get more keyboard/Controller/Mouse hotkey options For instance currently there is no hotkey: to go to next system to go to next alphabet letter to go to bottom of list to go to top of list to open options to edit a file **to mark a favorite** disable mouse **INTEGRATE MOUSE AND CONTROLLER** (make them act as 1) record a video take a snapshot Yet we already have a shortcut key to: Show status Show sources Show developers show publishers set star rating And there are odd shortcut keys like: Volume up = + but volume down = n Page down = next (I did check this and it works correctly) Also more abilities to quickly edit the location of image directories, this could be handled by xml, cfg, a built in program, or simply a bulk edit for the root of the images For example I have my Nintendo 64 images on d:\images\Nintendo 64 in all the sorted categories fron, back, clear logo, etc. The default location is d:\frontends\launchbox\images\Nintendo 64\Images, so if I could do a bulk edit feature and put in d:\images\Nintendo 64 and everything moves to that. Please vote for this option here VOTE HERE
-
Hello all, lurker for a while and decided I better create an account. I did a search and don’t see any mention of a portable app. I been setting up Launchbox/BigBox on my main work PC for testing and configuration. Can I then move this (easily) to my dedicated arcade PC? Is the program a true portable app where I can just copy and paste? Just trying to figure out an easy way to do this.
-
Hi everyone, I am a complete computer and arcade newbie and am having issues installing MAME onto my Launchbox. I get to the install screen (image 1). I click 'OK' then I get to the emulator screen and click "Close" but the emulator doesn't show up. Am i doing something wrong? Also when I try to add a ROM to launchbox nothing shows up either, it doesn't read the zip file. Can someone help me out or link me to a tutorial for loading MAME. I watched the launchbox video for mame but it doesnt tell me how to install the emulator.
.thumb.png.9332e12cab6cec0213b9ffd456a9a968.png)


