Search the Community
Showing results for tags 'bigbox'.
-

Version 2.1.0
20,256 downloads
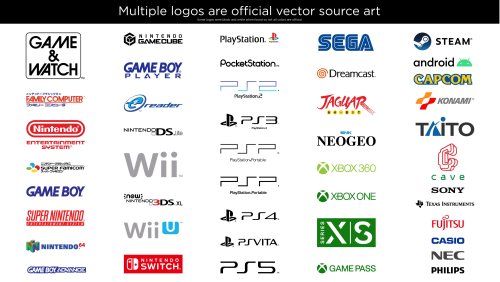
This is a giant collection of platform logos drawn digitally by hand. This took well over 500 hours of work over 15 months. While console logos exist all over the internet, this collection aims to bring them to a higher level of polish and accuracy. The default logos in BigBox will now come from this set. It was extremely tedious to ensure a very high level of accuracy across thousands of files. So Many Versions! Each included platform has multiple logo variants. Basically, many consoles had different logos for different regions and time periods. There are also smaller variations such as with or without a trademark (tm). There are black and white versions for each of these. With all of these it can add up to over 50 small variations for one platform! This would be impossible to navigate so I’ve split them up into smaller categories. For each format (Normal, Large and SVG) there are Light and Dark folders. For either of those there are: “Color”, “Black & White” and “Just White” (or Just Black respectively). If you wanted to use a minimalistic dark theme, you could use the “Just White” versions for a contemporary look. If you wanted logos for a standard dark theme then you could use “Light - Color”. Official Versions Included Besides the many hand drawn logos, I’ve also curated multiple logos that are the OFFICIAL renderings. Meaning, vector art ripped from official sources such as websites and pdf manuals. Finding official source art in the wild is pretty uncommon and required many hours of digging. Most of the source art was not in color so most of these colors are still generated by me. Some of the platforms with official logos include: Sadly, some of these wasted a lot of my time because I drew them and later found the official versions. The Drawing Process: My process for drawing a logo required many steps. I first did research on each logo. Then I would dig deep for the best references I could find. One rule I had was to never trust any image. I would compare multiple sources and make sure the source I chose was not fan made or some modern re-release that changed the logo. If a better source was found that showed differences from what I drew I would redraw it again (it sucked). I redrew the NEO GEO logo about 5 times before I was finally happy with it. Generally, source art would include box art images, adverts, brochures, and manual scans. Archive.org and Manualslib.com were a huge help for a lot of these scans. I would then use the pen tool in Adobe Illustrator and go to town! Sometimes if my source was really amazing, I could finish the whole logo in an hour and a half or so. Other times it would take much, much longer. Getting the correct color was always challenging and required intelligent guesswork. For example, with the classic Konami logo, I brought in 20 images. Gathered the color from all of those and found the average color for the red and orange. Then I’d tweak it slightly more, usually to improve saturation. When it came to fonts, I would always search for it but rarely found exact matches. If the font was found I’d obviously use it, but If not I’d have to hand draw it. However, a couple of the smaller taglines/subtitles do use a very close match. Hand drawing those fonts would do more harm than good. While drawing a logo I took great care to make things as visually pleasing as possible. Every little section of each letter of each logo was considered. Curves were carefully made to be smooth with as few anchor points as possible. Letters align with each other and angled letters all share the same angle. Hand drawing fonts is very tricky. Many logos were substantially harder than I’d anticipated. The Sega Saturn US logo for instance, drove me insane. It took over 40 hours to draw (not to mention wasted time from failed attempts months earlier). I used Adobe Illustrator to mimic every highlight, tiny color shift, shading and glow. When I was working on this logo, I’d come home from my graphic design day job and then spend 4 hours on it, which would only finish part of one letter. As I worked, I’d have a couple copies of the logo in the same file and a couple times it bottomed out 32GB of ram! Unique Versions This collection brings a few unique logos to the table. I’m just going to list a few. I created multiple new arcade and pinball logos, although previous arcade logos are here too. I highly polished the Daphne logo as it needed some love. I drew a detailed version of the TeknoParrot logo which seems to be uncommon in high resolution. I also created Sega system 16 and 32 arcade logos based on the exact font used in the Sega 32X and Sega CD (Copperplate Gothic Std 31AB stretched horizontally to 130%). The Capcom logos have stylized alternate versions based on a gradated version Capcom rarely uses. There are several other unique logos I could list here. White Outline - Default Versions Since these logos are replacing the default logos in BigBox, Faeran smartly requested that I create versions with white outlines around the outside. That way logos could be seen against any background color. I only made the outline versions for the options I gave to Faeran. I don’t plan on making outline versions for the rest of the variations. That said, the versions I did make are included here. The outline versions don’t look quite as nice in my opinion but they serve a very functional and important purpose. Solid black logos for some systems, like the PSP, would not be visible in certain themes without a white outline. However, theme creators or those wanting to add logos to a single theme, I would still recommend the non-outline versions for the cleanest look. Conclusion I included every platform and version that I wanted to. There are some more obscure ones I could draw but I didn’t see the need to seeing as how I've created 22,000 files as is. If I knew how much work this was going to take, I would've never gotten myself into this (lol). I hope that you guys get a lot of enjoyment out of these. I’m glad I made them and it feels really good to finally be able to upload them. I made these originally for LaunchBox but they can be used elsewhere. I will always appreciate credit if you use them. Needless to say, I don’t own the rights to the logos and these are NEVER to be sold in any way. Thanks Special thanks to Juketstu and Faeran for their valuable feedback. Also, huge thanks again to Faeran and the LaunchBox team for using these as the new defaults for BigBox! If you like what you see here, please also check out my LaunchBox / BigBox logo collection & Pineapple Graphics' Photoreal Controller Vectors:- 86 comments
- 32 reviews
-
- 164
-

-

-

-

-
- platform clear logo
- platform logo
- (and 6 more)
-
Version 2.2.1
1,380 downloads
What is it? Use this plugin to display bezels for emulators that don't natively support them. What does it do? It displays a bezel and resizes the emulator window to fit within the bezels transparent area. What's required to make this plugin work? LaunchBox v13.3 (or newer), the plugin file, bezel images and some minor setup. No more. No less. (See Setting up) Do I need to provide my own bezel images? Yes. (See Setting up for where to place them) Will it work with game specific bezels? Yes. Will this work with all emulators? Yes, with exception. RetroArch and MAME emulators will not show in the list of emulators and cannot be used with this plugin. The emulators that have been tested so far all work. Some adjustments may be necessary. (see Emulator Settings) Will this work with storefront games or Windows games? No. Can I use my existing RocketLauncher bezel configuration files?You can use the existing platform.png and platform.ini files from RL. These existing files should be located under: /RocketLauncher/Media/Bezels/platform_name/_default/something.ini (and something.png) (See Setting up [step #3]) What are the .ini files for? The .ini (configuration) files tell the plugin how to resize and move the emulator window to fit within the bezel. (See .ini (configuration) Files for more info and Testing for creating and saving them) Can this plugin add shaders as well? No. Yes. See Using Shaders (new v2.1.0) Disclaimer This works on my test PC. I didn’t test it on my cab because I didn’t want to change my emulator settings to not use fullscreen (see Emulator Settings). Outside of RetroArch and MAME, I don’t use bezels, so didn’t want to mess-up-a-good-thing. There are no guarantees, express or implied… blah blah blah blah blah blah blah. There is no risk. This plugin makes no changes to LaunchBox or your emulators. If you decide this isn’t for you, simply undo any fullscreen changes you made and (with LB/BB not running) delete the BezelLauncher folder. Special Thanks Special thanks to @MadK9 for the idea, direction and help with testing! Without him, I would have never contemplated starting this project. Also a big thanks to @Sbaby for testing un-tested emulators with the plugin. Installing With LaunchBox/BigBox not running... Download the plugin .zip file "Unblock" the file Right-click the file, select Properties, check the box "Unblock", click OK. Or better yet, just use 7-zip to open the file Copy the contents (a folder called "BezelLauncher") into your \LaunchBox\Plugins\ folder Start LaunchBox Setting up Start BezelLauncher Setup from the LaunchBox Tools menu, then click Close This will create the \Plugins\BezelLauncher\Bezels\platform_name\ subfolders Copy your bezel images into their respective platform_name subfolders See Bezel Images for more information (optional) If you have existing RL platform_name.ini files, copy those alongside the image files See .ini (configuration) Files for more information Restart BezelLauncher Setup Select a platform Choose an emulator you wish to use for that platform. Check Disabled to enable it Click Test Adjust (Move/resize) the orange frame to fit within the view area of the bezel (See Testing) Click Shaders to enable, adjust and change shader (see Using Shaders) (new v2.1.0) Click Save [to save the .ini file] Click Save on the main setup screen to add the emulator to the list of Enabled platform emulators Repeat for other platforms and emulators you wish to add You must click "Save" for each emulator you've enabled, separately. Maintenance After adding/removing platforms or emulators Run BezelLauncher Setup Click Refresh Continue with Setting up, step #5 Testing To configure the placement of the emulator window within the bezel (Requires an existing bezel image): Run BezelLauncher Setup Select a platform and an emulator Enable it (if it's not already) Click Test Move and resize the frame Click [and hold] the left or right side of the frame to move it around Click [and hold] the bottom right corner to resize Use the on-screen buttons to fine-tune the adjustments The on-screen display will show information about the emulator window. (You can click and drag the OSD to move it around as needed) x, y = upper left monitor-coordinates of the emulator window w, h = width and height of the emulator window x, y = lower right monitor-coordinates of the emulator window If any of the values are red, they are off the screen The OUTSIDE edge of the frame is the emulator window extents After adjusting, click Save. This will overwrite any existing configuration file. Using Shaders (new v2.1.0) First you need some shaders. Place the .png images in the /Bezels/Shaders/ folder (Scanline.png 'shader' is included) Start BezelLauncher Setup Select your platform and emulator and click Test Click Shaders Check the box to turn shader on Use the slider to adjust the shader Adjust the opacity down to lighten the shader Use the drop-down box to select a different shader Click Save to save your settings Parameters Depending on the emulator and the bezel, you may need to check 1 or more of the following parameters: (h) hideStuff Check this if you see the desktop behind bezel while the game is loading. This adds a black background during the startup process. (s) startupSleeper “Hide stuff” for a little longer during startup (3 seconds) (l) longerSleep Same as above (4 seconds) (g) hideGameStartup Check this if LB Game Startup screen is showing behind the bezel at game startup When selecting a platform, if the plugin detects an emulator that has been tested, “suggested” parameters will be shown. Your mileage may vary. Emulator Settings For the plugin to move/resize the emulators’ window, you will need to disable fullscreen in the emulator(s). This may be as easy as removing "-f" or "-fullscreen" from the Default Command-line Parameters (depending on the emulator). Beyond that, of the emulators I've tested, the only one that needs to have its Default Command-line Parameters altered is SuperModel. You will need to manually set the resolution. Start BezelLauncher Setup Select your Super Model 3 platform and Enable it Click Test and after adjusting the frame to where you want it, make note of the W(idth) and H(eight) #'s shown in the OSD. Save and Close. (Be sure to click Save on the main Setup screen to save Enabled as well.) Edit your SuperModel emulator (in LaunchBox) and set the Default Command-line Parameters to "-res=W,H" (no quotes, no spaces and replacing W & H with the #'s noted above) Example: -res=1420,1076 Bezel Images When you run BezelLauncher Setup for the 1st time, the plugin creates subfolders for each of your eligible platforms. They are created in: \LaunchBox\Plugins\BezelLauncher\Bezels\[platform_name]\ The platform image file needs to be in the [platform_name] folder and must be named the exact same as the platform. \BezelLauncher\Bezels\Sony PSP\Sony PSP.png Game-specific bezel files Game-specific bezel folders (or files) can be named after the games ROM filename or the games Title. Using the games Title: If the Title has 'invalid file name characters', those characters will need to be replaced with _ (underscore). The exact same way LaunchBox does with its image files (but without the -01 suffix). Example: Title = Disney-Pixar's Toy Story 2: Buzz Lightyear to the Rescue! Bezel = Disney-Pixar_s Toy Story 2_ Buzz Lightyear to the Rescue!.png NOTE: Additional Apps game Titles are (i.e.) "Play USA Version...". So the bezel would be "Play USA Version....png". Same rules apply with 'invalid file name characters'. Invalid characters are: < (less than) > (greater than) : (colon) " (double quote) / (forward slash) \ (backslash) | (vertical bar or pipe) ? (question mark) * (asterisk) ' (single quote) Not technically invalid (post-DOS), but consistent with LaunchBox character replacement Storing game-specific bezels: Option 1: Place your game bezel images directly inside their respective \[platform_name]\ folder. Game-specific image files must be named the exact same as the games ROM file or the games Title (accounting for invalid characters). example: \BezelLauncher\Bezels\Sony PSP\After Burner - Black Falcon (USA) (En,Fr,Es,It,Nl) (PSP) (PSN).png Option 2: Place your game-specific bezel image folders under the \[platform_name]\ folder. The subfolder must be named the exact same as the games ROM file or Title (barring invalid characters). The .png and .ini files in the subfolder can be any filename. example: \BezelLauncher\Bezels\Sony PSP\After Burner - Black Falcon (USA) (En,Fr,Es,It,Nl) (PSP) (PSN)\thisIsAnyFileName.png See Launching different game versions for information about bezel requirements for games that are combined as Additional Apps. ScummVM Setting up ScummVM for use with this plugin: In LaunchBox, Edit games using ScummVM. In the ScummVM section, have both checkboxes un-checked. (Fullscreen and Aspect Correction). This cannot be done using the Bulk Edit Wizard, so will need to be done on a per-game basis. One-at-a-time. If it's not displaying correctly with just the above, try the (optional) following: Navigate to /LaunchBox/Third Party/SummVM/ and start ScummVM.exe. On the Graphics tab, set Graphics Mode to opengl. Leave the other 2 as default and the check box's un-checked. Click OK and Exit. ScummVM Bezel Files: To use bezels with games using LB's integrated ScummVM, you will need to set them up manually. It will not appear in BezelLauncher Setup. Navigate to the plugins Bezels subfolder and add your platform folder. i.e. \LaunchBox\Plugins\BezelLauncher\Bezels\ScummVM\ Add your platform default png and ini files to this folder. i.e. ScummVM.png ScummVM.ini Game specific bezels for ScummVM must be named the same as the Game Data Folder. i.e. D:\LaunchBox\Games\ScummVM\King's Quest 1 - Quest for the Crown\[game files] use: "King's Quest 1 - Quest for the Crown.png" DOSBox The integrated version of DOSBox is NOT supported by this plugin. I couldn’t get it to cooperate 100% of the time. So going with plan “B”. To use DOSBox with this plugin, you will need to install and set up DOSBox-X. Setting up DOSBox for use with this plugin: Note: BezelLauncher Setup will NOT show your DOSBox platform ('MS-DOS') as an available platform. So don't bother looking for it. Download DOSBox-X DOSBox-X releases can be found here: https://github.com/joncampbell123/dosbox-x/releases Download the vsbuild-win64 version. (direct link for the download file) Create a new folder under \LaunchBox\ThirdParty\ and name it DOSBox-X Extract the contents of the downloads "\bin\x64\Release\" folder into the new folder Be sure to unblock the zip file before extracting (unless you’re using 7-Zip) Configuring DOSBox-X In Windows Explorer, navigate to \LaunchBox\ThirdParty\DOSBox-X\. Make a copy of dosbox-x.conf. Rename the copy to [something like] "BL-dosbox-x.conf" Right-click the new 'BL-dosbox-x.conf' file and select edit (Notepad++ works great for this. But any text editor (Notepad) will work) Look for the following keys and change their Values as shown: (starting on approximately line 78) fullresolution = 1400x1080 windowresolution = 1400x1080 windowposition = 260,0 output = ttf showmenu = false "1400x1080" (2 locations) is the dimension of the transparent area of your bezel. Adjust as necessary. From your MS-DOS.ini file, use [Right X]-[Left X] for the 1st value (1400) and [Right Y]-[Left Y] for the 2nd (1080) "260,0" is the upper-left coordinate of the transparent area. Use the Left-X value for the 1st number and Left-Y for the 2nd. Save the changes and close the editor. Configure games to use DOSBox-X The following assumes your MS-DOS platform games are already setup to use the integrated version of DOSBox. In LaunchBox, select all your DOSBox games and press Ctrl+E to start the Bulk Edit Wizard. (Select 1 game in the MS-DOS platform, then press Ctrl+A to select all) On the 2nd screen select the Field Custom DOSBox Version EXE Path for Value, Browse to and select dosbox-x.exe Click Next, Next Click “Yes, I would like to make more changes” select the Field DOSBox Configuration File for Value, Browse to and select the new file you created (BL-dosbox-x.conf) Click Next. Next (again). Click "No, I would not like to make more changes" MS-DOS Bezel Files: This assumes your DOSBox platform is called "MS-DOS". In the Bezels subfolder under the plugin folder, create a new folder called 'MS-DOS'. In \LaunchBox\Plugins\BezelLauncher\Bezels\MS-DOS\, add your bezel files (MS-DOS.png and MS-DOS.ini). Game specific bezels for DOSBox need to be named the same as the Game Data Folder i.e. D:\LaunchBox\Games\MS-DOS\Cosmos Cosmic Adventure\COSMO1.EXE use "Cosmos Cosmic Adventure.png" .ini (configuration) Files The .ini files contain the monitors' coordinates for placing the emulator window. The Upper Left x,y coordinate and the Lower Right x,y coordinate Example: Upper Left X Coordinate=240 Upper Left Y Coordinate=100 Lower Right X Coordinate=1680 Lower Right Y Coordinate=1080 The platform ini file must be named the exact same as the platform. If copied from RocketLauncher, you may need to rename it (removing any under_scores). i.e. \BezelLauncher\Bezels\Sony PSP\Sony PSP.ini For game-specific ini files, if they are located in a subfolder below /[platform_name]/ (see Bezel Images, Option 2, above), they can have any filename. If they are inside the /[platform_name]/ folder (Option 1), then they must be named the exact same as the games ROM file or Title. If a game-specific .ini file doesn’t exist, the plugin will use the games platform.ini file. Launching different game versions Also known as Additional Apps, when right-clicking a game and selecting Play Version, the Additional App is not required to have its own bezel files. If the Additional App doesn't have its own bezel, the plugin will look for the Default Games' bezel. If neither of those exist, it will use the platforms’ bezel. This eliminates the need to have a separate set of bezel files for each version of the game. Useful since they most likely all use the same image. This only works for games that are Additional Apps. Plugin Folder Structure As always, any thoughts, views, opinions, [constructive] criticism, comments and suggestions are welcome. -
Version 1.0.0
11 downloads
LaunchBox Video Recovery v1.0 Recover missing playlist and platform videos LaunchBox Video Recovery scans your video library and helps you recover missing platform or playlist videos by finding likely matches elsewhere in your LaunchBox video collection. The script can then optionally create symbolic links to the best matches, restoring videos without duplicating files. This is especially useful for large LaunchBox libraries where videos may already exist but are stored under a different platform or theme folder. What This Script Does LaunchBox Video Recovery can: • Scan LaunchBox Playlist XML files for missing videos • Scan LaunchBox Platform XML files for missing videos • Search your video library for possible matches • Score candidate videos based on similarity • Let you choose the correct match • Create symbolic links to restore missing videos The script helps recover missing videos without copying or duplicating large files. Why This Exists Large LaunchBox video libraries can become fragmented over time. Common causes include: • Media packs installed for the wrong platform • Theme videos stored in different platform folders • Moving media between drives • Playlists referencing videos that no longer exist • Duplicate or renamed videos Instead of manually searching thousands of files, this script finds and links likely matches automatically. Features • Recover Playlist videos • Recover Platform videos • Dry-run mode (test without making changes) • Interactive selection of candidates • Candidate scoring system to identify best matches • Automatic symlink creation for recovered videos • Report generation for all actions Match Score Explanation When the script finds possible replacement videos, it displays them with a '[ match score ]': Missing: Aquarium Collection 0. [1170] H:\LaunchBox\Videos\Final Burn Neo\Theme\Aquarium.mp4 1. [960] H:\LaunchBox\Videos\MAME\Aquarium Gameplay.mp4 2. [820] H:\LaunchBox\Videos\Arcade\Aquarium Trailer.mp4 3. [610] H:\LaunchBox\Videos\Arcade\Aquarium Intro.mp4 The number in brackets is the match score calculated by the script. Higher scores mean the script believes the video is a closer match. Score Guide Score Range Meaning 1000+ Very strong match 700–1000 Likely correct 400–700 Possible match Below 400 Weak guess Example: Missing: Aquarium Collection Candidate: Aquarium.mp4 The script sees: • "Aquarium" → strong match • "Collection" → missing word (small penalty) Result: high score How Matching Works The script evaluates candidate videos using several factors: • Exact word matches • Partial word matches • Filename similarity • Platform folder relevance • Penalties for extra or missing words This helps identify videos that are likely correct even when stored in another platform folder. Requirements • Windows • PowerShell • Administrator privileges (required for symlink creation) LaunchBox does not need to be running while the script runs. How to Run Place the script anywhere and run it with PowerShell from inside that location: powershell -ExecutionPolicy Bypass -File .\LaunchBox-Video-Recovery-v1.0.ps1 The script will guide you through: Selecting Playlist or Platform recovery Choosing dry-run mode (shows what will be changed without changing anything yet) Setting report output folder Selecting video search roots Example Workflow Example scenario: A playlist references a missing video: H:\LaunchBox\Videos\Playlists\Aquarium Collection.mp4 But the actual video exists here: H:\LaunchBox\Videos\Final Burn Neo\Theme\Aquarium.mp4 The script detects the match and can create: H:\LaunchBox\Videos\Playlists\Aquarium Collection.mp4 → symlink to H:\LaunchBox\Videos\Final Burn Neo\Theme\Aquarium.mp4 LaunchBox will then play the video normally. Typical Output Example: Playlist XML files checked : 718 Missing destination videos : 365 Missing: Aquarium Collection 0. [1170] H:\LaunchBox\Videos\Final Burn Neo\Theme\Aquarium.mp4 1. [960] H:\LaunchBox\Videos\MAME\Aquarium Gameplay.mp4 2. [820] H:\LaunchBox\Videos\Arcade\Aquarium Trailer.mp4 You can then select the correct match. Safety The script is designed to be non-destructive. It: • Does not delete videos • Does not overwrite existing videos • Only creates symbolic links to existing files Dry-run mode lets you preview all changes before anything is created. Recommended Usage This script is most useful for: • Very large video libraries • Recovering missing playlist videos • Fixing broken media references • Consolidating video libraries across platforms Feedback If you encounter issues or have suggestions, feel free to post feedback. -
Launchbox Video Recovery - Audit, Find and Fix View File LaunchBox Video Recovery v1.0 Recover missing playlist and platform videos LaunchBox Video Recovery scans your video library and helps you recover missing platform or playlist videos by finding likely matches elsewhere in your LaunchBox video collection. The script can then optionally create symbolic links to the best matches, restoring videos without duplicating files. This is especially useful for large LaunchBox libraries where videos may already exist but are stored under a different platform or theme folder. What This Script Does LaunchBox Video Recovery can: • Scan LaunchBox Playlist XML files for missing videos • Scan LaunchBox Platform XML files for missing videos • Search your video library for possible matches • Score candidate videos based on similarity • Let you choose the correct match • Create symbolic links to restore missing videos The script helps recover missing videos without copying or duplicating large files. Why This Exists Large LaunchBox video libraries can become fragmented over time. Common causes include: • Media packs installed for the wrong platform • Theme videos stored in different platform folders • Moving media between drives • Playlists referencing videos that no longer exist • Duplicate or renamed videos Instead of manually searching thousands of files, this script finds and links likely matches automatically. Features • Recover Playlist videos • Recover Platform videos • Dry-run mode (test without making changes) • Interactive selection of candidates • Candidate scoring system to identify best matches • Automatic symlink creation for recovered videos • Report generation for all actions Match Score Explanation When the script finds possible replacement videos, it displays them with a '[ match score ]': Missing: Aquarium Collection 0. [1170] H:\LaunchBox\Videos\Final Burn Neo\Theme\Aquarium.mp4 1. [960] H:\LaunchBox\Videos\MAME\Aquarium Gameplay.mp4 2. [820] H:\LaunchBox\Videos\Arcade\Aquarium Trailer.mp4 3. [610] H:\LaunchBox\Videos\Arcade\Aquarium Intro.mp4 The number in brackets is the match score calculated by the script. Higher scores mean the script believes the video is a closer match. Score Guide Score Range Meaning 1000+ Very strong match 700–1000 Likely correct 400–700 Possible match Below 400 Weak guess Example: Missing: Aquarium Collection Candidate: Aquarium.mp4 The script sees: • "Aquarium" → strong match • "Collection" → missing word (small penalty) Result: high score How Matching Works The script evaluates candidate videos using several factors: • Exact word matches • Partial word matches • Filename similarity • Platform folder relevance • Penalties for extra or missing words This helps identify videos that are likely correct even when stored in another platform folder. Requirements • Windows • PowerShell • Administrator privileges (required for symlink creation) LaunchBox does not need to be running while the script runs. How to Run Place the script anywhere and run it with PowerShell from inside that location: powershell -ExecutionPolicy Bypass -File .\LaunchBox-Video-Recovery-v1.0.ps1 The script will guide you through: Selecting Playlist or Platform recovery Choosing dry-run mode (shows what will be changed without changing anything yet) Setting report output folder Selecting video search roots Example Workflow Example scenario: A playlist references a missing video: H:\LaunchBox\Videos\Playlists\Aquarium Collection.mp4 But the actual video exists here: H:\LaunchBox\Videos\Final Burn Neo\Theme\Aquarium.mp4 The script detects the match and can create: H:\LaunchBox\Videos\Playlists\Aquarium Collection.mp4 → symlink to H:\LaunchBox\Videos\Final Burn Neo\Theme\Aquarium.mp4 LaunchBox will then play the video normally. Typical Output Example: Playlist XML files checked : 718 Missing destination videos : 365 Missing: Aquarium Collection 0. [1170] H:\LaunchBox\Videos\Final Burn Neo\Theme\Aquarium.mp4 1. [960] H:\LaunchBox\Videos\MAME\Aquarium Gameplay.mp4 2. [820] H:\LaunchBox\Videos\Arcade\Aquarium Trailer.mp4 You can then select the correct match. Safety The script is designed to be non-destructive. It: • Does not delete videos • Does not overwrite existing videos • Only creates symbolic links to existing files Dry-run mode lets you preview all changes before anything is created. Recommended Usage This script is most useful for: • Very large video libraries • Recovering missing playlist videos • Fixing broken media references • Consolidating video libraries across platforms Feedback If you encounter issues or have suggestions, feel free to post feedback. Submitter -McFly- Submitted 03/08/2026 Category Third-party Apps and Plugins
-
BezelLauncher View File What is it? Use this plugin to display bezels for emulators that don't natively support them. What does it do? It displays a bezel and resizes the emulator window to fit within the bezels transparent area. What's required to make this plugin work? LaunchBox v13.3 (or newer), the plugin file, bezel images and some minor setup. No more. No less. (See Setting up) Do I need to provide my own bezel images? Yes. (See Setting up for where to place them) Will it work with game specific bezels? Yes. Will this work with all emulators? Yes, with exception. RetroArch and MAME emulators will not show in the list of emulators and cannot be used with this plugin. The emulators that have been tested so far all work. Some adjustments may be necessary. (see Emulator Settings) Will this work with storefront games or Windows games? No. Can I use my existing RocketLauncher bezel configuration files?You can use the existing platform.png and platform.ini files from RL. These existing files should be located under: /RocketLauncher/Media/Bezels/platform_name/_default/something.ini (and something.png) (See Setting up [step #3]) What are the .ini files for? The .ini (configuration) files tell the plugin how to resize and move the emulator window to fit within the bezel. (See .ini (configuration) Files for more info and Testing for creating and saving them) Can this plugin add shaders as well? No. Yes. See Using Shaders (new v2.1.0) Disclaimer This works on my test PC. I didn’t test it on my cab because I didn’t want to change my emulator settings to not use fullscreen (see Emulator Settings). Outside of RetroArch and MAME, I don’t use bezels, so didn’t want to mess-up-a-good-thing. There are no guarantees, express or implied… blah blah blah blah blah blah blah. There is no risk. This plugin makes no changes to LaunchBox or your emulators. If you decide this isn’t for you, simply undo any fullscreen changes you made and (with LB/BB not running) delete the BezelLauncher folder. Special Thanks Special thanks to @MadK9 for the idea, direction and help with testing! Without him, I would have never contemplated starting this project. Also a big thanks to @Sbaby for testing un-tested emulators with the plugin. Installing With LaunchBox/BigBox not running... Download the plugin .zip file "Unblock" the file Right-click the file, select Properties, check the box "Unblock", click OK. Or better yet, just use 7-zip to open the file Copy the contents (a folder called "BezelLauncher") into your \LaunchBox\Plugins\ folder Start LaunchBox Setting up Start BezelLauncher Setup from the LaunchBox Tools menu, then click Close This will create the \Plugins\BezelLauncher\Bezels\platform_name\ subfolders Copy your bezel images into their respective platform_name subfolders See Bezel Images for more information (optional) If you have existing RL platform_name.ini files, copy those alongside the image files See .ini (configuration) Files for more information Restart BezelLauncher Setup Select a platform Choose an emulator you wish to use for that platform. Check Disabled to enable it Click Test Adjust (Move/resize) the orange frame to fit within the view area of the bezel (See Testing) Click Shaders to enable, adjust and change shader (see Using Shaders) (new v2.1.0) Click Save [to save the .ini file] Click Save on the main setup screen to add the emulator to the list of Enabled platform emulators Repeat for other platforms and emulators you wish to add You must click "Save" for each emulator you've enabled, separately. Maintenance After adding/removing platforms or emulators Run BezelLauncher Setup Click Refresh Continue with Setting up, step #5 Testing To configure the placement of the emulator window within the bezel (Requires an existing bezel image): Run BezelLauncher Setup Select a platform and an emulator Enable it (if it's not already) Click Test Move and resize the frame Click [and hold] the left or right side of the frame to move it around Click [and hold] the bottom right corner to resize Use the on-screen buttons to fine-tune the adjustments The on-screen display will show information about the emulator window. (You can click and drag the OSD to move it around as needed) x, y = upper left monitor-coordinates of the emulator window w, h = width and height of the emulator window x, y = lower right monitor-coordinates of the emulator window If any of the values are red, they are off the screen The OUTSIDE edge of the frame is the emulator window extents After adjusting, click Save. This will overwrite any existing configuration file. Using Shaders (new v2.1.0) First you need some shaders. Place the .png images in the /Bezels/Shaders/ folder (Scanline.png 'shader' is included) Start BezelLauncher Setup Select your platform and emulator and click Test Click Shaders Check the box to turn shader on Use the slider to adjust the shader Adjust the opacity down to lighten the shader Use the drop-down box to select a different shader Click Save to save your settings Parameters Depending on the emulator and the bezel, you may need to check 1 or more of the following parameters: (h) hideStuff Check this if you see the desktop behind bezel while the game is loading. This adds a black background during the startup process. (s) startupSleeper “Hide stuff” for a little longer during startup (3 seconds) (l) longerSleep Same as above (4 seconds) (g) hideGameStartup Check this if LB Game Startup screen is showing behind the bezel at game startup When selecting a platform, if the plugin detects an emulator that has been tested, “suggested” parameters will be shown. Your mileage may vary. Emulator Settings For the plugin to move/resize the emulators’ window, you will need to disable fullscreen in the emulator(s). This may be as easy as removing "-f" or "-fullscreen" from the Default Command-line Parameters (depending on the emulator). Beyond that, of the emulators I've tested, the only one that needs to have its Default Command-line Parameters altered is SuperModel. You will need to manually set the resolution. Start BezelLauncher Setup Select your Super Model 3 platform and Enable it Click Test and after adjusting the frame to where you want it, make note of the W(idth) and H(eight) #'s shown in the OSD. Save and Close. (Be sure to click Save on the main Setup screen to save Enabled as well.) Edit your SuperModel emulator (in LaunchBox) and set the Default Command-line Parameters to "-res=W,H" (no quotes, no spaces and replacing W & H with the #'s noted above) Example: -res=1420,1076 Bezel Images When you run BezelLauncher Setup for the 1st time, the plugin creates subfolders for each of your eligible platforms. They are created in: \LaunchBox\Plugins\BezelLauncher\Bezels\[platform_name]\ The platform image file needs to be in the [platform_name] folder and must be named the exact same as the platform. \BezelLauncher\Bezels\Sony PSP\Sony PSP.png Game-specific bezel files Game-specific bezel folders (or files) can be named after the games ROM filename or the games Title. Using the games Title: If the Title has 'invalid file name characters', those characters will need to be replaced with _ (underscore). The exact same way LaunchBox does with its image files (but without the -01 suffix). Example: Title = Disney-Pixar's Toy Story 2: Buzz Lightyear to the Rescue! Bezel = Disney-Pixar_s Toy Story 2_ Buzz Lightyear to the Rescue!.png NOTE: Additional Apps game Titles are (i.e.) "Play USA Version...". So the bezel would be "Play USA Version....png". Same rules apply with 'invalid file name characters'. Invalid characters are: < (less than) > (greater than) : (colon) " (double quote) / (forward slash) \ (backslash) | (vertical bar or pipe) ? (question mark) * (asterisk) ' (single quote) Not technically invalid (post-DOS), but consistent with LaunchBox character replacement Storing game-specific bezels: Option 1: Place your game bezel images directly inside their respective \[platform_name]\ folder. Game-specific image files must be named the exact same as the games ROM file or the games Title (accounting for invalid characters). example: \BezelLauncher\Bezels\Sony PSP\After Burner - Black Falcon (USA) (En,Fr,Es,It,Nl) (PSP) (PSN).png Option 2: Place your game-specific bezel image folders under the \[platform_name]\ folder. The subfolder must be named the exact same as the games ROM file or Title (barring invalid characters). The .png and .ini files in the subfolder can be any filename. example: \BezelLauncher\Bezels\Sony PSP\After Burner - Black Falcon (USA) (En,Fr,Es,It,Nl) (PSP) (PSN)\thisIsAnyFileName.png See Launching different game versions for information about bezel requirements for games that are combined as Additional Apps. ScummVM Setting up ScummVM for use with this plugin: In LaunchBox, Edit games using ScummVM. In the ScummVM section, have both checkboxes un-checked. (Fullscreen and Aspect Correction). This cannot be done using the Bulk Edit Wizard, so will need to be done on a per-game basis. One-at-a-time. If it's not displaying correctly with just the above, try the (optional) following: Navigate to /LaunchBox/Third Party/SummVM/ and start ScummVM.exe. On the Graphics tab, set Graphics Mode to opengl. Leave the other 2 as default and the check box's un-checked. Click OK and Exit. ScummVM Bezel Files: To use bezels with games using LB's integrated ScummVM, you will need to set them up manually. It will not appear in BezelLauncher Setup. Navigate to the plugins Bezels subfolder and add your platform folder. i.e. \LaunchBox\Plugins\BezelLauncher\Bezels\ScummVM\ Add your platform default png and ini files to this folder. i.e. ScummVM.png ScummVM.ini Game specific bezels for ScummVM must be named the same as the Game Data Folder. i.e. D:\LaunchBox\Games\ScummVM\King's Quest 1 - Quest for the Crown\[game files] use: "King's Quest 1 - Quest for the Crown.png" DOSBox The integrated version of DOSBox is NOT supported by this plugin. I couldn’t get it to cooperate 100% of the time. So going with plan “B”. To use DOSBox with this plugin, you will need to install and set up DOSBox-X. Setting up DOSBox for use with this plugin: Note: BezelLauncher Setup will NOT show your DOSBox platform ('MS-DOS') as an available platform. So don't bother looking for it. Download DOSBox-X DOSBox-X releases can be found here: https://github.com/joncampbell123/dosbox-x/releases Download the vsbuild-win64 version. (direct link for the download file) Create a new folder under \LaunchBox\ThirdParty\ and name it DOSBox-X Extract the contents of the downloads "\bin\x64\Release\" folder into the new folder Be sure to unblock the zip file before extracting (unless you’re using 7-Zip) Configuring DOSBox-X In Windows Explorer, navigate to \LaunchBox\ThirdParty\DOSBox-X\. Make a copy of dosbox-x.conf. Rename the copy to [something like] "BL-dosbox-x.conf" Right-click the new 'BL-dosbox-x.conf' file and select edit (Notepad++ works great for this. But any text editor (Notepad) will work) Look for the following keys and change their Values as shown: (starting on approximately line 78) fullresolution = 1400x1080 windowresolution = 1400x1080 windowposition = 260,0 output = ttf showmenu = false "1400x1080" (2 locations) is the dimension of the transparent area of your bezel. Adjust as necessary. From your MS-DOS.ini file, use [Right X]-[Left X] for the 1st value (1400) and [Right Y]-[Left Y] for the 2nd (1080) "260,0" is the upper-left coordinate of the transparent area. Use the Left-X value for the 1st number and Left-Y for the 2nd. Save the changes and close the editor. Configure games to use DOSBox-X The following assumes your MS-DOS platform games are already setup to use the integrated version of DOSBox. In LaunchBox, select all your DOSBox games and press Ctrl+E to start the Bulk Edit Wizard. (Select 1 game in the MS-DOS platform, then press Ctrl+A to select all) On the 2nd screen select the Field Custom DOSBox Version EXE Path for Value, Browse to and select dosbox-x.exe Click Next, Next Click “Yes, I would like to make more changes” select the Field DOSBox Configuration File for Value, Browse to and select the new file you created (BL-dosbox-x.conf) Click Next. Next (again). Click "No, I would not like to make more changes" MS-DOS Bezel Files: This assumes your DOSBox platform is called "MS-DOS". In the Bezels subfolder under the plugin folder, create a new folder called 'MS-DOS'. In \LaunchBox\Plugins\BezelLauncher\Bezels\MS-DOS\, add your bezel files (MS-DOS.png and MS-DOS.ini). Game specific bezels for DOSBox need to be named the same as the Game Data Folder i.e. D:\LaunchBox\Games\MS-DOS\Cosmos Cosmic Adventure\COSMO1.EXE use "Cosmos Cosmic Adventure.png" .ini (configuration) Files The .ini files contain the monitors' coordinates for placing the emulator window. The Upper Left x,y coordinate and the Lower Right x,y coordinate Example: Upper Left X Coordinate=240 Upper Left Y Coordinate=100 Lower Right X Coordinate=1680 Lower Right Y Coordinate=1080 The platform ini file must be named the exact same as the platform. If copied from RocketLauncher, you may need to rename it (removing any under_scores). i.e. \BezelLauncher\Bezels\Sony PSP\Sony PSP.ini For game-specific ini files, if they are located in a subfolder below /[platform_name]/ (see Bezel Images, Option 2, above), they can have any filename. If they are inside the /[platform_name]/ folder (Option 1), then they must be named the exact same as the games ROM file or Title. If a game-specific .ini file doesn’t exist, the plugin will use the games platform.ini file. Launching different game versions Also known as Additional Apps, when right-clicking a game and selecting Play Version, the Additional App is not required to have its own bezel files. If the Additional App doesn't have its own bezel, the plugin will look for the Default Games' bezel. If neither of those exist, it will use the platforms’ bezel. This eliminates the need to have a separate set of bezel files for each version of the game. Useful since they most likely all use the same image. This only works for games that are Additional Apps. Plugin Folder Structure As always, any thoughts, views, opinions, [constructive] criticism, comments and suggestions are welcome. Submitter JoeViking245 Submitted 12/02/2023 Category Third-party Apps and Plugins
-
Version 1.1.0
182 downloads
This is the AI-HyperTbox theme. It has been forked from the awesome "AI-HyperTocera" theme done by the The Mini Cake TV folks and they deserve most all the credit for the biggest part of the artwork. Using nice animated AI generated backgrounds. Added over 330 platform and playlist audio clips in SE version (not shown in video) The latest AI-HyperTbox (SE) version has: 5-Platform Views 3-Horizonal Game Wheel Views 4-Vertical Game Wheel Views 2-Game Wall Views Fullscreen Coverflow View Text Games View Platform Marquee View Game Marquee View Settings View Assets Used: AI-HyperTbox (SE) Sound Pack AI-HyperTbox (SE) Start/Exit theme AI-HyperTbox (SE) Pause theme Jarvis Startup Video The AI-HyperTbox theme has two flavors. The SE version (used in the video), available to my BMAC members and the free basic version posted here on the forums Comments, questions and suggestions are always welcome down below. Make sure to like and subscribe to the YouTube video if ya watch it to help out the channel, and do the bell thing to be notified of new videos. Please consider supporting these projects with a "cup of coffee" or by becoming a member @ my BMAC page OR A donation of any size via PayPal - ENJOY!!! • The Papaw 🙏❤️🙏 -
Version 2.1.0
283 downloads
This is a Big Box plugin that allows you to launch a game/application directly from the Platform Wheel View level. For use with platforms that only have one game/application. New in v2.0, now works in Hybrid views (if available). Hybrid Views are available in the Default theme in LaunchBox v13.22-beta-1 and newer. New in v2.1.0, (option) Set platform to go straight to the Game Details View (instead of directly launching the game). Example Use Case: You have a platform called "Music Box Alpha" which contains only one "game", the Music Box Alpha application. To launch it: Select the platform Select the [only] "game" Select "Play" (or press A on your controller to go to the games Details view). Using this plugin (once you've setup the Theme and added the platform via Launch Platform Setup in the Tools menu), to launch the application or go straight to the Game Details: Select the platform (That's it) Installing: Open the zip file and copy the contents into your ../LaunchBox/Plugins/ folder e.g. D:\LaunchBox\Plugins\LaunchPlatform\LaunchPlatform.dll If updating from a previous version, remove any existing .dll files first from the /LaunchPlatform/ subfolder. Setup: Click Tools and select Launch Platform Setup (You may first want to create a backup of the themes' folder you will be using for Big Box. You shouldn't need it, but never a bad idea.) Note: The Default theme is excluded. To use it, make a copy of the Default folder. e.g. /LaunchBox/Themes/Default - Copy/ In the Themes Not Setup list will be all your Big Box themes. (Excluding Default) Select the one you will be using use then click Setup Theme. This will now be listed in Themes Setup. At any time you can undo the changes made by selecting the setup Theme and click Restore Theme. Selecting platform(s) to Launch "the game": Select a Platform in the Platforms with one game List and click Launch . This will move it to the Platforms - Launch Game list. Selecting platform(s) to go directly to the Game Details View: Select a Platform in the Platforms with one game List and click Details . This will move it to the Platforms - Game Details list. Using: Start Big Box. If you just finished setting it up in LaunchBox, you can press Ctrl+B to switch to Big Box. Set the theme to the one you setup earlier (if it's not the current theme already). Scroll through your Platforms wheel until you find a platform you've added and select it. What's actually happening when you "Setup" a theme: (a behind the scenes look) @jayjay is the brains behind getting this to work, and I'm the one that threw it all together. So credit goes to where credit is due. (you decide ) If something's not working right, go ahead and post here and it'll get looked at. And possibly even get resolved. -
Version 1.0.1
350 downloads
*** Edit: Note that you can use this plugin to add startup marquee video support if you are using BigBox's native marquee handling. However, I recommend you switch to my new plugIn, ThirdScreen, for startup marquee video support because it also adds support for platform marquee videos and unlimited screens. *** Plugin that adds Marquee Intro video support. After installing the plugin you can simply place your Marquee intro videos into the LaunchBox/Videos/StartupMarquee folder. One will be chosen randomly at startup. Static images (jpg or png) will work as well. The marquee video will always automatically end at the same time as the main screen intro video. If the marquee video is shorter than the main screen video, it will loop until the main screen video ends (or until you hit a button to skip the intro). See demo: Installation: Unzip the file and drop the contents into your LaunchBox folder. Place your marquee startup video(s) into LaunchBox/Videos/StartupMarquee. You of course have to make sure your marquee screen is set up first in your BigBox settings: Set your marquee screen number in Options->General->Marquee Screen If you want the intro video to stretch fill the entire marquee, then set Options->Marquee Screen->Set Marquee Images to Fill the Screen If you have a cut-off type marquee, then make sure your screen compatibility mode is set correctly in Options->Marquee Screen->Screen Hardware Compatibility Mode. Currently this plugin does not support the squeeze 1/2 or squeeze 1/3 modes, but all of the following screen compatibility modes are supported: - None - Monitor Cuts Off Bottom 1/2 - Monitor Cuts Off Top 1/2 - Monitor Cuts Off Bottom 2/3 - Monitor Cuts Off Top 2/3 - Monitor Cuts Off 1/3 Top and Bottom -
AI-HyperTbox (SE) Theme View File This is the AI-HyperTbox theme. It has been forked from the awesome "AI-HyperTocera" theme done by the The Mini Cake TV folks and they deserve most all the credit for the biggest part of the artwork. Using nice animated AI generated backgrounds The latest AI-HyperTbox (SE) version has: 5-Platform Views 3-Horizonal Game Wheel Views 4-Vertical Game Wheel Views 2-Game Wall Views Fullscreen Coverflow View Text Games View Platform Marquee View Game Marquee View Settings View Assets Used: AI-HyperTbox (SE) Sound Pack AI-HyperTbox (SE) Start/Exit theme AI-HyperTbox (SE) Pause theme Jarvis Startup Video The AI-HyperTbox theme has two flavors. The SE version (used in the video), available to my BMAC members and the free basic version posted here on the forums Comments, questions and suggestions are always welcome down below. Make sure to like and subscribe to the YouTube video if ya watch it to help out the channel, and do the bell thing to be notified of new videos. Please consider supporting these projects with a "cup of coffee" or by becoming a member @ my BMAC page OR A donation of any size via PayPal - ENJOY!!! • The Papaw 🙏❤️🙏 Submitter The Papaw Submitted 01/12/2026 Category Custom Themes
-

Version 2.1b
3,352 downloads
This is a collection of incredible vector drawings graciously donated by Pineapple Graphics (Aka Snowway22) https://www.instagram.com/pineapple.graphics/ https://www.etsy.com/shop/PineappleGraphicsShp https://www.reddit.com/user/Snowway22/ These drawings take Snowway 10 to 15 hours each! I found this artist on Reddit accidentally and was instantly blown away by the quality of his work. Having a lot of experience in Adobe Illustrator myself, I was shocked to find that these were vector and not 3D models. His artwork showcases very clever techniques to sell the 3D effects including stunning imitations of various materials. Snowway said, “I ended up really enjoying the process and just kept going. I work as a graphic designer so I can make stuff like this in between ‘real’ work stuff. Everything for my job is rush rush. So, it’s really nice to relax, listen to some music, take my time and get lost in the detail. “ I told Snowway about LaunchBox and how this kind of artwork would be a huge boon for the frontend community. He was willing to contribute and even asked for suggestions on more controllers to draw. I gave him a list and some references to help. He said that he’d get to most of them, but he doesn't want to be rushed. I said take your time! Snowway later said, “If you could in any way shout out or plug my Instagram however or to whoever… that would be amazing. I, of course, don’t make any money from that but it’s been a fun hobby and the validation is a good motivator.” Guys, show your appreciation to this artist and enjoy his awesome work! Most of the “favorite” platforms are represented here. Feel free to suggest things here but just know that these drawings take a lot of time. While I’ve made carefully chosen suggestions based on what systems I think are most important and that people actually play, Snowway is the one crafting the art. I will continue to post more as this project grows! The current list of included platforms is as follows: Arcade (multiple versions) Analogue Pocket (Black and White) Atari 2600 (also paddle controllers) Atari 7800 (Controller and Joystick) Atari Jaguar Atari Lynx Atari VCS 2021 Bandai Wonderswan Color (2 Colors) Colecovision Commodore 64 (Mouse and Keyboard Variants) GCE Vectrex Logitech Steering Wheel Mattel Intellivision Microsoft Xbox Microsoft Xbox 360 Microsoft Xbox One Microsoft Xbox Series (Also Elite Controller) NEC TurboGrafx-16 / CD / DUO (also Turbo Express) Nintendo 3DS Nintendo 64 / DD Nintendo DS Nintendo Entertainment System (Also Dog Bone & Zapper) Nintendo Famicom Nintendo Game & Watch (Mario & Zelda) Nintendo Game Boy Nintendo Game Boy Advance (Original and SP) Nintendo Game Boy Color (5 colors!) Nintendo Switch (Original, OLED, Light, Pro Controller + more) Nintendo Virtual Boy Nintendo Wii Nintendo Wii U Nintendo GameCube Nintendo Super Famicom Panasonic 3DO Playdate SNK Neo Geo AES SNK Neo Geo CD SNK Neo Geo MVS SNK Neo Geo Pocket Color Sega Dreamcast (US and PAL) Sega Game Gear Sega Genesis / 32X / CD (3 & 6 button) (also Sega Nomad) Sega Master System Sega Saturn (Original & 3D Controller) (Japan versions also) Sony PS Vita Sony PSP Sony PlayStation (Original, Dual Analog and DualShock) Sony PlayStation 2 Sony PlayStation 3 (also boomerang prototype & move controller) Sony PlayStation 4 Sony PlayStation 5 Super Nintendo Entertainment System (US and PAL) -
NOV. 2023 UPDATE This was supposed to be a simple flat theme, but evolved into a 2 in 1, so you have the regular view which is flat and sleek and also you have available an optional view (per device) that resemble some classic mini consoles (including consoles that do not have mini versions as of yet). Features of this theme: Simple flat version that runs fast and looks great. No flashy animations that may affect perfomance. Optional "Classic Mini" view for many systems (WIP). Every Classic Mini view has it's own background music. Improved original design of some "Classic Mini" (Such as PSX and Genesis). Improved UI for some consoles like PS3, 3DS, etc. "Classic Mini" style views for consoles that do not have an oficial Mini version (such as PS2, WII, etc.). Platform/console selection with video (you need to download the video first from regular launchbox menu). Thanks to: @y2guru for your amazing theme editor @thiagofirmino for providing SNK Neo Geo and Sega Saturn Mini formats. - If you'd like to support my work, you can invite me a coffee anytime!
- 17 replies
-
- 1
-
-
- classic mini
- flat design
- (and 1 more)
-

Version 3.2.6
13,554 downloads
Manuals / How to Refer to my YouTube channel or visit Faeran's Theme Creator Workshop videos to better understand the new features. Dave Paterson - YouTube Development Live Streams - YouTube COMMUNITY Theme Creator - Patreon- 834 comments
- 20 reviews
-
- 87
-
-
-
-
-
- bigbox
- custom bigbox themes
- (and 1 more)
-
Looking for a specific option "Hide in BigBox". I have a large collection with different platforms. BigBox will only be used for games that are streamed to my living room playable with controller. But I still want to see each game in LaunchBox itself without hiding them also there. Any advise for a noob here?
-
Launchbox Precache Manager - Speed up your build View File LaunchBox Precache Manager (LPM) Mass image optimizer + precache system for LaunchBox libraries (PowerShell 5.1, ASCII-only). TL;DR LPM scans your LaunchBox Images folder, builds a compressed WebP/JPEG precache into: LaunchBox\Images\_Precache …then (optionally) swaps your original image folders for the precache using NTFS junctions. Original art is protected in: Images\_Originals LaunchBox/Big Box browsing gets faster and lighter You can restore originals at any time Designed for very large libraries (hundreds of thousands to millions of images). What’s included This package contains two main scripts: LB-Precache-Manager.ps1 – interactive front-end menu (the “manager”) Build-LaunchBox-Thumbnails-Parallel.ps1 – the “engine” that does the heavy lifting Optional (recommended): cwebp.exe – Google WebP encoder (best compression / speed) Launcher: Launch-LPM.cmd (optional convenience) You can also run the manager directly with PowerShell. High-level workflow Audit your Images folder (counts, types, savings estimates). Build thumbnails (create/update files in Images\_Precache). Backfill later (fill gaps only after partial runs or new content). Activate Precache (parks originals into _Originals, junction-swaps to _Precache). Restore Originals (undo junction swap, put everything back). Rebuild existing precache later with a new profile if you want tighter compression. Important notes up front Close LaunchBox and Big Box before running (especially Activate/Restore). Locked folders will be skipped. Back up first. Make a backup/snapshot of your LaunchBox folder if you’re cautious (recommended for first-time users). LPM does not change your game metadata except when you explicitly use: Clean XML references (only removes references to images already moved to _BadImages). Remote / network / external path warning (important) LPM is built for local, fixed disks. If your LaunchBox path is a mapped drive / UNC path / remote share, some operations will refuse to run and you will see: Remote paths not supported; run on the Launchbox PC. This prevents multi-day failures, broken junctions, and extreme slowdowns. SAFE vs FULL run mode At startup you’ll choose a run mode: SAFE: low impact (older/USB systems) FULL: uses hardware recommendations for faster multi-threaded work (best on SSD/NVMe) FULL mode will also show detected hardware and recommended defaults (workers/batch sizing). Why counts don’t always match It’s normal to see differences between: a simple file count script, and what the engine prints during scanning/building Reasons: The engine may walk additional internal paths (depending on mode and what already exists in your Images tree). “Visited directories” and “files matched” are progress counters, not a strict “real folder count.” Bottom line: don’t panic if counts don’t line up perfectly, especially after multiple runs or after Activate/Restore operations. Handling locked folders / “file in use” During Activate/Restore (and sometimes builds), you may see locked items skipped. What it means: LaunchBox/Big Box/Explorer/AV has something open. What LPM does: prints a warning continues with the rest (doesn’t abort the entire run) Fix: close LB/BB re-run the option (safe to re-run) Installation Extract the zip anywhere (Desktop/tools folder). Run one of: Launch-LPM.cmd (recommended convenience) or open PowerShell and run: .\LB-Precache-Manager.ps1 Recommended: Run PowerShell as Administrator for: junction swap operations optional Defender exclusion standby-cache clearing (RAM file cache) Logging LPM-Answers-Last.json This stores the last answered prompts so you can re-run the same build easily (Repeat mode uses this). This is NOT a log and remains on by default. Session logs can be viewed or deleted from the install folder. Batch mode also maintains small state/summary files so it can resume safely. Main Menu (Manager) You’ll see: Main Menu [0] Audit images (recommended first step) [1] Build Thumbnails [2] Activate Precache (junction swap) [3] WebP -> PNG hardlink aliases (LaunchBox compatibility) [4] Restore Originals [5] Clean XML references [6] Backfill missing precache from Images [7] Rebuild existing precache at new profile [8] Exit [B] Batch run-all (50,000 cap per session) [R] Repeat last build (use saved answers) [T] Clean LPM temp files (optional) WebP note (important): - LaunchBox / Big Box do not load images with a .webp extension. - LPM can still build WebP precache for disk savings, but you must create .png/.jpg filename aliases for LaunchBox. - Use menu option [3] to create .png hardlink aliases next to each .webp (no extra disk usage). - On startup, LPM checks whether Windows can decode WebP and (if missing) opens the Microsoft Store "WebP Image Extensions" page. [0] Audit images Walks the Images tree and produces: counts convertible totals rough space saving estimates planning hints per profile Outputs: lb_audit.json lb_audit.csv [1] Build Thumbnails Creates/updates the precache under: LaunchBox\Images\_Precache\... Profiles: Fast Balanced Extreme Custom Notes: If cwebp.exe is present, WebP is used (best compression). You can force JPEG-only (optional). [2] Activate Precache (junction swap) “Turns it on.” Moves originals to Images\_Originals\... Creates junctions under Images\... pointing to _Precache [3] WebP -> PNG hardlink aliases (LaunchBox compatibility) Run this after [1] or [2] to create replacement .png hardlinks for all the new .webp files for LB / BB compatibility. This will scan and create all the files in the _Precache folder. [4] Restore Originals Undoes Activate: removes junctions moves originals back from _Originals [5] Clean XML references Advanced/optional cleanup for broken image refs linked to _BadImages. [6] Backfill missing precache from Images Fills only what’s missing: finds originals without corresponding precache output generates precache copies only for those [7] Rebuild existing precache at new profile Re-encodes existing precache using a different profile (only replaces when beneficial, depending on settings). [B] Batch run-all (50,000 cap per session) This is for huge libraries with hundreds+ platforms/folders. What it does: Iterates through platform folders under Images Processes them in segments capped at 50,000 per batch session Writes output into: Images\_Precache\<Platform>\... Can resume where it left off in later runs using a state file Behavior: Prompts per platform with an auto-default (so you can run unattended) Designed so you can run overnight without bogging down the machine for days in one “run all” Batch state: LaunchBoxRoot\LPM-Batch-State.json (resume point / continuation) Batch summary: Writes short progress summaries to the LaunchBox root (easy to find) Also: Batch runs can clear standby cache automatically (admin required) before segments to reduce cache thrash. [R] Repeat last build (use saved answers) Re-runs your last answered configuration using: LPM-Answers-Last.json This is the “do exactly what I did last time” option. [T] Clean LPM temp files (optional) Cleans LPM temporary working files (typically under Windows %TEMP% related to LPM processing). This is safe housekeeping and does not change your LaunchBox Images content. Notes about WebP + LaunchBox LaunchBox can display WebP files when they’re in place in the Images tree, but: Drag/drop and scraping workflows typically expect PNG/JPG sources. LPM’s approach keeps originals safe, while precache improves performance. Clear Logos: PNG sources are strongly recommended (transparency matters). Recommendation for first-time users Run Audit Run Build Thumbnails with Balanced Test LaunchBox/Big Box performance Then consider Activate Precache Support / community If you like this and want to help me out, buy me a coffee https://buymeacoffee.com/mcflylpm Submitter -McFly- Submitted 11/22/2025 Category Third-party Apps and Plugins
-
Version 1.0.0
741 downloads
My first time at a theme. It obviously revolves around @nyny77's platform videos..I like the way it looks..It's nothing fancy by any means though. I also changed the select.wav file to the sound of doors opening in Metroid, so I'll add that in here as well. Select.wav -
Version 1.0.0
1,912 downloads
While I am not the original creator of the LaunchBox / BigBox logos, I have the best versions available in this collection. After roughly 30 hours, I have redrawn and perfected the recognizable cube shape and have multiple variants for multiple use cases. All previously used versions are available here, as well as new versions that are slightly different. All my drawings use perspective correct line work making these the best versions of these logos. They come in three sizes Small (1920x1080 max), Large (3840x2160 max) and SVG which is a vector file type. A lot of the BigBox logos can’t be properly saved in SVG format so I included vector PDFs for all logos as well. The LaunchBox logo had some uneven shapes which I corrected. In addition, I noticed the entire LaunchBox logo is not a perfect cube. Its sides are actually rectangles. I never noticed this until now. Once I saw it, I created a separate perspective correct version. I created a further revised version as well, with thicker lines, consistent line widths and punchier colors. The same standard goes for the BigBox logos. The thicker LB logo also has a glass BigBox variant which took a solid amount of work to get right. I really tried to make the glass thick enough to not be too busy and easily visible large or small. I went back and forth on every shade of every gradient until I felt it looked pretty good against dark and light backgrounds. The only versions that are official are the original taller designs. I wanted to improve them as much as I could while still keeping all of the artist’s intent. Feel free to use these how you’d like. I’ll always appreciate credit. If you like what you see here, please also check out my extensive platform logo collection:- 7 comments
- 1 review
-
- 30
-
-
-
-
-
- launchbox logo
- bigbox logo
- (and 9 more)
-
.thumb.png.6caf257a0459ccd133c470a97c7eaa6a.png)
Version 1.0.1
132 downloads
Hello and thank you for checking out my brand new theme. Flashycart is an attempt at recreating ODE/Flashcart/Loader interfaces for many different systems. It has taken me hours upon hours of work, and I'm most happy to finally make it public. Most consoles on this theme make use of Text views. The point is simplicity and speed. 3DS Uses a horizontal wheel. Each screen is also customizable, as you can change the backgrounds to your liking. On N64 you can add a gif file named animbg.gif if you wish for an animated background. NES, Sega Genesis/Megadrive, Turbografx, and Snes/Sufami support animated backgrounds as well (animbg.gif and animlistbg.gif). 3DS supports regular and animated background (pt_bottom.gif and pt_top.gif). Credits: Saieno for his incredible Mini Consoles Theme - RetroSai Nostalgia - Form over Function Tired Ric for Top 100 Mame Arcade Games - watch?v=9EWKbtXavxI MAME logo was designed by chemical and cleaned up by Exodus3D Vertical lines wallpaper by wallpaperflare.com Pixel City by CRUISE CANYON - https://cruisecanyon.tumblr.com/post/131152180891 Animated starry sky by CHOCOHONEY- DS overlays by Retro808 3DS overlays by Retro808 Game boy overlays by hydef 3DS Font by https://www.ffonts.net/3ds.font Undertale Waterfall theme by ShadowCM8 - https://themeplaza.art/item/2297 Swiss GC and all assets by @emukidid - https://github.com/emukidid/swiss-gc/releases PS2 Assets by Francisco Álefe UPDATE: Got a full time job, I'm A-OK! Thanks to everyone who helped out, no matter how much. I can breathe a little easier now. -
I have another issue. Im trying to build my own emulation Drive using LaunchBox/BigBox but now ive come across another issue: Im currently using the "Flat and Classic Mini by Exodus_cl" Theme. Before, the games were loading fine. But now whenever I try to load a game, it freezes up. I tried restarting my PC, but still does the same thing. How can I fix this without having to start all over again?
-
I'm running LaunchBox 6.12, MAME 0.178, and CPWizard 2.42. When using just MAME and CPWizard, everything seems to be going smoothly. I can push the CPWizard show key and it displays the control panel with buttons labelled for the game I'm playing. If I launch MAME via BigBox, I have two problems: Whlie playing the game, if I push the CPWizard show key, it does show the control panel, but it also has a strange little Window dialog with the title of CiceroUIWndFrame but no content. The mouse is hidden so I can't really interact with it. When I exit MAME, there is a white square stuck in BigBox. See attached screenshot. When I exit BigBox, the square goes away. Has anyone else successfully used CPWizard with BigBox?

-
Version 1.6.0
17,780 downloads
Launches LaunchBox in Big Box mode from within Kodi - It will close or minimize Kodi, launch LaunchBox in Big Box mode and when Big Box is exited Kodi will restart or maximize, with the option to run programs pre/post LaunchBox. It works with Windows only. Features: BigBox Startup video and splash screen support LaunchBox and BigBox Updater support LaunchBox (Free or Premium) and BigBox mode selection Multiple Monitor detection and handling Pre/Post scripts Minimize or close Kodi option Launcher Helper script version check Supports Kodi 19, 20 and Kodi Windows Store versions. Requirements: Windows PC LaunchBox (Premium or Free) Kodi 19, 20 or Windows Store for Windows Kodi 16, 17, 18, 19 for Windows (Up to version 1.5.9, BigBox only) Known Issues: Due to Windows Store's UWA security restrictions, user must set a save directory under the plugin's Advanced Settings to a directory of the user choice where the plugin's ahk helper script and icon file can be saved. Taskbar will flash on Kodi Windows Store version (UWA) using 1.5.4+. Current workaround is to switch to Kodi non-UWA or to minimize effects, enable hide taskbar in advance options, remove Cortana search bar and change taskbar to black. Starting with version 1.5.6, due to windows security restriction on SMB shares over IP (eg. \\192.168.1.1\shared-folder\), the addon will produce an error saying it is not supported. Current workaround is to enable SMB fix in Advance settings to replace IP with supplied server name or enable SMBv1 on server and computer to allow NetBIOS name resolutions in Kodi. Kodi-six package is now required with 1.5.6-1.5.9, addon will fail if after first installation of Kodi-six package dependency, Kodi was not restarted. Install instructions: Use 'Install from Zip' in Kodi and browse to the directory the plugin's zip was downloaded to and select it. Configuration: This plugin requires the user to set the location of their LaunchBox directory in the addon settings before first use. eg. C:\Users\<username>\LaunchBox\ PLEASE NOTE: THIS PLUGIN WILL PRODUCE AN ERROR DURING INSTALL IN KODI ON ANY OPERATING SYSTEM THAT CANNOT RUN LAUNCHBOX. SINCE LAUNCHBOX IS CURRENTLY WINDOWS ONLY THAT IS THE ONLY OPERATING SYSTEM THE PLUGIN CURRENTLY SUPPORTS. ATTENTION: WILL NOT WORK ON ANDROID (BOX, SMART TV, ETC.), IOS or MAC AND LINUX. -
I set BigBox as my shell on startup but I get an error message about a corrupt arcade.xml file. How do I start Windows normally so I can work with the Arcade.xml file. I assume there's a backup in that directory.
-
.thumb.png.c9faf450e4d2b690a819048b18173f61.png)
Version 5.1.0
502 downloads
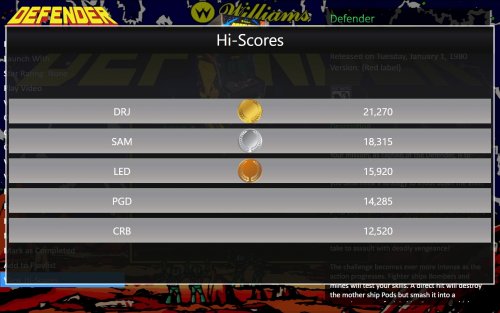
MAME Hi-Score Display - A plugin for BigBox Use this plugin to view a games high scores from BigBox’s Game Menu. Features Creates a menu item called “View Hi-Scores” that allows you to display high scores for most games in your Arcade platform directly in BigBox. What's needed (3) files that are included in the downloaded zip file (the plugin) Version 3.0 - One file that is included in the downloaded zip file (the plugin) 2 lines of text added to the "TextGamesView.xaml" file for your current BigBox Theme MAME configured to save high scores Saved high score files (These are automatically generated by MAME once it’s configured to save them in the "hi" and/or “nvram” subfolders of your MAME emulator) What it won't do Show high scores for games using emulators other than MAME. Show high scores for games in LaunchBox. MAME is not built to save high scores the same way (or at all) for all arcade machines, so not all games are supported by this plugin Contributors @jayjay – The one who came up with the idea and did all the hard stuff. @JoeViking245 – The one who helped with all the easy stuff. @fromlostdays – The one who made these instructions easier to follow. A HUGE Special Thanks goes to GreatStone’s utility “hi2txt”. This utility converts MAME’s high score files into a readable format which ultimately makes this plugin possible!! http://greatstone.free.fr/hi2txt/index.html Installation and setup instructions: Step 1: Installing the Plugin Step 2: Editing your BigBox Theme to add support for the Plugin Step 3: Making sure MAME is set up to save high scores Installing the Plugin: Download the plugin, Mame_Hi_Scores (v5.0.0).7z from the LaunchBox download section (If not using 7zip) After you’ve downloaded the zip file, be sure to unblock it in Windows by right clicking it, selecting Properties, and clicking Unblock Open the zip file and extract/copy the "Hi_Scores" folder into ..\LaunchBox\Plugins i.e. D:\LaunchBox\Plugins\Hi_Scores\Mame_Hi_Scores.dll Editing Your BigBox Theme to add support for the Plugin: As of version 5.0.0, this step is no longer required. If you are updating from a version PRIOR to v5.0.0, you will need to UNDO THE CHANGES made to your TextGamesView.xaml file!!! (just delete the 2 lines that were added, and save.) Setting up MAME to save high scores: Using a recent official MAME release – If you have an older release of MAME, you may need to do the following steps instead. Congrats! You’re all setup! Now that you’ve setup the plugin, why not give it a try? How to use: Start BigBox Go into the "Arcade" Platform Select a game Near the bottom of the Menu (if the selected game has a high score file saved) you'll see "View Local Hi-Scores" Select "View Local Hi-Scores" to see your high scores for that game! To close the Hi-Scores window (options): (new v5.1.0) Press the button you have mapped for your controller to Back Press the key you have mapped for your keyboard to Back- 50 comments
-
- 13
-
-
-
-
-
- mame
- high scores
- (and 2 more)
-
Ps5 Theme for Big box View File Best theme for gaming on big box Submitter ANASS RAKID Submitted 12/20/2021 Category Big Box Custom Themes
-
Version 1.0.0
1,374 downloads
Best theme for gaming on big box -
Here's a little theme I made for my upcoming dedicated trackball pedestal cabinet build called Golden Tee Ultimate. It's a dedicated trackball pedestal which will run the emulated versions of Golden Tee Live, Silver Strike Bowling, Target Toss Pro, PowerPutt Live, several classic arcade trackball games as well as a few select PC golf games that work well with a trackball. The goal of the theme was to (somewhat) mimic that actual Golden Tee Live interface that you would find on any commercial GT Live machine. I've included an assets folder in the theme that has the custom images for scrolling games, these will need to go in the various Clear Logo folders for your games. I've also included a template svg file to make your own. The template has a clip layer included so just pop in the image you want and clip it to fit inside the box with any image editing application. Included in the assets folder is background music from GT Live that can be put into Launchbox/Music/Backround and then turn on background music in BigBox settings if you want this. The theme has built in sound effects for navigation that are from the GT Live games. The theme has an animated trackball & left/right direction buttons that react to your direction of scroll. The background images are shots of GT Live courses that change as you scroll through. I do plan on expanding this theme later on when I have the full pedestal built to include videos from each game playing behind the wheel, a wheel that curves around like the actual GT Live interface, more games, etc. I'm navigating the games with a trackball now via an ahk script because BigBox doesn't have native trackball navigation built in. I've feature requested this. If you would like trackball navigation added as a feature please go to support/request a feature and it is item #9222 and upvote it! https://bitbucket.org/jasondavidcarr/launchbox/issues/9222/add-trackball-wheel-navigation-with Download the theme here:


.thumb.png.c9faf450e4d2b690a819048b18173f61.png)


.thumb.png.6caf257a0459ccd133c470a97c7eaa6a.png)


