
Fantastic - could not be better! The support has been amazing and I now have three different Stripe payment forms that I can keep on duplicating and changing the name of the product.

Last updated on February 23, 2024 by Formidable Team
How To Create a PayPal Payment Form in WordPress
This step-by-step guide teaches you how to create a PayPal payment form. Simplifying transactions and enhancing a website's functionality with just a few steps.

Approximate read time: 6 minutes
PayPal has over 430 million active users. So, if your website sells products and doesn't have a PayPal payment form, you're missing out on easy money.
But, adding one to your WordPress website can be time-consuming.
Not with this guide, though. At the end of this step-by-step tutorial, you'll have a PayPal payment form on your WordPress site using one plugin.
So, let's get started.
Upgrade your WordPress site with powerful, flexible forms.
Why use a WordPress plugin for your PayPal payment form
We know what you're probably thinking.
Another plugin? No, thank you.
And we understand. There's a balance between site speed and the number of plugins on your website. But, with how much a plugin can help you, it's worth considering.
Here's why:
- Ease of use: Plugins have quicker setup and simple dashboards to reduce the headaches (and time) you have while adding PayPal payment forms.
- Flexibility: It doesn't stop at forms. With a plugin, you can create payment buttons (like Buy Now PayPal button, subscription, donation, and more). Plus you can customize their look to match your site.
- Security: Plugins guarantee secure transactions to protect customer information.
- More features: Depending on the plugin, you get even more features. They offer shipping/tax calculators, multiple currencies, and more.
So, you've got the why. Let's get to the how.

From Idea to Reality in Minutes. Build Powerful Forms, Dashboards, Apps and More.
Formidable Forms makes advanced site building simple. Launch forms, directories, dashboards, and custom WordPress apps faster than ever before.
How to create a PayPal Payment form
There are many plugins you can choose from.
But, as you probably guessed, we recommend using Formidable Forms.
Not only is it the best WordPress form plugin, but it also has a PayPal forms plugin to add PayPal integration to your website.
It collects instant payments from your customers after a form is submitted. They often don’t even need a PayPal account to do it. You only need a Formidable form that redirects to a PayPal Checkout.
From there, your customer chooses their payment method: their PayPal account, debit card, or credit card payment. And you can choose to set up recurring payments or just one-time payments.
You need Formidable's Business plan or above to create a WordPress form with PayPal. So, grab a plan to our form maker, then install and activate it.
Then, there are six easy steps to accept PayPal payments Formidable:
Step 1: Download and install the PayPal forms plugin in WordPress
First, log in to your WordPress dashboard area. Next, go to Formidable → Add-Ons. Simply find the PayPal forms plugin and click Install.

Step 2: Set up the PayPal plugin
Next, integrate PayPal with Formidable Forms. You need to have a PayPal account already set up for this bit.
Go to Formidable → Global Settings and click the PayPal tab.
Enter your PayPal email address and update any other settings you need. If you’re installing this on a website already live, you’ll need to set your PayPal environment to Live. You can choose Test when you're setting it up if you'd like to make sure it's working.

Step 3: Set up instant payment notifications
This part is important to ensure it marks collected payments as paid. You must configure your PayPal account to send payment notifications.
Here's how to do it:
- Log into your PayPal business account and click the gear icon at the top right of the page.
- Click on My Selling Tools.
- Choose Instant payment notifications from the list of options.
- The page redirects you to the Instant Payment Notification (IPN) page. Click Choose IPN Settings.
- Enter a notification URL in the IPN settings. It doesn't matter what it is, Formidable PayPal will override it. Select Receive IPN messages (Enabled) and hit Save.

Step 4: Create your WordPress form with PayPal
Next, it’s time to set up a form to collect the payments.
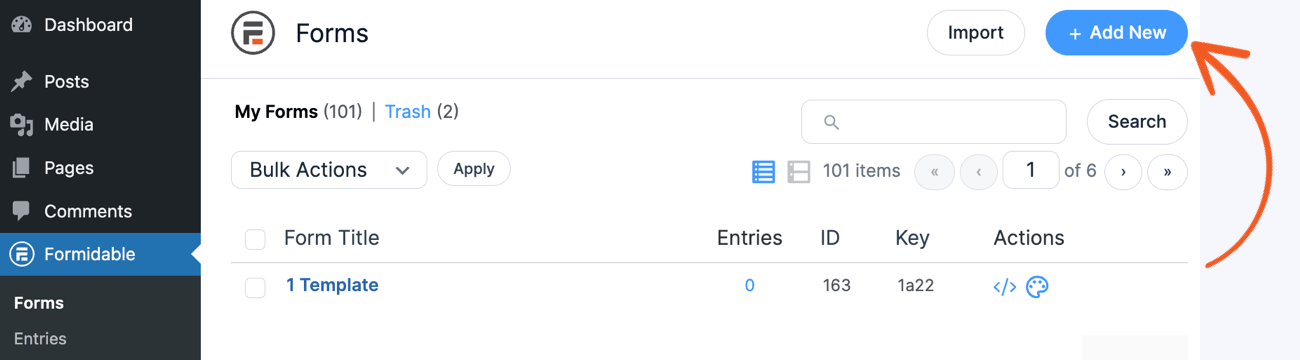
Go to Formidable → Forms and click Add New.
Next, click the Create a blank form button or choose from our pre-built form templates. We have plenty of PayPal order form templates that are easy to integrate with PayPal.
After that, the plugin will take you to its drag and drop form builder, making it easy to set up your online form.

Feel free to customize the form to your needs, like adding a Dropdown field for customers to choose items or an Email field. Once you've got it, click Save in the top right to save your progress.
Next, go to Settings → Actions & Notifications → PayPal.
Give your PayPal form action an Action Name for easy reference. No one else will see it.
Then, set the Item Name. This appears on the PayPal page and receipt. You can choose a simple name if you're selling one product. Or you can select a field to autofill depending on their choice or if they have multiple items in their shopping cart.
Also, enter the PayPal email associated with the account. Set an amount for the payment. This can be from a specific field or a set amount.

Last, set the payment type as one-time, donation, or subscription, and choose the currency they'll pay with. Then click Update to save your changes.
This is a general overview. If you want a deeper look into the settings, check out our Knowledge Base docs.
Step 5: Set up recurring payments (optional)
As you saw above, there is an option to select Payment Type.
If you know you’ll need to set up recurring payments, like a membership system, you’ll need to switch this to Subscription.

You can then set the Repeat Every value to however often you wish to set up the recurring bill.
You can even include a trial period where the customer won’t get billed for the first subscription. A free trial is always great for new people to sign up.

Once you've set these up, click Update to save your progress.
Step 6: Trigger an action after payment is complete
When payment is complete, it’s time to choose the next step for your new customer.
You can send a notification email or invoice, subscribe a user to your email list, or even send an SMS.
First, go to Settings → Form Actions. Open the type of action you would like to trigger. For example, we'll send an email.
Next, select Successful PayPal payment in the Trigger this action when dropdown.
- Click Update

Last, click Update to save and you're ready to accept payments!
Ready to create your PayPal payment form?
Formidable Forms makes it easy to handle PayPal payments on your site.
And this step-by-step tutorial showed you how. So, if you're excited to accept online payments, grab our form maker now! We think you'll like what you get.
And if you want to offer more than one payment option? Read our post on How to add payment gateways to WordPress forms.
Last join our community on Facebook, Twitter, and YouTube for more WordPress tips & tricks!
Read more about PayPal payments in WordPress forms
 How to Setup Recurring Payments for Memberships in WordPress Without Coding
 Authorize.net vs PayPal: The Best Features, Pricing, and More
 How To Make a WordPress Form with Payment Gateways
This article may contain affiliate links. Once in a while, we earn commissions from those links. But we only recommend products we like, with or without commissions.
