
Fantastic - could not be better! The support has been amazing and I now have three different Stripe payment forms that I can keep on duplicating and changing the name of the product.

Last updated on July 10, 2025 by Formidable Team
How to Display Form Submissions in an Image Carousel
Want to upload and display user-submitted images? Learn how to create a form to upload submissions and display them in an image carousel for WordPress using a gallery shortcode!

Countless WordPress websites rely on user-submitted images and videos. However, collecting, formatting, and displaying these graphics manually can be time-consuming.
That’s where an image submission form can be a life-saver. By giving people the freedom to upload their own images, you can create a more engaging visitor experience without increasing your workload.
In this post, we’ll show you how to create a secure and user-friendly file upload form. We’ll then demonstrate how you can display all of these graphics in less space by building a gallery images carousel in WordPress. Let’s get started!
Upgrade your WordPress site with powerful, flexible forms.
Why display form submissions in an image carousel
A picture really is worth a thousand words. So, it's no surprise that giving your visitors the option to upload images is essential for many types of websites. For example, if you’re running a review website, visitors will want to view user-submitted photos showing the product, services, or locations in question:

Even if a site doesn’t rely on user-submitted images, there are plenty of scenarios where this content can improve the overall experience. For example, if you run a forum, you might give visitors the option to upload profile pictures.
It’s possible to accept this content manually, via email. However, this means you’re responsible for formatting and uploading the image. It can also result in a delay between the visitor submitting a file and that graphic going live.
With this in mind, you may want to create an image submission form instead. You can then automatically display the image anywhere on your website, such as in a user profile. Alternatively, you may want to give visitors the option to submit files that will be displayed in an image carousel or WordPress slider:

This can be a great way to feature lots of graphics in a smaller amount of space. For this reason, many businesses use image carousels to post product review sections on their WordPress sites. They also use them to display posts and social media reviews on consumer sites such as TripAdvisor.
Many websites even have a WooCommerce product carousel with images that works seamlessly with any WordPress theme.
In addition, the ability to condense many images into one WordPress image carousel saves space on mobile devices.
With that in mind, an image carousel that displays uploaded submissions can be a great way to engage users.
? Want an easy way to track form submissions?: How to Track Form Submissions in WordPress [The Easy Way!]
From Idea to Reality in Minutes. Build Powerful Forms, Dashboards, Apps and More.
Formidable Forms makes advanced site building simple. Launch forms, directories, dashboards, and custom WordPress apps faster than ever before.
How to display form submissions in an image carousel
An automated image submissions form plus a carousel can save you time and improve the visitor experience. Here’s how to create one in four easy steps using the Formidable Forms form-building plugin and a shortcode plugin.
Combined, these two downloads give you the equivalent of the perfect WordPress carousel plugin plus so much more!
Step 1: Install the Visual Views plugin and Shortcodes Ultimate
To create an image carousel, you’ll need the Formidable Forms Pro plugin. You’ll also need the Formidable Views plugin. This add-on provides a drag and drop WordPress application builder that you can use to display form data on the front end of your WordPress website.
These Views (or different ways to display form entries) are versatile and can be used to display a wide range of submitted content. Views can also help you create everything from real estate listings to classified advertisements, business directories, membership sites, and even job boards.
If you haven’t already installed the Formidable Views plugin, navigate to Formidable → Add-Ons in the WordPress dashboard. You can then locate the Visual Views plugin. Select Install, followed by Activate.
Finally, you'll also be using a unique gallery shortcode included in the free Shortcodes Ultimate plugin. So you'll need to install that tool as well.
To do this, go to Plugins → Add New. Next, search for and install the plugin. Remember to activate it!
Step 2: Build an image submission form
Next, you’ll need to create a new form where visitors can upload their images. In the WordPress dashboard, navigate to Formidable → Forms. Then, click on Add New:

Formidable Forms has a range of built-in templates. We’ll be using the Blank Form option:

You can now give this form a straightforward name and enter an optional description. After clicking on Create, you'll be taken to the form editor.
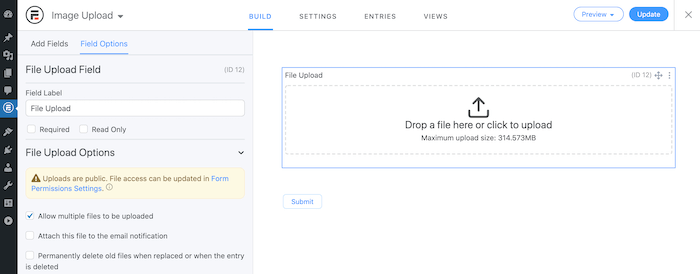
Here, you can add a wide range of fields to your form. For example, you might want to collect the visitor’s email address or phone number. However, to create an image submission form you’ll need to use the File Upload field:

Once you’ve added this field, click on it in your right-hand panel. This will open the settings, where you can configure this File Upload Field.
It’s worth exploring all of these options in detail, to see what different effects you can create. However, since we’re creating an image carousel, it’s essential that visitors can upload multiple files simultaneously.
In the left-hand menu, tick the box next to Allow multiple files to be uploaded:
Keep in mind that by default, anyone can upload files via this form. This can make sites more vulnerable to attack. For this reason, you may want to set some rules about who can upload or access the content.
To restrict access to this form, click on the Settings tab. In the left-hand menu, select Form Permissions:

You can now use these settings to secure your form. For example, you might make the form visible to logged-in users only. When you're happy with your configuration, click on the Update button.
Step 3: Create a View
The next step is creating the View where you’ll display the uploaded images. To start, click on the Views tab. Then select Add New:

When prompted, click on Grid. Then, give this View a descriptive name, and click on Create a view. In the subsequent editor, select start adding content:

You can now select the block where you want to create your image carousel. This launches an editor where you can add the necessary code. You can create a basic image carousel using the following snippet:
[su_image_carousel source="media: [12 show=id sep=',']" limit="20" slides_style="default" controls_style="dark" crop="16:9" columns="1" adaptive="yes" spacing="yes" align="none" max_width="none" captions="no" arrows="yes" dots="yes" link="lightbox" target="blank" autoplay="5" speed="medium" image_size="medium" class=""]
In particular, the following section connects this View to your file upload field:
media: [12 show=id sep=',']
In the above snippet, the file upload field id is 12. You can find the exact id that you need to use in your own code directly to the right of the editor:

For more information about configuring your image carousel using the gallery shortcode, check out the Shortcodes Ultimate page. Once you’re happy with your code, click on Update View → Update.
Step 4: Publish the image submission form and View
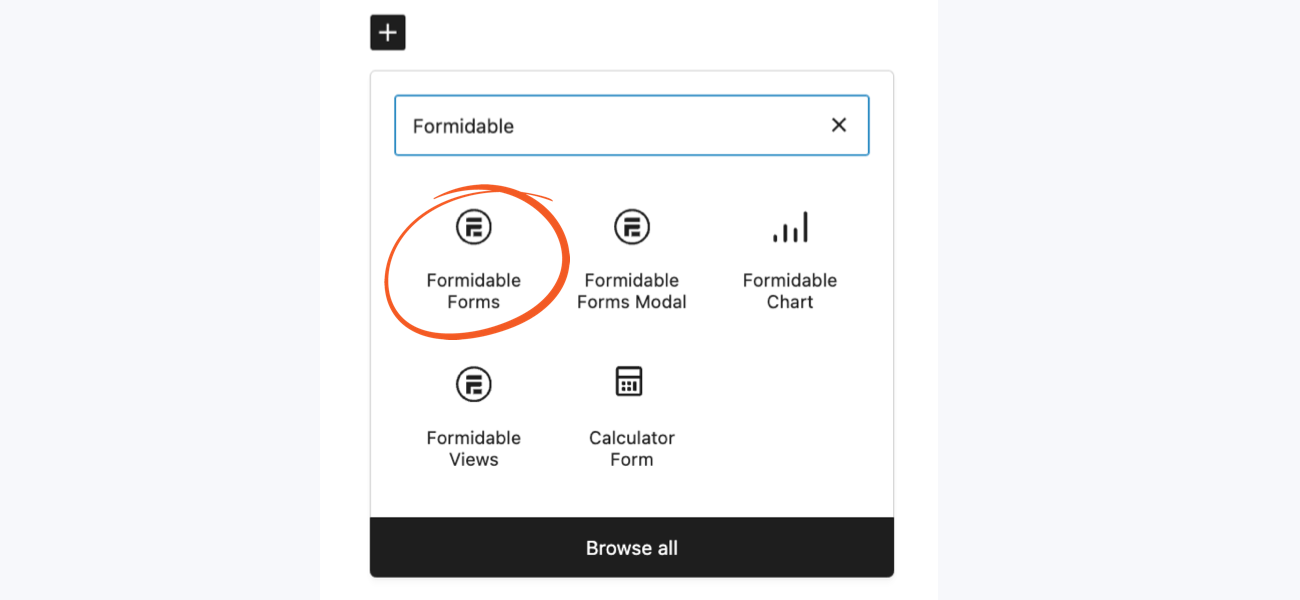
Now it's time to add the image carousel and the form on a page. Navigate to the webpage where you want to display your View. You can then add a new block and search for "Formidable":

Select the View you just created from the dropdown.
Next, you'll need to publish your image submissions form, so visitors have a way to upload files. Navigate to the page or post where you want to add this form. Then, add a new form block:
Now, whenever someone visits this page, they’ll be able to upload image files. This content will then be displayed as an image carousel for WordPress:

Form submission and image carousel conclusion
Whether you run a membership site, business directory, job board, or anything in between, there are lots of reasons to accept user-submitted images. And there are just as many reasons to display these graphics in a WordPress image carousel.
But don't stop there, use the carousel to display images, WordPress posts, reviews, and more in a smaller amount of space.
Let’s quickly recap how to create an automated file upload form and an image carousel:
- Install the Formidable Visual Views plugin and Shortcodes Ultimate.
- Build an image submission form.
- Create a View.
- Publish your image submission form and View.
You can use Views to display a wide range of user-generated content. Download Formidable Forms and see what you can create today!
More on File Uploads!
 How to Let Users Submit Photos on Your WordPress Site
 Client-Side Image Resizing for Faster Form Submission
 How To Make a Multi-File Uploader in WordPress [3 Steps!]
This article may contain affiliate links. Once in a while, we earn commissions from those links. But we only recommend products we like, with or without commissions.
