
Fantastic - could not be better! The support has been amazing and I now have three different Stripe payment forms that I can keep on duplicating and changing the name of the product.

Last updated on June 25, 2025 by Formidable Team
How to Build a Quote Form in WordPress [For FREE!]
Discover how to easily create a custom quote form in WordPress to enhance your business interactions. Follow our step-by-step guide for efficient setup.

Approximate read time: 7 minutes
WordPress quote forms streamline an entire quote process.
From providing estimates and proposals to price breakdowns for your products and services — one form can solve it all.
Adding one to a WordPress website saves time, improves the customer experience, and potentially boosts sales. In this guide, I'll walk you through the step-by-step process of creating a customized quote form in WordPress.
Let's get started.
Upgrade your WordPress site with powerful, flexible forms.
Why use a quote form on WordPress?
Adding a quote form to a WordPress website has many benefits for the site owner and potential customers.
Here are a few:
- Automation & efficiency: No more back-and-forth phone calls and emails. A quote form speeds up the start of information gathering, allowing you time to focus on more important tasks.
- 24/7 availability: Customers can request quotes at their convenience. This avoids delays that may cause them to check out other options.
- Lead generation: A quote request doesn't always become a sale immediately. But now you have a lead to nurture for the future.
- Improved accuracy: A custom form gets all the necessary information upfront, meaning more accurate quotes.
And I don't know about you, but I think that sounds pretty good! So, let's get to building that quote form now.
Read more: How to Create an Instant Quote Form in WordPress
From Idea to Reality in Minutes. Build Powerful Forms, Dashboards, Apps and More.
Formidable Forms makes advanced site building simple. Launch forms, directories, dashboards, and custom WordPress apps faster than ever before.
How to create a quote form in WordPress
I recommend using Formidable Forms to create a WordPress quote form.
You could go with a quote plugin or an instant quote generator plugin in WordPress, but then you miss out on a lot of the features a form builder like Formidable Forms offers.
It's the most advanced WordPress form plugin, used by over 400,000 people daily. With its drag and drop form builder and notifications, Formidable Forms helps create any form in a few minutes. Contact forms, calculators, and, of course, quote forms.
In fact, it's only four steps to build a quote form in WordPress:

1. Install and activate Formidable Forms
The first thing to do is install the free version of Formidable Forms.
You can search on the Add New Plugin page in your WordPress admin and search for Formidable Forms. Next, click Install, then Activate to complete the setup.
You can also check here to download the free online form builder.

The free version is all you need to make a basic quote request form. But you must create it from scratch. On the other hand, Formidable Forms Pro has a Request a Quote form template, which saves time and headaches.
Plus, it's risk-free for 14 days! Don't like it? Get your money back, no questions asked. Just click the button below.
2. Build a WordPress quote form
Now that Formidable Forms is installed and activated, it's time to build a quote form.
First, go to Formidable → Forms and click + Add New at the top of the page. On the next page, a list of templates is available in Formidable Forms Pro plans, such as the Request a Quote form template.

But, to start from scratch, click Create a blank form.
The plugin takes you to its user-friendly drag and drop form builder, where you can add form fields. Click to add a field, or drag and drop it on the form canvas.

For a basic quote request form, I recommend adding:
- Two Name fields: One for the first and one for the last name
- Text field: For the business or organization name
- Email field: To capture the email address for lead generation
- Phone field: To contact them via phone
- Paragraph field: To enter their request

Once the fields are in place, adjust the field options. The quote form should be as clear as possible.
For example, change the Field Labels to ask for correct information and mark fields as Required. There's also conditional logic, which shows or hides information depending on the user's previous answers.
Once everything is set up, click Save to name and save the form.
3. Set up notification emails
Now, it's time to decide what happens after the quote form is filled out.
In this example, we want to ensure the client knows their request has been received. And we also want the correct team to see a request has been sent.
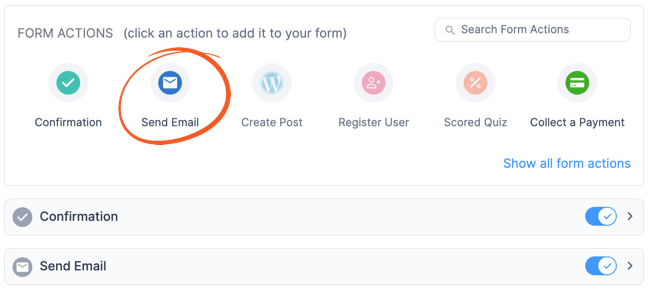
The best way to do this is using email notifications. In the Formidable form builder, click the Settings tab at the top.

Next, go to Actions & Notifications. By default, an email notification is already set up. This is to notify the admin email that there was a new submission.
I recommend setting this to the employee or team email handling the quote request. To do this, click the Email Notification action and edit the To field. Then, you can customize the message to include any important information or leave it as default.
![Screenshot of an email notification settings interface with fields for Action Name, To, From, Reply To, and Subject. A drop-down menu shows 'Entry is created' as the trigger for the email notification. The 'Message' section displays a visual text editor toolbar and includes a placeholder '[default-message]' in the content area.](https://formidableforms.com/wp-content/uploads/2024/04/email-notification-example.png)
Now, sending the customer an email notification letting them know their request was received is also. a good idea.
So, click the Send Email action again.
Next, change the To address to the shortcode for the email field. Click on the field, and the box for the different fields will appear. For example, in the image below, my Email shortcode is [248], so I can put that in the To field to contact the customer.
![Partial screenshot of an email template editor with fields for To, From, Subject, and Message. Shortcode placeholders such as '[admin_email]' and '[sitename] <[admin_email]>' are used in the From field. An arrow points to a tab labeled 'Fields' showing options for Name, Last, Business/Organization, Email, and Phone with corresponding shortcodes.](https://formidableforms.com/wp-content/uploads/2024/04/email-field-shortcode-example.png)
Then, customize the message to the customer and personalize it using their name or business. Feel free to play around here and customize it to suit any business needs.
Read more: Send Email Notification in Formidable Forms
4. Publish the quote form on a WordPress page
First, go to the page or post where users will see the quote form and fill it out in WordPress. Add a new WordPress block, and search for the Formidable Forms block.
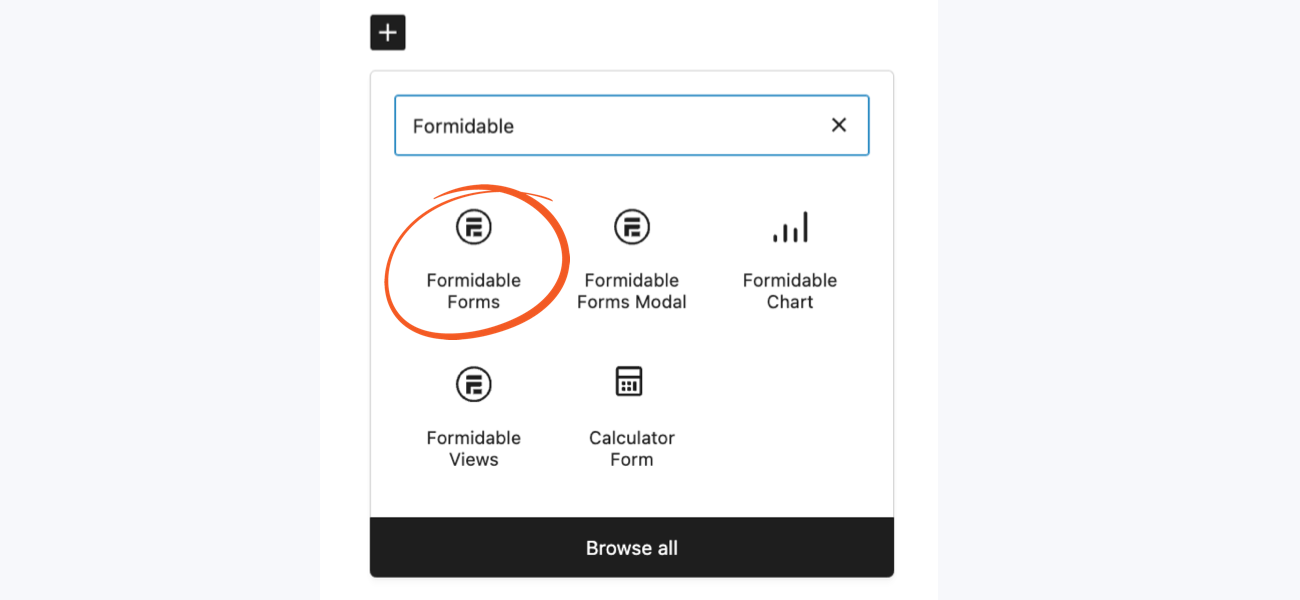
Next, choose the WordPress quote form from the dropdown in the Formidable WordPress block. Then, the form will automatically show.
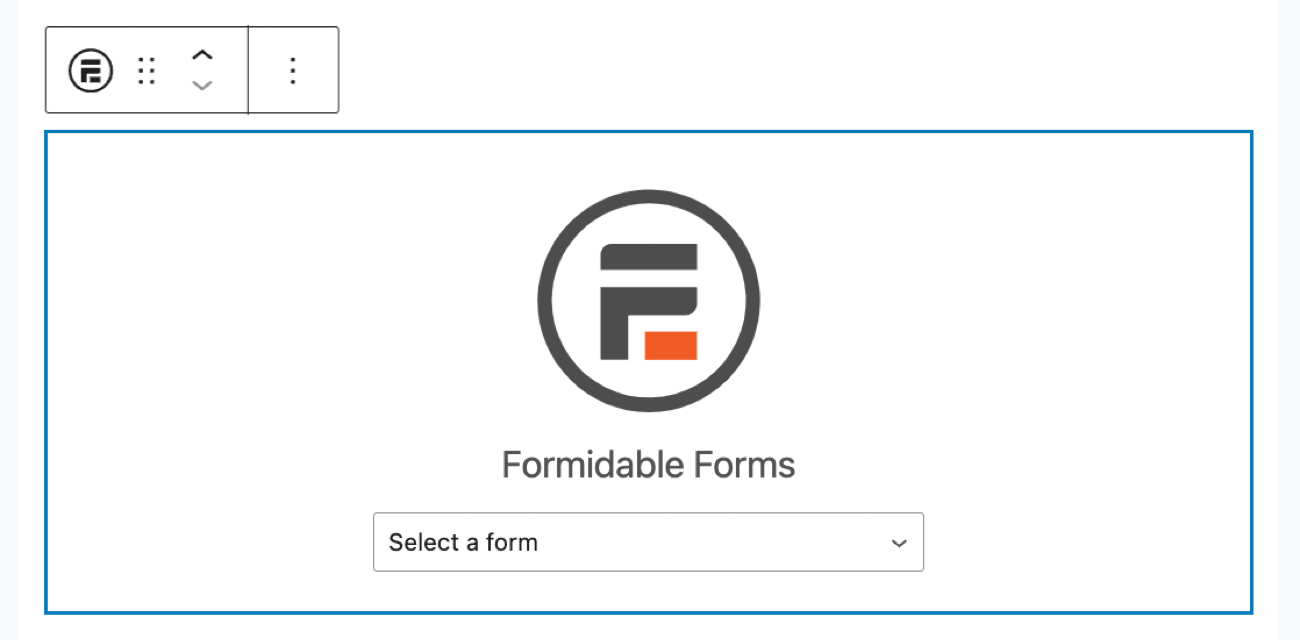
Last, update or publish the page, and the quote form is live.
(Optional) Add an automatic quote calculator
The WordPress calculator plugin makes Formidable's forms even more powerful.
And an easy way to use it is for price estimation depending on the customer's chosen services. For example, let's imagine a plumbing business.
It offers three different services on its quote form:
- Toilet repair — $200
- Clogged drain fix — $150
- Water heater installation — $1000
So, to show this, I'll put a Checkbox field on the form. This way, customers can choose which services they'd like. Then, each choice has a Separate value for the dollar amount using the Use separate values checkbox in the field settings.

When customers pick a service, it will use a separate value instead. This makes it easier for calculations.
Next, I'll add a Number field and set its visibility to Administrator under the Advanced field settings in the left-hand panel. This field only calculates the quote estimate, so customers don't need to see it now.
Then, I'll click the three dots in the Default Value field and choose the Math type, then the field shortcode for my Services Requested checkboxes.

Also, I'll add a $ sign in the Before Input field to represent the total in dollars. This can be adjusted to any currency.
Now, the field will update with the total based on the customer's choices. This can be used to notify the sales team or the customer via email.

Learn how to create an instant quote form in WordPress
A WordPress quote form is great, but sometimes customers want to know an estimate on the spot.
That's where an instant quote form comes in. So if you're ready to add an instant quote form to your website, then it's time to check out why Formidable Forms is the best instant quote WordPress plugin!
Or, if you're more of a visual learner, check out our entire series on creating an instant quote form on YouTube! Catch the first part below.

Also, be sure to join our community on Facebook, Twitter, and YouTube for more WordPress tips & tricks!
Read more about quotes in WordPress!
 The Best Instant Quote WordPress Plugin
 More Customer Conversions with Instant Quotes
This article may contain affiliate links. Once in a while, we earn commissions from those links. But we only recommend products we like, with or without commissions.
