Top 8 Uses of Conditional Logic in WordPress Forms

If your forms show every field to every user, the result is long, confusing layouts that users abandon. Conditional logic changes that entirely. It makes your forms intelligent; they respond to user input, adapt in real time, and display only what’s relevant to each individual.
The idea is simple: instead of building one static form for everyone, you build a form that shapes itself around each person. Fields appear, disappear, and adjust based on the answers someone gives. As a result, no two users have to navigate through the same unnecessary clutter.
Here’s what it looks like: when users select “Student,” the form asks for their university, not company name. They choose “Home Delivery,” and an address field appears immediately. They indicate they’re in a hurry, and the confirmation message reassures them that someone will be in touch within hours.
This is how conditional logic offers a tailored experience to every user.
In this guide, you’ll learn:
- What conditional logic is and how it works in forms
- Eight practical ways to use it
- When it’s worth adding
We’ll use Fluent Forms to demonstrate the uses, which makes setting up conditional logic simpler than most form builders.
TL;DR
- Conditional logic makes forms smarter by showing or hiding fields, sections, messages, and notifications based on user input.
- In Fluent Forms, you set rules on the dependent field, choosing which field it should depend on and what value should trigger it.
- You can use ALL (every condition must match) or ANY (at least one must match) to handle complex rules. Condition groups let you combine both (there can be multiple groups of conditions, and all the conditions inside at least one group must match).
- 8 practical uses: show/hide relevant fields, control entire sections with containers, personalize confirmation messages and redirects, route email notifications to the right people, validate submissions before they go through, trigger conditional workflows in external tools, display dynamic content with conditional shortcodes, and proceed with user-generated posts conditionally.
- Setup is visual. No code required. Start with your most-used form and add one simple rule to see the difference.
- Field-level conditional logic is available to the free users, whereas to access setting-level conditions, you need Fluent Forms Pro.
What is conditional logic & how do you use it on forms
Conditional logic is a rule-based system. Each rule has two parts: a condition (what the user does or selects) and an outcome (what the form does in response).
In plain terms: “If this field equals this value, then do this.”
The “this” on the outcome side can be
- Showing or hiding a field or section
- Sending or blocking an email notification
- Redirecting to a specific page
- Blocking a submission that doesn’t meet certain criteria
- Triggering a third-party integration
The condition itself can be as simple as checking whether a checkbox is ticked. Or it can be layered, like matching three different field values.
How Fluent Forms handles it
Fluent Forms gives you a visual rule builder, so no code is needed. Here’s how to set up a rule:
The starting point is the field you want to show or hide conditionally. You open its settings, go to the conditional logic tab, and tell it: “Only show this field when this other field has this value.”
Here’s the step-by-step:
1. Open the conditional logic settings on the dependent field: Go to the field that should appear or disappear based on user input. This is the field being controlled. Navigate to “Advanced Options” from its customization settings. Check “Enable Conditional Logic.”
2. Pick the field it depends on: Under “Condition Match,” select which other field should control this one in the first box. It can be any other field in your form. When a user enters a value in this controlling field, the rule triggers.
3. Set the condition operator: The operator defines how the controlling field’s value gets checked. Fluent Forms offers different operators depending on the field type:
| Operator | Works best with | What it checks |
|---|---|---|
| Is equal to | Dropdowns, radio buttons, text | Exact match |
| Is not equal to | Dropdowns, radio buttons, text | Anything except the specified value |
| Contains | Text, textarea | Value appears anywhere in the input |
| Does not contain | Text, textarea | Value is absent from the input |
| Starts with | Text, textarea | Input begins with the specified string |
| Ends with | Text, textarea | Input ends with the specified string |
| Greater than | Number fields | Input is numerically higher than the value |
| Less than | Number fields | Input is numerically lower than the value |
| Greater than or equal to | Number fields | Input meets or exceeds the value |
| Less than or equal to | Number fields | Input is at or below the value |
| Regex match | Text, textarea, email | Input matches a custom regular expression pattern |
4. Enter the trigger value: Type the specific value that activates the rule. This is the answer option in the controlling field that makes the dependent field show up.
- For equality checks, this is a fixed word, number, or response option (e.g., “Enterprise” or “50”)
- For regex match, this is a pattern (e.g., ^[A-Z]{2}\d{4}$ to match a two-letter prefix followed by four digits)
The outcome applies instantly as the user interacts with the form. If the conditions are met, the form dynamically shows the dependent field immediately.
Any vs. All vs. Group: How multiple conditions work together
A single condition works fine for simple rules. But real forms often need logic that checks for combinations. Sometimes you want something to happen only if multiple conditions are true. Other times, you want it to happen if any one of several conditions is true.
Fluent Forms handles this with different matching modes:
Any (OR logic)
At least one condition must be true for the outcome to trigger. If any single condition matches, the result shows.
Example: Show the “Compliance Documents” section if:
- Industry selected is “Healthcare” OR
- Industry selected is “Finance” OR
- Industry selected is “Legal.”
If the user picks any of those three, the section appears. The rest don’t matter.
When to use ANY: When multiple different inputs should lead to the same result.
All (AND logic)
Every condition in the rule must be true for the outcome to trigger. If even one condition fails, nothing happens.
Example: Show the “Enterprise Support” section only if:
- Plan selected is “Enterprise” AND
- Company size is greater than 50 AND
- “Priority support” checkbox is ticked
All three have to match. If a user picks Enterprise but enters a company size of 10, the section stays hidden.
When to use “All”: When the action should only fire for a very specific combination of inputs, not just one of them.
Condition Groups: Handling More Complex Scenarios
Sometimes, “All” or “Any” on their own aren’t enough. Say you need something like “Show this field for Enterprise customers in the EU, OR for any customer who selected the Data Processing plan.” These are two distinct scenarios leading to the same result.
Fluent Forms solves this with condition groups.
- All the conditions inside a group must match (AND logic)
- But if any one group matches, the action triggers (OR logic)
Example: Show a “Regulatory Compliance” field if the user fits either of these profiles:
Profile 1: Based in the EU and selected “Data Processing” as their service
Profile 2: Based in California and selected “Consumer Data” as their service
You’d create two groups, one for each profile. If the user matches either one, the field appears.
It sounds complex on paper, but in Fluent Forms, you can visually fill in the conditions and group them as your form needs.
When to use condition groups: You have two or more distinct user types that should see the same field or section; however, each type has its own requirements.
What sets Fluent Forms apart is that conditional logic goes beyond individual fields. You can set conditions on:
- Entire field groups (called containers)
- Confirmation messages
- Email notifications
- Third-party integrations
- Post creation
That makes it a full system, not just a single feature. With that foundation in place, let’s look at eight practical ways to put it to work.
Top 8 uses of conditional logic in WordPress forms
Conditional logic can do a lot. But the best use cases improve user experiences or cut down manual work for your team. The eight use cases below cover both.
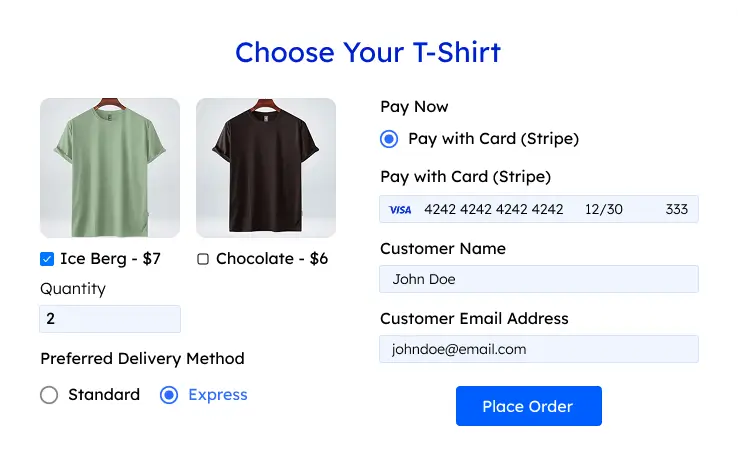
1. Show relevant fields based on user input
This is the most common use of conditional logic. The idea is simple: only show a field when the answer to a previous question makes it relevant.
Example: A registration form asks whether someone is signing up as an Individual or a Business.
- Business selected → show company name, company size, tax/registration number
- Individual selected → skip all of that
The same logic applies across dozens of form types:
- A contact form asks what the inquiry is about, then shows fields tailored to the chosen topic
- A product order form reveals a customization section only for customizable products
- A booking form shows a preferences section only for options that include them
Setting it up in Fluent Forms:
Open the field you want to show conditionally, turn on conditional logic in its settings, and add a rule. Choose the field it depends on, set the condition, and pick the value that should trigger it. You can also combine conditions:
- Show a field only when two conditions are both true (ALL mode)
- Or when either of them is true (ANY mode)
Conditional logic more than shortens the form. It signals to users that the form was built with them in mind. When every question feels relevant, people answer more carefully. And the data you collect is cleaner because no one’s guessing what to put in fields that don’t apply to them.
2. Hide & show entire sections using containers
Sometimes one conditional field isn’t enough. You might have a whole group of fields that should appear or disappear together based on a single user choice. Applying conditions to each field individually is tedious and hard to manage. Containers solve this.
A container groups multiple fields together. Apply one conditional rule to the container, and every field inside follows it automatically.
Example: An insurance inquiry form with separate sections for:
- Vehicle Insurance
- Home Insurance
- Travel Insurance
Instead of hiding each field one by one, you put each group into its own container and set one rule: “Show this container if the user selected this insurance type.” The user sees only what applies to them.
Containers also keep your form editor clean. You manage visibility at the group level, so your conditional logic stays organized even as the form grows.
Build Smarter Forms for Free
3. Show personalized confirmation messages & conditional redirects
What happens after submission is part of the experience too. A generic “Thanks for your submission” message works, but it’s a missed opportunity.
Example: A support ticket form where urgency matters.
- Critical issue → “We’ve flagged this as urgent. Someone will respond within the hour.”
- Low priority → “We’ll get back to you within 2 business days.”
Same form, two completely different messages. Both feel appropriate.

Fluent Forms lets you create multiple confirmation messages, each tied to its own set of conditions. You can customize the heading, body text, and any links or media.
Conditional redirects work the same way. Instead of showing a message, the user gets sent to a specific URL:
- High-intent leads → scheduling page
- Specific product selected → that product’s onboarding guide
- Trial signup → account setup page
The redirect only works when the conditions you defined are met. Everyone sees a tailored redirect or confirmation message. And the post-submission experience feels intentional rather than generic.
4. Trigger email notifications based on form responses
Not every form submission needs the same follow-up email, and not every submission should go to the same person on your team.
Fluent Forms lets you set up multiple notifications for a single form, each with its own conditions. You can customize their subject line, body, and recipient.
- One notification executes only for “Enterprise” plan selections
- A different one triggers only for “Startup” selections
Smart routing examples:
- Integrations question → technical support team
- Pricing question → sales team
- Custom project request → account manager

With conditional notifications, you don’t have to manually review and forward submissions. The form handles routing automatically based on what the user selected.
Dynamic content in notifications:
- The email subject can include the user’s name
- The body can reference what they selected
- The recipient sees the full context in the notification email
This saves time and reduces follow-up errors.
5. Show content dynamically based on user selections
Fluent Forms has a feature called conditional shortcodes that lets you display different content depending on what a user submitted. You place these shortcodes inside confirmation messages, email notifications, or PDF documents, and they show or hide blocks of content based on what the user submitted.
Each shortcode checks three things: which form field to look at, what condition to apply (equals, contains, greater than, starts with, etc.), and what value to compare against. If the condition matches, the content inside the shortcode is displayed. If it doesn’t, that content simply isn’t there.
You can stack multiple shortcodes to cover different scenarios. For example, a feedback form could show three different messages depending on whether the user rated their experience as “great,” “okay,” or “bad.” Each message is wrapped inside its own shortcode, and only the relevant one appears.

For more complex situations, shortcodes can be nested. Say a user selects “Yes” for product satisfaction and gives a rating above 2. A nested shortcode lets you check both conditions together and display a specific message only when both are true.
The result is confirmation messages and emails that read as if they were written individually for each user, without you having to create separate templates for every scenario.
6. Use conditions to proceed or fail submission
Standard form validation checks individual fields: required fields, email format, number ranges, etc. But some forms need advanced validation, verifying that the overall combination of answers makes a valid submission.
Fluent Forms has an advanced validation feature that lets you block or allow submissions based on conditional rules. If a submission doesn’t meet those conditions, the form displays an error, and the data isn’t submitted until the user corrects it.
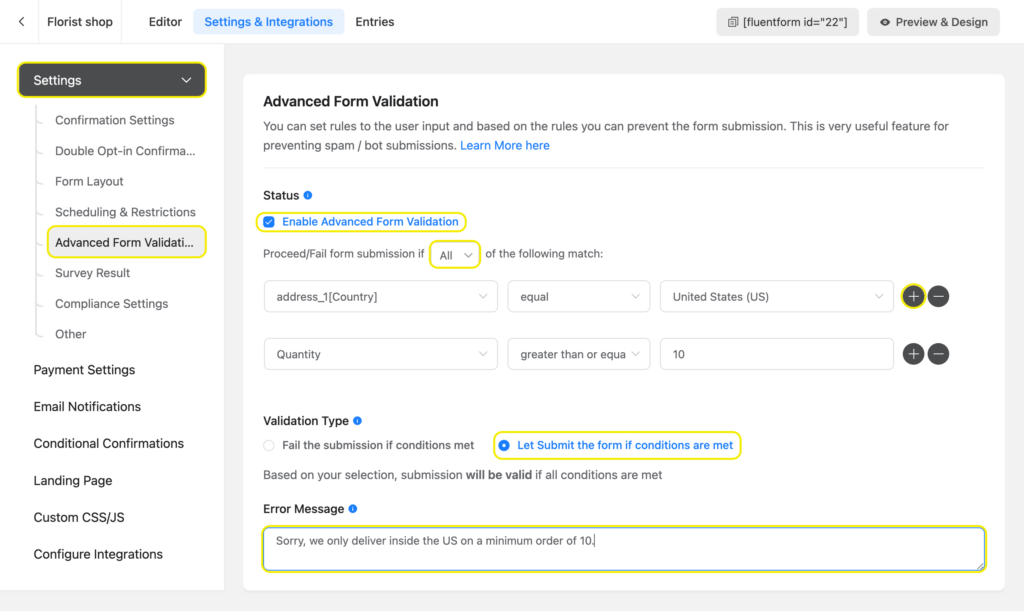
Examples:
- Job application form: Block submissions where the years of experience are below your minimum. The user sees a clear message explaining why.
- Quality gate: Certain answer combinations indicate missing meaningful data. Catch those at the form level instead of filtering manually later.
If every accepted submission triggers an email sequence, creates a CRM record, or generates a project task, you don’t want invalid submissions to go through. Conditional validation acts as a quality gate to stop that from happening.
7. Create workflows based on user responses
Fluent Forms integrates with dozens of external tools: CRMs, project management apps, email marketing platforms, and more. What makes these integrations useful beyond the basics is that conditional logic applies inside them, too. Here are two examples.
FluentCRM example:
You can set conditions to decide whether an entry qualifies for FluentCRM integration. The email address only gets sent to your FluentCRM contacts if the submission meets the conditions you set.

Fluent Forms also allows you to apply different tags based on what the user selected in the form. For example, a user interested in email marketing gets tagged accordingly and added to a relevant nurture sequence. Your contact lists stay organized without anyone manually sorting submissions.
Trello example:
Say you have a real estate form where potential buyers select the houses they’re interested in and enter an offer amount for each. On your Trello board, you have a separate list for each property.
With conditional logic on the integration feed, you can create a separate Trello feed for each house. Each feed has its own condition: it only triggers when the buyer selects that specific property. The offer amount becomes the card title, and the buyer’s name and email go into the card description.
This way, every offer lands as its own card in the correct list, with all the relevant details attached. You don’t need to sort or copy data manually.
The broader principle here is simple: conditional logic in integrations lets you build workflows that respond to each user’s input, with zero manual effort after setup.
8. Trigger a user-generated post when conditions match
Fluent Forms can function as a front-end content submission tool, letting users create WordPress posts directly through a form. You can automatically publish the post, keep it in draft or pending status. You can also assign a category automatically. Besides, you can map which field entries go to which post fields (title, excerpt, content, etc.).
The interesting part is that you can apply conditional logic in the post feed as well. This way, a submission will only work as a post feed if the conditions match. This is a great filtering tool; you can automatically block submissions from being published or drafted if they contain certain words or are irrelevant.

For sites that rely on user submissions as a core content strategy, this combination of post forms and conditional logic removes a significant amount of manual overhead while keeping output clean and consistently structured.
When to use conditional logic in forms
Conditional logic adds real value in specific situations. Here’s when it’s clearly worth adding:
Use it when:
- Your form serves more than one type of user, and different people need to answer different questions
- Your form is connected to post-submission actions (emails, CRM records, task creation, post publishing), and you want the right workflow triggered for the right submissions
- You want to show custom confirmation messages, notifications & redirects to different users for the same form.
- You’ve noticed your form is longer than it needs to be for many users
Skip it when:
- You have a simple three-field contact form that’s the same for everyone
- The added rules would create complexity without a clear user or team benefit
Use it where the complexity is genuinely warranted, and you’ll get results. Add it where it isn’t, and you’ll just make the form harder to maintain.
Enjoying this article?
We regularly publish actionable content on our blog. Subscribe to get them delivered straight to your inbox.
We won’t spam you. You can unsubscribe whenever you want.
Offer personalized experiences with conditional logic
The magic of conditional logic is that it makes forms feel like conversations rather than checklists. Instead of showing every field on the screen at once, the form asks follow-up questions only when they make sense. It confirms submissions in a way that matches each person’s situation. It routes inquiries to the right person without extra steps.
Here’s how using conditional logic can be beneficial to you and users.
For users: It builds trust. When a form doesn’t waste attention on irrelevant questions, people are more willing to answer the ones it does ask. When the follow-up email addresses their specific situation, it feels like genuine communication, not a default response.
For your team: Less manual work. Submissions route themselves, notifications work automatically, and integrations respond based on the data provided. The time you’d normally spend sorting, forwarding, tagging, and routing gets freed up for actual work.
For data quality: Cleaner records. When users only see fields relevant to them, they fill those fields in with real information. Every response in your database exists because it was asked for the right reason.
The best part is that setting all of this up in Fluent Forms is straightforward. You simply have to:
- Open a field’s settings
- Navigate to the conditional logic tab
- Add rules using a visual interface
- Stack multiple conditions if needed
- Preview how the form behaves in real time
If you haven’t used conditional logic yet, start with your most-used form. Find one place where users currently see a field that doesn’t always apply to them. Add a simple show/hide rule. Test it. You’ll see right away how much cleaner the experience feels. From there, it becomes easy to spot other places where the same approach would help.

Sarika writes for Fluent Forms and loves to offer insights into small businesses. She’s curious and enjoys discussing ideas, interests, and perspectives. In her free time, she’s either marvelling at architectural beauties or trying different cuisines.


Leave a Reply