Changing the Directions

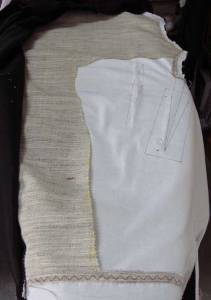
Well, well, well, after many hours of wondering what else I could do to make these pockets work, I removed all the pieces and decided to make the lining fabric sewn to the slashed opening instead of the wool. Then the wool section, not slashed, would then be attached to the lining pieces. Here is what it looked like but the pattern did not say how the front and back of the pocket would match to keep closed with showing raw edges as before.

So I placed the pieces on top of each other and pinned them flat. I decided NOT to use French seams as that would show through to the outside of the jacket.

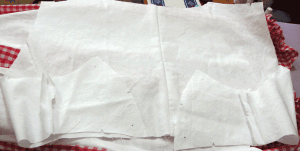
I needed a center line for the matching for the two sides to lay flat and come together.

The front pocket edge moves over to the center line:

The back pocket edge moves over to join the front edge:

What does it look like inside? Here is the back flap that will be secured to the underlining so it doesn’t flip forward and make a bump or pleat:

Here is the back of the pocket lining with the wool section attached:

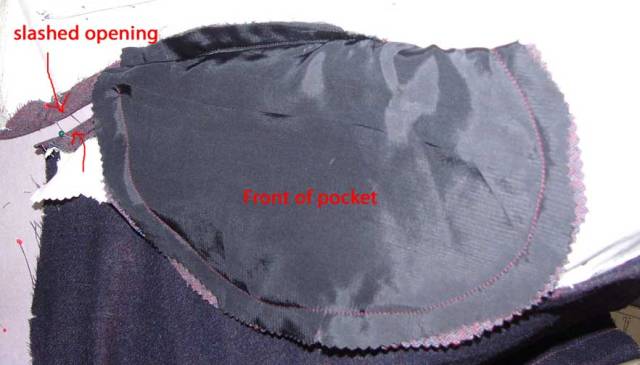
Once all stitched together, I opted for serging to keep everything neat and tidy.

What the pattern doesn’t tell you is that you will have to secure the back flap of the pocket to keep it from going forward. I have understitched the lining to the pocket on that side and then will catch stitch that edge to the white underlining otherwise it would flip itsef forward and make a lump or pleat.

I will top stitch the back pocket edge to make it behave as well.

It makes me wonder why anyone would want the back area of the pocket to be accesible? It’s not like you would put your hand in backwards? If the main body of a pocket flips forward what is the rest supposed to do? Stay open?

Now finally I can get to finishing this jacket as the pocket dilemna was really holding me back but at the same time niggling away at me. Here is the lined top back panel underlined and interfaced and hand basted all around the edges.

Other chores to do are to catch stitch the horsehair interfacing to the wool and underlining so it doesn’t get loose and clump. Here are the edges just pinned down:

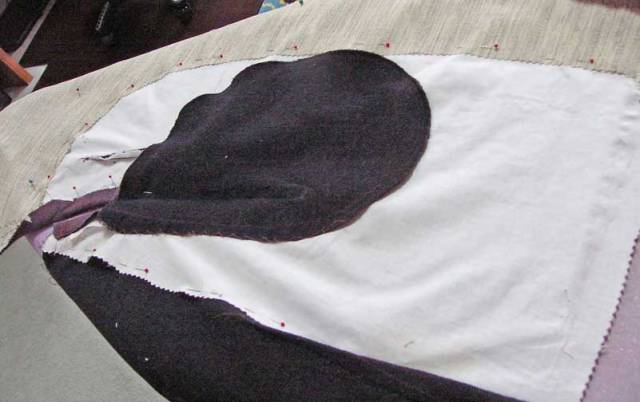
Then, after the catch stitching has been done:

On days I was so frustrated, I finished another puzzle to calm me down:

And baking more sourdough loaves:

This week we have had some snow but not enough for the local kids to even make a snowman. Still the weather service is predicting more so that will be welcome before our summer fire season takes hold.

Soon I will be sharing photos of a classic blouse pattern that a friend is working on. She lives in another state but she can send me photos and we can work together to get a perfect fit with muslins made from gingham fabric and solids.

So, until next time, I hope you all have a super week making projects and thinking of Spring sewing!!!

Posted in non-challenges | Tagged , , , | 5 Comments

Pain in the Pockets

A little leftover from the last post trimming away the interfacing from the fronts allowed me to use that chunk to add to the upper back panels and catch stitch all the edges down.

Now, unto the dart like pockets and basting some silk organza behind the pocket area:

Stitching the dart lines:

Cutting the dart open and folding seams to the inside:

Topstitching the front pocket edge:

Attaching the wool pocket section to the inside pocket flap:


Looks great from the wrong side on the directions but this is what it looks like in real life:

I’m going to play around with this stack of pocket pieces and see if it will lay flat and have no raw edges. I have checked other blogs and sites and most of the people who have made this jacket say to leave off the pockets so they must have encountered the same weird outcome?

But next are some photos of where I stayed for two weeks to help my friend with her knee replacement surgery. It was out in the high desert and one day it snowed and was 20F degrees.

Empty lot ready for new construction:

Neighborhood park

The snowy day:

See the snowflakes?

Have to include the latest finished puzzle:

And the latest sourdough loaf:

Fingers crossed I will solve the mystery of the weird pockets and show a completed jacket next time!!!

Looking forward to starting the year of the Fire Horse on Feb 17!!! Big changes will be coming as the year of the Snake sheds its skin!

Posted in non-challenges | Tagged , , , | 2 Comments

Backing Up

One nice thing about being an independant seamstress is the fact that having Nancy as my client, she allows me to change my mind when things just don’t work. If I consider that everything I make, including sourdough bread, is an experiment, then this jacket falls into that catagory.

Here it is all hand basted and waiting for a real body to occupy it. You can see all the stitching and basting lines have been thread basted to mark the placement and ready for a try-on. The pocket darts have been basted shut along with the bizarre vertical waist darts. The other thread basting involved a horizontal line marking the waist and center front. This pattern has no provision for a closure of any kind so no decernable placement for a button or snap either high up or down low…YOU is the designer along with the client to make that decision!

Two inches have been trimmed off of the width of the collar but it still looks wide to me. The horsehair holds the shape well in the collar but I think that it is too stiff for the main part of the front bodice but once Nancy tries it on, we can change that by removing some of it.

The back of the collar sits on the neckline seam and other than taking in the center back closer to the hem, it works ok. The hem darts pull the fullness towards the body and the sleeves have to be shortened. There is extra fullness in the sleeve cap and the center back panel has no interfacing right now but will need some to keep the shoulders with a good shape. Shoulder pads can be added later but mainly it will be worn over an existing lightweight jacket of some sort.

With the darker wool basted to the collar and a real body, you can see how stiff the bodice is already so that will be changed. The photos are very blurry as my battery was low using a real camera not a phone. Nancy loved the high collar and the drapey feature so she can wear this without a neck scarf.

In the back view you can see the shoulder area collapsing because of no stiff interfacing. The hem darts look weird but being hand basted, that will even out when machine stitched.

In this side view you can see the issue with the area of the shoulder seam joined to the back of the sleeve at the back princess seam and the extra fullness in the sleeve cap. Also this shows how the interfacing is holding the front well away from the body instead of straight down.

Let’s turn this puppy inside out and see what has to be done…

You can see the thin cotton muslin is not enough to keep the back in good shape so some horsehair canvas will be attached.The large dart at the top of the lower panel helps hug her back waist and will gradually return to the 5/8 inch center back seam at the hem. The muslin at the bottom panel with darts may be removed as well later. All of this will be lined with black Ambiance. The sleeves are already lined and pinned up. All the hand basting will be replaced with machine stitching and pressed flat and possible topstitched.

All the interfacing will be removed from this darted area and just left at the center front edges (about 4 inches) to keep those edges nice and sturdy for future buttons/snaps. By removing it, the darts and pockets should relax and hang straight.

Let’s escape this holy mess!!!

While I was away in another state helping my friend with her new knee replacement surgery, I was able to complete some puzzles.

More about my trip next time and a completed jacket!!!

Stay warm to those who are expecting heavy snow this weekend! We could use some rain here in the Pacific Northwest before the fire season!!!

Happy New Year everyone!

Posted in non-challenges | Tagged , , | 2 Comments

Underlining?

The more I feel the two layers of wool and imagine them working (or not working) together, I feel they need something else to make them more stable and hold up under the pressure of many wearings and dry cleaning.

I have all of the Kennth D. King CDs and have been watching him on making jackets. He uses the technique of an underlining to attach the thicker and rougher interfacing known as “horsehair or goat hair or hymo” interfacing. It gives the sewer something to needle prick or grab unto when doing pad stitching. So watching the video and thinking about going off and searching for some thin cotton-like fabric to place under the horsehair, I realized that I have something that would be perfect…hold the phone…what about a perfect copy using the already used cotton muslin? It has all the markings already and is thin enough to lay flat.

Of course this adds more labor but what good would it be to have a limp jacket that you don’t want to wear over and over and get compliments??? All I had to do was open the basted darts and iron it flat to attach with pins before I do a zigzag stitch all around and then trim off the thick horsehair just inside the seam allowance thus making a “frame” of cotton that will not add bulk in the seams. So let’s try that out…

Sorry that the photo is blurry after being reduced but you can make out the shoulder on the top right and all the other red arrows point to waist lines and darts and pocket dart positions. For now I have not opened the tw0 neck darts but they will be flattened and then resewn as a unit later.

The muslin is pinned to the back of the wool and all the wrinkles will be smoothed down.

Then the horsehair is laid on top and re-pinned.

You can see the extra muslin that will be trimmed away to the actual edge of the wool.

Pinking shears keep all the layers from raveling away.

All edges neat and clean and ready for some hand basting and the eventual zigzagging just over 5/8 inch from the edge. Once that is done, the horsehair is trimmed away. Kenneth uses a Serpentine stitch in his video which again would result in less bulk than a regular zigzag stitch that could act like a satin stitch.

Just to get in the holiday mood, tonight we are going to see a local production of A Christmas Carol and indulge in a drink of the season…

good old eggnog         and rum.

Wishing all my readers have a serene last week before the 25th! Thank you for following along!!!

Posted in non-challenges | Tagged , , , , | 7 Comments

Stiffen Up!

When your client buys fabric, especially wools for a jacket/coat, the texture and thickness have to perform just right. If there is not enough interfacing inside, the finished garment will hang like a rag and not hold up after many dry cleanings.

With the pieces all cut out of the two colors of wool, I need to find just the right interfacing in my stash to make it all work well. Now the leading advice about interfacings is to not join unto the fashion fabric that is thicker that the original. We need something that resembles a softness and drape without making it look and feel very cardboardy. Every piece will also be lined with black Ambiance.

While the pattern calls for 3.5 yards of 60 inch fabric, I had to mess around with two 2.25 yard pieces in different colors of burgundy and different thicknesses. I folded back 2.5 inches to narrow the collar and had to reduce the length of the front of the jacket by 2 inches to fit it on the wool. Nancy said she didn’t mind losing some of the length in both those areas…whew!

The other things to decide on is…do I really want to use the type that requires lots of hand worked pad stitching like I would use for a tailored jacket?

Maybe not….the jacket is supposed to be soft yet strong enough to hold a nice wraparound collar.

Digging through my stash, I found all these types of interfacings that I have been buying and collecting for the past 50+ years while sewing for clients. Wherever I travelled or lived, in whatever country it was, I bought tailoring interfacing both fusible and sew-in. Some were bought in 10 yard pieces and some I bought a whole bolt…Lord help me!

Mainly all the pieces were fusible Suitmaker but in all the different colors I could find. Back in the 60’s and 70’s interfacings came in many shades from white to black and all the greys and beiges in between.

I decided to use the black nylon tricot fusible on the upper collar (facing) that will show when flipped back and also be attached inside to the main layer. It has to be pliable as the under collar as main body of the jacket will be stiffer to hold the shape.

With so many darts in the neck seams and the pockets and hems, there had to be a way to mark all the stitching lines so I made a paper template to transfer the markings on either the right side or wrong side of the wools. I tried using different marking tools and settled on the chalk triangle and a pastel chalk pencil.

The wrong side of the lighter burgundy wool has a black fused backing:

The pastel chalk pencil shows up better than the tailor’s pencil:

The neck seam darts:

The pocket dart and waist dart in the front:

The back and side hem darts:

At this point I am thinking that when they designated this pattern “FACILE”…someone must have had a real laugh!

With Christmas being two weeks away, I won’t be rushing to finish this project with long machine basting stitches as usual as Nancy, my client, will be stuck in Portland for a while and we will meet up again in the new year.The flooding in the Pacific northwest this year has been quite dramatic!

Also two days after Christmas, I will be flying to visit and help a friend who is having knee replacement surgery like I had for both my knees in the last two years. Knowing how helpless you are in those first few weeks, I just had to offer her my help as she is a widow and will need a driver to get her to the physicel therapy appointments and someone to cook the meals and keep up with the laundry. I had Mr. Mole step up when I was in that situation and it made such a difference when he could drive and cook and run the washing machine on his own while I spent most of my time downing pain pills.

I will be taking some sourdough starter with me to make some crunchy loaves and making and freezing all sorts of soups for her too.

So my friends, I wish you a very safe and healthy holiday season and will meet back in 2026! Thank you for following along!!!


Posted in non-challenges | Tagged , , , , | 4 Comments

Getting Serious

After surviving 3 weeks of a nasty virus and non-stop coughing and nose blowing, it was time to get to work on the jacket.

In the last post I had photos of some of the problems and now I can really address them and see what needs to be done before cutting out the wool fabrics.

There is the 1.5 inch slash and spread across the back yoke area which will be adjusted on the paper pattern as my usual way.

The collar is at least 2 inches too wide and would hang over the sleeve cap so it is just folded under to preview the loook.

Side view shows the curved back and also where the side seam is and where the hem dart is in line with it.

There are 4 hem darts in the front and two of them are cut so just opening them up shows that I will have to fill in the gaps with the paper pattern as we are leaving them out.

That’s one doozey!

While the pattern envelope shows the jacket does not close enough to cover the front opening, it will be cut wide enough to close properly and not expose any skin to get cold.

Next we have a bizarre side dart that also houses a pocket…never have done one of these so I will be very careful to follow directions! You can see I have marked the new stitching line to bring it closer to the body.

The side back princess seam is adjusted as well to be tighter.

Here is the side panel with two pieces #7 front and #6 back. Either I can take in the actual side seam .5 inch (1 inch total) or take the extra .5 inch off the curved edges. No matter which I choose,the adjoining parts of the jacket will have to be changed as well.

#6 side back panel will be trimmed where the “X’s” are marked. I cut the muslin in the XXL size just to be sure and now, It will be cut down to the XL size.

Same for the side front #7…excess will be trimmed.

Upper back #5 will get a patch to keep the curve. With a center back seam, this is done easily and no need for any neck darts.

Lets compare it to the original paper pattern:

Besides sewing, the garden sweet potatoes have been extracted and we ended up with this assortment. The purple sweet potatoes have come out pretty scrawny but when roasted on a sheet pan in the oven with olive oil and spices, they are delicious skins and all!

The cool part is, I can now start to make more “slips” for planting next Spring and not have to buy more online. The same with the regular orange sweet potatoes…one can be saved to make more slips next year as it is organic and does not have pre-emergent spray on it.

The butternut squash did not produce a lot of fruit but OH MY are they fat and heavy!!!! They reside on Mr Mole’s work bench in the garage all winter and will be used for soups and veggie side dishes.

Still make time to sit and do puzzles:

When Nadine is not hiding in bags or boxes, she also helps out with my puzzle making:

My sourdough bread making is still coming along with a little invention for keeping the top bread pan from shifting in the oven. Every time I tried using the top pan as a cover, the heat of the oven and spray caused it to slip off the bottom pan, so I inserted tin foil into the upper one to make it wider and it stayed in place.

The happy result:

Lots of small holes to hold the butter…yummy!

Thank you for following along and I hope all your sewing projects turn out great!  A deserted beach in San Diego and Mr Mole resting.


Posted in non-challenges | Tagged , , | 8 Comments

The Try-On

Let’s get started with fitting this Vogue 1263 muslin to Nancy:

From the back we see that there is extra fabric at the back princess seams and the collar is huge! The hem shaping darts are basted and ok for now.

I’ll be taking in the center back seam 1/2 inch totalling 1 full inch. Doing that makes the horizontal waist seam rise more that the normal curve.


Time to slash and spread:

The amount needed is 1.5 inches.

The collar will be reduced by 2 inches and the front princess seams will be taken in 1/2 inch like the back seams.

Snugging up the back princess seams give a more flattering shape.

The center lower back also will be taken in 1/2 inch all the way to the hem.

There is no photo of the front hem darts that will be opened to lay flat. Sorry I forgot to take a photo this time.

Now moving unto the “Little Somethin” Jacket:

We start with the back and see the drag lines pointing to the yoke line.

Keeping the straight line:

Slash and spread another 1.5 inches as the jacket before:


The front shows a need for shoulder pads with drag lines pointing to the shoulder seams and maybe later I will slash the front on the horizontal lines drawn.

The photo on the pattern envelope doesn’t show that the fronts can cross over each other for an Asian feel, but it works.

The sleeve needs another 3/4 inch to the cap to keep the horizontal lines in the gingham to be parallel with the floor.

So there is lots to do and mess with before we can get cutting the wool fabrics.

Nancy will be button shopping when she returns to Portland.

Last week, Mr Mole and I flew down to SoCal for a couple days to visit two of my grown children and two grandchildren. We made a quick trip down to San Diego with a rental car and were lucky enough to get out unto the I-5 freeway before it was closed for military maneuvers at Camp Pendleton Marine Base where live ammunitions were fired near the freeway. Some of the stray bullets etc were found resting on local police vehicles, so the danger was real!Here is a one video from the scene:  https://www.youtube.com/shorts/CHdVvVkk3Eg 

While away, we both managed to catch a severe chest infection so this week at home has been for recovery with lots of coughing and sneezing. I’m hoping that next week I can get back to sewing and some garden harvesting before the first frost. So excited to have butternut squash to keep in the garage over the winter to make soups!!! Then we will be checking the grow bags and raised beds for signs of the purple sweet potato experiment…fingers crossed for a decent harvest!!!

With Halloween a week away, so many of my neighbors have decorated their houses with ghosts and bats and spiders to make it all seem creepy for the little kids collecting candy. I think that this year we will see more inflatable costumes especially since the frog and dinosaurs and unicorns have become so popular from the Portland peaceful protests up north.

May your Halloween celebrations be safe and filled with laughter and happy children filled with candy!!!

Posted in non-challenges | Tagged , , , , | 1 Comment

Muslins to Go

In my last post I shared the Vogue jacket 1263 made up in muslin for Nancy. She has also mentioned that other jackets have caught her eye, so I will be making more muslins for her when she comes back for her first try-on of the 1263.

So far I have made the muslin for the CNT A Little Somethin’ Jacket

It is simple with collar/facing that folds under and is stitched down. My thoughts are to self line the jacket and then the facing could be used as a contrast and sewn on the right side instead of the wrong side. But you never know. While the muslin is not very exciting, it does have that “blank canvas” quality about it and only 3 pieces.


Once again, I used gingham for the sleeve and drew possible slashing lines across the back yoke area and front bust and tummy region. The sleeves can be full length or 3/4 where the lines are drawn. I also changed the center back fold to a real seam for adjusting for a curved back or sway back adjustment.

Another pattern is CNT Start after Breakfast

What I like is the center back pleat and the choice to cut the fabric crossgrain, the dolman sleeves and it can be reversible.

Next will be Butterick 5423

Who doesn’t like pockets and those cool lapels and an asymmetrical closing? The choice to use two different fabrics is also a plus!

What about this final choice…Butterick 5617

It has great pocket details and chance to use big buttons and maybe even contrasting front bands with a madarin collar. With real bust darts, this boxy jacket could have a good shape and flatter. Many sleeve variations are a bonus for sure!

The garden continues to produce so much goodness for us!

The purple sweet potatoes are continuing to spread and this photo taken in August shows just the first vines to completly cover the planting bed. Soon they will be excavated with the hope of finding many many tubers!!!

The view from my sewing room:

Thankfully our daytime temps have come down from the high 90’s and the nighttime temps have been in the high 50’s so lots of nice cool sleeping with the windows open!

Wishing all of you much success with your projects! Thanks for dropping by!!!!

Posted in non-challenges | Tagged , , , , | 5 Comments

Struggling at 102 Degrees

These past few weeks have challenged both plants and people.

The purple sweet potato slips have been growing wildly in the ground and in the grow bags. So far I have given 5-6 slips each to about 10 people who were willing to carry on the experiment.

Our new blackberry bushes are coming along…lots of leaves but only two berries.

The blueberry bushes are still producing along with the ever-bearing strawberries.

Our old Asian Pear tree is dropping fruit before the birds get to eating them.

Sitting in the shaded patio, you get a view of the fountain and all the other plants under the sun awning.

But what about the new jacket for Nancy?

Well, the muslin has been basted together and I decided to use gingham for the sleeves to find drag lines to correct.

Here it is ready for try-on when Nancy returns from Portland. There is a facing that gets attached to this and also hidden pockets within darts but for now it just hangs there looking a little sad and lifeless…ha ha.

The back view:

In the kitchen, things have been busy with the sourdough baking. Instead of making all the loaves in a round shape in the Dutch Oven pan, I used regular loaf pans to see what a normal shaped loaf would taste and look like. One pan is used at a cover before being removed for extra browning.      

The finished product when sliced fits perfectly in the toaster!!!

As we have another week or hot weather coming, I think staying indoors and working on projects sounds like a good idea!

Stay cool and keep up the fluids…until next time, happy sewing and baking!

Posted in non-challenges | Tagged , , | 5 Comments

Summer Veggies and Things

OMG is it August already?

Let’s start with a quick walk around the back garden to grab some things for dinner:

Found this monster lurking under a big leaf!

The berries are still producing!

My neighbor’s peach tree overflow:

My neighbor’s plum tree:

Mr Mole trimmed the sunflowers and brought these in for me.

Our yellow plums have been turned into a cobbler by Mr. Mole and it was delicious!!!!

For those who have never seen the inside of Nancy’s pants with the center front invisible zipper and lining and French tack that holds the top inside snap.

The lining is hand stitched to the serged edge of the zipper so everything is very smooth inside. Since last week’s blog, I let out her right side seam and added to the waistband to drop the whole right side down after seeing the drag lines from her larger right hip. Sorry no photos of the finished project.

What’s next for Nancy when she returns in Sept? Well, I will be making a muslin for her with this pattern from 2011 we have had for a while.

Check out: Vogue 1263 review by The Sewing Lady Alison Wheeler

She has a three part tutorial on her blog.

I have had two wools that will be made into this once I get the right color blocking with the light and dark burgundy fabrics. Not sure about a lining as it does not line the entire jacket, probably just the under collar once I get it all layed out on the cutting table. We may not use the darts on the back hem as they would certainly cause the back hem to “cup” under her bottom and who needs that???

The wool on the left measures 3 yards and the darker wool on the right measures 1 yard so I should have enough….fingers crossed!

Stay cool everyone and stay hydrated on these hot days!!!


Posted in non-challenges | Tagged , , , | 2 Comments