
Nice to welcome you to the second part of the Windows 7 window tutorial! Today’s continuation is seamlessly linked to the first part of HTML and CSS. After the interface design of a Windows 7 window in the Firefox “Look & Feel” was simulated in yesterday’s first part, in today’s second part JavaScript or the plugin jQuery (UI) will play the main role in this tutorial 2-divider. In particular, a possible modification of the window size (resizable) and position (draggable) by the user is discussed.
Step 1 – Create and reference to JavaScript files
Since we have already implemented a Windows 7 window according to the “design specifications”, but still no “movement” is possible, the necessary javascript files as resources (jQuery & jQuery-UI – lines 4 to 6) For the still pending request, is added to the existing HTML code from Tutorial 1. In the finally given JavaScript file windows7.js (line 7) the functions corresponding to our requirements (step 3 to 4) are defined.
...
<title>Windows 7 mit CSS3 und jQuery</title>
...
<s cript type="text/javascript" src="http://ajax.microsoft.com/ajax/jquery/jquery-1.4.2.min.js"></script>
<s cript type="text/javascript" src="../js/jquery-ui- 1.7.2.min.js"></script>
<s cript type="text/javascript" src="../js/windows7.js"></script>
</head>
<body>
...
Step 2 – Draggable shift
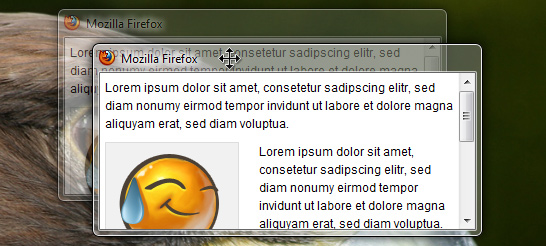
In order to make the Windows 7 window look and look like a Windows 7 window (draggable) and resizable, the following code must be created in the file windows7.js become. This code causes the already embedded [jQuery UI module dragging] (http://jqueryui.com/demos/draggable/) to be addressed and executed.
$function
  $".window".draggable
    cancel: .inhalt,
    containment: body,
    scroll: false,
    stack: group: .window, min: 1
  ;
;
A brief explanation of what’s going on here:
- Line 2 – all elements of class window can be moved
- Line 3 – Elements of class content can not be used for moving
- Line 4 elements can not be moved beyond the body-tag
- Line 5 – no scrollbars when a window is pushed out of the body-tag
- Line 6 – stack causes the currently active window to be placed in the foreground, is only interesting for more than one window
So you can now grab the window and move around.
Step 3 – Resizeable – Change of size
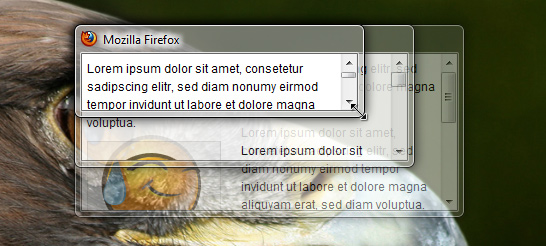
The last feature is still missing, the dynamic change of window size. Just below the dragging code within the windows7.js, the following JavaScript code is created.
$function
  $".window".resizable
    handles: n, e, s, w, ne, se, sw, nw,
    containment: body,
    minHeight: 80,
    minWidth: 138,
    maxHeight: $window.height,
    maxWidth: $window.width
  ;
;
This will now jump to the Resizable Module.
- Line 2 – all elements of the class window can be changed in their size
- Line 3 – handles specifies the corners and edges of the window elements to be added to the size change
- Line 4 elements can not be expanded beyond the body-tag
- Line 5 to 6 – minHeight and minWidth define the minimum height or width
- Line 7 to 8 – maxHeight and maxWidth define the maximum height or width (here, equal to the viewport of the browser)
Step 4 – Resizeable Features designed by CSS
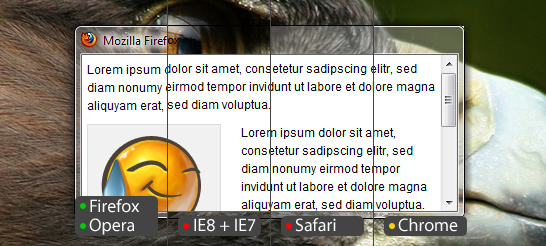
But a little is missing: The elements added by handles, such as the resizeable cursor, etc., still have to be styled via CSS. For jQuery UI there are themes, which of course already include. For our beginners example, the following code, which must be written into the style.css, is sufficient:
.ui-resizable-handle display:block;position:absolute;
.ui-resizable-disabled .ui-resizable-handle,
.ui-resizable-autohide .ui-resizable-handle display:none;
.ui-resizable-n,.ui-resizable-s height:7px;left:0;width:100%;
.ui-resizable-n cursor:n-resize;top:-5px;
.ui-resizable-s bottom:-5px;cursor:s-resize;
.ui-resizable-e,.ui-resizable-w height:100%;top:0;width:7px;
.ui-resizable-e cursor:e-resize;right:-5px;
.ui-resizable-w cursor:w-resize;left:-5px;
.ui-resizable-se,.ui-resizable-sw,
.ui-resizable-nw,.ui-resizable-ne height:12px;width:12px;
.ui-resizable-se bottom:0;cursor:se-resize;right:0;
.ui-resizable-sw bottom:0;cursor:sw-resize;left:0;
.ui-resizable-nw cursor:nw-resize;left:0;top:0;
.ui-resizable-ne cursor:ne-resize;right:0;top:0;
Demo
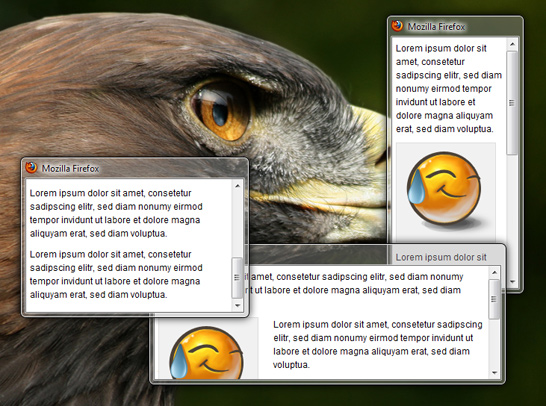
Now we would be at the end, from now your imagination is asked. The strict separation of content and layout allows you to create other themes as well, eg. With windows in Windows 2000 or Mac OSX Style? Or several windows at once? Who of you in the implementation of the two tutorials have done everything right, should have the following representation of a Windows 7 window:
On my blog I have a demo, Which also pushes the whole thing further: Aero Peek, maximize or close windows, Taskbar and Start menu, to name only a few points. I hope that I can give you some ideas, especially about CSS3, how useful it is, and how it will make it easier to design everyday.
Download
On Norman’s blog you can also get the final result of this small tutorial series as ZIP for download.
Author
This second part of this small tutorial series with the theme “Windows 7 with CSS3 and jQuery” has been posted by the guest blogger Norman Paschke, whom we welcome on this website on the Webstandard blog. Norman studied Applied Computer Science at the Technical University of Chemnitz and started Norman’s blog in early 2009, where he devoted himself to the subject of “Web and Webdesign”. In addition to tutorials, he also developed current trends and developments such as, for example, the Browsermarkt, picks up.


