


Kimi CLI官网,是月之暗面Moonshot AI自研的命令行ai工具
简介
Kimi CLI是月之暗面Moonshot AI自研的命令行ai工具。它旨在帮助用户快速完成编程和文件处理等任务。作为Python包发布,推荐使用uv安装。Kimi CLI不仅支持类Shell界面与原生Shell命令执行,还能与Zsh Shell深度集成,赋能AI代理能力。其原生支持ACP,可实现与兼容编辑器或IDE的协同工作。同时,遵循MCP配置约定,可连接指定的MCP服务器。
Kimi CLI官网: https://github.com/MoonshotAI/kimi-cli

Kimi CLI 是 Moonshot AI 自研的命令行通用智能体工具,它可以帮助你快速完成各种各样的编程和文件处理等任务。
Kimi CLI 目前还在 Technical Preview 阶段,如遇到 bug 或有任何意见或建议,欢迎通过 https://github.com/MoonshotAI/kimi-cli/issues 提交反馈!

安装
Kimi CLI 支持 macOS 和 Linux 系统,要求使用 uv 包管理器安装。
如果你的系统中还没有安装 uv,请先参考 uv 安装说明 进行安装。通常,在 macOS 和 Linux 系统中,可使用以下命令安装 uv:
curl -LsSf https://astral.sh/uv/install.sh | sh安装 uv 后,使用以下命令安装 Kimi CLI:
uv tool install --python 3.13 kimi-cli运行以下命令检查是否安装成功:
kimi --version由于 macOS 的安全校验机制,在 macOS 上第一次运行可能需要较长时间,请耐心等待。可以尝试将你所使用的终端工具添加到「系统设置」-「隐私与安全性」-「开发者工具」中,以信任终端上运行的程序。
升级
使用以下命令升级 Kimi CLI:
uv tool upgrade kimi-cli --no-cache使用
在命令行中进入你想要 Kimi CLI 操作的项目目录,运行 kimi 命令,即可启动 Kimi CLI。例如:
cd my-project
kimi
首次运行时,Kimi CLI 会提示没有配置模型,需输入 /setup 元命令,进入配置流程:
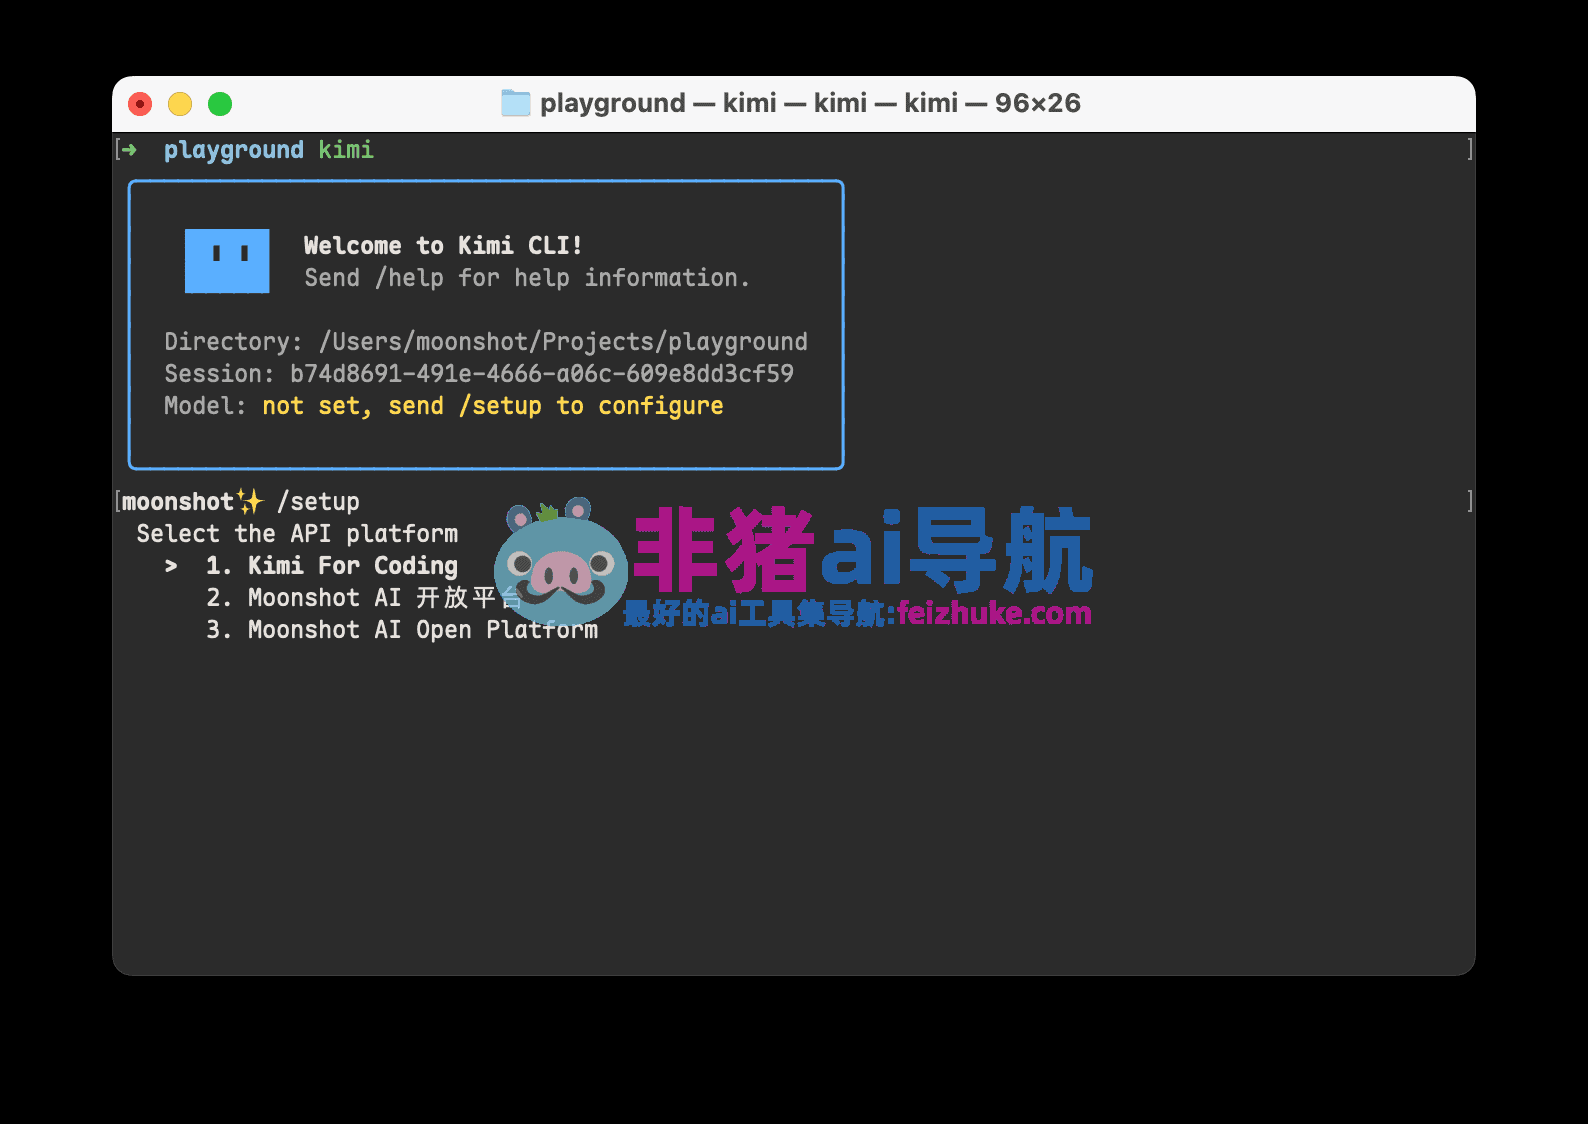
Coding 会员权益用户,选择第一个「Kimi For Coding 」,在随后的提示中,输入在会员页面获得的 API Key,并选择 kimi-for-coding 模型;Moonshot AI 开放平台用户,根据提示选择对应的平台,输入 API Key 并选择想要使用的模型。
配置完成后,即可开始使用 Kimi CLI,例如:

Thinking 模式
在 Kimi CLI 中,你可以使用 tab 键切换 Thinking 模式。
Shell 模式
Kimi CLI 不仅仅是一个编程智能体,还可以通过 Ctrl-X 快捷键切换到 shell 模式。通过该模式,你可以在不离开 Kimi CLI 的情况下,直接执行 shell 命令,方便进行文件操作和查看结果。例如:

搭配 Zsh 使用
Zsh 用户可以搭配 zsh-kimi-cli 插件,在 shell 中快速调用 Kimi CLI。
使用如下命令安装(以 oh-my-zsh 为例,其它包管理请参考仓库 README):
git clone https://github.com/MoonshotAI/zsh-kimi-cli.git \
  ${ZSH_CUSTOM:-~/.oh-my-zsh/custom}/plugins/kimi-cli
然后在 ~/.zshrc 中启用该插件:
plugins=(... kimi-cli)重新启动 Zsh 之后,即可在 Zsh 中通过 Ctrl-X 进入 Kimi CLI 模式:

目前 zsh-kimi-cli 插件还在持续更新中,请定期前往 custom/plugins/kimi-cli 目录通过 git pull 拉取更新。
搭配 Zed 编辑器使用
Kimi CLI 原生提供 Agent Client Protocol 支持,可以搭配任何 ACP 客户端使用,例如 Zed 编辑器。
ACP 是 Zed 编辑器推出的一种通用智能体协议,使智能体的核心功能(服务端)和用户界面(客户端)解耦,用户可以自由选择不同的智能体服务端和客户端进行搭配使用。
要在 Zed 中使用 Kimi CLI,首先需确保已经安装并配置好 Kimi CLI,然后在 Zed 配置文件(~/.config/zed/settings.json)中添加以下内容:
{
  "agent_servers": {
    "Kimi CLI": {
      "command": "kimi",
      "args": ["--acp"],
      "env": {}
    }
  }
}
随后即可在 Zed 侧边栏创建 Kimi CLI Thread:

接入 MCP 工具
Kimi CLI 支持广泛采用的 MCP 配置格式指定 MCP 工具。例如:
{
  "mcpServers": {
    "context7": {
      "url": "https://mcp.context7.com/mcp",
      "headers": {
        "CONTEXT7_API_KEY": "YOUR_API_KEY"
      }
    },
    "chrome-devtools": {
      "command": "npx",
      "args": ["-y", "chrome-devtools-mcp@latest"]
    }
  }
}
启动时,通过 --mcp-config-file 参数指定 MCP 配置文件路径即可。例如:
kimi --mcp-config-file /path/to/mcp.json
在第三方 Coding Agent 中使用
Claude Code
TIP
在 Claude Code 中,你可以使用 tab 键切换 Kimi K2 Thinking 模型
安装 Claude Code
若已安装,可跳至下一节。
macOS 与 Linux
# MacOS 和 Linux 上安装 nodejs
curl -fsSL https://fnm.vercel.app/install | bash

# 新开一个terminal,让 fnm 生效
fnm install 24.3.0
fnm default 24.3.0
fnm use 24.3.0

# 安装 claude-code
npm install -g @anthropic-ai/claude-code --registry=https://registry.npmmirror.com

# 初始化配置
node --eval "
    const homeDir = os.homedir();
    const filePath = path.join(homeDir, '.claude.json');
    if (fs.existsSync(filePath)) {
        const content = JSON.parse(fs.readFileSync(filePath, 'utf-8'));
        fs.writeFileSync(filePath, JSON.stringify({ ...content, hasCompletedOnboarding: true }, null, 2), 'utf-8');
    } else {
        fs.writeFileSync(filePath, JSON.stringify({ hasCompletedOnboarding: true }), 'utf-8');
    }"
如果终端提示
fnm命令未找到,请重新打开终端窗口再执行后续命令。
Windows
# windows 上安装 nodejs
# 右键按 Windows 按钮,点击「终端」

# 然后依次执行下面的
winget install --id Git.Git -e --source winget # 或者参考 https://git-scm.com/install/windows 用其他办法安装 Git
winget install OpenJS.NodeJS # 或者参考 https://nodejs.org/zh-cn/download 用其他办法安装 Node.js
Set-ExecutionPolicy -Scope CurrentUser RemoteSigned

# 然后关闭终端窗口,新开一个终端窗口

# 安装 claude-code
npm install -g @anthropic-ai/claude-code --registry=https://registry.npmmirror.com

# 初始化配置
node --eval "
    const homeDir = os.homedir();
    const filePath = path.join(homeDir, '.claude.json');
    if (fs.existsSync(filePath)) {
        const content = JSON.parse(fs.readFileSync(filePath, 'utf-8'));
        fs.writeFileSync(filePath, JSON.stringify({ ...content, hasCompletedOnboarding: true }, null, 2), 'utf-8');
    } else {
        fs.writeFileSync(filePath, JSON.stringify({ hasCompletedOnboarding: true }), 'utf-8');
    }"
配置 Kimi For Coding 模型
完成 Claude Code 安装后,请按照一下方式设置环境变量使用 Kimi For Coding 模型。
macOS 与 Linux
export ANTHROPIC_BASE_URL=https://api.kimi.com/coding/
export ANTHROPIC_API_KEY=sk-kimi-xxxxxxxxxxxxxxxxxxxxxxxxxxxxxxxxxxxxxxxxxxxxxxxxxxxxxxxxxxxxxxxx  # 这里填在会员页面生成的 API Key

claude
Windows
$env:ANTHROPIC_BASE_URL="https://api.kimi.com/coding/";
$env:ANTHROPIC_API_KEY="sk-kimi-xxxxxxxxxxxxxxxxxxxxxxxxxxxxxxxxxxxxxxxxxxxxxxxxxxxxxxxxxxxxxxxx"  # 这里填在会员页面生成的 API Key

claude
确认环境变量是否生效
启动 Claude Code 后,在命令输入框输入 /status,确认模型状态。
接下来就可以使用 Claude Code 进行开发了!
Roo Code
安装 Roo Code
若已安装,可跳至下一节。
- 打开 VS Code,进入扩展视图(
Cmd+Shift+X/Ctrl+Shift+X)。 - 搜索
Roo Code并安装 Roo Code 官方扩展。 - 安装完成后,活动栏会出现 Roo Code 图标;如未出现,可重启 VS Code。
配置 Kimi For Coding 模型
- 打开 Roo Code 面板,进入设置页。
- 在 Providers 区域选择
OpenAI Compatible,按照提示填写:- Entrypoint:
https://api.kimi.com/coding/v1 - API Key:输入在会员页面获取的 Kimi For Coding API Key
- Model:
kimi-for-coding - Use legacy OpenAI API format:✅
- Enable streaming:✅
- Include max output tokens:✅
- Enable Reasoning Effort:Medium
- Max Output Tokens:32768
- Context Window Size:262144
- Entrypoint:
- 如无需浏览器自动化,可关闭相关选项。
- 保存后返回 Roo Code 主界面,新建会话即可使用。
完成配置后,即可在 Roo Code 中调用 Kimi For Coding 模型开展代码开发与协作。
数据评估
本站非猪ai导航提供的Kimi CLI都来源于网络,不保证外部链接的准确性和完整性,同时,对于该外部链接的指向,不由非猪ai导航实际控制,在2025年11月19日 下午11:31收录时,该网页上的内容,都属于合规合法,后期网页的内容如出现违规,可以直接联系网站管理员进行删除,非猪ai导航不承担任何责任。
相关导航


 粤公网安备 44080402000127号