 EcoSmart Stud
2. Using EcoSmart® Studs in Wood Framed Construction
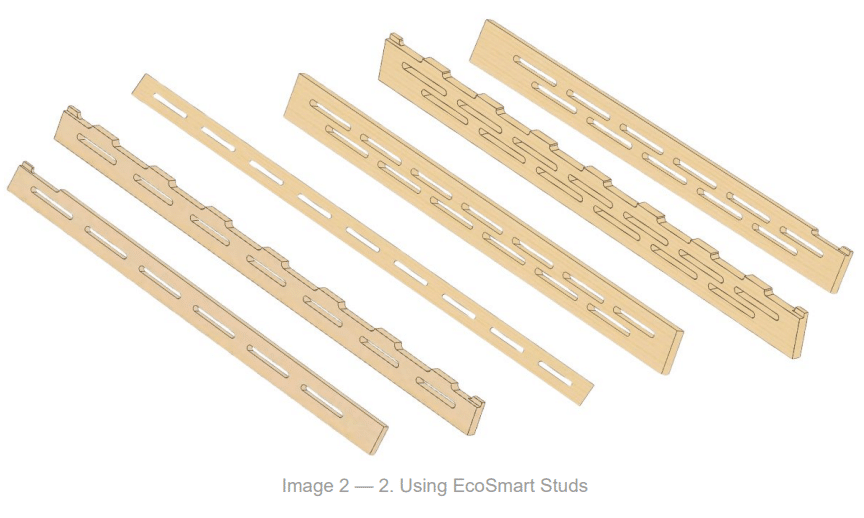
EcoSmart® Studs (ESS) are easy to install in wood framed construction and offer excellent exterior wall insulation. They are lightweight and simple to handle, making wall framing more efficient without changing the fundamentals of standard framing practice.
The EcoSmart Stud is evaluated under TER 2304-120, provided by DrJ Engineering. DrJ Engineering works with manufacturers to bring new products, processes, and services to market through generally accepted wall framing practices, reliably and cost-effectively. Download the EcoSmart® Stud TER in PDF or sealed format for full design values, bracing tables, and code references: drjcertification.org/ter/2304-120.
Product family at a glance:
| Product | Framing Position | Key Feature |
|---|---|---|
| 2×6 Original EcoSmart Stud | King, perimeter, field, or cripple | 2 thermal breaks; nubs face exterior |
| 2×6 EcoSmart V2 Stud | King, perimeter, field, or cripple | No nubs; one slot; solid nailing surfaces both sides; supports 6/12, 4/12, 3/12 patterns |
| 2×6 EcoSmart Jack/Trimmer Stud | Trimmer/Jack (supports header) | Full-depth solid nailing face; compatible with nail-fin windows |
| 2×8 Original EcoSmart Stud | King, perimeter, field, or cripple | 3 thermal breaks; highest R-value in the line |
| 2×8 EcoSmart V2 Stud | King, perimeter, field, or cripple | Same no-nub, one-slot design as 2×6 V2, scaled to 2×8; solid nailing surfaces both sides; supports up to 2/12 pattern |
| 2×8 EcoSmart Jack/Trimmer Stud | Trimmer/Jack (supports header) | Full-depth solid nailing face; compatible with nail-fin windows |
3. Tools & Materials Checklist
Gather the following before starting a wall section:
- Framing nail gun (or hammer) rated for 3″ / 3½″ nails
- Sheathing nail gun (or hammer)
- Tape measure & speed square
- Chalk line
- Depth gauge (for spray foam verification)
- 3″ or 3½″ 0.131 box nails (or better) — framing
- 2-5/8″, 2½″, or 2¾″ 0.113 box nails — sheathing
- ccSPF to be installed by a certified insulation installer, rated ASTM C1029 Type II (e.g., XCELUS® XLS 2000 or equivalent) — confirm rated R-value/inch and vapor barrier depth on the product data sheet
- Plywood gussets (on hand for reinforcement if a stud is damaged in the field)
- Metal reinforcement brackets (e.g., Simpson Strong-Tie® or equivalent) — optional alternative or supplement to plywood gussets for reinforcing a damaged, notched, or penetrated stud; select per the bracket manufacturer’s load tables for the application
Spray Foam Specification
Structural equivalency values in TER 2304-120 depend on using a 2 lb. ccSPF rated ASTM C1029 Type II — this is the rating that governs the bonding/adhesion and compressive strength needed for structural reinforcement. Most 2 lb. closed-cell products, including XCELUS® XLS 2000, meet this rating; other ASTM C1029 Type II products may be used as an approved equal. Two other properties vary by manufacturer and product version and are not interchangeable: rated R-value per inch (typically 6.5–7.5) and the depth needed to qualify as a vapor barrier (typically 1″–2″). Confirm all three — ASTM C1029 Type II rating, R-value/inch, and vapor barrier depth — on your chosen product’s data sheet before ordering, and check with your local AHJ on vapor barrier requirements for your climate zone.
4. General Installation Instructions
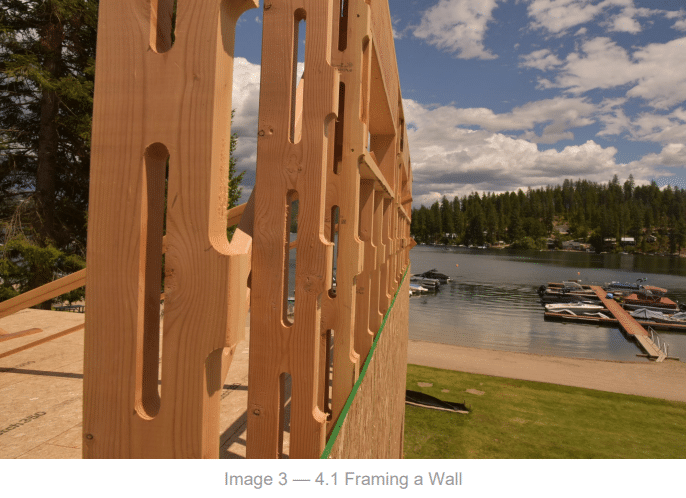
4.1 Framing a Wall with EcoSmart® Studs
- Frame with 2×6 or 2×8 EcoSmart® Studs just like standard wall framing for wood framed construction.
- Position spacers/nubs to face the exterior side, against the building sheathing, for optimal exterior wall insulation.
- The solid side of the stud faces the interior side of the building.
4.2 Wall Framing Techniques
- Frame at 12″, 16″, or 24″ on center. Observe additional framing requirements when using 24″ o.c. advanced wall framing techniques.
- Standard solid top plate(s) and bottom plate. Alternate plate assemblies may be used for advanced framing.
- ESS may be used as a cripple stud. If the slot in the ESS is split where it meets the upper or lower framing, place a nail on each side of the slot.
- ESS may be used for header support (see Section 7 for the Jack/Trimmer Stud, purpose-built for headers).
- For 2×8 walls, a combination of 2×4 and 2×3 studs can be used as plates to create a full thermal break for top and bottom plates.
4.3 Nailing and Sheathing Guidelines
| Application | Fastener |
|---|---|
| Framing nails | 3″ or 3½″ 0.131 box nails or better |
| Sheathing nails | 2-5/8″, 2½″, or 2¾″ 0.113 box nails or better |
| Standard pattern (non-high-wind) | 6″ o.c. perimeter, 12″ o.c. field |
| High-wind areas | Follow local code nailing pattern(s) |
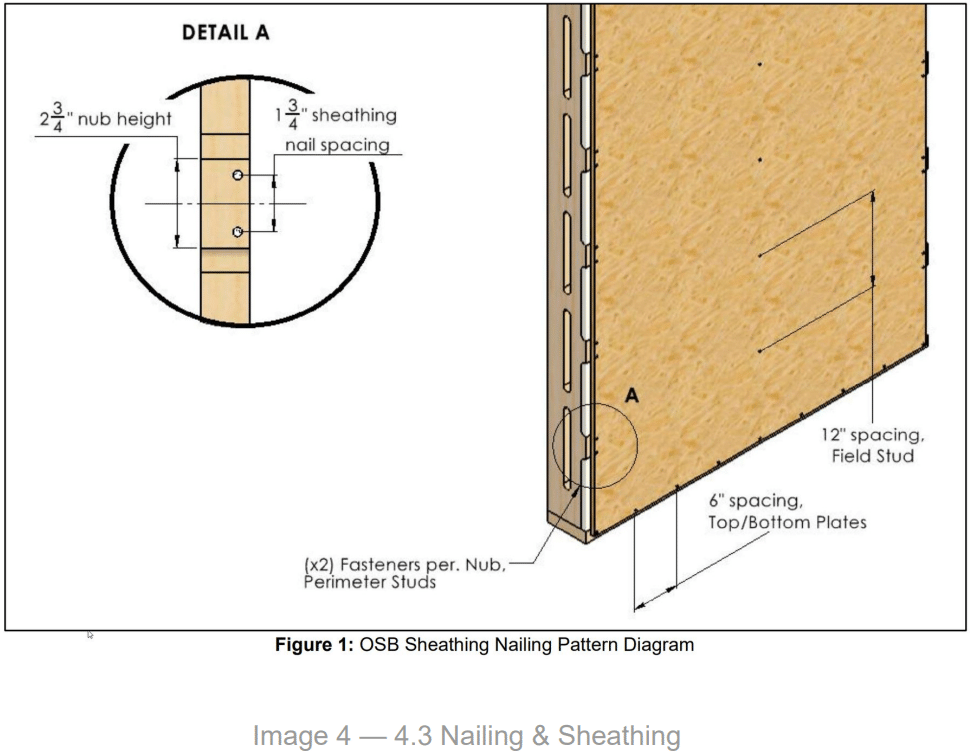
Alternate nailing pattern: 6″ on center for top and bottom plates. On vertical perimeter studs, place 2 sheathing nails in each nub, 1¾″ apart, for every nub on the vertical perimeter studs. Full detail: see the Hybrid Nail Pattern reference (link to be restored on website — currently missing; PDF exists in Resources). This Hybrid nailing pattern applies to the Original (V1) EcoSmart® Stud when used in the perimeter position, since it nails into the nubs. The EcoSmart® V2 Stud has solid nailing surfaces rather than nubs, so it does not require the Hybrid pattern when used in the perimeter position — standard nailing applies.
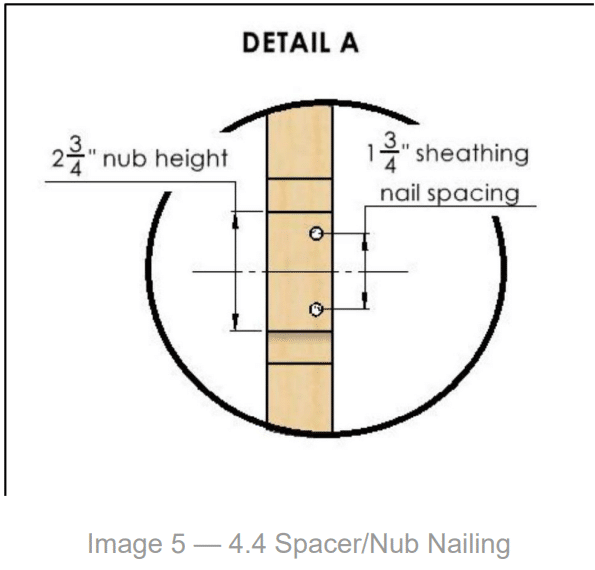
4.4 Spacer/Nub and Perimeter Nail Placement
- 2×6 or 2×8 ESS are designed for direct contact between sheathing and the ESS for the 6/12 nailing pattern. For field ESS studs, install the nail in the spacer/nub.
- At perimeter stud locations for 6″ o.c. nailing, install nails into the spacer/nub and also halfway between the spacer/nubs. This nub-based Hybrid pattern applies to the Original (V1) EcoSmart® Stud.
- The EcoSmart® V2 Stud does not require the Hybrid nailing pattern when used in the perimeter position, since it has solid nailing surfaces rather than nubs — standard nailing spacing applies instead.
- For 7/16″ or ½″ sheathing on 2×6 or 2×8 ESS, use 2-5/8″ sheathing nails to achieve the 1″ penetration required by code.
- For 5/8″ or ¾″ sheathing on 2×6 or 2×8 ESS, use 2½″ sheathing nails for the required 1″ penetration.
- For the 2×6 EcoSmart V2 Stud, 2-5/8″ sheathing nails may be used for sheathing up to 1¼″.
4.5 Utility Pass-Throughs and Reinforcement
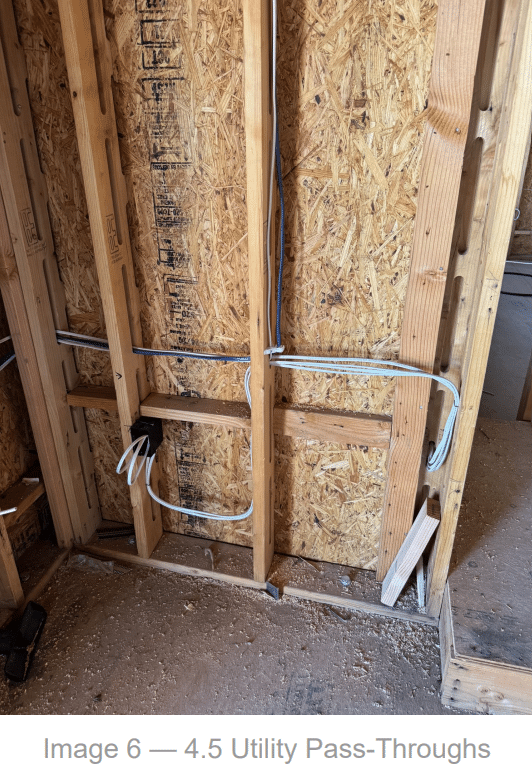
- Gas lines, electrical, and low-voltage wiring can pass through the ESS slots without additional drilling.
- If an individual ESS will not work in a given wall assembly for any reason, simply substitute a solid 2×6 or 2×8
stud in its place. - Use plywood gussets to reinforce an ESS if it is damaged during installation or by trade installers.
- For plumbing penetrations through an ESS, metal reinforcement brackets (e.g., Simpson Strong-Tie® or equivalent) may be used in place of, or in addition to, plywood gussets — select per the bracket manufacturer’s load tables for the size and location of the penetration.
- Where notching or drilling beyond the provided slots is required, reinforce the stud per accepted engineering practice or manufacturer guidance, or replace with solid sawn lumber per applicable code.
4.6 Spray Foam Installation, Air Sealing & Vapor Barrier
ESS Chambers Must Be Insulated — Fire Safety
Any wall system using EcoSmart® Studs must be filled with insulation — ccSPF, blown insulation, or the combination specified for the assembly — per this section and the TER. This is primarily a fire-safety requirement: the open thermal-break slots in an ESS assembly may result in a lower ignition temperature than a solid-sawn stud if left empty and exposed, the way a stud cavity might be in an unfinished, uninsulated space (for example, an uninsulated garage). ESS chambers are open after framing and before insulation is installed; that is expected during construction. The chamber must not be left empty and exposed in the finished structure. Filling the chamber as specified is required for fire performance, and also supports the thermal performance and, where ccSPF provides structural reinforcement, the structural values in TER 2304-120.
Warranty Limitation — Uninsulated Walls
ESS walls must be insulated. Uninsulated walls automatically void any warranty by ViCa3 Ventures and EcoSmart Stud, and automatically limit liability to the cost of the ESS product used on the project. ViCa3 Ventures is not liable for any incidental or consequential damages due to the Builder’s negligence or deliberate acts in improperly using or failing to follow the appropriate version of the ESS installation instructions.

- Apply 2 lb. ccSPF along the perimeter ESS studs, bottom plates, and top plates. The foam must fill the gap between the ESS, field studs, and the sheathing for structural reinforcement and air sealing.
- Extend foam 2.0″ onto the vertical studs and 4″ onto connected sheathing and plates.
- Use a 2 lb. ccSPF rated ASTM C1029 Type II — the rating that governs bonding/adhesion and compressive strength for structural reinforcement, and is required in the wall chamber for air sealing. XCELUS® XLS 2000 is one example product meeting this rating; other ASTM C1029 Type II products may be used as an approved equal.
- A minimum depth of 1″ of 2 lb. ccSPF is required in the chamber to complete structural reinforcement of the exterior wall, and is also typical for air sealing performance. This 1″ minimum is separate from — and may be less than — the additional depth needed for the R-value, vapor barrier, and dewpoint considerations below.
- For hybrid installations (solid 2×6/2×8 stud or 2×6 EcoSmart V2 Stud at perimeter stud locations), no ccSPF is needed for structural reinforcement.
- R-value per inch varies by manufacturer and product version, typically 6.5–7.5 per inch. To meet the 2021/2024 Energy Code R-22 effective insulation requirement for exterior walls, calculate the depth needed using your chosen product’s rated R-value per inch, then install to whichever is greatest among all the depth requirements in this section.

- Additional foam depth (typically in the 1″–2″ range) may be required to meet vapor barrier/vapor retarder performance, depending on the manufacturer’s tested permeance rating at a given thickness. Confirm against the product’s current data sheet, and check with your local AHJ on whether a vapor barrier is required for your climate zone.
- Additional foam depth (typically in the 1″–2″ range) may be required to address dewpoint condensation control, based on climate zone and wall assembly. Check with the local AHJ for applicable code requirements.
- Once the required ccSPF depth is determined — the greatest of the structural, R-value, vapor barrier, and dewpoint considerations above — check with your insulation installer on the fill volume needed for any remaining blown or batt insulation in the chamber above the ccSPF layer.
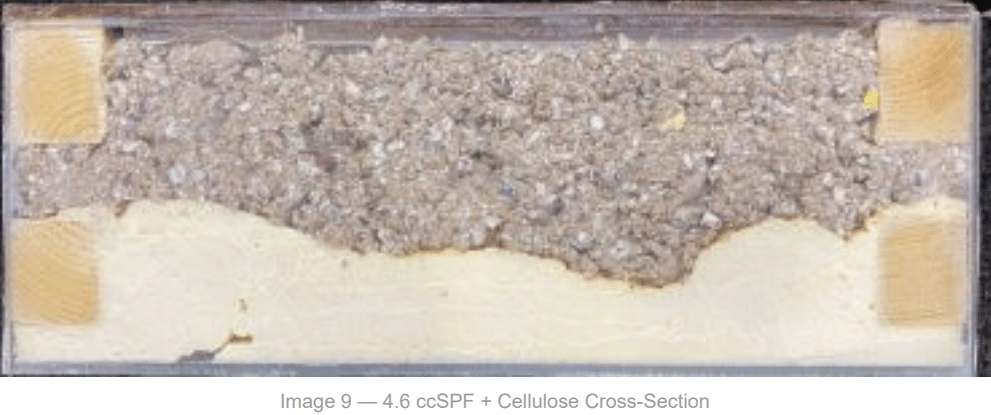
- “Picture framing” of the chamber (foam applied around the perimeter rather than filling the full cavity) is acceptable in some locations and provides partial air sealing and structural reinforcement benefit. Check with the local AHJ for code requirements before using this method as a substitute for a full fill.

- Check with your local AHJ for any additional ccSPF depth required for Flash-and-Fill in your area.
- Use a depth gauge to verify depth and adhesion of the ccSPF.
- Filling the slot(s) of the ESS with 2 lb. ccSPF adds extra reinforcement but is not required.
Foam Specification Reminder
Structural values in TER 2304-120 depend on an ASTM C1029 Type II-rated 2 lb. ccSPF (XCELUS® XLS 2000 is one qualifying product). R-value per inch, vapor barrier depth, and dewpoint condensation control depth all vary by manufacturer and product formulation — confirm all specifications on your chosen product’s current data sheet before ordering, and check with your local AHJ on climate-zone-specific requirements. Follow the foam manufacturer’s SDS for PPE and ventilation requirements.
5. Framing for Windows
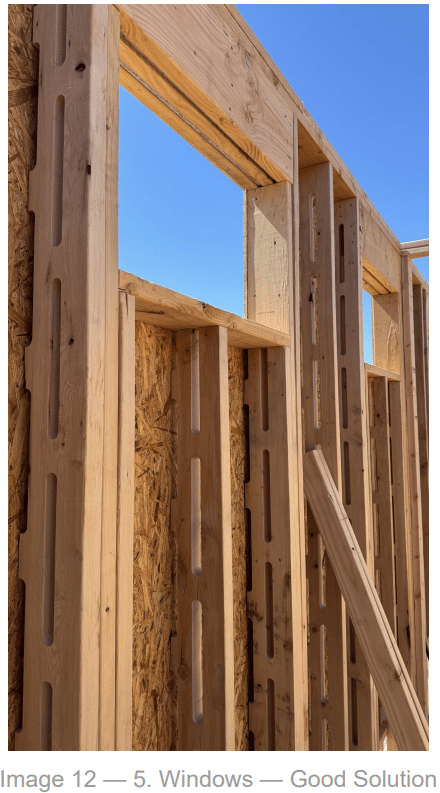
Good Solution
- Use a solid 2×6 or 2×8 for the trimmer studs to support the header and top/bottom plates, simplifying installation.
- Use EcoSmart® Studs (ESS) as King studs on both sides and as cripple studs under the window.

Best Solution
- For 2×6 and 2×8 walls, use 2×6 or 2×8 ESS for the King studs.
- For trimmer studs and sill plates, use 2×6 or 2×8 Jack/Trimmer studs.
- Align all slots and nubs for accurate framing and proper insulation around the window.
- 2×8 ESS can also be used for the cripple studs — make sure nubs line up properly for the exterior sheathing.
6. Framing for Doors

Good Solution
- Use a solid stud for the trimmer studs to support the header, ensuring strong structural support.
- Use standard ESS for the King studs on both sides of the header to maintain consistent framing.

Best Solution
- For 2×6 walls, use 2×6 ESS Jack/Trimmer studs and 2×6 ESS for King studs for enhanced structural stability and improved exterior wall insulation.
7. EcoSmart® Jack/Trimmer Stud (Header Applications)

The EcoSmart® Jack/Trimmer Stud (available in 2×6 and 2×8) is purpose-built for the trimmer/jack position to support a header, reducing wood waste compared to field-cutting a standard stud for the same role.
- Framing position: trimmer/jack (supports header) — not used as a King, perimeter, field, or cripple stud.
- Installation orientation: nub face toward the exterior with the sheathing; solid side faces interior, same as the
- Original and V2 studs.
- Nailing surface: full-depth solid nailing surface, compatible with nail-fin windows and doors.
- Pre-crowned during manufacturing, with an alignment nub that aids on-site framing.
- Available sizes: 84″ (8 ft walls) and 96″ (9 ft walls).
- Pair with the 2×6 or 2×8 Original or V2 EcoSmart® Stud as the King stud on each side of the opening.
- Jack/Trimmer Studs share the same allowable design values as standard ESS of the same size (see TER 2304-120, Table 5).
8. Corners, Plumbing, Posts & Multi-ESS Assemblies

Corners
EcoSmart® Stud inside and outside Energy Corners use a mix of solid studs and ESS, designed for effective wood framed construction. A correctly framed corner is completely thermally broken, improving exterior wall insulation, and structurally reinforced by the installed 2 lb. ccSPF. Full detail: 2×6 / 2×8 ESS Energy Corner reference PDF (see Resources).
Plumbing
Plumbing should not run in exterior walls. If a drain line must cut through an ESS, place a solid 2×6 or 2×8 stud instead. If a trade installer cuts a larger hole in an ESS during installation, attach plywood gussets — or metal reinforcement brackets (e.g., Simpson Strong-Tie® or equivalent, sized per the manufacturer’s load tables) — to both sides of the stud for structural reinforcement. Most electrical, low-voltage, water supply, and gas lines fit through the provided slots.
Posts
ESS can be used for posts and is treated just like a solid 2×4 stud. In certain situations, posts may need to be glued together in addition to being nailed — align the slots/nubs before gluing. Check with your local jurisdiction.
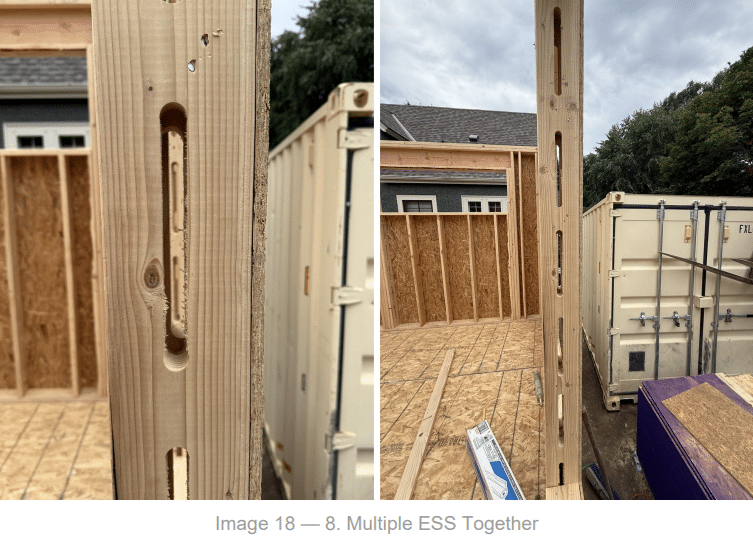
Multiple ESS Together
- When two or more ESS are together in the wall framing, line up the slots/nubs so spray foam can be inserted during insulation.
- If one or more studs are not full length, match them up before installing so all slots and nubs align for insulation.
- This is especially important around windows to maintain consistent framing.
- Slot/nub alignment also matters for nailing sheathing onto the ESS.
- There is no designated top or bottom to the ESS. Cut shorter studs from each end first, using the middle section for other purposes if needed, for efficient use of materials.
9. Handling & Jobsite Storage

- Store EcoSmart® Studs off the ground and covered to protect from moisture prior to installation.
- Stack flat and supported evenly to prevent warping.
- Handle slotted sections carefully during transport to avoid unnecessary stress at the slots.
- Inspect studs before installation; do not install a stud with damage beyond what plywood gusset reinforcement (Section 4.5) can address — substitute solid sawn lumber if in doubt.
DOWNLOAD THE GUIDE
If you’d like a copy to reference on the jobsite, download and print the EcoSmart Stud Installation Guide v2.0 for easy access throughout your build.
DOWNLOAD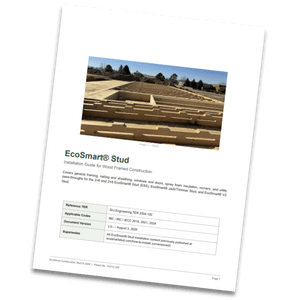
HOW TO ORDER
Contact us today to learn more about EcoSmart Stud and how it can benefit your next construction project. EcoSmart Stud is now available nationwide.
Call us at +1-612-887-5200 or click below to fill out the contact form.
CONTACT PRIORITY LIST