The Everest Forms and Zapier integration enables seamless connection between your WordPress forms and over 8,000 applications via Zapier’s automation platform. With our official Zapier app now published, you can create powerful automated workflows without the complexity of setting up webhooks.
Prerequisites:
✅ Active Installation of Everest Forms Pro.
✅ Active Zapier Account to create a Zap.
Installation of the Plugin and Zapier Addon #
Before setting up the Zapier integration, you’ll need to install and configure the required components. The Zapier integration requires the Pro version of Everest Forms. If you haven’t already:
- Visit the Everest Forms website and complete the purchase process.
- Log in to your WPEverest account dashboard and navigate to the Downloads tab.
- Locate Everest Forms Pro and click Download to get the plugin zip file.
- In your WordPress admin dashboard, go to Plugins > Add Plugin > Upload Plugin.
- Choose the Everest Forms Pro zip file you downloaded and click Install Now.
- Once the installation is complete, activate the plugin using the provided license key.
For a detailed guide, read our documentation on how to install Everest Forms Pro. 
Similarly, to install the Zapier Addon, follow these steps:
- Navigate to Everest Forms > Add-ons and use the search bar to find “Zapier”.
- Locate the Zapier and toggle to activate.

What Does This Integration Mean for Users? #
- Simplified Automation: Our native Zapier app provides a streamlined experience using REST API authentication, making form automation accessible to users of all technical levels
- Real-Time Data Flow: When someone submits your Everest Form, the data instantly flows to your connected applications—whether that’s your CRM, email marketing platform, spreadsheet, or any of the 8,000+ apps available on Zapier.
- Enhanced Productivity: Eliminate repetitive tasks and human error by automating data transfer between your forms and business applications.
Setup Guide on Integrating Zapier into Everest Forms (REST API Method) #
Follow these steps to set up the integration:
Step 1: Generate REST API Key #
- Navigate to your WordPress admin dashboard.
- Go to Everest Forms > Settings > REST API.
- Toggle the Enable REST API option.
- Click Generate to create your API key.
- Copy and save your API key securely.

Step 2: Enable Zapier on your Everest Form #
On the form where you want to integrate the Zapier, you first need to enable Zapier. So, navigate to Integrations > Zapier on your form setting. Now, toggle to enable Zapier through REST API method.

Step 3: Create a New Zap #
- Log in to your Zapier account.
- Navigate to Zaps and click on + Create from your dashboard.

3. Give your Zap a descriptive name by renaming it.

Step 4: Set Up the Trigger #
- Click on the Trigger and search for Everest Forms.
- Select Everest Forms as your trigger app.

3. On the right side bar, choose New Form Submission as your trigger event.

Step 5: Connect Your Account #
Now, select the account. You can either select an existing account or create a new account. Meanwhile, the selected account must have been configured with Everest Forms Rest API key.

Now, a new window pops up, and you need to enter your site URL and API key.
- Enter your authentication details:
- Site URL: Your WordPress site URL (e.g., https://yoursite.com).
- API Key: The REST API key generated in Step 1.
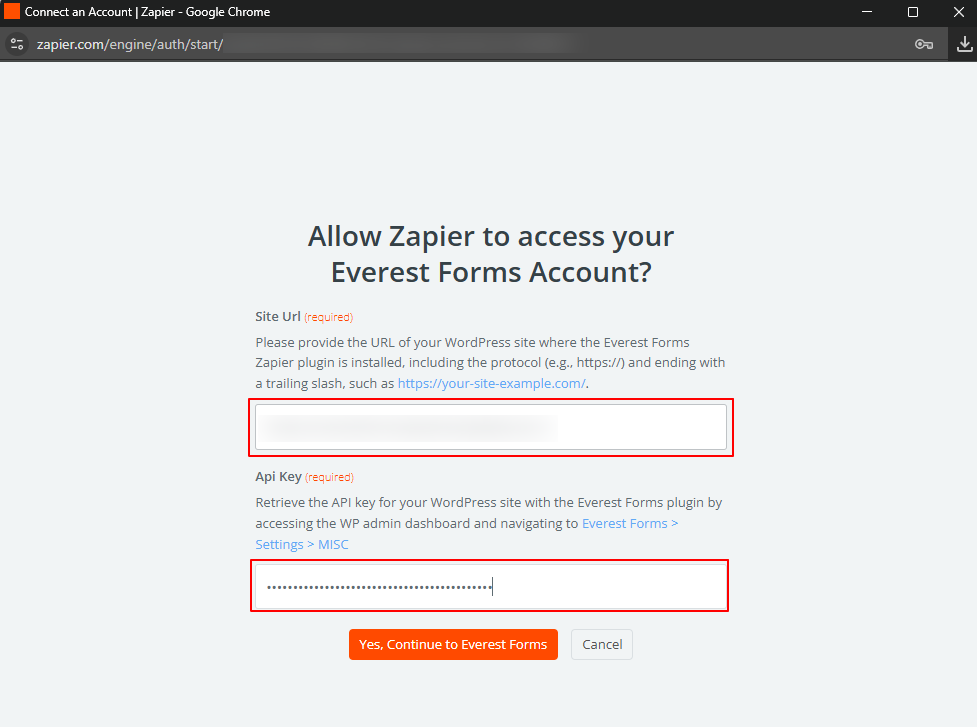
2. Click Yes, Continue to Everest Forms
Step 6: Configure Trigger Settings #
- Form: From here, you can choose which Everest Form will trigger this Zap.

2. Zap Connection Name: Give a suitable name to the Zap connection so that you can easily identify. Hit the Continue button to proceed further.

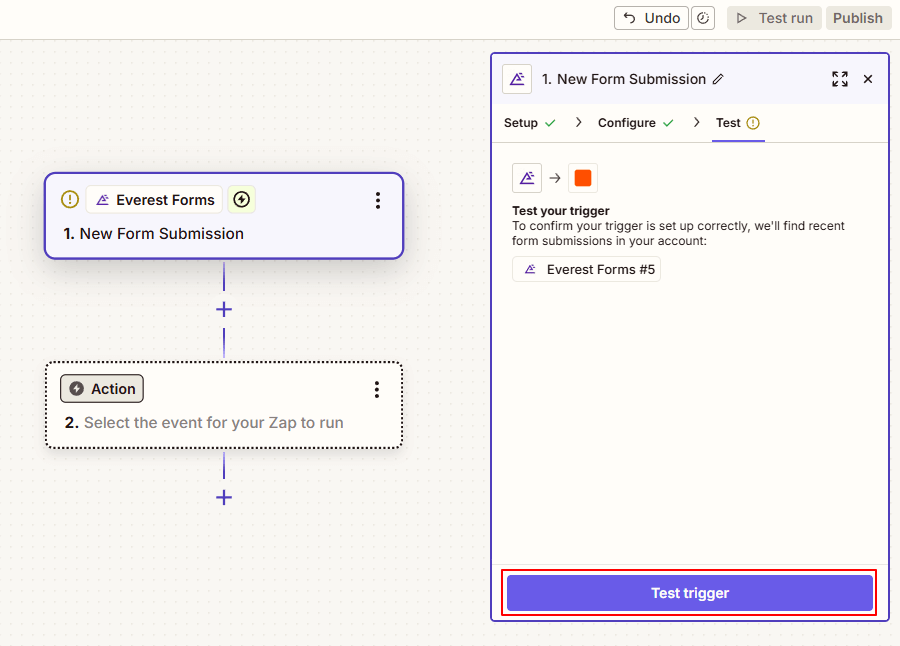
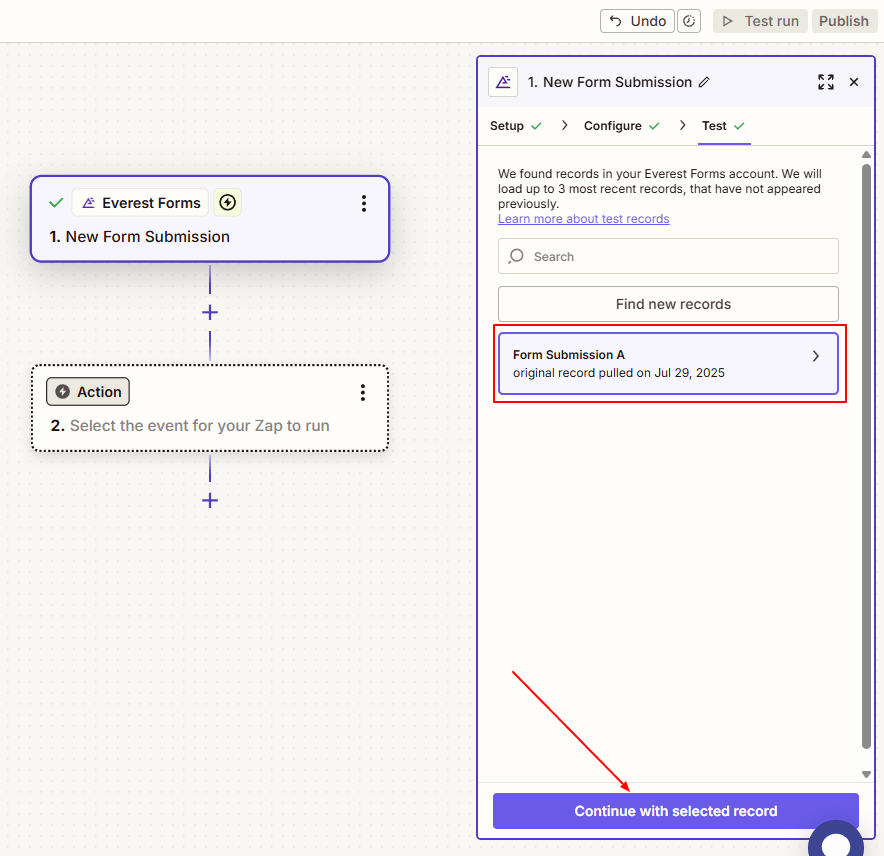
Test Trigger: Zapier will fetch a recent form submission to ensure connection. If no recent submissions exist, submit a test entry through your form, and you can test again. You’ll see the test entry in Zapier’s records.
Click Continue with selected record.
Step 7: Set Up the Action #
- Again, search for your destination app, for eg., Everest Forms. You can also use other apps (e.g., “Google Sheets”, “Mailchimp”, “HubSpot”) to connect Everest Forms.
- Select your desired action event. For now, the plugin has only one action event – Create Entry.

3. Connect your account for the destination app and click on Continue.
4. Form: Connect your desired form, where you want to perform the action.
5. Customize Settings: Configure any additional options for your action. Here, you might be asked to map the data for your action form.

Click on Continue button to proceed to the next step.

Step 8: Test and Publish #
- Click the Test action to verify the integration works correctly.
- Review the test results to ensure data is properly formatted.

3. If successful, click Publish Zap. Your automation is now live!
Setup and Configuration (Legacy Method) #
Once you complete installing and activating both the plugin and the add-on, move on to set up the Zapier Add-on on your site.
If you don’t have an account in Zapier already then, you need to create it before you start.
Now, follow the simple instructions below to integrate Zapier with Everest Forms:
Step 1: Make a Zap! #
First of all, you need to make a Zap.
Zaps are automated workflows that connect two or more apps. A trigger from one app starts the workflow, and the job gets done. A zap is completed after the required Action is performed.

Step 2: Create a Webhook #
A Zap consists of two parts:
- When this happens
- Then do this
In the “When this happens” section, you need to select a trigger app. Here, we choose Webhooks by Zapier. Webhooks are the information that is automatically passed between the connected apps when any new items are created.
In the “Then do this” section, you need to choose an action app where the action takes place.
Also, you can name your Zap in the top left bar.

Step 3: Select Catch Hook #
Next, you need to Choose Trigger Event. You need to select the Catch Hook option which allows you to pass information through the Zapier URL.

Step 4: Copy your generated Webhook URL #
After your Custom Webhook URL is created, copy it to Everest Forms settings.

Step 5: Set up Zapier in Everest Forms #
Now, navigate to Everest Forms->Select your form->Settings->Integrations->Zapier. First, check the Enable Zapier option. Then, on Webhook URL, paste your copied webhook.
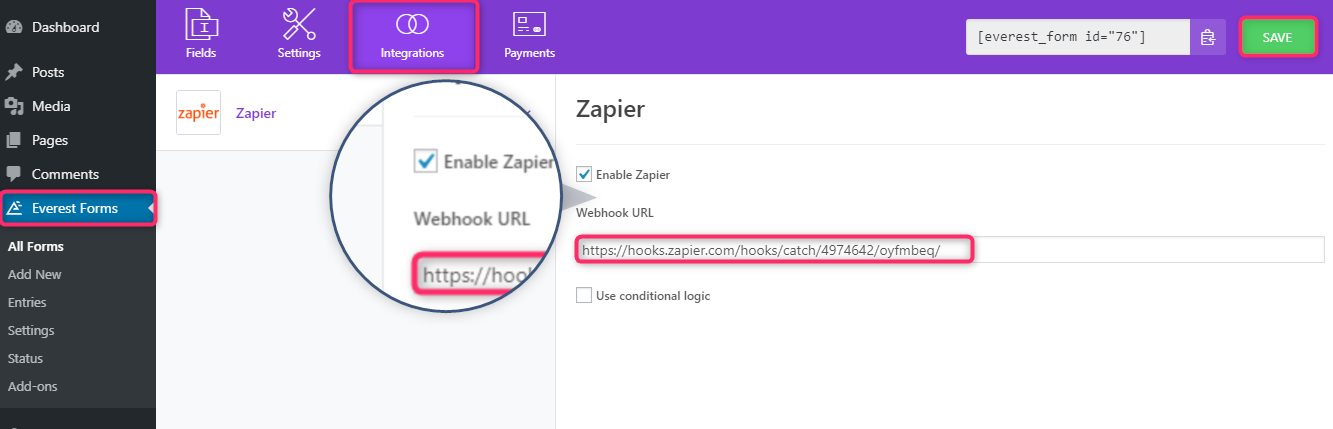
Use Conditional Logic:
Check the Use Conditional Logic option to enable Conditional Logic and send the form data to your zap if only users fill certain fields. For example, the form data will be sent to your zap if the value of the field “Send to Zapier” is “Yes” while submitting the form.
Similarly, you can add more than one conditions according to your requirements.
Step 6: Test your Connection #
Lastly, you need to test your Hook. For this, submit a sample form entry of your WordPress form.
Then, go back to Zapier and click continue. Now, in the Test Your Connection section, click on Find Hook.

If the test is successful, the first step is completed.

Connecting Web Applications with Everest Forms #
The Everest Forms Zapier Add-on allows you to connect various web applications with your WordPress forms effortlessly. You can check the following articles for detailed instructions:


