Genesis Custom Blocks makes creating custom blocks and their required block templates quick and easy. To demonstrate this, we’ll show you how we’ve used the block builder and template editor to create an example Ebook Cta block.
Refer to the Create your first custom block article for more information.
In this article:
Block Builder
The block builder tab is where we configured the block settings and add all the fields we wanted to include in the block.
In this example, we’ve added the following field types:

Click image to enlarge
Template Editor
The template editor tab is where we created the block template that’s required to display the block properly on the website. The template editor includes 2 types of code: HTML and CSS.
Note: The template editor accepts HTML markup, field names (enclosed in 2 brackets), and CSS only. If you need to use logic, loop syntax, define variables, or use PHP, you can create the template manually using the PHP templating method instead.

Click image to enlarge
HTML Markup
The Markup tab is where we entered all the HTML we wanted to include in the template.
Note that when adding a field to the markup, we enclosed the field’s slug in 2 brackets. For example: {{field-name}}.

Click image to enlarge
For your reference, we’ve included the HTML we used in this example below:
<section class="alignwide block-ebook-cta">
    <div class="block-ebook-cta--wrapper">
        <div>
            <img class="block-ebook-cta--book-image" src="{{book-image}}" alt="">
        </div>
        <div>
            <span class="block-ebook-cta--pretext">{{pretext}}</span>
            <h2 class="block-ebook-cta--heading">{{heading}}</h2>
            <p class="block-ebook-cta--text">{{text}}</p>
            <a class="block-ebook-cta--button" href="{{button-url}}">{{button-text}}</a>
        </div>
    </div>
</section>
CSS
The CSS tab is where we entered all the CSS we wanted to use to style the HTML markup.
The CSS entered here will only be rendered on pages where the block is displayed so it won’t affect the overall performance of the website.
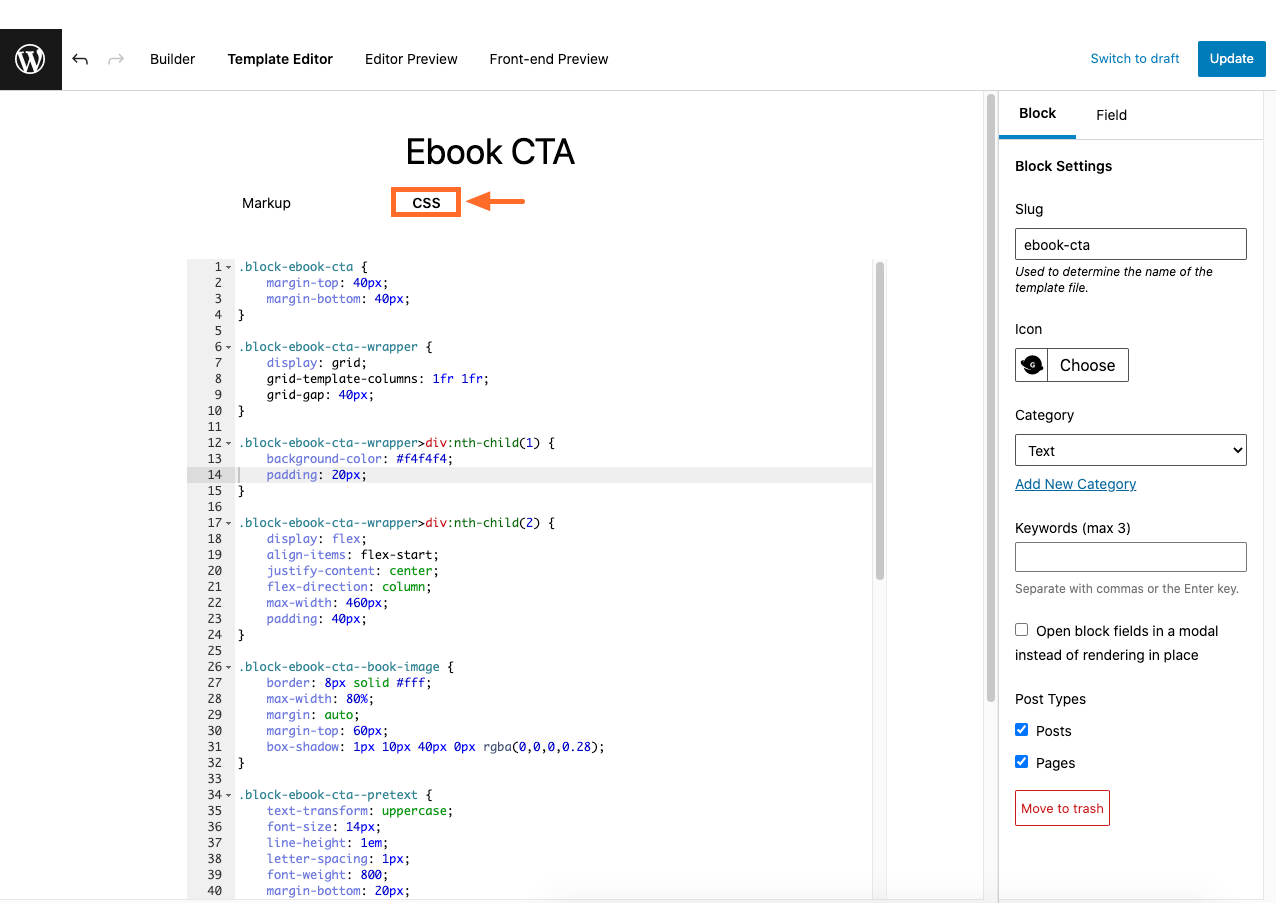
Click image to enlarge
For your reference, we’ve included the CSS we used in this example below:
.block-ebook-cta {
    margin-top: 40px;
    margin-bottom: 40px;
}

.block-ebook-cta--wrapper {
    display: grid;
    grid-template-columns: 1fr 1fr;
    grid-gap: 40px;
}

.block-ebook-cta--wrapper>div:nth-child(1) {
    background-color: #f4f4f4;
    padding: 20px;
}

.block-ebook-cta--wrapper>div:nth-child(2) {
    display: flex;
    align-items: flex-start;
    justify-content: center;
    flex-direction: column;
    max-width: 460px;
    padding: 40px;
}

.block-ebook-cta--book-image {
    border: 8px solid #fff;
    max-width: 80%;
    margin: auto;
    margin-top: 60px;
    box-shadow: 1px 10px 40px 0px rgba(0,0,0,0.28);
}

.block-ebook-cta--pretext {
    text-transform: uppercase;
    font-size: 14px;
    line-height: 1em;
    letter-spacing: 1px;
    font-weight: 800;
    margin-bottom: 20px;
}

.block-ebook-cta--heading {
    font-weight: 800;
    margin-bottom: 40px;
}

.block-ebook-cta--text {
    font-size: 16px;
    margin-left: 20px;
}

.block-ebook-cta--button {
    display: inline-block;
    color: #fff;
    padding: 24px 24px;
    text-transform: uppercase;
    font-size: 12px;
    line-height: 1em;
    letter-spacing: 1px;
    font-weight: 800;
    margin-left: 20px;
    box-shadow: 1px 10px 40px 0px rgba(0,0,0,0.28);
}

.block-ebook-cta--button:hover {
    box-shadow: 1px 10px 40px 0px rgba(0,0,0,0.4);
    color: #fff;
}

.block-ebook-cta--button {
    margin-top: 2rem;
    background-color: #166dca;
}

.block-ebook-cta--pretext {
    color: #166dca;
}
Editor Preview
The editor preview allows you to see what the block looks like on the backend (in other words, within the post or page editor).

Click image to enlarge
Front-end Preview
The front-end preview allows you to see what the block looks like after data has been entered into the block fields on the backend.
To see an updated front-end preview, you’ll need to enter data into the block and then save or publish it.

Click image to enlarge