Table of Contents
- Display 3D Models
- Using ShortCode
- Using Gutenberg
- ShortCode- Configure
- Sources
- Sources- Simple
- Sources- Cycle
- Options
- Elements
- Styles
- Gutenberg- Configure
- Sidebar
- Settings
- Model(Source)
- Options
- Style
- WooCommerce
- Add Models
- Configure
- WooCommerce- Variant
- 1. Add Variant
- 2. Set Model for Different Variant
- Hooks
- Filter Hook
- Disable Hand tool
Display 3D Models
Here is how you can Display 3D Models using the 3D Viewer Plugin.
Using ShortCode
- From your admin dashboard, click on Add New under the 3D Viewer menu.
- Give a title for the viewer. (optional)
- Upload a 3D file it supports only .glb and .glTF format.
- Copy the shortcode. (you can also copy the shortcode after published)
- Now publish/save the post.

Paste the shortcode in post, page, or text widget content. Save and view the content, you will see the 3D model is visible with the 3D Viewer.

Using Gutenberg
- Go to your Gutenberg Editor.
- Insert Model Viewer block.
- Upload a 3D model or insert a 3D model link.

Here are the 3D Viwer Gutenberg settings.

Save and view the content, you will see the 3D Viewer.
ShortCode- Configure
When creating a 3D Viewer post, you will see the configuration area under the shortcode area. From there you can configure the 3D Viewer.
Sources
For the sources, you can add single(Simple Type) or multiple(Cycle Type) models. Also, Posters for each model.
Sources- Simple
By default, the Simple Model Type is selected. By this, you can add a model Source(by uploading or inserting a link). Also can upload a Poster for the model.

Sources- Cycle
To show multiple models, change the Model Type to Cycle and the Poster Type to Cycle. Then insert models and posters repetitively. Also, set Cycle Animation Duration.

Options
After setup, the sources configure the options accordion to your needs. For the configuration, enable/disable Autoplay, Preload, Moving Controls, Zoom, Auto Rotate, Custom Angel, and set Loading Type(Auto, Lazy, Eager), Auto Rotate Speed, Auto Rotate Delay.

Elements
For the elements, show/hide the Fullscreen button, Progressbar, Progress Percent, and set Shadow Intensity, Exposure(Brightness).

Styles
To style set width, height, alignment, background color, progress bar color, and icon color of the 3D Viewer.

Gutenberg- Configure
First, go to your Gutenberg Editor and insert the 3D Viewer block like before.
Sidebar
Select the block, you will see the settings option in the right sidebar. You can see there are 2 tabs for the settings: Settings, and Style.

Settings
There are two panels for the settings, Model(Source) and Options
Model(Source)
From here insert the URL or upload the model and model poster. And you can use a decoder if you have a decoder file.
Also, if you want to use multiple models enable the Use Multiple Model.

Options
In options you can change several things for the model:
- Fullscreen: show or hide the fullscreen button for the viewer
- Mouse Control: by enabling, control the model using mouse interaction.
- Lazy Load: enable or disable lazy loading.
- Loading Percentage: show or hide the loading percentage.
- Progressbar: show or hide progressbar.
- Shadow: enable/disable the shadow of the model.
- Autoplay: enable/disable autoplay for the (only work model has animated feature).
- Variant Selector: select the variant of the model (if the model has variants).
- Animation Selector: enable the animation selector to choose different animations.
- Set Animation: select different animation (if has different animation in the model).
- Auto Rotate: by enabling the model will auto-rotate.
- Rotate Direction: set rotates direction for auto-rotate.
- Exposure: set exposure for the model.

Style
Switch to Style Tab and you will see the options for changing the 3D Viewer style.
From here you can change the width, height, background color, or background image of the 3D Viewer.
Additional: you can set class and ID for the 3D Viewer. Also, can add custom CSS.

WooCommerce
To show models in WooCommerce, enable Woocommerce options first from 3D Viewer > Settings > Woocommerce Settings.

Add Models
After enabling, go to the product edit page, there will be a settings panel called 3D Viewer Settings.
From here, add one or more 3D models to show on the product page. Also, set the position of the models and the custom angle.

Configure
For the configuration of WooCommerce models, again go to 3D Viewer > Settings > Woocommerce Settings.
Enable/disable Moving Controls, Zoom, Auto Rotate, Autoplay, set Shadow Intencity, Loading Type(Auto, Lazy, Eager), Auto Rotate Speed, Auto Rotate Delay, and show/hide Progressbar, Fullscreen Button.

WooCommerce- Variant
There are two steps to add different models for different variants of a product: Add Variant, and Set Model for Different Variant
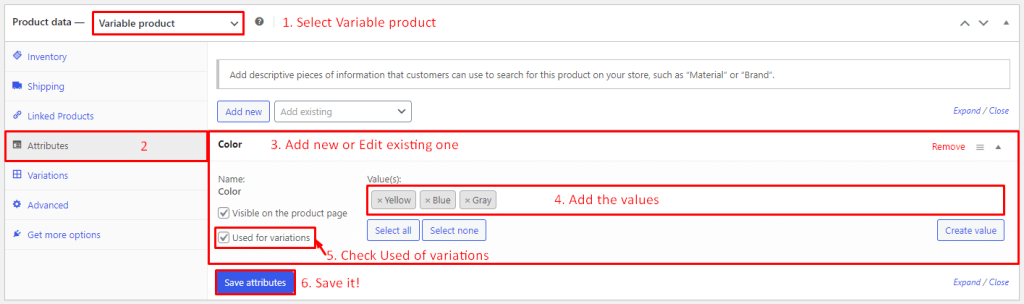
1. Add Variant
To add variants of a product,
- 1. Select the Variable product from the Product data.
- 2. Select Attributes.
- 3. Add new or edit existing attributes. Note: the first attribute will be the selected variant
- 4. Add attribute value.
- 5. Must check Used of variations option.
- 6. Finally, Save attributes.
After saving attributes, select Variations. Then click Generate Variations.

After clicking Generate Variations, you will see it will show the variations. You can edit the variation. Make sure the price for the variation is added.

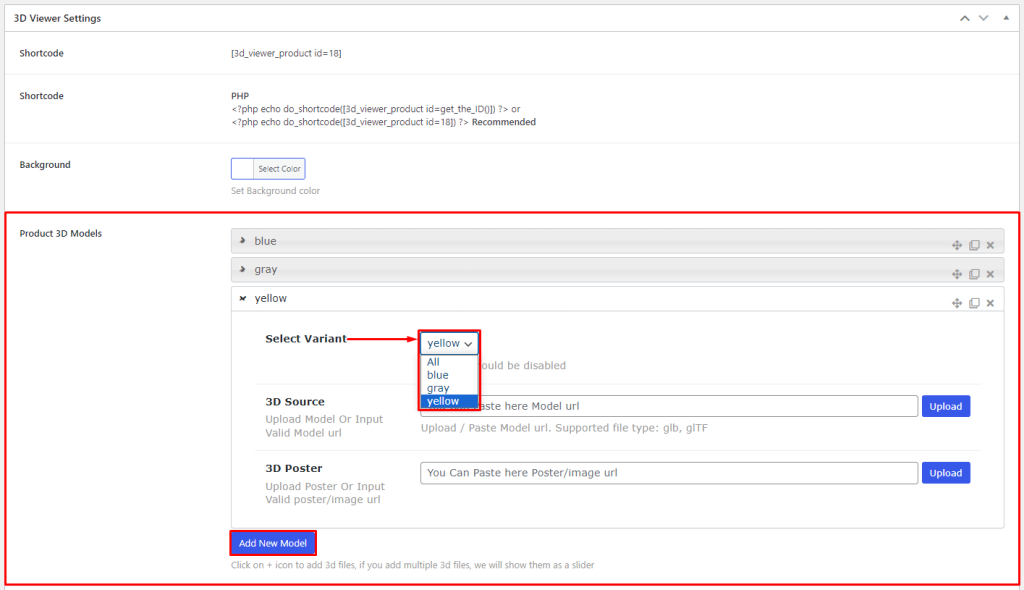
2. Set Model for Different Variant
After adding variations, go to 3D Viewer Settings. From this panel, click on Add New Model from the Product 3D Models option. You can see the option called Select Variant. Add different models from there.
Hooks
Filter Hook
Disable Hand tool
add_filter( 'bp3d_model_attribute', function ($defaults){
    return wp_parse_args( [
        'interaction-prompt' => 'none'
    ], $defaults );
}, 10, 2 );