Massive Annoyance aided by AI

I was working on my HP z620 workstation when I started having trouble with Microsoft edge starting. It went from working perfectly to trying to start up and then dying. I usually start searching through various websites looking for ways to resolve this issue. This time I used Grok to describe the problem and have it walk through troubleshooting and potential solutions.

The suggested fixes didn’t work. Not even close. Edge is pretty well integrated into windows 11. You can’t really uninstall it and repairing it wouldn’t work. I spent quite a bit of time trying to resolve this using grok’s guidance.

The solution came through a combination of my debugging intuition and grok’s deep searches. The first break through came from logging into my pc as a different user. Edge started right up. Grok found that interesting as it ruled out a faulty installation of the program and suggested it was a user profile issue.

More troubleshooting with no real progress. Grok suggested looking at the system logs. Edge would shutdown around an executable and a specific DLL file from Nvidia. Grok had a Eureka moment with this and linked the Nvidia desktop program and the edge problem. Disabling the software allowed Edge to start normally again. Apparently this program would sometimes interact with edge and its profile settings.

The problem was resolved and while the resolution took a few hours of troubleshooting (reboot/restart times, etc) I do believe the time to troubleshoot using conventional search would have taken much longer. I may have lost patience and wiped the computer leading to potential data loss and a lot more time in recovery.

AI is a helper but doesn’t completely replace intuition when it comes to debugging a complex problem
Updates to WSPR Lab

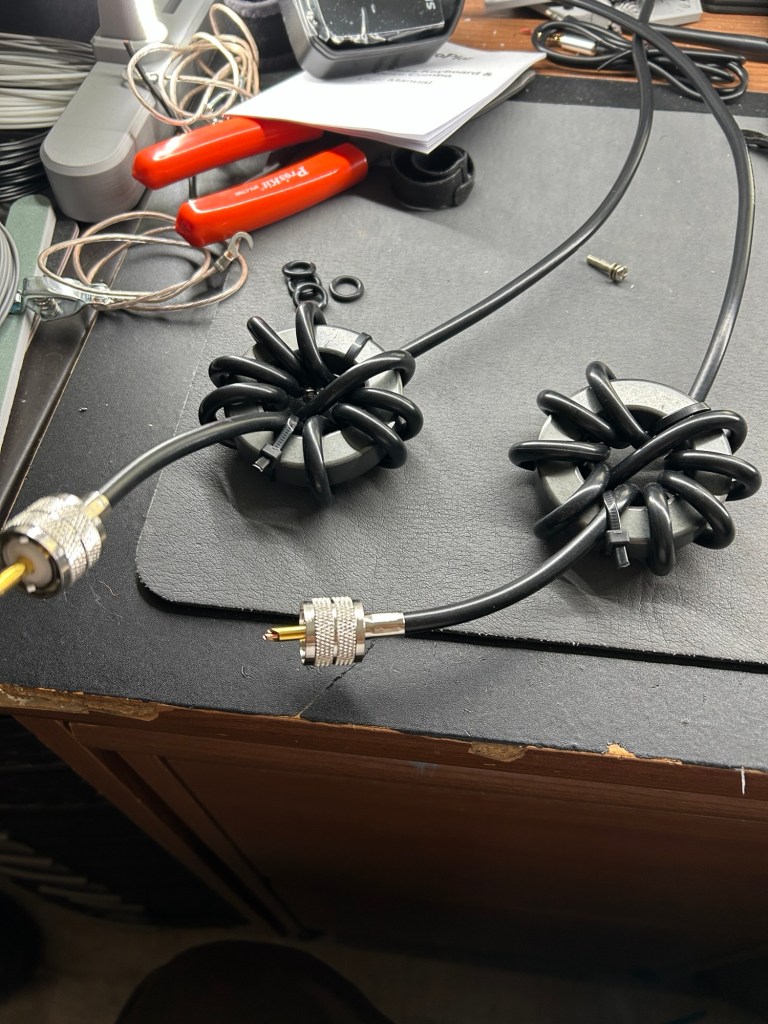
I added two Rf chokes consisting of 9 turns of rg-8x coax around an FT240-32 toroid to the inputs of the zbitx radios. I had to connect a keyboard and HDMI monitor to each radio to reconfigure the WiFi on each as I changed providers and routers since the last time I used it. Once configured I can access both via VNC.

I also fiddled a bit with the time setting issue I was having before and found a very simple fix. There is a configuration setting in Linux that has the machine wait until it connects to the network before proceeding with full startup. Enabling this allows the WiFi connection to be in place when the NTP service updates the time.

I have been running WSPR on the S9v31 vertical and collecting data on receive with no issues.

My remaining task is to build two identical feedlines and patch cables and I can setup my vertical antenna comparison.

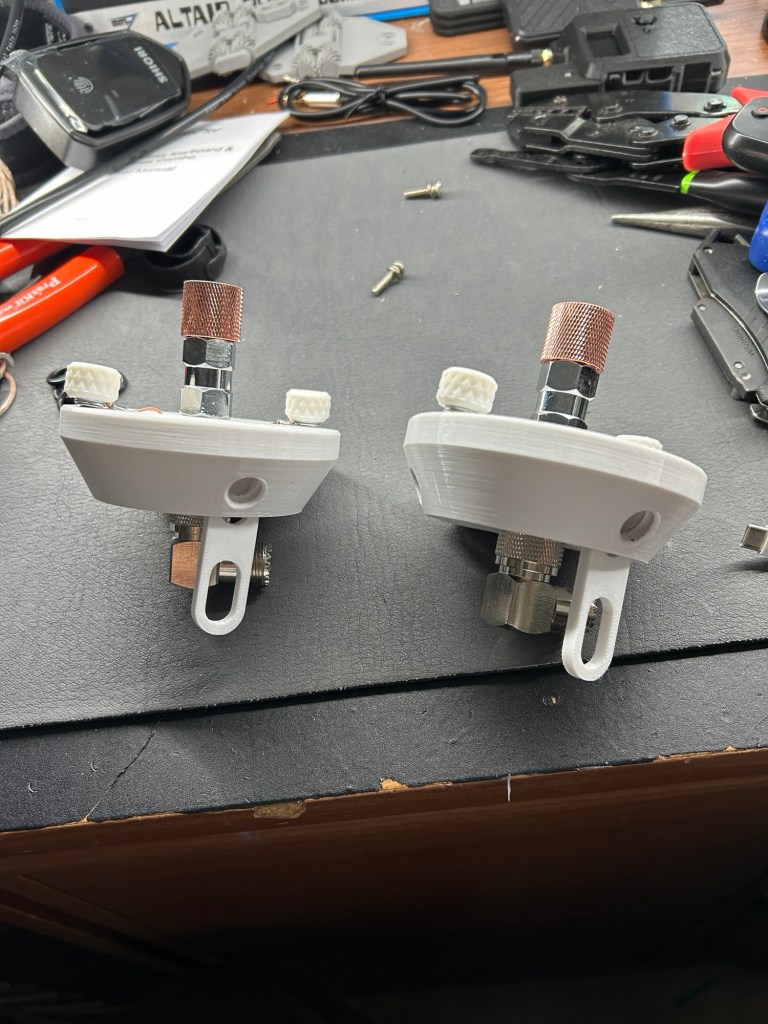
Two polypuck antena tripod hubs

I 3D printed two identical polypuck tripod hubs for use in WSPR experiments. I also made a total of four Rf chokes. Two will be used at the puck feed points and two were installed at the Rf inputs of the zbitx radios in the WSPR lab rack.

Each puck takes three 3/8” aluminum rods as legs. A telescopic whip will allow 20m and up resonant 1/4 wave antenna plus some planned variations. I’ll be using these to compare a 1/4 wave vertical with wire radials versus faraday cloth using these WSPR lab.

Meshtastic Repeater Operational

I setup a solar powered Meshtastic repeater using the “people’s repeater” instructions on printables. This is a nifty design that repurposes a $10 solar spotlight from Lowe’s. Everything works as expected but it is important to fully charge the battery before deploying. The battery drains slightly at night but fully charges during the day. I have the device mounted on my VHF mast up about 10 feet. I’ll raise this higher once I make some changes to the mast I have planned. I also joined RGVmesh channel which has many local enthusiasts exchanging messages from Brownsville up to Los Fresnos.

I’ve also started working on a TinyGS satellite ground station. I just need a 433Mhz antenna that I can mount outside.

WSPR Lab Project

I am going to setup what may prove to be an interesting first project for the WSPR Lab. I plan to setup two JPC-12 vertical antennas one with ground mounted wire radials and the other with a piece of faraday cloth as the ground plane.

Meshtastic

I started playing around with Meshtastic LoRa nodes this week. Seems to be interesting and I. Seeing a few nodes locally. It’s amazing that I’ve seen nodes about 50 miles away! I’m planning to setup a solar powered repeater as soon as I get a few parts in.

Field Day 2026

Well I participated in Field Day this year…just not very long.

I made about a dozen contacts on Saturday afternoon from contest start till about 5pm local time. All were on 20m and most were FT4.

I setup a 1/4 wave vertical on 20m with a 5.6m telescopic whip and four 30 foot radials. This worked really well. I intended to run 50W with an external amplifier but for some reason I could not get it to work. I suspect the finals are bad. I suppose it’s time to learn how to troubleshoot an hf amplifier. I worked with 10w instead power was not an issue with a 100w solar panel.

The bands seemed very bad at the QTH with very few signals were actually heard.

Very little activity on 15m and 10m was dead. I suspect that blanketing was really suppressing propagation this year and I think next year I’ll start working about 4 or 5 pm. Did I mention the heat? 94 degrees and 65% humidity make it very uncomfortable. I packed it in about 4:30pm and met my wife for a late lunch.

I am outside as I write this on Monday. It’s hot humid and hazy due to a plume of Saharan dust but I am setting up my secret weapon…

I’ll look at waterproofing my gear for next field day.

A New Day and Field Day

Started the day real early by driving to the coast with my wife to see the sunrise over the Gulf.

After breakfast and driving back home I fiddled with the printers a bit. I replaced the nozzle on the K1 Max, cleaned the plate with soap and water and changed filament to the Grey. The roll of black filament I loaded into the K1C. I ran calibrations on both machines then ran a test print. Both came out perfect.

I tried running a hinge model for the K1 Max but the first layer didn’t stick…hmmm. I cleaned the plate and restarted the print and now it’s working fine. I ran a few more test prints on the K1 Max and it is working fine now. Only thing missing is the front door which is in order along with spare extruder boards and hot ends.

In short, all is good 3D printing-wise.

Now on to Field Day!

I setup a 1/4 wave vertical for 20m with four 30 foot ground mounted radials. Fully extended telescopic whip gives me under 1.5 SWR across the whole band. I plan to try 15m by using a tuner. I’m not expecting much activity on 15m until late in the afternoon.

100W solar panel is deployed. So all I need now is to take out the radio and set it up which I’ll do during this hours before the start of the event.

Weather… mostly sunny 90 degrees 69% humidity.

Some Days…

I woke up and found a mess in my 3D printer on a long print I left running over night. I wasted about 1/3 of a roll of filament. I cleaned up the K1 Max and ran a few extrude cycles then tried the print again. Once again the print failed. This time I find a clog in the extruder. I take the extruder apart, clear the clog, run some extruder cycles and recalibrate before starting the next print. I run the print unattended for about 15 minutes only to find that it not only failed but had wrapped filament all around the nozzle and silicon sock. As I pulled it off, it ripped the thermistor connection off.

I had a spare hotend so I prepared to replace the it. As I moved my chair back to my desk it hit the open front door of the K1 Max.

Crash! The tempered glass door shattered into a zillion pieces all over my office!

I’m barefoot…

My wife brought me my shoes and I started cleaning up the glass. It was literally everywhere. About 45 minutes later my wife wanted to ask me something about some stuff in the backyard. The wind had picked up an umbrella and cracked the mast off. The garbage pickup was going by just then but wouldn’t take it as it wasn’t in the garbage can.

I think I’ll take the rest of the day off…

A Homebrew PTT Switch

I had some extra momentary contact switches so I decided to make a custom PTT switch for my IC-7300. The body is 3D printed along with a small junction box for the 1/4” jack. I wanted a switch with a coiled cord. Simple little project that looks and feels nice.