In 1987 Apple released its newest and final revision of the venerable Apple IIe, The Apple IIe Platinum. This final version of the Apple IIe would simplify the motherboard, include many of the Apple IIe enhanced upgrades such as the 65C02 CPU and extra memory, added a number pad to the keyboard and it all came in a new platinum colored case. If you’d like to learn more about the IIe in general or its associated monitors I’d suggest clicking on the previous link.
Besides the new color, the case itself is more or less the same in terms of size, weight, and overall design. The biggest difference is the inclusion of a number pad on the right side of the keyboard as well as a larger power LED located above it.
The inclusion of the number pad itself is of somewhat dubious utility since no games take advantage of it and it’s really only useful if you’re doing a lot of number crunching on your Apple II. I suppose this would have been more useful in the late 80s if you were doing business tasks though as a retro gaming computer, it has little to no use. The inclusion of the pad does offset the keyboard so If you really prefer a centered keyboard the older Apple IIe is probably the better choice.
The rear of the Platinum is identical to the older IIe. In the lower-left corner, we have an RCA-style composite color video jack with the same capabilities as the IIe.
40 and 80 columns text, white-on-black, with 24 lines
Low-Resolution: 40×48 (16 colors)
High-Resolution: 280×192 (6 colors)
Double-Low-Resolution: 80×48 (16 colors)
Double-High-Resolution: 560×192 (16 colors
next to that are dual 1/8th audio jacks for connecting a tape deck and finally a DB-9 joystick port.
Expansion capabilities are the same as the IIe
finally, we have the power supply with a standard three-prong connector.
The top of the case removes the same as the earlier model, via two plastic tabs on the rear.
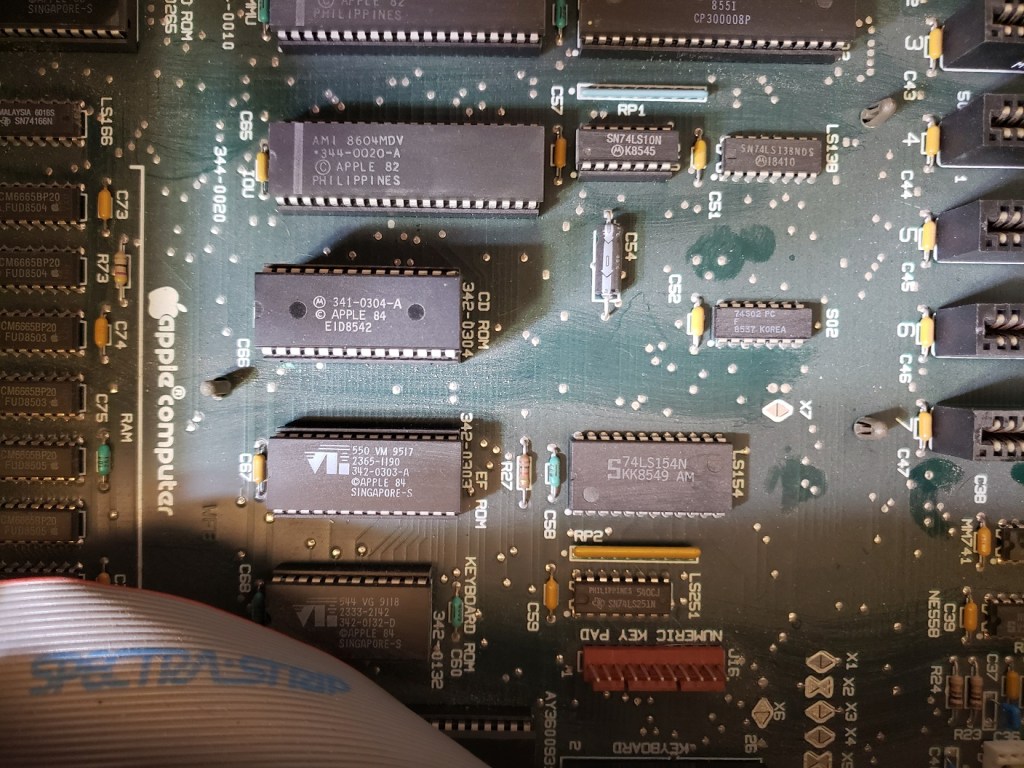
Compared to earlier versions of the Apple IIe the motherboard in the Platinum has fewer chips and is more integrated.
1) CPU – The Platinum uses the 65C02 processor running at 1.023MHz on an 8-bit bus. This CPU is an enhanced version of the 6502 CPU found in earlier Apple IIe computers and offers bug fixes, lower power draw, and some performance improvements. This CPU as well as its accompanying chips was standard on the Platinum, whereas on the IIe it was an optional upgrade. This newer chip does break compatibility with a very small number of early and “poorly written” software titles.
2) RAM – Although the Platinum contains the same amount of memory soldered onto the motherboard as the earlier IIe, 64k , the number of RAM chips has been reduced from eight to two chips. This has led to overall higher RAM reliability on the Platinum as there are fewer chips on the board to go bad. It’s also possible the memory in the Platinum is higher quality as well as just being newer produced chips in general.
3) Expansion Slots -Like the IIe, the Platinum features seven 50-pin Apple IIe Bus slots for expansion. This worked very much the same way as it does on any IBM compatible as you can buy various compatible expansion cards and simply install them in the slots. These cards ranged from the disk drive controller to modems, sound cards, and even hard drive controller cards.
My IIe Platinum came with the newer style floppy drive controller which is compatible with the Duo Disk Drive. I believe this controller was sold standard with the platinum.
My Platinum also came with an Apple Super Seriel card II which I believe was installed after purchase by the previous owner. The super serial card functioned as both a modem and a Serial Interface Card for connecting a printer.
4) Auxillary slot – Also like the IIe, the Platinum motherboard features an Auxillary slot for adding memory cards and accelerators. The Platinum did come standard with an 80-column 64k memory card for a stock memory size of 128k.
The memory card that came with the Platinum also appears to be much smaller and more integrated than the previously sold 80-column memory cards meant to upgrade the IIe.
5) Sound – Like the video, sound was not improved for the Platinum and is provided by a cone speaker.
If you’re in the market for an Apple IIe should you stick with the older IIe or choose the Platinum. The answer mostly depends on which case you prefer, as they are more or less identical machines. From what I gathered online most people seem to prefer the classic look of the Apple IIe as well as the positioning of its keyboard. That said the Platinum does have a few practical advantages. The first is that they appear to be more plentiful than the earlier IIe and thus tend to sell for lower prices. They also can save money in the upgrade department as with an IIe you may need to acquire things like the 65C02, an 80-column memory card, or a newer floppy drive controller if you’d like to expand your machine’s capabilities. On the Platinum, these features were standard (though previous users may have removed these options).
being a newer machine overall with a lower chip count also seems to have improved the general reliability of the Platinum over the IIe, especially in the memory department which is another good reason to grab a Platinum over a IIe.
Overall the differences don’t seem to be too major when comparing machines. The number pad really doesn’t add much at all to usability and the improved reliability is likely marginal so if you enjoy the Apple II I’d suggest grabbing whichever one you prefer.
In today’s article, we will look at the quintessential Macintosh II, the Mac IIci. The Macintosh IIci went on sale in 1989, well after the original Mac II was introduced in 1987. There were also several models introduced after the IIci, some faster, though overall the IIci may be the best all-around model of the line.
The IIci as seen above came in a compact yet expandable desktop form factor which could also be turned on its side and used as a tower if needed. The four small rubber “feet” can also be relocated to the side if the user wants to orient the IIci vertically.
The case for the IIci used Apple’s “snow white” case design. As you can see, mine, unfortunately, is quite yellowed, except for one rectangle on the front where previously a sticker was placed. This case uses a “toolless” design as well so with few exceptions this case can be opened and disassembled without a screwdriver due to the use of plastic tabs. Thankfully unlike some models, these cases have held up fairly well though caution is still advised when opening.
The two buttons in the lower left-hand corner are reset and the interrupt switches. On the right side of the case, we have a single 1.44MB floppy drive and two LED indicator lights. The top right is for HDD activity and the bottom right LED is the power indicator light.
On the rear of the case if you look at the top you can see the two plastic tabs that latch the cover of the case on. On the far left we have a standard three-prong power connector as well as a power inlet above this for connecting a monitor.
Starting from the lower left side we have a power button though the IIci can also be soft powered on via a keyboard power-on key. The power button can also be depressed and turned with a screwdriver to lock it in the power-on position. to the right of this, we have an external floppy drive connector, a SCSI connector for connecting external devices such as hard drives or CD-ROM drives, etc. Next is the video port for the built-in video. The on-board video for the IIci uses a shared framebuffer meaning that the video does use a small amount (about 320k) of system memory from the first RAM bank, which can affect performance negatively under certain situations. Next are the printer and modem ports followed by a 1/8 audio jack for connecting external speakers and last we have two ADB ports for connecting things like a keyboard and mouse.
Next, let’s take the lid off and take a look inside.
we can start in the upper right-hand corner with the power supply.
Depending on the maker of the PSU the reliability can vary. Most Macintoshs I’ve come across from this era are either dead from leaked capacitors or dead power supplies. The GE power supply in this Macintosh IIci is still functional.
These power supplies connect directly to the motherboard underneath and basically sit on the connector.
At first, I installed this rather chunky 540MB SCSI hard drive which although mechanical like the stock drives you would have found on this Mac, was much larger than their 40MB and 80MB size.
I eventually did decide to remove the older 540MB drive for a whopping 2GB SD2SCSI solution as you can see above.
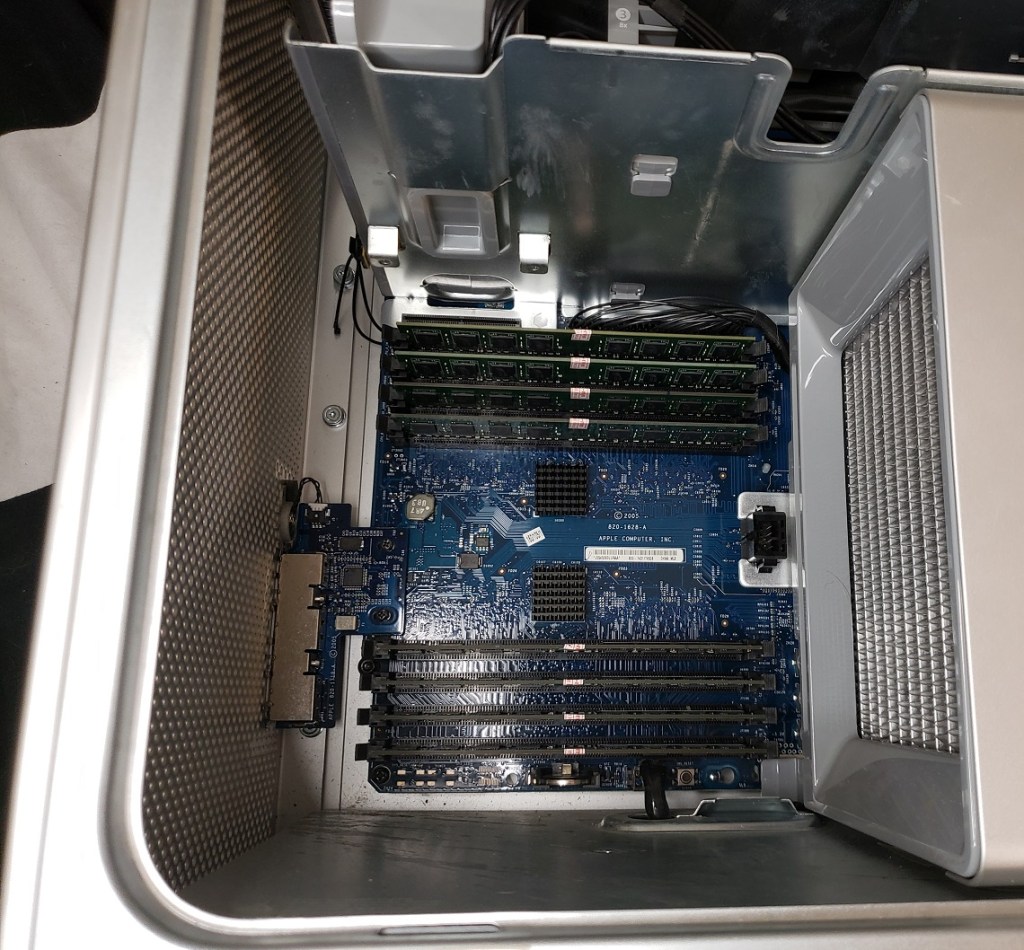
Let’s take a look at the motherboard before we check out the lone expansion card I have installed.
1 ) CPU – The CPU is the Motorola 68030 running at 25MHz as well as running on a 32-bit bus motherboard meaning that, unlike some Macintoshes that featured a 32-bit CPU and a 16-bit bus, nothing was holding the CPU back in the IIci. Despite this, some games can still struggle even at 320×200 resolution such as Wolfenstein3D though I have been told there is a patch to improve performance on a 68030.
2 ) FPU – The IIci also has a math co-processor on the board in the form of the Motorola 68882. I’m not completely sure if like on the PC, this is underutilized or if more games on the Mac support it.
3 ) RAM – Like many classic Macs the IIci can take much more RAM than was practical for the time. Typically a IIci of the time would have had 1-4MB of memory installed but due to its 32-bit clean ROM and 8 memory slots the IIci can accept a total of 128MB of memory via 30-pin SIMMs. I maxed my memory out though this is far more than any program would need.
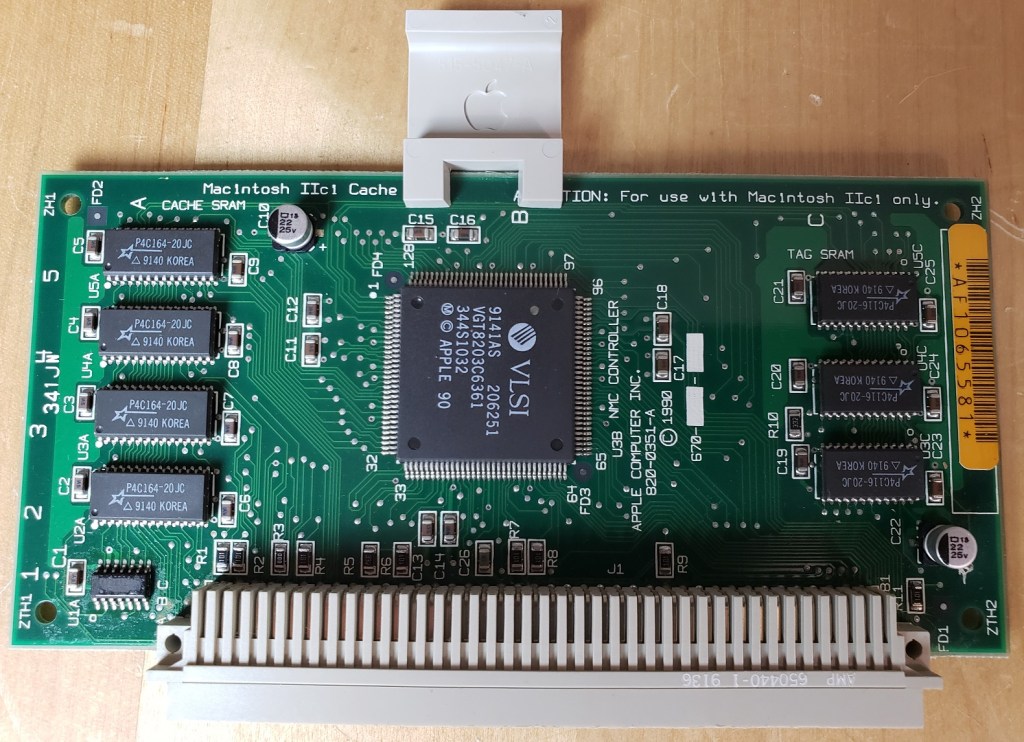
4 ) Cache PDS slot – The PDS slot located near the center of the motherboard is most commonly used for L2 cache upgrades, having a function similar to COASt module slots on early Pentium motherboards. It can be hit or miss whether you find one of these cards in any IIci one may pick up as they seemed to be optional at first before Apple began including them in the systems.
Official L2 cache card
The cache card is a highly recommended upgrade for the IIci as it is claimed to increase performance from 20% to, if you believe some sources, 130% though the vast majority of data indicated a general performance gain of 25% overall. The standard card from Apple contains 32k of L2 cache although third parties did make cards with larger amounts. Expect greatly diminished returns in performance after 128k.
Several third parties also took advantage of this slot to release CPU/cache accelerator cards allowing faster 68000 CPUs and even PowerPC processors to be installed.
5 ) ROM slot – Right next to the cache PDS is a slot to install an optional ROM. The IIci was the first Macintosh to use a fully 32-bit “clean” ROM allowing much higher amounts of memory without modification or extra software. I decided to install a Macintosh “ROMinator” ROM SIMM from BMOW since it gives me several nice features like the ability to boot into System 7 from ROM in the event I have any issues with my HDD.
6 ) Nubus slots – The IIci features three Nubus slots for decent expandability although most users may not find a real need to add any cards. The general recommendation would be to add a more powerful video card as this can be beneficial for gaming purposes and allow more colors and higher resolutions. Another reason to add a discrete video card would also be to free up the memory used by the integrated video.
7 ) PRAM battery used for holding system settings
8 ) power connector for the system power supply
9) Interestingly the IIci does not pull power straight off the PSU but has a separate connector on the motherboard ending in a Molex connector for powering the hard drive. The floppy drive is powered via the floppy drive cable.
The sole expansion card I have added is a video card, the Radius PrecisionColor 8-24X
I wouldn’t say it’s the best video card option to upgrade to as although it supposedly has QuickDraw acceleration I haven’t noticed any performance improvement in games but at the very least it is an improvement over the built-in video as it allows more colors and has its own video memory.
I am currently running System 7.5 on my Mac as that is what feels most appropriate and it seems to run quite well overall.
In my opinion, the Macintosh IIci is Apple doing the Macintosh II right. The system offers good performance, especially with an added cache and video card as well as offer decent (for a Mac) expandability in a small case. I’d certainly recommend one for anyone wanting to set up a classic 68k Mac for gaming and as I said a full setup will not take up much space on a corner desk. Another bonus is that the IIci was sold in fairly large numbers over several years so despite rising prices on retro goods as of 2023 the IIci isn’t as pricy or hard to find as some other models, just be aware of the possibility of bad caps and PSUs to contend with as these plague most classic Macintosh models
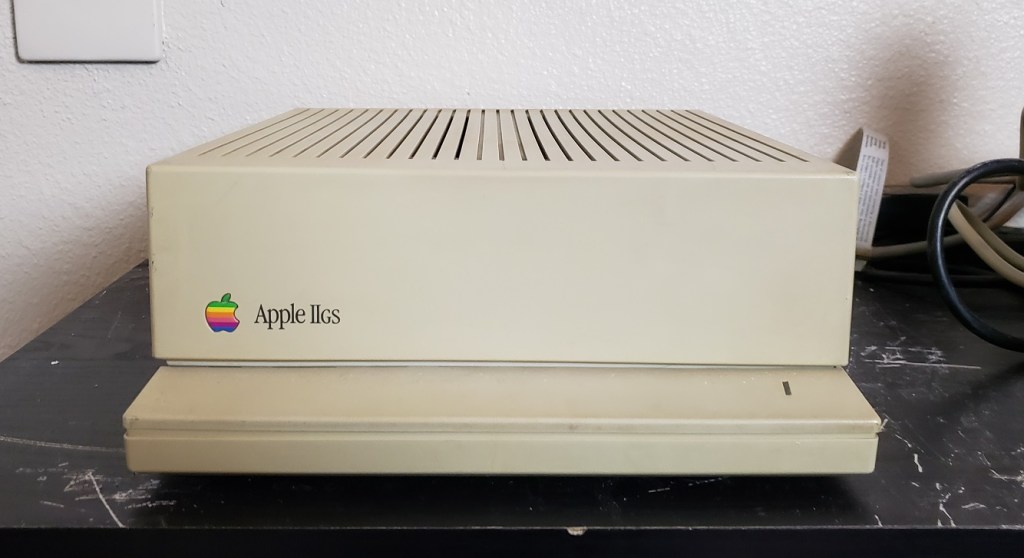
The Apple IIGS was released in 1986 and despite not being the final form of the Apple II released, would come to be the pinnacle of the Apple II line, despite having the IIe Platnium and IIc Plus released after it. Unlike the previously mentioned Apple IIe and Apple IIc which were minor improvements or portable versions of the previous Apple II the Apple IIgs was virtually an entirely different machine. The IIgs (which stands for graphics and sound) was a 16-bit PC as opposed to the 8-bit Apple II. Regarding sound and visual capabilities, the IIgs was more like the Amiga or the Atari ST than its fellow Apple IIs. The IIgs did however have very high compatibility with older Apple II software thanks to the Mega II chip on the motherboard which served as an Apple II on a chip. Unfortunately for the Apple IIgs its impact on the computing world was largely hampered due to Apple itself holding back the system due to a fear of it competing with its Macintosh line.
The Apple IIgs came in three major revisions, the ROM 0, ROM 1, and ROM 3 revisions. The best of these revisions is the ROM 3 due to the large 1MB of memory that came standard on the motherboard but today we will be looking at the still extremely capable ROM 1 revision.
Looking at the IIgs it’s immediately apparent this is a different case design from the earlier Apple line as well. Instead of the built-in keyboard design of the earlier models we have a very small and light case using the “snow white” case design. On the front, we have the Apple IIgs logo while on the right we have a slit located on the small ledge that comes out from the bottom of the case which is our green power LED light.
Looking at the rear of the case we can see that unlike the Apple IIe and previous Apple II’s the IIgs had a full complement of various ports built into the motherboard. starting on the lower left-hand side of the case we have a standard headphone audio jack (mono only), next an Apple-style modem and printer port, a joystick port, and then an external floppy drive port. Next, we have an RGB video out port. Note that this is a DA-15 Analog RGB video port and NOT a DB-15 video port as found on the Macintosh and is not compatible with VGA Macintosh monitors. Next to this, we have an RCA composite video jack for connecting to TVs or monitors like the Apple Color Composite monitor. Finally, we have an Apple ADB port for connecting various devices, most commonly a keyboard or mouse. The IIgs was the first computer to include this port and would become a standard port for Apple mice and keyboards much like the PS/2 port became that standard in the IBM compatibles world. Above these on the right is a standard 3-prong power connector and an on/off switch.
Before we take a look inside the case I think it’s worth looking at the external floppy drives as well as the monitor options available.
You’re most likely going to want to have both a newer style 5 1/4 Apple disk drive capable of reading 140k disks if you plan on running any Apple IIe software as well as a 3 1/2 Apple drive for running Apple IIgs specific software. These drives can be easily daisy-chained together to work on the single rear external floppy port. Older 5 1/4 drives like the Duo Disk drive can supposedly be made to work but some modification may be needed.
For a monitor, you can use the color composite out to display to any composite monitor or TV including the Apple Color Composite monitor. This is especially nice if you want to simply use the IIgs as an IIe and want a more authentic experience. The large composite monitor does look a bit goofy on top of the smaller IIgs case though.
There is however an official RGB monitor for the IIgs, the AppleColor RGB Monitor, model A2M6014.
This 12″ monitor fits very nicely atop the small IIgs case and gives a very nice sharp image for both Apple II and Apple IIgs games. Take note that this is a 15KHz analog RGB monitor and not VGA and this is why monitors meant for the Macintosh, despite physically being able to connect to the rear RGB port will not work. Other RGB monitors such as ones meant for the Commodore Amiga SHOULD work but I’ve read mixed results.
One other thing to note is that using an RGB monitor with some games meant for the Apple IIe can theoretically lead to some games looking incorrect due to the software expecting to be displayed on and taking advantage of the quirks of a composite monitor though I could not find any specific examples.
It’s also worth noting the IIgs will happily output from both its RGB and composite outputs simultaneously if one desires.
For mouse and keyboard I’m just using a standard ADB mouse and an Apple keyboard II. I do not believe these are the stock keyboard and mouse combo but they are very similar.
On power up the Apple IIgs if you hold down the option key on the keyboard the computer will boot into a control panel. From here you can adjust various things such as CPU speed, the internal clock, or the border and background colors, among other things.
Although you can play Apple IIe games on the faster settings for best compatibility it is suggested that the CPU speed be changed from “fast” to “normal” which downclocks the CPU to the original Apple IIs speed of 1.023MHz. For a more authentic experience, you can also change the border and background colors to black to mimic the look of the original Apple II line.
Here we have the inside of the case with my chosen expansion cards installed. I have replaced the power supply on the left with a modern equivalent as the original PSU swiftly failed upon acquiring this machine. The two main expansion cards I have installed are transfers from my Apple IIe which are my mockingboard sound card clone and my ReactiveMicro Turbo HDD controller card paired with a 512MB compact flash card acting as a hard drive.
Just like the previous Apple II computers the IIgs motherboard provides seven expansion slots. These slots are identical to the slots found on other Apple IIs and should be compatible with most if not all cards meant for the Apple IIe and earlier.
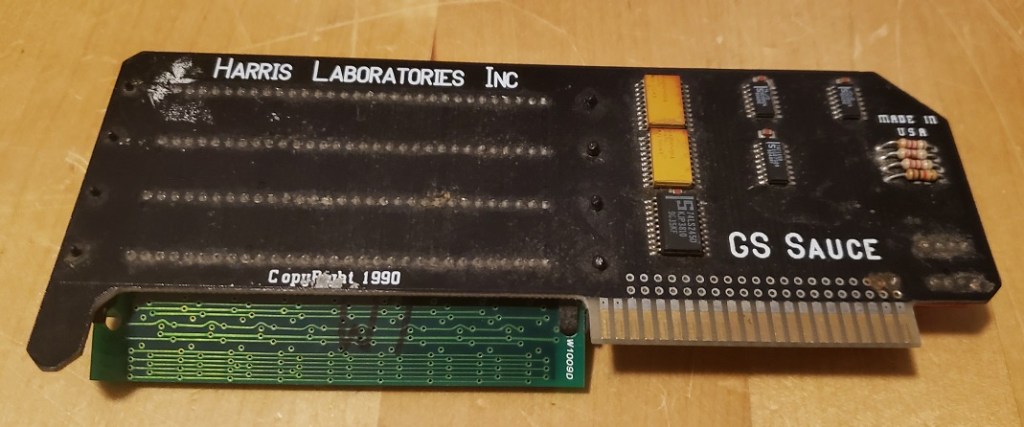
On the bottom right-hand corner of the motherboard, we have a connector for the internal speaker and above that we have another expansion slot, this slot is reserved for memory expansion cards. My ROM 1 revision has 256k total memory on the motherboard but I did add an expansion board to bring the memory total up to 1.25MB. This is enough memory to run most if not all Apple IIgs games and the graphical OS. Later ROM 3 revisions would ship with 1MB of memory soldered directly on the motherboard. The IIgs are capable of being expanded up to a total of 8MB.
I’m using an old Apple “GS Sauce” memory expansion board but newer boards are available.
CPU) The Apple IIgs uses a 16-bit 65C816 running at 2.8MHz. Unfortunately despite being a capable CPU the low clock speed can hinder performance in more demanding IIgs games and generally it is recommended to install an accelerator if you wish to fully utilize the potential of the IIgs. The 65C816 was available at higher clock speeds (up to 14MHz) though Apple chose to hobble the IIgs, supposedly so it wouldn’t compete with the company’s then-new Macintosh line of computers.
RAM ) The memory map of the IIgs is a bit convoluted with memory being located on several positions on the board labeled as “sound”, “standard” and “fast”.
Understanding how it works can be complicated so I’ll just quote Tofro, a member over at the Vintage Computer Forums.
“The lowest 128k are set up like in the IIc: (48k main memory + 16k “Language Card” memory) * 2. The language card memory is bank-switched with the Apple II ROMs, because when in 6502 mode, the IIgs can address no more than 64k without bank-switching ) and the IIGS needs to behave like an “old” Apple II.
The rest of the standard 256k is only accessible when the 65816 runs in its native, 16-bit mode. Any memory expansion that goes in simply linearly attaches to the 256k upwards.
The Apple II memory emulation is controlled by the “Mega II” chip that basically emulates a classic Apple II memory layout in the lowest 128k. This lower half of the IIGS standard memory is run at 1MHz, just like in the Apple II (so it’s “slow” memory).
The upper half of the 256k is run outside the bank-switched area controlled by the Mega II at full speed of the 65816, so it’s “fast memory” ran at 2.8MHz (and any memory you add using IIGS memory expansion cards is also “fast memory”).
None of the marked PCB areas are actually ROM. To make things even more complicated, the IIGS also has “slow” (i.e. Apple ][-compatible) ROM and “fast” ROM only used in IIGS-native mode”
Video ) The Apple IIgs can output resolutions up to 640×200 in various different palette modes. graphics in Apple IIgs software are roughly comparable to the Atari ST and Amiga in terms of looks. In Apple II emulation mode Apple II games will be displayed in RGB if an RGB monitor is connected, generally, this is not an issue though some games could theoretically look off due to the difference in quality and lack of composite dithering.
Sound ) Sound capabilities are a stand out on the IIgs and are provided by an Ensoniq 5503 DOC providing a maximum of 32 channels of sound. The memory labeled “sound” on the motherboard is 64k of dedicated memory for storing wavetable samples.
Mega II) The Mega II chip is basically an “Apple II on a chip”. When playing non IIgs, Apple II software this chip takes care of most of the functions of an entire Apple II computer. Apple claimed 95% compatibility with older 8-bit Apple II software though that percentage from what I can find on the internet may be even higher.
Battery ) On the earlier ROM 0 and ROM 1 machines the battery is soldered directly to the motherboard and will likely be dead and require replacement or removal to avoid battery leakage. This will require snipping the connections to the board. Be sure to snip the connections close to the battery since this will make it easier to either solder on a battery holder or clip on a new battery. Later ROM 2 revisions of the IIgs used a battery holder similar to ones found in many Macintosh computers.
The Apple IIgs may be simultaneously the greatest of the Apple II line as well as the biggest missed opportunity. The excellent backward compatibility with the previous Apple II line gave this machine a massive backlog of software right out of the box while, besides its lower-clocked CPU, its video and sound capabilities gave the machine great potential to rival the Amiga, Atari ST, and other 16-bit competitors. Unfortunately Apple never really supported the IIgs in the way they should have and thus it never reached that potential. Although there is a good deal of Apple IIgs specific software it tends to be pricy while also available on other platforms. There really weren’t any exclusives for the IIgs with only the mediocre game Task Force coming to mind as an exclusive although the IIgs port of the arcade title, Rastan is said to be the best of the home conversions.
The Power Macintosh G5 series was the end of an era for Apple and the Macintosh. It was one of the last Macs to use the venerable Power PC CPU before moving onto Intel CPUs which in my opinion made Macs little more than PCs with a custom Apple OS and took away much of their uniqueness for better or worse. The quad-core G5 Macintosh was one of the last of the G5 Macs and one of the most powerful. Before we get into the specs keep in mind that older G5 Machines will have differing configurations and this is only a look at one of the last PCs in this line and not a general overview of the entire G5 line..
I’ve frequently seen these cases referred to as “cheese grater” cases due to the front. The case is all aluminum and despite the lighter weight of the metal, the thing is very heavy. Being aluminum though it’s likely the case will survive long after all of us are dead, that is unless they all get melted down to make aircraft during WW III. The front of the case is very simple with a single 5 1/4 drive bay near the top for a CD/DVD optical drive and only a few inputs further down on the left.
First is the power button which does light up when pressed and powered on. Next, we have an audio headphone jack and finally one USB 2.0 port, and below that a Firewire 400 port. The case also has aluminum “feet” on both the bottom and top which are handy for both assisting in carrying the heavy beast of a case as well as keeping it off the ground a little. Be aware that these “feet” are very prone to being crushed if shipped improperly.
Opening the case on the G5 Macs is a cinch. on the upper right hand side of the rear of the case is a simple lever. Simply pull it up and the side panel pops off. To the right of the handle are four expansion slots. Most of the rear is taken up by two massive fans and below those is the connector for your power cord.
The connector is, in classic Apple fashion, not quite your usual 3 prong connector as the shape is completely square and the three prongs are fairly flat as opposed to round so you will need a special power connector. Now the power cable used here is not proprietary but it is commonly found on high-end server equipment with high-wattage power supplies. I couldn’t really say what advantage this connector type has over the more standard one and I seriously doubt it is needed for the G5 Macintosh so all it really seems to do is be extremely annoying if you happen to lack a compatible power cable and the 50 standard ones you have laying around the house won’t fit.
Starting at the top and going down the G5 has a neat row of various inputs and outputs. First are dual Ethernet ports followed by a Firewire 800 and 400 port. Next are optical audio in and out ports followed by dual 1/8 audio jacks and finally three USB 2.0 ports.
Upon removing the side panel most of the lower section of the case is further covered by a hard clear plastic cover. This is easily removed via a small handle near the top. There is also a badge on the bottom portion of the case that if you are unsure of the exact factory specifications of your model you should be able to find them there.
On the top left is the sole 5 1/4 drive bay which at least factory standard should be occupied with a 16x DVD drive. To the right of this bay are dual 3 1/2 drives for installing hard drives. A 250GB SATA drive was the stock drive but I have added a second drive in the lower “B” bay.
I have seen people install SDD drives in these bays but it may require an adaptor to fit securely or just be installed loose in the bay.
Below these bays are the four expansion slots.
Four slots for expansion cards is pretty anemic for a computer but in all honestly, they are all PCI-e, and being a Macintosh you’re not likely going to find you need to install much more than a video card anyway. The four PCI-e slots is actually a nice upgrade from previous models in the G5 line which lacked any PCI-e expansion slots and instead used AGP, PCI, and PCI-x. Only the bottom slot is PCI-e x16 so I would suggest installing your video card in the bottommost slot. As far as I can tell there is no option to run either a crossfire or SLI configuration in the G5 Mac.
The G5 Power Mac came stock with the Macintosh version of the Geforce 6600 with 256MB of memory. This card is quite adequate though it is not the most powerful card the G5 quad can accept and if you want to take some better advantage of what this system has to offer the video card should be one of your first upgrades if possible.
The G5 is somewhat limited on video cards it can accept due to the requirement that cards use a special Apple Mac BIOS and OS drivers. The fastest video card I could find for the G5 Mac quad was the Quadro FX 4500 with 512MB of memory. This card is basically the workstation version of the 7800 GTX and is more or less the same. Upgrading to an FX 4500 gives a noticeable boost to gaming on the G5 though finding a specific Macintosh version of the card can be difficult and/or expensive. Another route you can take is tracking down the much more common PC version of the card and flashing its BIOS to the Mac version.
You will need a specific revision of the PC card with a specific BIOS in order to flash it though. Usually, the card with the L bracket on the back are flashable models but always check the BIOS revision to be sure.
Guides on the process such as the one Here can be found with a simple Google search.
Also, take note the FX 4500 will require an additional power cable that connects to the motherboard and then to the card as seen below. also seen below is the connector for the IDE cable that goes to the optical drive.
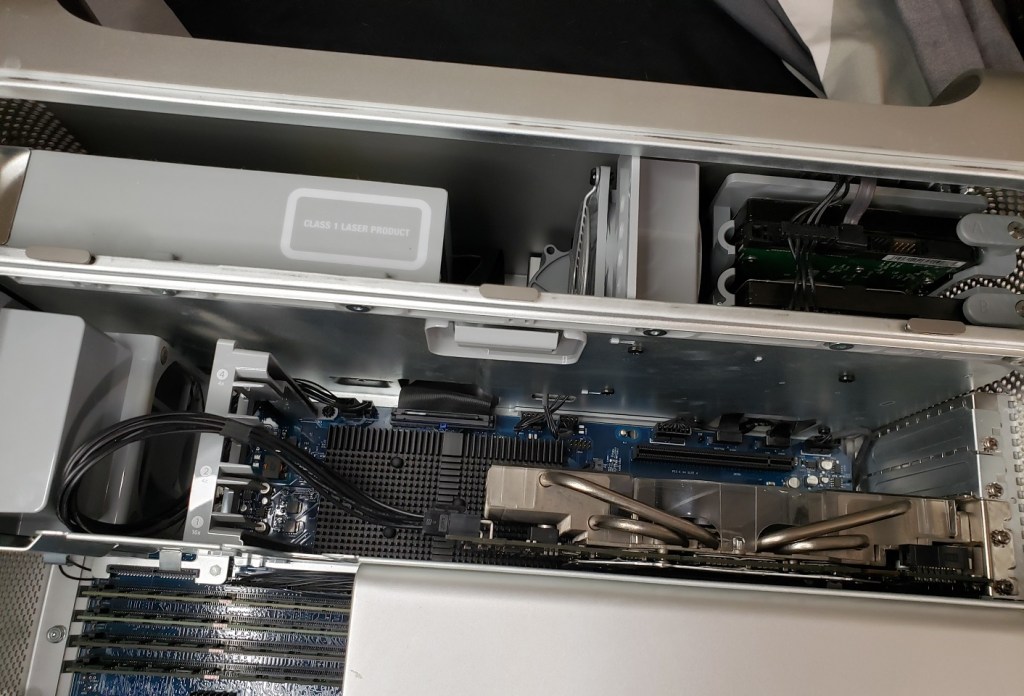
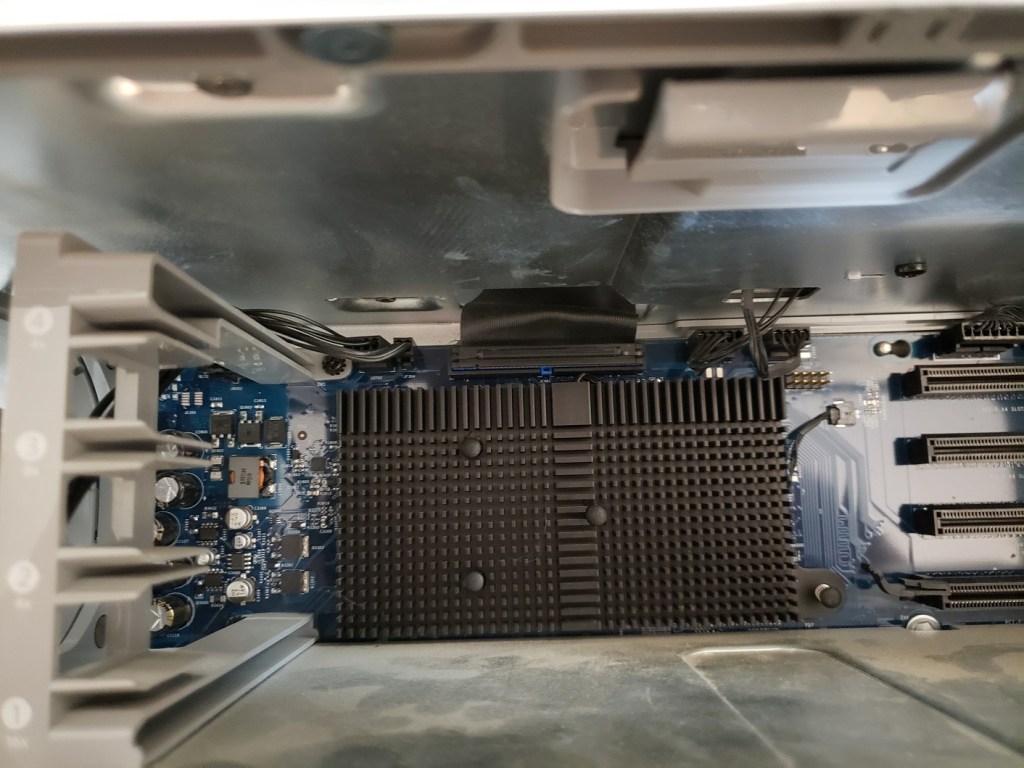
The area of the motherboard below the expansion slots is dominated by the CPU and in this model, the water cooling system, which is located behind the “G5” shield. To the left of this is the RAM which we can get a better look at by removing the large gray fan which simply lifts straight out.
The G5 “quad-core” came factory with 512MB of DDR2 memory but I have expanded mine to a whopping 16GB of RAM. 16MB of DDR2 is a lot of memory for 2006 when the G5 line was discontinued and when many PC’s were still maxed out at 4GB with Windows XP. I do remember reading that the jump from DDR memory in all other models of the G5 to DDR2 in the late 2005 models such as the quad-core made very little to no performance improvement but I can’t seem to locate the source so I can’t confirm this though I felt it worth mentioning.
Finally, we have the CPU or in the case of the Power Mac G5 Quad Core, two CPU’s.
The CPUs and cooler are under a stylish aluminum shield with a large G5 emblazoned on it so you know what’s under it. The G5 Quad Core sports two separate dual-core 2.5GHz G5 Power PC CPUs under a factory stock water-cooled system.
My machine is equipped with a liquid cooling system by Delphi. The Delphi coolers were known to have leakage issues which could corrode and destroy the system. according to Wikipedia Apple started later using a liquid cooling system from Panasonic which was much more reliable. I have found at least one comment in my research that indicated that it was actually the Panasonic cooler used in the 2.7GHz G5 Macs that was unreliable and thus resulted in the apparent scarcity of that model. This also makes sense since the 2.7GHz G5 with the Panasonic cooler seems to of been released in early 2005 where the models with the Delphi coolers were released in late 2005.
There are faster 2.7GHz G5 Macs though these machines use two separate single-core G5 CPUs so they may be faster in single-threaded applications and games that do not take advantage of multiple cores though the quad-core is seen as the fastest overall G5 PC. It’s very hard to compare speed-wise with Pentium or other X86 processors but I have seen rough equivalency with faster AMD FX processors.
The Power Mac G5 quad core is the king of the G5 line and possibly of the power PC computers in general. It was the end of an era for Apple who after these machines switched over to Intel CPUs and in my opinion, lost some uniqueness. The case for the G5s is durable but be prepared because it is heavy and moving it around is a real pain. The G5s did get a reputation in its day for being fairly good machines for things like video editing but also as a space heater as it tends to give off a lot of heat while in operation. I will say my machine does get a little warm and is loud though I expect the models with fan cooling as opposed to water cooling would be even louder. It should be the king of OS X gaming though unfortunately there aren’t many games that are exclusive to power PC based OS X though.
In my last article, I wrote about the iconic IBM 5150. This time we are going to look at another machine of the eighties that is just as, if not more iconic, the Apple IIe. The Apple IIe or Apple II “Enhanced” is the third model of the Apple II line and was released early in 1983. It was the longest produced Apple II and with little doubt the most iconic of the line.
Like many computers of the early 80s and unlike the IBM 5150, the Apple IIe used specialized chips and was only able to use its own software specifically for the Apple II line. The Apple II was a bit more expandable than some other micro computers such as the Commodore 64 and Tandy CoCo as it does have a number of expansion slots available which we will take a look at once we open the Apple II up.
Keep in mind there were a few revisions of the Apple IIe. Mine appears to be the 1985 “Enhanced IIe” which involved several changes and upgraded chips which we will also talk about a bit later.
All versions of the Apple IIe were the popular at the time “keyboard computers” as in the computer was compact and featured a built in keyboard similar to a Commodore 64 or Tandy CoCo. The image above also features two DISK II 51/4 floppy drives which the Apple IIe was commonly found with. These drives accept 140kb Apple formatted disks.
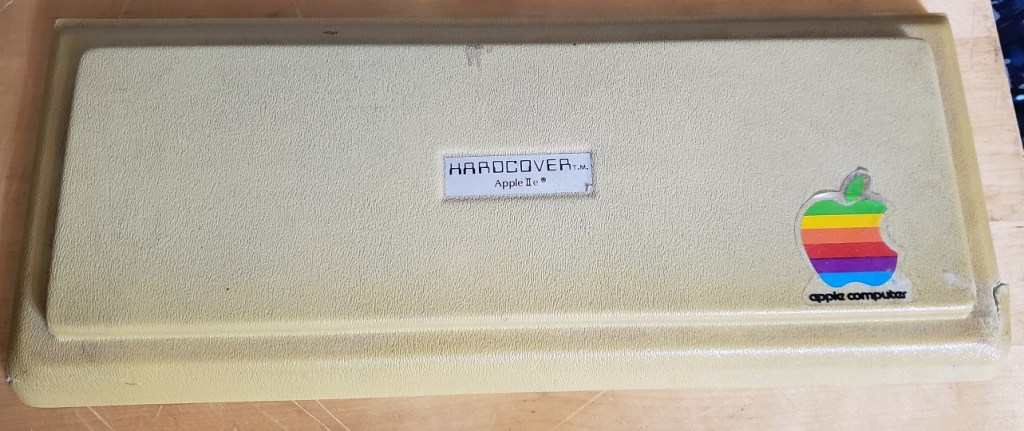
I also have a cover for my Apple II’s keyboard. Its not in perfect shape but I’ve never seen another one.
Let’s take a quick look at the monitor I’m using before taking a look at the rear of the Apple II and then opening it up.
I am using the 13-inch Apple ColorMonitor IIe which is a composite color monitor that was widely used with the Apple IIe line. Mine is not in the best shape with a chipped power button and a missing front bezel but it works and the image is of good quality, generally higher than a similar consumer TV of the same size and time. There are several adjustment knobs as well as a “white button” which turns the Color IIe into a monochrome monitor. The connector is a RCA style composite connector located on the rear of the monitor.
The Apple monochrome monitor was also a very popular choice at the time as a display for the Apple II line.
This monitor was, obviously green monochrome but offered a very sharp image through a composite connection.
Another advantage is the monitor is very light compared to Apple’s color offering though this is common to monochrome monitors.
The monitor itself has a kind of odd profile when seen from the side. It also can be tilted upwards or downwards slightly which is neat but not terribly useful.
Unlike many of the home micro computers of the early 1980’s the Apple IIe line allowed for relatively easy expansion via expansion cards much like an IBM compatible PC. The Apple IIe does have a few built in ports located in the lower left hand corner.
Starting on the left we have a single RCA style composite jack for connecting to a composite color or monochrome monitor like the Apple ColorMonitor IIe or any standard TV with a composite input should work although Wikipedia states the output is “unreliable” and may have varied results when connected to anything besides a monitor.
video modes according to Wikipedia for the Enhanced IIe are as follows
40 and 80 columns text, white-on-black, with 24 lines
Low-Resolution: 40×48 (16 colors)
High-Resolution: 280×192 (6 colors)
Double-Low-Resolution: 80×48 (16 colors)
Double-High-Resolution: 560×192 (16 colors
Next to the composite out jack there are dual 1/8 input and output jacks for connecting a tape deck. Lastly is a db-9 joystick port. This port is for Apple compatible paddles and joysticks.
This port is physically compatible with Atari and Genesis joysticks and gamepads but is not electronically compatible and can cause damage if connected.
The joystick port was also used to support the official apple IIe mouse, the “Apple Mouse IIe” which is essentially a rebadge of the Apple Mouse II. I do not believe however that a large amount of software on the IIe supported a mouse interface.
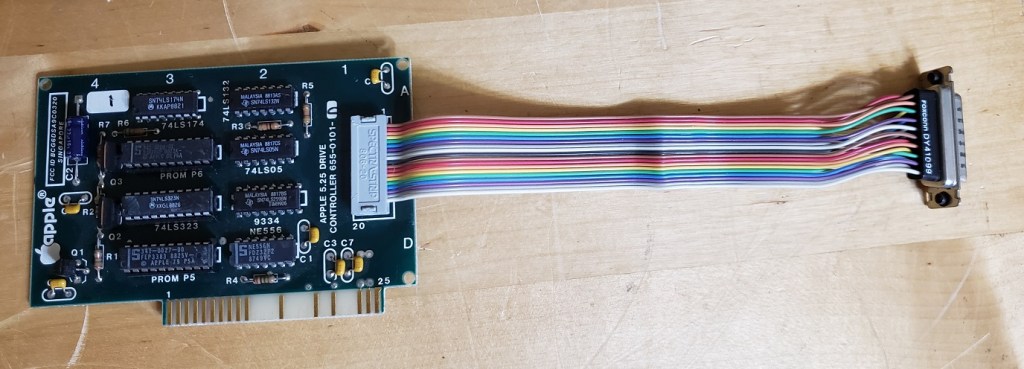
Above these built in ports taking up expansion port cutouts 1 and 2 are the cables connecting to the dual Disk II floppy drives. Unlike most cards which would have a port on the rear of the card and be exposed on the rear of the computer through the expansion slot the apple II disk II controller card has dual internal pin connectors for the floppy ribbon cables. This means the cables connect to the card and then must be snaked out of the rear of the Apple IIe and to the drives.
Below is an Apple IIe disk II controller card
Down farther from the floppy drive cables at expansion port 6 is my Hayes modem card. I’ve never actually used this card but It came with my Apple IIe
The Apple IIe is relatively easy to open up and the cover can be removed by unclipping the two plastic tabs at the rear and then lifting up.
As I stated earlier my Apple IIe is the Enhanced IIe meaning that 4 chips have been replaced or “upgraded” including the CPU and three ROM chips in order to make the Apple IIe more compatible with the Apple IIc. These changes did fix a few bugs and increase compatibility with newer software but also introduced some slight incompatibility issues with a few older software titles.
1) CPU – The Enhanced IIe uses the 65C02 processor running at 1.023MHz on an 8-bit bus. This CPU is an enhanced version of the 6502 CPU found in earlier Apple IIe computers and offers bug fixes, lower power draw and some performance improvements.
My Apple has the 65SC02 CPU which is a variant lacking bit instructions. Below is the official Apple IIe enhancement kit that included the updated 65C02 CPU and accompanying ROMS.
2) RAM – The Enhanced IIe like the Apple IIe before it comes with 64kb RAM built into the motherboard. This was fairly easy to increase up to 1MB by use of RAM expansion cards.
One common card used for expanding RAM on the Apple IIe was the 80col/64k card. This card when installed in the auxiliary slot on the motherboard added 64k of additional RAM bringing the total system memory up to 128k and allowing 80 column mode to be used.
My Enhanced IIe came with a RAM Works card from Applied Engineering. This card when installed in the auxiliary slot operated exactly like the 80col/64k card except it could upgrade your system memory all the way up to a full 1MB of RAM.
As far as games go I’m not sure any games required or took advantage of more then 128k of memory although several utility/productivity programs either required or ran better with more RAM on the Apple IIe.
3) Expansion slots – The Apple IIe used seven 50-pin Apple IIe Bus slots for expansion. This worked very much the same way as it does on any IBM compatible as you can buy various compatible expansion cards and simply install them in the slots. These cards ranged from the disk drive controller to modems, sound cards and even hard drive controller cards.
4) Auxiliary slot – The Auxiliary card slot is a 60-pin slot designed specifically for certain Apple IIe compatible cards. Primarily these were memory expansion cards but RGB video adaptor cards also used this slot.
5) Various connectors can be found on the right side of the IIe motherboard. The connector labeled “keyboard” is obviously for the built in keyboard cable. The “numeric key pad” connector is for adding an external numeric keypad which you would need to snake the connector cable out one of the various openings on the rear of the computer. Finally the game I/O is simply another internal game joystick/paddle port.
Sound – Sound for the Apple IIe was provided by a simple cone speaker. There were sound cards produced for the Apple IIe line such as the Mockingbird card but very few games seemed to take advantage of these cards.
Upgrades
Besides expanding the memory for my Enhanced IIe to 1MB there was also a few other simple upgrades I was able to try out.
The first was upgrading the dual Disk II drives to something that looked a little better. The dual drives worked fine but I feel like they looked a little crude and having both drives essentially hard wired to the case unless I removed the lid and disconnected them internally from the card made moving the Apple IIe a bit of a chore.
Thankfully in 1983 Apple released the DuoDisk which took two disk II drives and placed them inside a single case which connected to a controller card via a single detachable cable.
The second upgrade I tried was an accelerator card. The card I tried was the Titan Accelerator IIe. The Titan accelerator features the same 65c02 microprocessor as the IIe but this one runs at a blazing 3.58MHz and adds 64k of memory.
My card has a R65C02P4 processor installed which is supposedly running at 4MHz. Unfortunately, I didn’t have much working Apple IIe software to do testing at the time but the game Planetfall which I did test did not seem to be running any faster than before and would lock up when landing on the planet while the Titan accelerator was installed.
Since all Apple IIe computers used the same CPU at the same speed rating games by nature were fined tune to operate at 1.023MHz and thus I find using any accelerator in an original IIe to be dubious at best. The added speed may be of benefit with some productivity software but since most of us retro computer enthusiasts primarily enjoy gaming on original hardware I feel like an accelerator may do more harm than good in an Apple IIe by throwing off the timing of games or even flat out locking up or refusing to run the software.
The Apple IIe is an iconic computer that any hardware collector needs to have in their collection. The enhanced IIe is a pretty good choice when looking for an Apple II and should play most games and software just fine though keep in mind some older games may not function correctly due to the updated ROMs and CPU.
Unfortunately in the time I had my Enhanced IIe setup I found it getting fairly little use. Although there is a huge number of games available on the Apple II I found myself primarily running their ports on other machines which offered either superior visuals and sound or better ease of use. Despite the huge amount of games for the Apple II there seem to be relatively few exclusive titles and the titles that are exclusive seem to go for large sums of money on sites like eBay.
Previously we have looked at several black and white compact Macintosh computers including the Classic, Classic II and Macintosh SE. Today we are going to take a look at the pinnacle of the B/W compact Mac family, the Macintosh SE/30.
The Macintosh SE/30 was released in 1989 and was a compact mac to rule them all. It offered the power of its larger Macintosh II brothers in a small compact package as well as some future upgradability.
The front of the SE/30 is obviously dominated by its 9-inch 512×346 pixel black and white screen. The quality of this screen is excellent and games designed for the b/w mac look great on this machine. Other then the screen we have a small HDD activity LED hidden within the horizontal lines below the screen. The floppy drive is a 1.44MB drive which on the SE/30 for the first time came standard on a compact mac.
The only dial or button on the face of the SE/30 is a brightness dial for the monitor hidden away below the Apple badge and model name.
First off on the lower left side of the rear is the expansion card plate for certain expansion cards. This SE/30 previously seems to have had a Radius display card but unfortunately the card was removed by the previous owner but the bracket was left behind. To the right of this we have a standard 3-prong power connector and the power switch.
Taking a look at the various ports starting from the lower left we have dual ADB ports for keyboard and mouse. Next to this we have an external floppy drive connector for attaching well, an external floppy drive. Next is an external SCSI port for connecting external SCSI devices such as hard drives and CD-ROM drives. Next is an apple printer and then modem jack and lastly we have a 1/8 stereo audio out jack for connecting headphones or external speakers. Since we are talking about the sound the SE/30 uses an Apple Sound Chip (ASC) including four-voice, wavetable synthesis and stereo sampling generator. The sound coming from the built in internal speaker will be mono but anything through the rear audio jack, wether speakers or headphones will be stereo.
Removing the case reveals the drives and internals.
It is fairly cramped inside but the motherboard is fairly easy to remove as it just slides up and then away. Remember to detach the cables before removing the motherboard though.
The fan header, floppy and SCSI cable and power cable need to be unplugged from the motherboard. Only the power cable may present an issue since it can be a little stubborn and hard to reach. Below the CRT tube is a tray for an optional SCSI hard drive. Generally the SE/30 was sold with either a 40MB or 80MB hard drive installed but the system will take as large as a drive as you can find. I currently have a 300MB hard drive installed. Below the hard drive is a 1.44MB floppy drive.
Above is the motherboard for the SE/30 after being separated from the case. A common point of failure on these boards as with most of the older Macs are the silver surface mounted capacitors. These tend to leak over time but can be replaced with modern equivalents.
1 ) CPU – The CPU is the Motorola 68030 running at 16MHz. This is the same CPU and speed as some of the SE/30’s big brother full sized Macs such as the Macintosh IIx and IIcx. Due to the SE/30’s 32-bit bus it is the fastest of the black and white compact macs being even faster than the Mac classic II which features the same CPU and speed but only ran on a 16-bit bus.
2 ) FPU – One other feature of the SE/30 is the inclusion of an FPU co-processor standard on the motherboard as opposed to being optional. The Motorola 68882 FPU unit helped when performing more complex math functions though like the on the PC I’m not sure it was utilized very often in games. You could argue that an optional FPU socket is a better option since if the FPU fails you can replace it much easier.
3 ) RAM – The SE/30 features eight slots for 30-pin RAM SIMMS. 1MB or seems to of been stock but it’s not unusual to find SE/30’s with 8 to 16MB of memory.
Unofficially the SE/30 can support up to 128MB of RAM using 8 16MB SIMMs. This is a staggering amount of memory for 1989 when this model was released let alone in such a compact machine. I was able to upgrade My SE/30 to 128MB, just be sure to remember afterward to navigate to the memory option in your OS and enable 32-bit memory mode.
4) ROM – The original ROM that came stock with the SE/30 was a 32-bit “dirty” ROM meaning that it still had some 24-bit code. This meant the SE/30 was limited to 8MB of RAM though there was a software solution called Mode32 which allowed 32-bit mode. Both SE/30s I have come across had Mode32 installed and if yours does not the software is freely available with an internet search.
Thankfully the ROM on the SE/30 is not soldered to the motherboard and can be swapped out as easily as if it was a stick of RAM. One way to make your SE/30 32-bit “clean” was to swap the stock ROM out with the ROM from a Macintiosh IIsi or IIfx. For a while I had swapped my ROM with one from a Mac IIsi and it seemed to work fine.
Possibly the best option currently for making your SE/30 32-bit “clean” would be ordering the reasonably priced ROM-inator-II from Bigmessowires. The ROM-inator II is a modern replacement for your SE/30 which makes it 32-bit “clean” but also adds HD20 hard disk support, various utilities and lets your Mac boot to System 7.1 from the ROM.
5 ) PDS slot – The PDS or Processor Direct Slot allowed the SE/30 to accept a number of expansion cards. Something not seen in most of the compact Macs. Various cards such as accelerators and display cards can be added via this slot.
6 ) PRAM battery
7 ) SCSI connector
8 ) floppy connector
9 ) Power connector
10 ) Interrupt and reset buttons
The SE/30 is one of the all time classic Macintosh computers and along with the color classic I and II one of the absolute best compact Macs. The SE/30 has all of the power of a full sized Macintosh II in a much smaller package. With a ROM replacement, a sizable SCSI hard drive and the full 128MB of RAM the SE/30 becomes a monstrous classic Macintosh. The smaller black and white monitor can be a handicap when it comes to games but games designed for the B/W mac look stunning on the monitor and the lack of color even lends itself to the atmosphere of certain games such as the Infocom Macventure series.
re-capped Mac SE/30 motherboard upgraded with ROM-inator II and 128MB of memory
I would highly recommend tracking an SE/30 down if you want a classic compact Mac. You’ll probably never need the 128MB of RAM but I would certainly recommend adding a nice sizable SCSI hard drive or even a SCSI2SD adaptor for storage. I would also highly recommend the very affordable ROM-inator II if only to make your machine 32-bit “clean” and to get that very nice ability to boot from ROM.
(right-clicking on any image and choosing “view image” will enlarge image)
Todays article we will be looking at the short lived Apple eMate 300. Apple’s late 90’s attempt to fuse the Newton PDA and laptop.
I won’t be taking this unit apart mostly for the reason of I do not actually own this machine and I’m borrowing it, thus I don’t want to risk accidentally damaging it seeing as I’m not very familiar with laptops and such nor do they particularly interest me. that said I didn’t want to pass up an opportunity to feature this interesting and kind of rare machine.
The eMate 300 was briefly sold for less then a year between 1997 and 1998, mostly to the educational market.
The eMate 300 comes in an all translucent green case and If I’m not mistaken is the first Apple computer to use the colored plastic motif that the later iMacs became so well known for. The plastic has actually held up fairly well over time and did not seem brittle to me.
Another thing you may notice is the eMate 300 kind of looks like a butt in tight green spandex. I’ve also been told it looks like a bust line, just the image you want to evoke for a device meant for the educational market…
Lets take a quick look at the specs for the eMate. The screen is a 480×320 resolution grayscale that operates as a touch screen with the use of the stylus. It does have a backlight that can be toggled on and off via a button on the keyboard and sort of resembles the look of the screen on the original Gameboy with the green soup look although the eMate screen does look much better.
There are some nice touches like the holes to place your stylus on either side of the eMates keyboard.
The CPU is a 25MHz ARM 710a RISC processor and the machine comes with 3MB of RAM standard. In a world with several hundred Megahertz Pentium and K6 CPU’s this feels like an extremely underpowered processor in 97/98 but remembering this was not meant to be an actual laptop but a beefed up PDA the power is acceptable for most tasks as far as I could see. Under the battery door there is an expansion slot that did make the RAM expandable via third party cards. There is also a headphone jack and PCMCIA slot on one side so adding things such as wireless and flash memory is possible.
On the opposite side of the eMate is a small sliding panel door that acts as a cover for Macintosh serial/localtalk ports.
Unfortunately I don’t have much else to say about the eMate. It seems like it was a good idea at the time but it never really caught on and sold very well. You could also at the same time buy the more traditional looking Apple Messagepad 2000 which was a more powerful and expandable PDF device.
As far as I know there are no games for the eMate 300 which makes sense as that was not it’s intended use nor does it even sport USB ports or floppy and/or CD drives to help facilitate such things. I did have some fun just mucking around on it. There are some neat features like the art program which lets you draw free form shapes and then the eMate sort of fixes them up. For instance I could draw a rough circle or triangle and the eMate would then adjust my hand drawn shapes to perfect circles and triangles. It was also neat to hand write sentences and then have the eMate transfer the hand written notes into text, although it didn’t always get things right.
Again, The eMate is a neat and pretty rare piece of Apple and computing history but it isn’t really my personnel cup of tea.
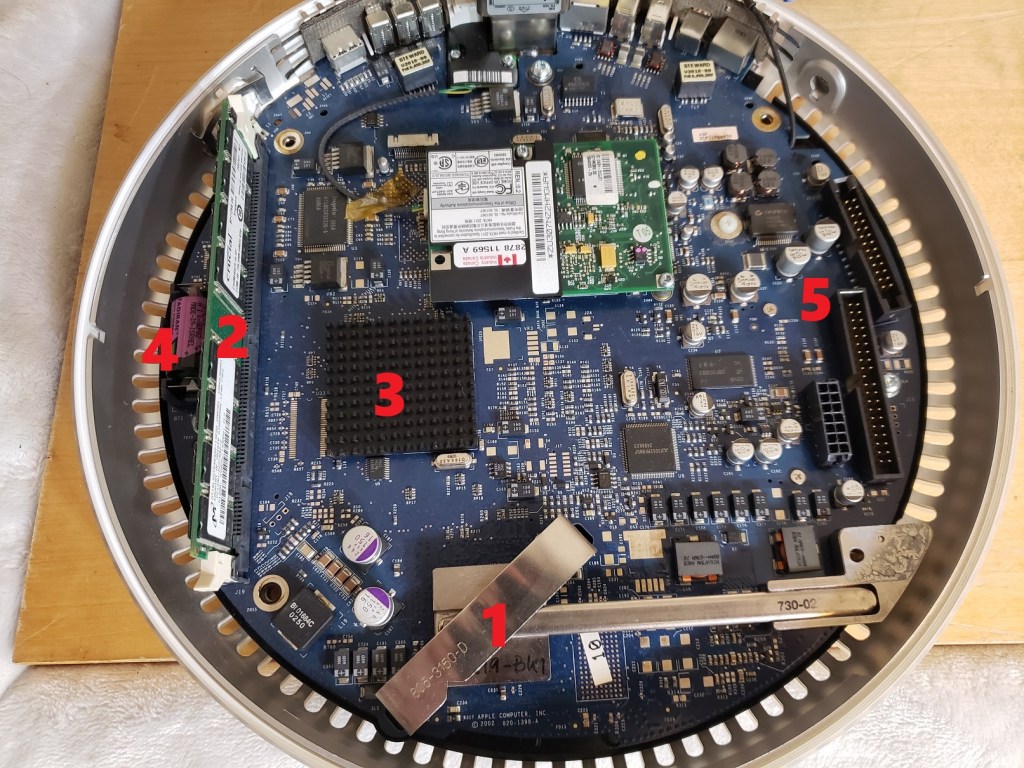
In 2002 Apple released the successor to their all-in-one computer, the iMac G3. Originally named the “New iMac” the PC would eventually be known as the iMac G4. The iMac G4 was extremely futuristic looking for it’s time with the entire motherboard and other components being housed inside a dome case. Coming out of the top of this dome was an adjustable metal arm and a TFT active matrix LCD screen with a native resolution of 1024 x 768. This was still a era of large heavy CRT monitors and seeing an LCD still felt pretty futuristic. In today’s article we will be looking at the 800MHz model which is the second of the four revisions Apple made of the iMac G4.
Even if your not an Apple fan you have to appreciate the industrial design and ability to fit everything into a small 10.6″ dome case. Even in 2019 as I write this article the iMac G4 wouldn’t look out of place on a sci-fi TV series taking place in the future home or on a starship.
Of course there is a price for this compactness and design and I’m not talking the dollar amount Apple wanted for one. I’m talking about expandability which is obviously severely lacking with the G4.
The front of the dome has no visible buttons or LEDs, just a shiny Apple logo and a slot for the optical drive. The optical drive in my model is a CD-R / DVD combo drive but the drive did vary by model.
Side shot
Full rear shot
On the back of the dome we have an array of different connections for connecting your G4 to the internet as well as other peripherals.
All the way, barely visible, on the left side we have a Kensington security lock for securing your iMac to some object so whomever doesn’t walk away with it. Next to this we have a standard 3.5mm headphone jack. The next jack looks to be another standard 3.5mm audio jack but it is not. This is actually a special audio jack for a set of Apple Pro speakers. The jack is a little smaller then a standard 3.5mm jack and it also delivers power to the speakers. I unfortunately do not have a pair of these speakers but many consider them some of the best speakers ever made for any Mac computer. Following this we have two firewire 400 ports and an Ethernet jack. In the center we have a three pin power connector followed by a modem, three USB 1.1 ports and finally a mini VGA output port. The port supposedly only mirrors the main display but still handy if your having issues with the built in monitor.
To access the internals of the iMac there are four small screws on the underside of the base.
Removing the metal base plate gives access to the airport wireless card, or if you don’t have one, the port to install it. To the right is a 144-pin SO-DIMM RAM slot. This RAM is the smaller style SDRAM more commonly found in things like laptops. This slot will accept up to a 512MB stick of PC133 memory which is what I have currently installed. The iMac G4 can accept up to 1GB or RAM total but the second RAM slot is not as easily accessible. Later versions used DDR memory and had a maximum limit of 2GB..
After removing several more screws on the base of the G4 you need to carefully pry the two pieces apart. Even with the screws removed it may take some effort as there should be thermal paste still bonding the two haves of the case together.
Here are the two halves separated. The upper half houses a fan and speaker as well as both the CD/DVD drive and hard drive above that. My 800MHz G4 came with the stock 5400RPM 60GB hard drive and OS X 10.4.11 installed. This hard drive can be upgraded to a larger size and can even be replaced with an SSD (via an adapter) if so desired.
Now lets take a look at the interesting part, the motherboard attached to the base of the g4.
1) CPU – My model features an 800MHz Power PC G4 but earlier models featured a 700MHz CPU. Later models went all the way up to 1.25GHz. There is no fan on the CPU but the heat sink is interesting on these models as it attaches to the side and makes contact with the upper half via thermal paste to use the entire case as a heat sink. This heat sink is more significant on the faster models. A metal clip holds the sink firm against the CPU but can easily be removed with the help of something like a flat head screwdriver and a bit of force though be careful not to gouge the motherboard or slip.
I do tend to like the Power PC chips and the 800MHz is sufficiently powered for the time though of course you’ll get more gaming mileage from a 1 or 1.25GHz model.
2) RAM – The second RAM slot is located on the upper half of the motherboard and uses a standard 168 pin DIMM slot. The slot on mine is also populated with a 512MB PC133 stick bringing my G4s memory up to the 1GB limit. I do understand Apple was working with space limitations and had to be creative to fit everything but it is an annoyance that one can only easily access half of the RAM sockets for upgrading without taking the computer apart. The difference in form factor could also potentially confuse less tech savoy consumers looking to upgrade their iMac G4s memory.
3) Video – I did not remove the small passive black heat sink to confirm but I’m almost 100 percent certain that lying underneath is the iMac’s Geforce 2 MX video chip. This model as well as the earlier iMac G4 also used this chip along with 32MB of non-upgradable video memory. Later models used the Geforce 4 MX chip as well as FX 5200 Ultra chips along with more memory. The Geforce 2 MX in the 800MHz here was not a high end or enthusiast oriented card but was a sort of cut down Geforce GTS with performance numbers a little higher in general then the older Geforce256. It did run cool and featured some advanced features for the time such as T&L (Transform and Lighting) capabilities making it a good choice for a non gaming oriented all in one machines like the iMac G4.
Next to the GPU chip we also have a small daughterboard like card. I believe this card has chips controlling the wireless and networking functions of the iMac.
4) Battery – This is the typical PRAM battery found ubiquitously in older Macintosh PCs. It’s always a good idea to change this battery when picking up an old Mac.
5) Various connectors
Above where the heat sink arm meets the upper case we have three connectors for interfacing with the upper half of the iMac. The smallest connector on the lower right is a power connector while the one above it is a standard ATA-66 IDE connector for interfacing with the CD/DVD and hard drive. The last connector strongly resembles a floppy drive connector but it is not. I believe this is just the interface between the monitor and the motherboard video and connects with a female connector on the upper half of the case.
The iMac G4 is a very futuristic design that even in 2019 I feel would fit in on the set of Star Trek or some other sci-fi production. As an everyday PC in its time it probably made a half decent space saving and fashionable family computer for tasks such as surfing the web and doing things like homework. As a gaming computer for a retro gamer though I find it very limited. The CPU is adequate but the Geforce MX is more suited for older 90’s games rather then early 2000’s mac titles. The RAM is a bit annoying to upgrade requiring you to open the case and upgrading in general is very limited. Unless your very short on space, only looking to play older 90’s Macintosh games or just love the stylish futuristic look of the iMac G4 your much better off with any of the Macintosh G4 towers such as the Digital Audio G4 or the Mirror Drive Door G4 towers, at least as far as expandability and gaming go. If you must have that iMac G4 look though there are always the more capable 1 and 1.25GHz models that should offer more in the way of early 2000’sOS X gaming capabilities.
Way back in Jan of 2016 I wrote an article on the slot loading iMac G3. This time we’re going to take a look at the original Bondi blue “tray loading” iMac G3 and see how this iconic computer that is often times referred to as “the Mac that saved Apple” compares to its later “slot loading” revision. In this article we will be looking at a more or less bone stock very first revision or revision A model originally released in August of 1998.
As I stated in my original post on the slot loading variant of the iMac I was not the greatest fan of the Mac and was firmly in the Wintel PC camp during that time. My disdain for the iMac though was at the height of my displeasure with all things Apple and I honestly did not know why anyone would want one of those computers. Time and experience though has softened my stance and I now can appreciate these computers for what they are and the use they were intended for. The all in one iMac G3 was not a new idea but it was an idea that Apple as a company had moved away from during the latter half of the ’90s to make more generic “PC” type machines and hence lost a lot of what made Apple unique and stand out in the market. The iMac G3 was an all-in-one machine and was extremely simple to set up and played with Apple’s strength of focusing on industrial design with a colorful and inviting Bondi blue colored shell as opposed to the standardized beige of almost all other PC cases. The iMac was intended to be extremely user-friendly and be simple to set up like a microwave or a toaster. This computer was aimed at the average user just wanting to “surf the net” or write school assignments rather than power users or gamers (even though the iMac certainly could be gamed on).
The original model seen here only came in Bondi blue as opposed to later models that were offered in a variety of colored shells. A handle was provided at the top to help move the Mac around but to be honest it always feels a little awkward to use and I always feel like it’s going to snap off despite the handle being very sturdy.
The bulk of the iMac is taken up by the built-in 15-inch shadow mask CRT monitor capable of resolutions up to 1024 x 768. The iMac G3’s kept this same spec monitor throughout all models though later slot loading iMac’s supplied an external VGA port to connect to an external monitor. These early tray loaders did not which makes it quite unfortunate if your monitor dies. The rear of the Mac hides only a small handle, which is used when removing the motherboard, and a standard 3-prong power connector.
They also came with a matching Bondi blue iMac keyboard and mouse. The keyboard is a simple Apple USB keyboard and is not so dissimilar from others besides the color but the mouse, a USB ball type mouse, is the infamous “puck mouse” so called because of its hockey puck like shape.
Unfortunately the rumors of the poor ergonomics of the of the puck mouse are completely true and the mouse can be very awkward and uncomfortable to use over any extended period of time. This isn’t a major problem since the mouse can be swapped out with any Apple USB mouse including later Apple Pro mice which use a standard shape and sports a laser as opposed to the older ball for tracking. The puck mouse also uses the traditional one-button Apple style mouse so no scroll wheel. The mouse has held up well though I’m not sure if this is from rugged construction or lack of use.
The iMac was famously the first Mac to drop the floppy drive although one was easily added via a USB port. In its place a 24x CD-ROM drive was standard and is located below the monitor. The early runs of the iMac used a tray loading CD drive, hence the “tray loader” title where as the later models used a self-loading slot mechanism. Next to the CD drive we have a power button that emits a soft green light when on and on the right and left sides we have two built-in stereo speakers. These speakers do have a habit of rotting a bit but it is a repairable issue and fortunately this particular iMac does not suffer from the foam around the speakers deteriorating.
The speaker on the left has a wireless 4Mbits/s IrDA inferred sensor which was removed starting with the revision C tray loaders. The right speaker has dual 1/8 stereo jacks for hooking up headphones that two users can use at once which is quite nice. Underneath the Mac is a fold-out stand of the same Bondi blue as the case.
On the left side of the iMac we have a small compartment housing some various ports. The is a plastic cover which can either be removed entirely or replaced after your various peripherals are plugged in and the wires snaked out through the several openings provided.
Once the plastic cover is removed we are greeted by a variety of ports.
On the left we have two more audio jacks, one for a microphone and a second for optional external speakers, handy if the built-in speakers fail or are not powerful enough for your liking. Next to that is a scant two USB 1.1 ports. The iMac is also known for going all in on USB and ditching the traditional Apple ADB ports in favor of USB though I wish more USB ports were made available. The mouse is generally expected to plug into the USB port on the keyboard (this why the cord is generally so short) and this does help free things up. A USB hub can also be used without issue in case you have multiple USB devices you want to use. Next we have a 10/100 Ethernet jack and lastly a 56k Modem jack.
Under these ports we have a mysterious little covered cutout held in by two screws. Behind this cover is what is commonly called a “mezzanine slot”. This is a sort of expansion slot that originally was only supposed to be for Apple’s internal use but you can use it for other things and third parties did make expansion devices that took advantage of the presence of this slot though from my research they seem to be extremely rare. I even know of at least one third party adaptor that uses the slot to add a 3DFX Voodoo II upgrade and according to Wikipedia SCSI and TV tuner cards were also available though I’ve never seen any of these cards in person. This port was removed along with the previously mentioned inferred sensor with the tray loading revision C model.
Opening the iMac is much easier then it is on later revisions and there is no “mesh” layer present that requires removal. You just need to remove a few screws on the underside and then use the handle to pull off the plastic case section. Once the outer case is removed as well as a few more screws and cables the motherboard assembly will slide out though be careful as with most older Macintosh computers the plastic casing can be delicate and things tend to snap off.
Here is the underside of the case with the motherboard assembly removed. The early tray loaders sport a fan for cooling as seen here while the later slot loaders used a fanless convection process to cool internals.
Here we have the tray that holds the motherboard and most of the iMac’s components completely removed from the case. The hard drive is located under the CD-ROM drive as seen in the image below. Mine came with the original 4GB 5400 RPM drive.
Originally the iMac came preloaded with Mac OS 8.1 or 8.5 with the ability to officially upgrade to OS X 10.3.9 though mine has been upgraded to OS 9.2.2.
1 ) CPU/RAM – The CPU and RAM on the tray loaders were both located on daughterboards that connected directly to the main motherboard. The metal cage enclosing the daughterboard easily wiggles off with some light force. Revision A as seen in this article and revision B iMacs only shipped with a 233MHz PowerPC 750 G3 processor w/ 512kb of L2 cache but later revision C and D tray loader iMacs had 266MHz and 333MHz CPUs installed.
CPU module top
CPU module bottom
Standard RAM amount was 32MB of PC100 SDRAM in a smaller laptop style form factor. The revision A iMac was expandable officially to 128MB and unofficially to 384MB. Revision B, C and D were officially expandable to 256MB and unofficially to 512MB. My machine came with the oddly numbered 288MB of RAM installed. It seems the previous owner did make the sole upgrade of adding a 256MB stick of memory in addition to the 32MB of RAM already installed.
I had no problem up upgrading my RAM to a full 512MB by installing two 256MB RAM modules despite being a Rev. A motherboard and sources online indicating 384MB being the limit.
2) Video – Original revision A iMacs shipped with a built-in Rage IIc chip and 2MB of SGRAM as seen on my iMac but this was quickly changed in revision B and up tray loaders to the much more powerful Rage Pro chipset with 6MB of SGRAM standard. The original revision A boards can be upgraded to a full 6MB of SGRAM.
The ATI chip isn’t a surprise as Apple has a history of using ATI chips for graphics in this era. As far as I can tell the revision A iMac G3 is the sole computer to use this specific version of the Rage chip built in. Overall the Rage IIc is an adequate chip, though by 1998 it was getting quite outdated and was seen as a entry level 3D video chip. 2D applications should run just fine as well as less intensive 3D titles as long as resolutions and features are kept in check.
with 4MB extra video RAM module
3) Sound – Sound has always seemed like a bit of an afterthought in Apple machines and finding specifics has always been a bit of a chore as sound chips aren’t commonly noted on spec sheets. The iMac would appear to use Crystal CS4211-KM chip which supports simulated surround sound via the two built-in speakers.
4) Battery – Lastly we have the PRAM battery which acts just like the CMOS battery in a standard motherboard. Be sure to replace this on any newly acquired Macintosh computer.
Accessories
Compucable iDock II
The iDock is an interesting accessory that was designed for the iMac to extend its capabilities. My version is the iDock II which features a built-in 1.44MB floppy drive. As far as I can tell the floppy drive is the only difference between the iDock I and II. The iDock connects to the iMac by way of a standard USB cable and requires its own power supply.
The top of the iDock swivels allowing you some measure of turning your iMac which sits on top of the iDock.
The rear of the iDock features several ports to expand your iMac such as four USB ports, two Geo ports and one ADB port. The ADB port has been reported to not work or only partially work on these units. On mine I was able to get an ADB mouse to work but it was very iffy and the response was poor. The iDock does require special drivers to function.
The iMac does what it set out to achieve and I can see now what I couldn’t see as my high school self, why the iMac succeeded. It wasn’t meant for people like me. It was meant less for hardcore PC gamers and those that liked to expand and tinker with their computers and more for the everyday user, the soccer mom, the person that just wanted to do homework and surf the internet and it made a pretty easy to setup and usable computer to sit in the corner of the family room and have for general family usage.
As a collectors piece the Bondi blue iMac is certainly worth adding to the collection and holds a significant place in computer history and especially Apple’s history. They are still relatively inexpensive as of 2019 though an original revision A may take some work track down and identify. If your purely looking for a Macintosh for late 90’s gaming though there are much better options. Personally, I think your better off acquiring a Power Macintosh G3 tower or desktop simply for the vastly greater options you get in upgrading (such as PCI slots) and higher ease of repair. Failing finding one of these a later slot loading iMac or even a G4 could make a good choice as they seem to be easier to source and are more powerful out of the box.
In previous articles we covered both the nearly identical LC and the LC II, both of which were early attempts to bring an affordable color Macintosh to the market. Both machines more or less accomplish what they set out to do but also both were heavily compromised in functionality to achieve this end. The main compromises of the original LC and following LC II were
1 – A 32-bit CPU on a 16-bit motherboard severely hampering the performance of the LCs 16mhz 68020 CPU.
2 – An imposed limit of 10MB of RAM regardless of the size of the RAM stick(s) installed.
3 – complete lack of a MMU or FPU socket on the motherboard.
4 – Difficulty getting the LC to run with monitors outside of the fixed resolution 512×386 monitor it was intended to be paired with or period Apple or early VGA monitors.
The LC II added the ability to use virtual memory via the CPU’s built in MMU and tweaked the video a bit but was otherwise identical. Thankfully the LC III finally addressed all the above issues while maintaining the same small form case. Finally we have a full 32-bit data bus so as not to strangle the 32-bit CPU. There is now a MMU as there was built into the LC II but also much more expandability for RAM as well as a socket for a FPU chip and the video memory supports 640 x 480 resolution without any kind of fiddling or upgrade.
Other then the LC III badge the case is identical to the LC I and II. bear in mind there are two versions of the LC III case and one features a manual eject floppy drive that looks a little different with an indentation to grasp the disk. These cases also have the case badge as more of a label then etched onto the case. Otherwise these machines are identical.
The rear of the case though is identical to the LC I & II. from left to right you have the power connector and switch, Mac video port, modem and printer ports, external SCSI port, ADB port and finally an audio jack for speakers and mic. The Ethernet card installed on the right is the same one that used to be installed in my LC II.
The LC III like the LC I & II does not support power on via the keyboard and use of the rear switch is required. Opening the LC II is exactly the same as the other LC’s with just two fairly sturdy tabs securing the top.
Now with the top removed.
The general layout is basically the same as it was in the LC II with a single floppy drive and space for a SCSI hard drive. Mine came with a standard 80mb SCSI hard drive but I upgraded mine to a 500mb model by transferring the upgraded hard drive from my LC II.
Now lets take a look at the motherboard.
1) Enhanced LC PDS slot – The PDS slot on the LC has a slight extension to it compared to the PDS slot in the LC and LC II. The “enhanced LC PDS slot” in the LC III supports both 16-bit PDS cards of the type that would be used in the older LC machines but also 25mhz 32-bit PDS cards. Unfortunately these 32-bit cards are quite uncommon.
2) CPU – The LC III unlike the LC I & II now uses a full 32-bit data bus as opposed to a 16-bit but so the CPU can be taken full advantage of. The CPU in the LC III is a Motorola 68030 running at 25mhz, also a bump up from the 16mhz of the previous LC’s. Some benchmarks of the time placed the LC III twice as fast as the LC II in overall performance. There is also a version of the LC III known as the LC III+ which is identical save for the CPU which got a speed bump up to 33mhz. There is no way to tell the two models apart as there was no indication given on the outer case. Only opening the case and checking the CPU or powering the machine up and checking in software would reveal the difference. There are guides available on modding the LC III into an LC III+ but perform at your own risk. Also Later LC III’s with the manual floppy drive eject are more likely to be the plus models though be aware this isn’t a sure thing.
3) FPU – Finally we have a socket to add an optional 68882 math coprocessor to assist in complicated math calculations. This doesn’t seem to of been a popular upgrade though as I’ve never come across an LC III with this upgrade though the chips are fairly cheap (as of 2018). Like on the x86 PC though I don’t think the FPU was heavily utilized in any number of games on the Mac so the FPU upgrade was not seen as a priority.
Empty FPU socket to the right of the CPU
68882 coprocessor installed
4) RAM – The LC III has 4mb of RAM on the motherboard but also unlike the previous LC’s the LC III has a single 72 pin SIMM socket with the ability to add up to 32 additional MB or RAM for a potential max of 36mb. This is the configuration of my LC III featured here. The LC III was also the first Macintosh to use 72 pin SIMMs. This was a welcome feature as the previous 10mb was serviceable for the time but the ability to add up to 36MB total went a long way to extending the usefulness of the LC III in the future.
5) Video – The LC III features built in video and 512kb of VRAM standard. This allows 640 x 480 resolution on a 640 x 480 capable monitor out of the box and I had a much easier time hooking this LC up to my various monitors via a Mac to PC VGA adapter and getting a image without any hassle or “out of range” errors. The VRAM is upgradeable to 768kb via a VRAM slot and 256 KB 100ns VRAM SIMM. This will allow a maximum resolution of 832 x 624 at 16-bit
6) PRAM – this is the ever present PRAM battery for saving settings. It is always recommended to swap this battery out when you get a new Mac or if you start encountering strange instabilities.
The Mac LC III was a great evolution of the LC line finally fixing all of the shortcomings of the line while maintaining a lower price point. For all intents and purposes the LC III was a Macintosh IIci in a smaller form factor case with slightly lower performance and much less expansion capabilities. If all you wanted to do was some light work and gaming and didn’t need the expansion slots of the Macintosh II line the LC III was an excellent option that saved money and took up a little space in the house.
For the retro Mac gamer I would easily recommend this machine over the LC I and II. They don’t take up much space, are light and relatively cheap and easy to fine. They also offer enough power to run early color Macintosh games or black and white titles well and can work with most monitors hassle free.