Skip navigation

1024px-Intel_i486_dx_50mhz_2007_03_27(Image from Wikipedia commons)

The Intel 50mhz DX chip, released in the summer 1991 was the first 486 CPU designed to run on the then blazing fast 50mhz front side system bus. For a very quick and simple explanation, front side bus or FSB is in a very simplified sense the speed at which the various components of the motherboard such as the chipset, RAM and so on communicate.  If the CPU is to be thought of as the brain of a computer then the FSB would be the nervous system. The higher the number the faster the machine is overall. Generally the CPU ran at the FSB of the motherboard, thus if you had a 486DX-33 CPU running at its stock speed your FSB would be 33mhz as well. the 486DX-50 promised blazing fast speeds in a time when most 486 motherboards were running a FSB of 33 or even 25mhz. Unfortunately the majority of motherboards at the time simply could not cope with a 40mhz FSB let alone 50mhz and PC systems running a 486DX-50 quickly gained a reputation for being a very unreliable setup. This reputation was compounded by the fact that the faster VLB or VESA slot cards especially had a hard time running on the 50mhz FSB since this slot was tied directly to the CPU.

With that said I wanted to to take a look at the nowadays uncommon 50mhz DX chip and see if I could put together a stable running PC. I also wanted to compare it to a few of its contemporaries, especially the 486DX2-50 which also ran at 50mhz but on a much more stable 25mhz FSB via “clock doubling”.

So due to that last sentence I think we need to take a very quick look at what “clock doubling” is to help us better understand this era of CPU’s. I’m going to quote the Red Hill guide here on how they explain clock doubling.

While it is relatively easy to make a CPU run faster, it’s much more difficult to do it for a whole motherboard…. you will remember that the IBM AT (286) decoupled the expansion bus, so that the video and I/O cards could run at a safe, conservative 8MHz even though the motherboard and CPU were zipping along at 16 or 33MHz. But even the best motherboards were limited to about 40MHz in those days, so to make a 50 or 66MHz CPU work reliably, the motherboard had to be decoupled as well. This is a mixed blessing. It allows a faster CPU, but looses performance because access to anything off-chip (RAM in particular) is limited to motherboard speed — in this case, 25MHz.

So CPU clock doubling is really motherboard clock halving. In itself it doesn’t make the CPU run any faster, it just lets the motherboard run more reliably with a fast CPU.”

So in a nutshell a 486DX-50 is running both the motherboard AND the CPU at 50mhz where for example a 486DX2-50 is running the motherboard at 25mhz and the CPU at 50mhz but how great of a difference does this really make? My reading suggests a DX-50 in a well setup system can rival the famous DX2-66 which is a 66mhz CPU running on a 33mhz FSB but that remains to be seen.

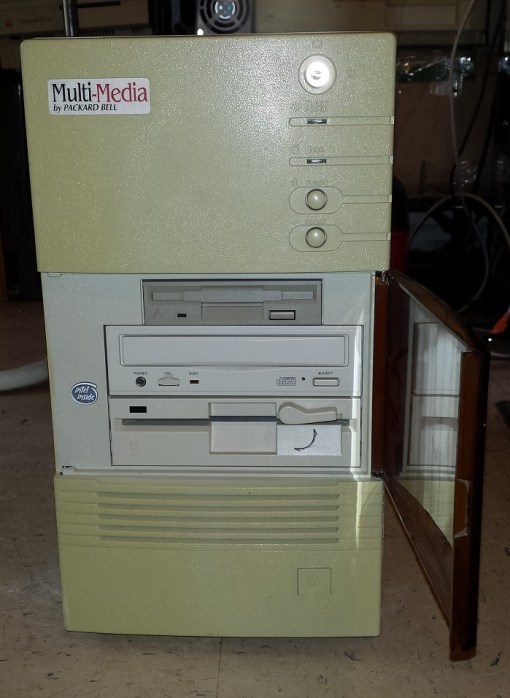
First off lets look at the setup I will be using.

50dx1

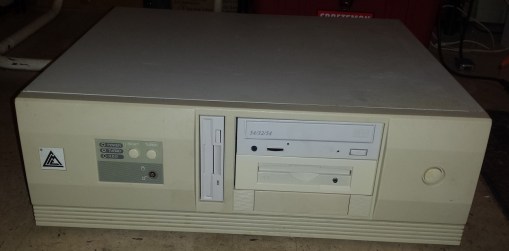
Specs are as follows

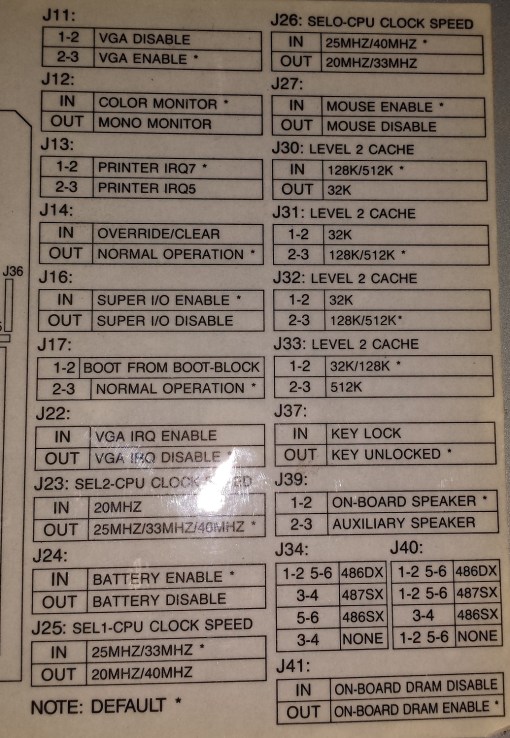
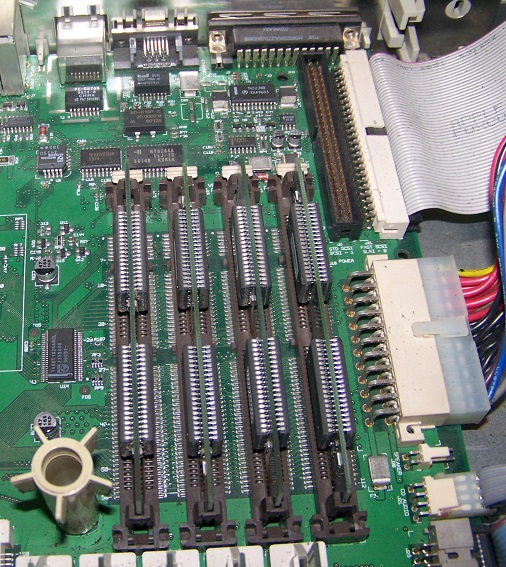
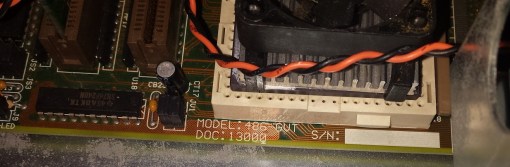
Motherboard – FIC 486-GVT U2?

The motherboard is a slight mystery to me. It identifies itself on the board as a 486-GVT or on some chips a 486-GVT U2 but from looking on the internet the jumper layouts of similar boards don’t seem to quite match up. There seems to be a few layouts for the 486-GVT 2 but they don’t exactly match this board though I was able to figure out were the jumpers that control FSB were and discover the settings via experimentation. This board is actually pretty nice featuring both 30 and 72 pin RAM slots and two VLB slots as well as a lithium coin battery for the CMOS so I would guess this is a later model motherboard for the era.

50dx2

50dx3

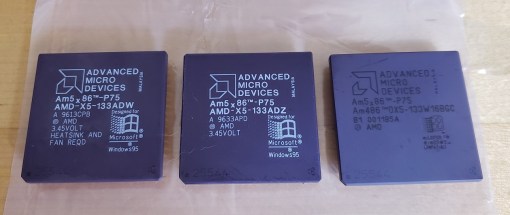
CPU’s – for testing I will be using all Intel CPU’s. a Intel 486DX-33, Intel 486DX-50, Intel 486DX2-50 and lastly the legendary Intel 486DX2-66.

50dx4(DX-50 on left with heatsink I added)

50dx5(bottom side of Intel 486DX-50)

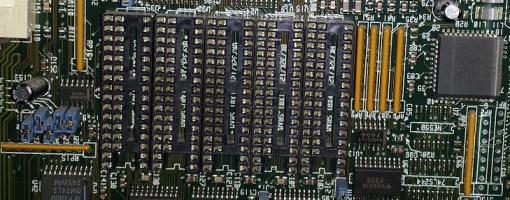
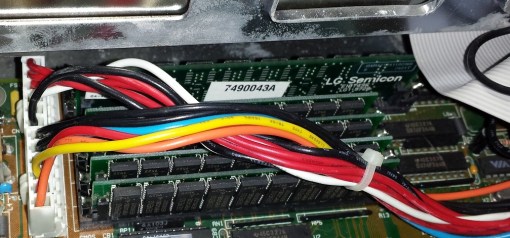
RAM and cache – for RAM I’m not using anything special just 24MB total of 30 and 72 pin RAM, for L2 cache I’m using 15ns chips totaling 256KB

50dx6

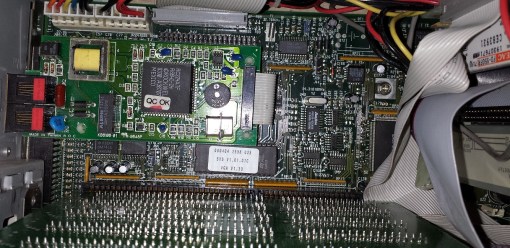
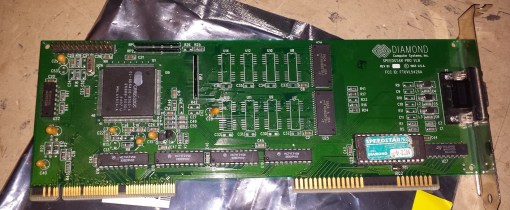
Video and sound – for video I’m using a 1MB VLB Diamond Speedstar Pro card based off the Cirrus Logic CL-GD5428 chipset. Cirrus Logic was mostly known for their mid range graphics card offerings but near the end of the 486 era did put out a few of the fastest video chipsets. the GD5428 is no slouch and is a very competitive 2D DOS video card.

50dx7

 the sound card really doesn’t come into play here with the CPU benchmarks but for the sake of telling it is a sound blaster 16 Vibra model.

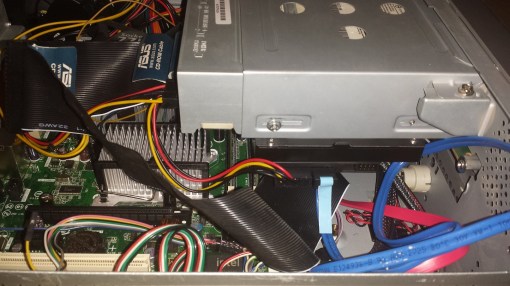
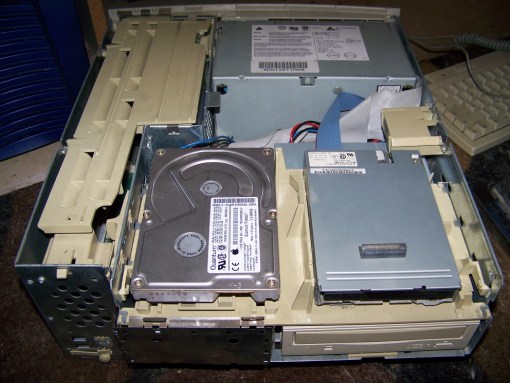
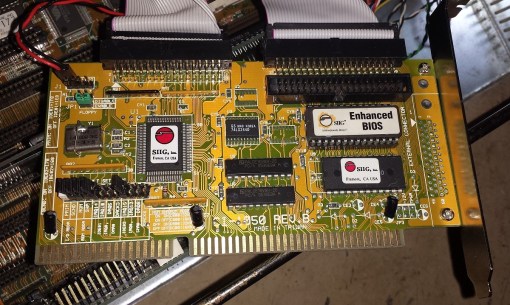
I/O – for I/0 ports and IDE control I’m using two separate cards. for serial and parallel ports I’m using a generic 8-bit SIS controller card and for my floppy and IDE controller I’m using a SIIG CI-1050. One problem I’m having with the SIIG card is my CD-ROM drive is not being detected which I haven’t taken the time to trouble shoot since I did not need it for these tests. It also does not work with other CPU’s installed so I’m chalking it up to an issue with the SIIG card. for  a hard drive I’m running an old 1.1GB Quantum fireball 1080.

50dx8

 The main thing one needs to watch out for on 486 machines if your using 40mhz or higher FSB is the number of VLB cards you have installed. Since they are tied to the CPU they can be very sensitive to the bus speeds. The general rule is the less VLB cards the more stable. Your usually safe running two cards on a 33mhz bus system but on a 40mhz bus system you will likely hit instability using two or more VLB cards. It’s not uncommon to have one or another card refuse to work, corrupt data ect. On a 50mhz bus system even getting one VLB running reliably can be a challenge. The safest bet for the type of card to use in a VLB slot is a video card as this is the type of card the slot was originally intended for.

With this in mind I limited myself to strictly one VLB card to use for video. Many times PC builders had to cherry pick cards to find one that ran reliably in these high FSB system but luckily my Diamond Speedstar Pro has run perfectly at 50mhz.

Which leads me to the reliability of my machine. Although I don’t use it daily I did run it extensively prior to writing this article and played quite a few games on it without any issues. I don’t doubt the frustration I’ve read about with 50mhz FSB 486 boards but it appears I got very lucky with this build. I haven’t had any of the usual issues such as data corruption, crashes or refusals to post. The one problem I did encounter though is that I cannot confirm my L2 cache is working. Cachechk crashes when attempting to run it and Speedsys also detects no L1 or L2 cache to test. This seems to be a usual issue to very fast 486 systems. Faster cache RAM may help solve this issue.

I have compared benchmarks though with multiple other users of 50mhz 486 systems on Vogons and my numbers seem spot on with those systems with slight variations.

So, does the 50mhz Front Side Bus speed pay off in the end? Well, no, not really.

I ran several benches on the exact same machine with the only differences being the CPU and FSB and in the end the results were usually the same regardless of the test. The 66mhz DX2 running on a 33mhz FSB always smoked the 50mhz DX chip. Also the 50mhz DX and DX2 were usually somewhat close in performance despite the FSB of the DX2 being half that of the DX version. In theory programs only using the CPU’s internal cache should run about the same speed wise but those that are I/O intensive should see a noticeable speed bump and my VLB video card running with 0 wait states SHOULD be blazing fast under the 50mhz bus speed. keep in mind results seem to vary depending on the motherboard and chipset as well.

here’s two graphs to illustrate. First is 3DBench a popular 486 era benchmark test.

3DBench

3dbench results

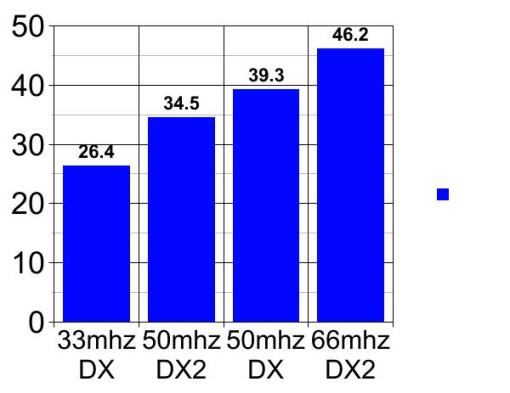
Results are mostly as we would expect. the 33mhz DX lags well behind while the 66mhz DX2 beats the 50mhz DX by roughly 7 points while 4.8 points separate the 50mhz DX and DX2.

This is largely repeated in the Doom speed test as well.

Doom Speed Test

Doom st

In the Doom speed tests the DX and DX2 are even more evenly matched it appears with the 66mhz DX2 pulling well ahead again and the 33mhz DX falling well behind. I made a comparison video of both these tests running here as I think a video better represents the various CPU’s.

So in the end, yes you can get a 486 system with a 50mhz DX chip and a VLB card running reasonably stable with a little luck and the right parts. Is it worth it? Again, my answer is no, at least in my opinion. Sure having a 50mhz system has a kind of retro cool factor but despite what Red Hill seemed to say I don’t think it comes close to the 66mhz DX2 at least from what my testing and running both CPU’s has shown me. I have also looked at benchmark results as I said earlier from other users that compared systems and the 66mhz always seems to come out on top in these other tests as well. I’m sure there are instances where the 50mhz bus system may run faster but those instances seem few and far between. When looking at both 50mhz 486 chips and comparing to the DX2 version, sure, it’s a little faster but its really not that significant especially when put up against the hassle of finding the right parts to make a DX system run reliably.

Shortly before Christmas of 2015 there seemed to be a lot of buzz about the coming of “Steam boxes”. Overpriced pre built PC’s with a new Steam OS installed. Its seemed many people were treating them as their own sort of console which honestly sort of baffled me. This got me thinking and as much as I dislike it the world moves on. Physical game releases are looking to go the way of the Dodo bird and as much as I dislike supporting digital only downloads I would be doing myself a disfavor by not playing some of great indie games that have come out on steam as digital download only or with very limited physical release thanks to something like Indie box.

I decided I wanted to see if I could make my own budget “Steam Machine”. My taste in steams library though tends to be very specific. I like retro style games on the service and in my opinion these type of games are the ones that feel most correct on a TV with a game controller. These are games generally designed in the style and look of 2D 8 and 16 bit graphics. Games that do not take a whole lot of processing power or that require a fancy graphics card. This machine could also be used as a home theater PC for streaming. Some examples of the games I intended to play were Rouge Legacy, Breath of Death VII: the beginning, Retro City Rampage and Bro Force.

I wanted to achieve this as cheaply as possible with my first task being to secure a small case and motherboard. Thankfully I was able to acquire a case at a local swap meet for $3.

rsb1

This is the case I used for my project. I like it because it’s a smaller case designed for micro ATX motherboards but it’s not to small so I can use full height cards. This case can be used in desktop or tower configurations and supports two external 3 1/2 bays as well as an internal 3 1/2 bay and a 5 1/4 bay. I could live without the silver color and would have preferred black but for $3 I couldn’t turn it down. The floppy drive came with the case but realistically it won’t be seeing any use. The same can mostly be said for the DVD drive which I took from an old P4 Gateway PC. It’s hard to come across silver optical drives and at first I wasn’t sure about the curved bezel but it actually works to give the PC a interesting look. The drive is IDE even though the motherboard supports SATA but seeing as this machine is largely for streaming I’m not concerned.

rsb3

On the back you can see I did not have a back plate for the motherboard which doesn’t particularly bother me. The PSU is a 500 watt micro ATX supply I purchased off eBay for about $20. So far its worked without issue.

The motherboard was one I already had, A Intel DG31PR. This board though not a high powered gaming motherboard fit my needs perfectly. It had most everything I needed built in as well as built in VGA and audio for backup options and 4 onboard SATA connections. A PCI-e connector was my biggest priority due to the need for a semi modern video card.

rsb10

rsb5

rsb4

The specs are as followed.

OS – My first choice was to try Steam OS but I just wasn’t to impressed with it. I know its still in Beta but I felt I could do just as well with a more traditional OS choice so I went with Windows 10. Privacy concerns aside Win 10 is a pretty sleek OS in my opinion and looks very much at home as the OS for a media center. This machine is also more then powerful enough to run Win 10 so don’t feel like you need to only install it on PC’s with really high specs just because it is new.

CPU – I went with the fastest socket 775 CPU I had on hand which was a 2.5ghz dual core quad. Though no longer a powerhouse I felt the 4 cores was more then enough to run the style of games I intended to play as well as drive some older 2008 era PC games if I choose to play them on this machine. Remember I didn’t create this machine to play Witcher 3 or Fallout 4 on Ultra settings, this was for light streaming and “retro style Steam games”.

RAM – my motherboard only has two RAM sockets supporting a maximum of for GB or two  2gb sticks of DDR2. I always want more RAM in a modern machine but so far 4GB has worked just fine. I did have some slight issues with non low profile ram though because of the fact the sled for the hard drive is under the optical drive where the RAM goes.

Storage – For this machine I went with two hard drives. One for the OS ONLY and the other for data. The first drive I went with for the OS was a small solid state drive. I chose a SATA II 64GB drive that I was able to find on eBay for around $20. smaller SSD’s are getting very cheap and I found Windows 10 fit snugly on it with about 30GB to spare. The SSD fit nicely in the second external 3 1/2 bay under the floppy drive.

rsb11

rsb9

I don’t foresee the size being an issue as I’m basically done adding anything to the drive and I doubt patches are going to take up the remaining 30GB. I really love how fast this drive gets the machine to desktop after powering on and really makes it feel like more of a console under the TV.

The second drive is a more traditional hard drive. It is a 250GB SATA drive I have in the bay under the optical drive.

rsb8

I know 250GB isn’t a lot these days but for small indie retro style games I think it serves is purpose fine. I will upgrade in the future if needed but since this drive was free for me I can hardly complain.

Video – The video card selection was the toughest part for me. My number 1 priority was a card that could output audio over the HDMI port. This ruled out older but powerful cards like the Nvidia 8000 and 9000 series that required a additional audio cable to run from the motherboard to the card. I also wanted a card that required no additional power and could run from the PCI-e buses power alone. My first choice was an Nvidia 630 GT. which  is actually a very capable entry level card but due to some issues with my possibly defective card such as constantly losing the video signal I had to use the next most powerful card I had on hand which was an entry level Radeon HD6450.

rsb6

rsb7

This card is certainly no powerhouse but again our goal was not to playing Crysis 3 at 4K or anything like that. The card installed without an issue and does have a few benefits. first off it was free since I already had it, it can output audio through its HDMI port without any fiddling, it uses no extra power connectors and also is passivly cooled and does not require a fan so that cuts down on noise.

Thus far the card has run flawlessly and has run the games I mentioned earlier and more without issue. It also streams from YouTube and other sources just fine. In the future I would like to upgrade to a better card but for now this one seems to be serving its purpose.

Lastly I wanted to mention controllers. As far as game controllers go I initially used a older Gravis gamepad pro but many games failed to support it so I picked up a third party Rock Candy Xbox 360 controller from the local Walmart for $19.99.

rsbcon

I have had no issues with this controller and all games thus far have recognized it, sometimes even listing it as a Rock Candy rather then a generic 360 controller. It’s a pretty solid controller for the price and I’d recommend it for light gaming.

Since putting this “Steam machine” together two weeks ago I have greatly enjoyed it. I’ve had no issues playing the games I want to play on my 50 inch LG 4K LED TV in the main room as far as seeing any slowdown or crashes. games seem to run fine at 720p and 1080p though some games do look a bit blurry in spots as if they were smeared lightly with Valvoline but nothing very serious. I’m unsure if this is the games themselves or the video card or results of upscaling to the TV.

Overall I’m very happy with this project and it cost me under $100 to put together. If you have lots of spare money to burn or don’t have a proper PC then I guess splurge on a retail Steam Machine but don’t be to intimidated by the specs of these machines. If your on a budget and your tastes aren’t for the most demanding graphical games on Steam you can certainly get by with something lesser powered.

rsbend

g3imac1

Growing up I never considered myself a “fanboy”. Even at the height of the 16-bit console wars I never took sides. Sure I preferred the Super Nintendo and considered it the better system but I generally didn’t belittle or shun the Sega Genesis and still wanted and was happy when I received one. This was the general trend with me as far as video game consoles were concerned. I had my favorite that I preferred but I always felt every console had something to offer. Then enter the PC gaming side of me. In my youth I will admit I was an unashamed PC “fanboy”. Ive gone into this before with my previous Macintosh posts as well as said how over time I have grown to accept Macintosh machines and acknowledge they have their place in the great computer scheme of things. I felt I needed to restate this though because of all Macintosh machines no other machine earned my irrational hated and scorn like the iMac G3.

Back in the very late 90’s and early 2000’s I could not comprehend why anyone would want one. To a younger me that couldn’t appreciate the industrial aesthetics as I can now they looked and felt like cheap toys. I felt the playful translucent color schemes were childish and cheap looking. I felt the machine was ridiculously limited in its upgrade options and also overpriced. Why in my own mind would anyone pay a premium for a machine that you could barely upgrade? Of course this is before I came to understand Macintosh as I do now, to appreciate the design and simplicity. You must understand as well that back then as well as now I was primarily a gamer. The computer to me was more a machine for playing games then it was for work, artistic pursuits or perusing the world wide web and as a game machine the iMac generally falls behind when compared to a PC with its massive amount of video card acceleration options as well as bountiful expansion slots and drive bays.

Flash forward some 14 years. I am much more accepting of the Macintosh now and own several, from classic compact versions to late 90’s 7500 machines. One day as part of a computer lot I was picking up I was given a iMac G3 and there it was, my old enemy. Even after all those years I still felt a strange disliking for the thing, “Pointless toy for teenage girls and people that know nothing of computers. Only  fit to surf the web and do homework on, not a “real” computer”. Yet here it is, setup in my apartment where I have very little space. As a matter of fact it is the only Macintosh machine I currently have set up and it has replaced my Mac 7800 as my primary late 90’s Macintosh. Honestly the thing kind of grew on me for the very reasons I once shunned it, simplicity and its interesting design, such irony.

As a gaming machine I still say its is limited compared to its PC contemporaries but really the Mac never was a meant as a ultimate gaming rig and for late 90’s Mac exclusive titles or “Macintosh enhanced” versions of games the iMac G3 is just fine.

g3imac2

There are actually several versions and revisions of the G3 iMac. The greatest version differences though are from the early CD tray loading models and the later slot loading models. I do not own a tray loading model so that may be for a separate review but I do currently own two later slot loading models which differ slightly in design that I will go over now. Both models I own are “indigo” colored models. one being a lesser powered 350mhz version and the other being a more powerful 500mhz version. These machines differ in ways other then CPU speed which I will discuss.

The slot loading models came in CPU speeds ranging from 350 – 700mhz. The machine shown above that I have setup and game on is actually the lesser powered 350mhz model. I chose to use this model for a few reasons. First is for the era of games I’m playing which will be mid to late 90’s a more powerful CPU is really unimportant. After all the machine this replaced was only running a 300mhz G3 at a lower FSB and it performed exactly how I intended. Anything that needs a faster CPU I’ll just use the G4 Mac I acquired.  Second the faster model I own is in considerably worse shape then this model. Its internal speakers are almost dead and its plastic shell is chipped, faded and overall degraded.

g3imac3

So looking at the machines its pretty obvious that this is a “all-in-one” type machine harking back to the original concept of the Macintosh. This is both a blessing and a curse. The up side is the very small footprint this machine takes up on a desktop, at least without anything added such as external speakers and external USB drives. Its extremely simple to setup and only requires a single power cable. The downside of all this is if something fails your pretty much screwed. If the monitor dies on a more traditional setup you just replace the monitor. On this machine if your monitor dies your screwed…well for the most part but I’ll get to that. It also makes the machine very cramped inside and difficult if not impossible in many cases to upgrade.

The monitor is a 1024 x 768 pixel resolution CRT which I’ve found to be adequate in most situations. There is a built in slot loading CD drive bay and that’s about it for built in drives. Most iMacs came with a CD drive but there were models with DVD drives and you can upgrade CD drive versions with DVD drives. Unfortunately I’ve found identifying which model slim DVD drives will work and fit in the iMac to be difficult to figure out over the internet. Below the CD slot we have two headphone audio jacks and to the right a power button. On this model the power button glows a traditional green when powered on but on my 500mhz model the power LED is white.

On the bottom left and right we have two built in speakers. Ive found the built in speakers to be fairly weak and worse yet many of them have degraded considerably over time and have become static filled popping messes. This usually due to the foam around the cones disintegrating over time. Also in my attempts, replacing the speakers seems an almost impossible task. Go ahead, try it if you have one with bad speakers, all I can say is good luck. I found some vague references to latches and having to push down and twist but all my efforts to remove the speakers for replacement proved futile. I was to afraid to snap something as the pressure it seems you need to apply seems excessive. Not even mighty YouTube had a video showing speaker replacement on these things as of the writing of this article. Thankfully this issue can be bypassed by use of external speakers. I would recommend a good pair of external USB speakers to keep the concept of desktop clutter down. There is also a little plastic stand on the bottom of the unit that works as it should. I should also mention the nice carrying handle on the top of the case as well as the fact these machines are fanless so their whisper quiet.

Originally the iMac was sold with a round USB “hockey puck” mouse but these weren’t very well received and a little awkward to use. Later units were sold with the black optical USB Apple Pro mouse like the one I’m using here. These mice were prone to failure due to “flexing and corrosion” so be mindful of that. Later white revisions of the mouse solved these issues. I am using my Pro mouse with a Pro keyboard from around 2000, contemporary with this machine.

g3imac4

g3imac5

This was one of the first computers to finally ditch the floppy drive as standard. Thankfully if you still have a use for floppy drives and disks USB floppy drives were actually made specifically for the iMac and many drives even included color covers that could be swapped out to match your machine. My drive is by VST and you can still find them relatively cheap on eBay boxed. I paid about $12 for mine still sealed.

g3imac6

On the right side of the case we have our various connectors. Two for USB 1.1, two audio jacks for a microphone and speaker as well as a jack for ethernet and a modem as well as a restart button and a “programmers button” that gives access to firmware. On the later 500mhz model you can see two firewire 400 ports were added.

g3imac7

Your likely going to be relying heavily on external USB devices to expand the capabilities of the G3 iMac. Two USB ports doesn’t seem like much in this situation but luckily there are more USB ports on the keyboard as well as the option to use a USB hub device. I keep my keyboard directly plugged into the iMac with my mouse plugged into the keyboard USB port. For any other devices such as my speakers and floppy drive I have a USB hub device plugged into the second jack and those devices running from the hub.

g3imac8

g3imac9

Alright so lets open these things up and see whats inside. To open the iMac you need to flip it over and unscrew the base to get to the motherboard.

g3imac10

CPU – first I’m going to talk about the CPU which I don’t have numbered on the images. To the best of my knowledge it is located on the underside of the motherboard. All of the slot loading  iMacs G3’s run on the PowerPC G3 CPU with a 100mhz front side bus. The models I own are running a 350mhz PPC 750 G3 and a 500mhzmhz PPC 750cx G3. Personally I always liked the power PC line of CPU’s and the G3 is perhaps my favorite. Don’t be fooled by the lower clock speed as these will smoke a 350mhz Pentium II as well as draw less power. More then capable of driving 90’s gaming.

1) Drive tray – This where your slim CD/DVD drive goes as well as the hard drive. The iMac takes an IDE hard drive. Mine was 20GB but I upgraded to an 80GB drive and installed OS 9.2.2 for the best late 90’s game compatibility. I also made a smaller 20GB partition with OS X installed just for fun. I don’t use OS X much on these machines because I do find it runs a tad slow especially on my 350mhz Mac.

2) RAM – The G3 iMac takes PC100 SDRAM and usually came with 64MB or 128MB. This can be upgraded to a max of 1GB via the two 512MB sticks as I have done in the images above.

3) Graphics chip – All versions of the slot loading iMacs use some variation of the Rage 128 chip. My 350mhz iMac sports a Rage 128 Pro with 8mb of RAM while my later 500mhz model has the Rage 128 Ultra chip with 16mb of RAM. Video on the iMac is not upgradable so your pretty much stuck with what you get. That said the Rage chips aren’t bad. They are more then adequate for playing any games from the late 90’s though competent but unimpressive for post 2000’s.

This slideshow requires JavaScript.

Now to address the things that are completely lacking on the earlier revision of the slot loading iMac. On opening these machines I was actually surprised how similar yet different these motherboards were. First off if you look at the 500mhz motherboard there are two items circled in blue. The white connector by the RAM slots is a port for a wireless AirPort card. These cards are still compatible with the older revision with an adapter. The second item circled is an actual VGA out port. This is a very welcomed addition as I assume this would allow you to use a separate monitor if you wanted or if the built in monitor died. Personally I think this thing would look very awkward being treated as a tower with a separate monitor but it is a very nice option to have included.

before I conclude I also wanted to show this handy program I have installed.

g3imacw1

g3imacw2

That’s something you don’t necessarily see every day. I ran across this program at a thrift shop and its pretty nice. This would of been very handy back in the day if all you had was a Macintosh. The program has sound blaster and USB support and it actually makes transferring files across OS’s pretty convenient. For me its mostly a curiosity since I have plenty of Windows 98 machines but its nice to have even if it does just feel wrong.

So what are my final thoughts? I certainly no longer hate the iMac G3 but I still don’t feel they made great gaming computers even in their day. Then again that was never the purpose of these machines. They are beautiful and interesting to look at in an industrial design way and have very little desktop clutter especially without a floppy drive or external speakers but again they are so very limited in expansion options. As a platform for playing 90’s Mac games though It does quite well. It’s kind of a toss up though between this and a beige G3 for 90’s gaming. The beige G3 offers much more expandability in the way of video cards and monitor but internally is an overall slower system with a lower FSB and comes with more cord clutter. For someone like me that is really only interested in a few 90’s mac exclusives and Mac “enhanced” games the iMac G3, a once dismissed machine has ironically become the computer of choice thanks to its small footprint.

g3imac11

beta1My SL-HF600 Super Betamax player

Ah, the Beta player. Sony’s creation to battle the formidable VHS format in the 1970’s and into the 1980’s. I’ve known about Betamax for a very long time but never owned or saw a player in stores growing up. As a matter of fact no one I knew owned a Betamax player, not even my uncle who was very into movies and A/V type electronics. Of course by the time I was old enough to care about things like video formats it was well into the very late 80’s and early 90’s. Long after Beta’s heyday had past. I only knew about it since it was often referred to in jokes of the day. For instance on the popular Married with Children I remember the Bundies only had a Beta player and thus when they went to rent a movie they were left with a rather lacking selection. This was funny at the time because as we all know Beta failed in its format war against VHS and was relegated to obscurity in the consumer sector. Owning a Beta player was seen as “backing the wrong horse” much like if you went out and bought an expensive HD DVD player not to long ago.

Now I say it failed in the commercial market and not just failed because  not to many people know Beta is actually still produced, although Sony announced it will be stopping production in 2016. This is because even though VHS dominated the home market in the 80’s and 90’s Beta was widely used in the commercial sector and in some places may still be used. This would be broadcast studios, new studios, professional video editing businesses and such places.

I won’t go into details since specs can be easily looked up via Wikipedia but Betamax was known to deliver a better image quality then VHS and offer slightly higher resolution. This partially the reason it was embraced by professionals. Like VHS and SVHS, Beta was upgraded over time and in 1985 super betamax was introduced and eventually in 1988 Extended Definition Betamax which supposedly had a better resolution then even Laserdisc, reaching DVD like quality. Beta failed in the end despite arguably better image quality. It’s often cited that the price of player/recorders as well as a lesser recording length compared to VHS were the chief causes.

The player I have above is a Sony model SL-HF600 from 1985. This was a mid-high end player and retailed for $700-$1000. It featured the then new Super Betamax standard as well as various options such as frame by frame, slow motion and hi-fi audio. I picked this player up at Goodwill for a few bucks and I’m rather happy with it. It fired right up and played a tape without any issues.

beta2

beta3

Despite being slightly higher end the rear of the player isn’t to fancy and simply has composite video in/out as well as RCA stereo. There is also a switch for the hi-fi audio option.

beta4

Some months later at a swap meet I did come across a box of Beta tapes and a cleaning kit.

beta5

The tape I ended up buying for less then a dollar was a demo tape for Super Betamax. I assume this tape would be used for demonstration reasons in a storefront and looped to show off the new Super Betamax standard.

beta6

beta7

As you can see above, Beta tapes were quite similar to VHS but were overall smaller then their VHS counterpart. Likely another reason professionals like news cameramen may of favored them.

So should you buy a Beta player? well….no. If your really really into outdated video formats and can find one for a few bucks working then I guess so but honestly their use is pretty limited. The style is neat and they can offer better image quality over VHS but its hard to endorse Beta when Laserdisc is such a better option then Beta. LD’s are arguably “cooler” and many more movies and special feature editions of movies were leased on LD. Some films that still haven’t been brought to DVD or Blu ray have thier best versin on LD. yes Extended Definition Betamax introduced in 1988 did offer virtual DVD quality images but very few players with this capability were ever produced as it was marketed to professionals. I don’t even think from my research any commercial films were produced in ED Beta format. I haven’t been able to even find a single film that was only released in Beta format or only VHS/Beta but not any other format such as LD or DVD to justify owning a player. So in the end they are neat but hardly practical in usefulness terms to own, even for the retro enthusiast.

If you think I’m wrong please let me know in the comments. I always love hearing compelling reasons to make use of old tech.

colon8088

The Ultima and Wizardry series are heavy hitters of the early CRPG days and generally considered must plays for anyone even remotely interested in the early days of PC RPG’s. Unfortunately if you want a physical copy many of these early games are not only hard to find but also command a hefty price. Fortunately for us collections of both these series were compiled on CD-ROM in the late 90’s and although these collections also go for a hefty sums these days they still not only represent the better value but you have the piece of mind of having all the games on a convenient CD. But what about us purists that long for the experience of these games on early 1980’s 8088 based hardware from the time they were released? After all these collections were released in the era of Windows 9X and were surly expected to run under that environment. Are these collections of any use to us? Well friends, read on to find out.

Will start with Wizardry Archives.

wizarch

Wizardry Archives was released in CD-ROM format in 1998 and contained the first seven games in the series as well as Wizardry Gold. The original Wizardry games were released on 360kb floppies and were PC booter games. This means that no operating system such as DOS was needed. simply put the floppy into your machine and power on. When it comes to the Wizardry Archives there is good and bad news.

The bad news is you cannot copy the games from the CD to floppy and play them as you would an original copy. On the archives collection Wizardry 1 through 5 are broke into three files, wiz1.com, wiz1.dsk and a save1.dsk the wiz1.dsk is exactly 320kb, Wiz1.com 2kb and finally save1.dsk is 640kb. Obviously these files will no longer fit on a 360k floppy.

This is because the games in the archive, amusingly enough, have been officially modified with a 3rd party, gray-area software loader (wiz1.com) to run off of a hard drive which is very good news for us. The modified files automatically advance through prompts where switching disks would otherwise be required. Of course there is the negative of not being able to play as originally intended off a floppy disk but I myself think it’s a good trade off for the ability to play and save straight from a hard drive and have the greater reliability that comes with that medium. I wouldn’t want to trust a floppy disk these days with save data for an RPG you may of just dumped hours upon hours into.

Unless you have a CD-ROM drive installed in your early 80’s PC (unlikely) your going to need a method to transfer the files. Your also going to need a hard drive in your machine to copy the games to, obviously. This will likely be an MFM drive but there are more modern methods such as using a 8 bit IDE controller card and an IDE hard drive. There are several other methods to transfer the files such as via a network connection or ZIP drive (if you have a NEC V20 or later installed) but I prefer a 720kb floppy drive as it is a very easy method and chances are you already have one installed. If not I would advise installing a 720kb floppy drive to make things very easy. Almost all floppy controllers can recognize 720kb floppy drives. Also you can use the cheap and abundant 1.44mb floppy drives on a older controller and have it be seen automatically as a 720kb drive.

If your one of the lucky ones that have a high density 1.44mb floppy controller in your 8088, are using a 286 with a high density drive or are using a parallel port 1.44mb drive or one of the other methods mentioned you can skip this part but assuming most people will have a 720kb drive were going to need to ready a 720kn floppy disk. First off we need to ready a disk or two. If you don’t own any 3 1/3 inch 720kb disks, no problem as you can easily make a 1.44mb floppy into the 720kb sort by simply covering up a hole as depicted in the image below.

20151204_195427

The most common method is to tape over the hole. I use black electrical tape but even clear scotch tape will work. It also serves to mark which disks you have as 720kb formatted.

20151204_195341

So now that we have a disk ready we need to format it. This is very easy in Windows 95 and 98 as you can format disks for 720kb right through My Computer. Just insert the floppy disk, click on My Computer and then right click the floppy drive (likely A:) and you should be presented with a list of option. Click Format and then you should get a options screen and a pull down menu that allows you to format for 720kb.

w98f

This option however was removed from Windows XP and up so in this instance your going to need to use the command line interface to format your disk. Open a new command prompt by going to Start->run and typing CMD. Type Format A: /T:80 /N:9 and hit enter and that should do it. I haven’t tried this with Windows 7 and up but I’ve read it does work. Honestly I’ve never had luck with floppy drives and Windows 7 as they usually end up coming out corrupt.

w7cmdflop

The wizardry Archives breaks the games up into their own folders so once you have the game files on your floppy disk it’s just a matter of copying the files to your chosen PC’s hard drive via the COPY command.

That’s basically it. I made a folder called WIZ1 on my 4.77mhz 8088 PC and copied the first game there and it works like a charm. Just go into the file and run WIZ1 and it loads right up. Saving within the game works without issues as well. Now I haven’t tested the other games on the archives or tried transferring the party between games as you are required for Wizardry 1-3 but seeing as they are set up the same the process should be identical.

20150815_203549_LLSJust hit S and the game starts as normal bypassing all the Make Scenario Disk stuff.

I have played down to level three in Wizardry 1 so far and sunk well over ten hours into it without a single issue. The game runs as it should on my 4.77mhz 8088 which is the type of CPU that this game was originally intended for. I did try running the game in 10mhz turbo mode but all it does is speed the message screen up making it very difficult read information during a battle before it goes off screen. I never bothered playing the archives in a Windows  9X environment but I’m guessing theres some kind of slowdown utility included.

Now on to the Ultima Collection.

100_4439

The Ultima Collection was released on CD-ROM in 1997 and contained the first eight games in the Ultima series including several add-ons and the speech pack for Ultima VIII. All the games in the Ultima Collection as far as I can tell are unmodified in any way. These are not ports for Windows but the original DOS versions so for retro enthusiasts this is a boon as like the Wizardry Archives they will all have no issues running on period hardware. The collection does include a registered version of mo’slow to allow the games to run on faster computers but from what I’ve read Ultima VII and VIII are still virtually unplayable within Windows (though getting Ultima VII running even in DOS is a challenge and is going to be its own article).

I won’t go over again the transfer process but its basically the same as with the Wizardry archives and the games will run just fine on native era hardware for which each game was intended.

The collection includes Akalabeth which was retroactively named Ultima 0, being the very first, and primitive, Ultima game. This game was never given a DOS port and was only available on the Apple II cira 1971 – 1981. The version of Akalabeth that comes on the collection though requires a 32-bit DOS extender so will not run on a 8088 or a 286. It should run fine on a 486 or possibly a 386 but that’s about as close as you’ll get to Apple II era hardware. The game is slightly different from the Apple II version as it has color and basic midi as well as a title change to Ultima 0. It also plays much better and smoother then the original version. There is an unofficial bootleg port of Akalabeth though floating around on the internet that I’ve read will work on 8088 hardware for those interested.

akab4Playing the Ultima Collection version of Akalabeth on my Dell Dimension Pentium II PC.

Ultima Fan Upgrade Patches

That normally would be all I had to say about the Ultima Collection but I think its worth getting into the subject of fan upgrade patches. Generally I’m very picky about upgrade patches, After all why would I bother playing on original era hardware if I wanted anything but an “original” experience but in the case of the Ultima Collection I think the upgrade patches may be worth checking out for a few reason.

First off keep in mind that the Ultima 1 was not released for DOS until 1986 as Ultima I: The First Age of Darkness. This means that the first Ultima was actually released AFTER Ultima II through IV. This can be fairly jarring to retro computer game enthusiasts that are playing through the games in order as the 1986 DOS release of Ultima I was improved over the original and displayed in EGA graphics (as opposed to the rather ugly CGA of Ultima II & III DOS ports) and makes the earlier released Ultima II and III feel like pretty massive steps backwards.

100_8500

Ultima I from the Ultima Collection on my 8mhz 8086 machine

Ultima II released for DOS in 1982 especially looks bad in CGA in my opinion. There is also a map related bug in all CD versions including the Ultima Collection that makes the game unbeatable. Add this to a number of other bugs and I would say the DOS version of Ultima II included in the collection is unplayable. Thankfully an unofficial fan patch was made that converts the game to EGA but also corrects the map bug along with many other bugs.

Even being unofficial I would call this fan patch essential. It not only makes the game winnable but the EGA makeover brings the game more in line with the 1986 version of Ultima 1. Just compare below.

u2cgaOriginal CGA version

100_8591EGA fan upgrade patch

So does the upgrade patched version still run on original hardware? Absolutely.

I applied the patch prior then transferred the patched game to my 8mhz NEC V30 system and it ran without any issues. Interestingly enough though the patched game does seem to have some issues in Dosbox. The bump up to EGA does create a little more processing overhead so a 4.77mhz 8088 may run it a little slower then normal. As I stated I played through the entire game on a 8mhz NEC V30 machine and everything played just fine. I would recommend playing on such a machine or perhaps a 8088 or V20 in turbo mode (7.16mhz or 10mhz). You may need to split the game over several 720kb floppies if your transferring by that method as the file is a good bit larger then Wizardry.

The patch is available at The Exodus Project

The next fan patch I want to talk about is the upgrade patch for Ultima III released in 1983. This patch also works just fine on actual hardware. The U III patch fixes multiple bugs as the U II patch did but also introduces a wider degree of video modes for EGA to VGA and emulated color composite. The VGA mode looks pretty good but I stuck with EGA as to stay closest with the spirit of the era this game came out (even though EGA did not come out until 1984).

Another very cool feature this patch implements is music. The DOS version of Ultima III lacked any music, likely because there were no real PC sound cards to speak of in 1983. Computers like the C64 on the other hand had sound hardware built in and thus had music in there respective versions. What this patch does is take official Ultima III midi tunes from the Commodore 64 and Apple II versions and add them to the DOS port creating whats probably the definitive version. I have a sound blaster 1.5 installed in the machine running this game and it sounds great.

Speaking of CPU. Ultima III was ment to run on a 4.77mhz 8088 and the original CGA unpatched version runs fine on one but the EGA and sound of the patched version again take a toll on the CPU. With the patch installed I would definitely recommend a 286 running at least 10mhz. Even my V30 PC at 10mhz seemed just a little off and to slow so I had to install the game to my 20mhz 286 that downclocks to 10mhz via a turbo button.

The patch for Ultima III is available at The Exodus Project

There is an upgrade patch for Ultima IV but as of now I have not attempted to try it. This patch also adds music and this time upgrades the graphics to 256 color VGA. I don’t really find this patch nearly as necessary as the earlier patches and when I get to Ultima IV I probably will decline to use it.

This patch though unlike the others WILL NOT work in true DOS but requires Windows or DOSbox. well….sort off. There apparently is a pached version of the patch that does work in DOS but I have not tried it myself.

Ultima IV upgrade patch

Patched version of patch for real DOS mode play

Finally there is a upgrade patch for Ultima V which only adds music from the Apple II, Commodore 128 and Amiga versions to the DOS version. Again I have not tried this patch but it should work under true DOS.

Ultima V upgrade patch

And that concludes our look at the Wizardry Archives and Ultima Collection. Thankfully for us retro PC enthusiasts we do have a means through them to play these convenient collections of some great classic CRPG’s on real era hardware.

20151118_142425

Say what you want about the quality of Packard Bell but you have to admit they did use some pretty interesting and unique cases for their computers. The example I have today is the Packard Bell Axcel 39CDT. From what information Ive gathered this is a rather uncommon model and I’ve been told is somewhat sought after by Packard Bell enthusiasts so I’m guessing it didn’t sell very well.

pb39cd1

This machine is a 486 PC as you may be able to guess by the turbo button on the front that is accompanying the reset button. On the to is a keyboard lockout keyhole. setting this to lockout mode will prevent the machine from registering key presses from the keyboard pretty much making it useless. If you don’t have a key and its set to lock don’t worry. They weren’t built to keep out anybody with anything but the most rudimentary picking skills and I was able to change the position on mine with a Xacto knife. The power button is located on the bottom of this case but what is interesting is the panel that opens up to your drives.

pb39cd2

The door is actually kind of slick looking but personally I don’t see much need. There is one 3 1/2 bay as well as two 5 1/4 drive bays. This machine did come with a double speed CD-ROM drive according to advertisements I’ve seen but this drive mine came with is a CDR drive added by the previous owner. There is actually two internal bays under the 1.2MB floppy drive you see here that you could fit a hard drive or two into with a 5 1/4 adapter. Specs and adds claim the 39CDT came with a 420MB IDE hard drive but when I picked mine up the hard drive had been removed but more on that later.

pb39cd3

You can tell right off front looking at the rear of this PC that the power supply is located at the bottom of the case, a somewhat uncommon location of the time. There are five expansion slots and along the right side we have  our various ports. Two PS2 ports for keyboard and mouse followed by a built in VGA port. below those we have a common parallel port and a serial port.

After unscrewing the four rear screws the case on this machine slides forward taking the front face along with it as one piece. It took me a minute to figure this out as I kept trying to remove the case cover in a more traditional manner by pulling to back and toward myself.

pb39cd4

There is also a spot as you can see above the power supply for a 3 1/2 hard drive. The power supply is mostly standard except instead of a mounted switch there is an internal button that is pressed in by that long plastic arm that lines up with the power button on the front of the case. This may force some inventive solutions should the power supply fail.

My machine thankfully had the motherboard and jumper configuration chart on the inside of my case. Here it is for any of you that may be missing and need it.

pb39cdmbdia

pb39cdjc

Ok, now lets take a look at the motherboard.

pb39cd5

First thing I need to point out is that is NOT the original stock CPU but is what the previous owner upgraded this machine to.

1) CPU – This model originally came stock with an Intel 50mhz SX2 chip. This isn’t to surprising from Packard Bell as this was a cheaper part. The SX designates no built in math coprocessor. Being a DX2 that means the chip ran on a 25mhz front side bus. Overall the 50mhz SX2 running on a 25mhz FSB wasn’t all that much faster then a 33mhz DX chip. I downgraded this machine to a 50mhz DX2 to bring it closer to stock while giving it a math copro and freeing the Intel Overdrive CPU for other projects of mine.

pb39cd6

pb39cd7

2) RAM – The 39CDT has 4MB of RAM built into the motherboard so if you don’t have any spare 72 pin sticks of RAM lying around it will still run. Mine came with 24MB total RAM but according to advertisements as well as the specs sticker on the bay door RAM is upgradeable to a full 64MB

pb39cd13

3) Video – The video is a Cirrus Logic GD-CL-GD5424 running on the VLB or Local Bus. It comes with 512kb of VRAM stock but is able to be upgraded to a full 1MB. Unfortunately from looking at the motherboard it appears that upgrading requires a 512kn VRAM ZIP socket chip. I’m not sure those are to common. As for the CL chip, there isn’t much to say and not much turned up but it appears to be a decent mid range chip and one of CL’s earlier VLB offerings being a VLB version of their ISA GD5422 chip. Overall not bad and likely decent speed/compatibility wise.

pb39cd8

4) L2 cache – My SRAM sockets are currently empty but according to the jumper chart the motherboard supports 32, 128 and 512kb of L2 cache via 16 pin and 14 pin chips. This is very similar to my Packard Bell Legend 115. I don’t care that there is no option to use the more common 256kb l2 cache amount though as this seems to be the L2 “sweet spot” for the era.

pb39cd9

5) ISA riser card – This is the slot for the ISA riser card that allows for up to five ISA expansion cards.

pb39cd14

My machine came with a pretty generic modem and extra parallel port card but it did also come with a Crystal based sound card. Likely a Sound Blaster 16 clone but I do believe it is original to this machine with the PB stickers on the chips.

pb39cdsc

6) Modem – This appears to be a built in internal fax/modem but for whatever reason the port in the rear is covered up. My guess is the former user added the ISA modem card and covered the rear port to avoid confusion.

pb39cd10

pb39cd11

7) I/0 connectors – This is the connections for the built in floppy and IDE controller. The floppy controller seems to work just fine but for all my efforts I could not get the built in IDE controller to “see” any hard drive I tried. For that matter I also couldn’t get either of the discrete ISA I/0 controller cards I tried to work either. I tried several hard drives, new and from the era but I could not get this machine to see any of them. My best guess would be it’s an issue caused by not having a CMOS battery present. The original barrel battery was long dead and beginning to leak so I removed it. There is a connector for an external battery but I haven’t tried it yet.

*update* I finally did get the built in IDE controller to work but I was forced to use a old 300mb hard drive. all my efforts to get a ISA controller running failed.

So…the Axcel 39CDT. Again this machine like all but one of the Packard Bells I’ve come across booted and posted just fine. not bad for a twenty some year old machine coming from a very poorly regarded company. The case design is pretty interesting and doesn’t really compromise anything because of it. Three external bays isn’t a lot for a tower but is pretty standard for the era and OEM machines. I don’t like the lack of a 256kb L2 cache option and I would prefer a more conventional sockets for expanding VRAM but still, not a terrible machine.

This slideshow requires JavaScript.

m76005

For this article I’ll be taking a look at my Macintosh 7600 from 1996 but I’m also considering this a overview of the 7500 as well since they are basically the exact same computer using the same case and motherboard. The only difference as far as I can tell besides the case badge is the 7600 came with a slightly more advanced CPU, which since the CPU on these models came on a removable daughtercard you could easily upgrade/downgrade to either or.

Here’s a few pics if you don’t believe me since at one time I had both models.

m760017500inter

I ended up Frankensteining RAM and drives from the 7500 into my 7600 so I condensed it into one machine that I used for some time.

late 90’s Macs are some of the most hated by Macintosh fans but ironically I rather like them, at least in principal. My fondness for them though is the reason many Mac lovers probably dislike them, they are very “PC like”. You can actually easily open and expand a late 90’s Mac unlike earlier models where actually getting inside the machine and tinkering was somewhat discouraged. That said they also share qualities that I hate. chief among them is the plastic tooless cases that although makes it easy to get inside they have not aged well and are very prone to having critical retention tabs snap.

The 7600 is somewhat of a mainstay of late 90’s Macintosh computers and offers decent expansion abilities as well as being pretty easy to work on.

m76003

The 7500/7600 both use the “Outrigger” style case that’s basically a desktop style casing. These models both come with a 1.44mb floppy drive and SCSI CD-ROM drive. To the left of the CD drive bay is room for another drive. When I bought my 7600 off Craigslist it had a purple SCSI 100mb ZIP drive installed in this bay that I promptly removed for another project. To the left of this bay is a built in speaker and below that is a manual power button. Thanks to the brittle plastic my tabs holding the power button in place have broken so it is not always reliable. Thankfully there is a power key on the keyboard.

m760014

I used an Apple Design M9280 ADB keyboard with mine.

The number after the 7600 on the case badge designates the CPU speed that the machine came with stock. Mine came stock with a 132mhz CPU.

m760012

The back features a full range of connections. First from the left we have an external DB-25 SCSI connector. This is followed by two ethernet connector types. First the AAUI or Apple Attachment User Interface, a type of ethernet connector I honestly never knew about before this machine. Next to it is a more standard 10Base-T ethernet jack. Next are two Geoports which are for printer and modem interfaces. This is followed by the Macintosh DB-15 VGA out, of course if you need to connect to a standard VGA monitor adapters are plentiful. Next is a ADB port for keyboard or mouse (your supposed to plug a keyboard in here and then the mouse into the keyboard). Finally we have two 3.5mm minijacks for a microphone and speakers.

Above the ports we have a nice array of video in/out jacks. My models only has RCA stereo out but it does have stereo audio in as well as composite video and S-video in. I don’t really do any editing or work like that much on a Macintosh but these must of been pretty convenient in its day.

There are only three expansion slots as you can tell from the plates on the right but seeing as so much is built in I never found this to be so much of an issue.

m76006

The cover comes off relatively easy. You need to depress two plastic tabs located under the front bezels overhang and then pull forward. With luck your will slide off without anything snapping off. You cant see it here because I removed them but theres is a lot of annoying and flimsy metal shielding across the front drive bays. I have upgraded my machine a little. I replaced the stock 4x SCSI CD drive with a 8x SCSI CD drive from another Macintosh. Macs are very touchy about what drives you use so for simplicity sake I just pulled mine from a Mac from the same era. There are of course ways to get non apple drives to work but for the CD drive I didn’t go through the hassle.

I also added a second SCSI hard drive that you cant see in this image. It is a 2GB IBM SCSI drive. I had to first install it in my other G3 machine and format and initialize it before the 7600 would detect it.

The insides again unfold relatively easily giving access to the motherboard.

m760013

Most of my little tabs and what not have snapped over time. I have to watch the right part of the chassis doesn’t fall down on my hands since the little black plastic stand that props it up also snapped some time ago. With access to the motherboard lets take a closer look.

m76007


1) CPU – Here we have the CPU card. To be honest I like the PowerPC line of CPU’s and I like how easy it is to swap out CPU’s in this fashion. The 7500 shipped with a 100 MHz PowerPC 601 CPU while the 7600 sported a 120 MHz, 132 MHz PPC 604 or a 200 MHz 604e. The front side bus is 40mhz to 50mhz controlled by the CPU card. Mine was originally a 132mhz model but when I received it my machine had been given a 300mhz G3 CPU upgrade. Interestingly my 7500 also had a G3 CPU upgrade leading me to believe these were fairly common upgrades and generally recommended as they seem to really give the Mac some additional power.

m76008

2) PRAM Battery – running without a battery or a low battery seems to have much harsher effects on a Mac then a PC. 3.6V PRAM batteries are relatively cheap and should probably be the first thing to check/replace if your machine is acting odd or unstable.

3) RAM – The 7500/7600 use 70ns 168-pin DIMMs with the standard amount being 16-34MB. I haven’t really expanded mine to much beyond that but the eight slots support 512mb officially and 1GB unofficially with 128mb DIMMS. This is actually a pretty incredible amount of RAM for a consumer computer of the time.

m76009

4) L2 cache – The 75/7600 use a COASt (Cashe On A Stick) module for L2 cache up to 256kb. I don’t know if the machine will support sticks larger then 256k such as 512kb or 1mb but initial research suggests it will. When using a G3 upgrade card such as myself I have read it is advisable to remove the L2 cache stick as the G3 cards have faster L2 cache on the CPU card.

5) ROM – This slot actually confused me for a long time. It’s a ROM slot for some kind of ROM chip which the system I assume would NEED to function yet on both my machines it was not present. It wasn’t until later I found out the ROM chip is on the underside of the motherboard and this slot was left in case any ROM upgrades came later this slot could be used to implement them.

6) Video Ram – Like many Macs the 75/7600 has built in video capabilities. I was not able to find specifics except that at max it supports 1152×870 resolutions at 24-bit and 1280×1024 at 16-bit. The on board video supports up to 4MB of VRAM which is what the four slots are for with 2MB being standard. I was able to lift two 1MB sticks from my 7500 for this machine maxing it out. Keep in mind you need the full 4MB to achieve the highest resolutions. This though is rendered pointless since I did eventually install a dedicated video card.

m760010

7) DAV (Digital Audio Video) slot – This is another slot that took me some time to figure out what it does. Apparently this slot with a cable can be combined with certain expansion video cards. according to here “The DAV connector provides access to the Audio/Video card”s 4:2:2 unscaled YUV video input data bus and associated control signals. By means of a 60-pin cable to the DAV connector, a PCI expansion card can gain access to the digital video bus on the Audio/Video Input/Output Card and use it to transfer real-time video data to the computer. Such a PCI expansion card can contain a hardware video compressor or other video processor.”

8) These are just internal connectors. From top to bottom we have two SCSI connectors, power connector, speaker/CD audio jack, floppy connector and finally 3.3v power connector.

9) The 75/7600 fortunately come with three PCI expansion slots. Adding a video card or two is probably a good choice. There are really no Audio cards made for the Mac to speak of so video upgrade is really your best option. Keep in mind you need Macintosh specific cards. The PCI slots themselves are the same as a PC but the cards BIOS is different. The video card I am using is a RAGE 128 w/16MB of RAM.

m760011

The lack of an AGP slot limits your options but I find the Macintosh Rage 128 cards to be pretty cheap and abundant as well as providing enough power for the majority of 90’s Mac games. You can also add a Voodoo 2 mac edition or if you can find and afford one a Mac edition Voodoo 5500. I actually chanced across a boxed card at a swap meet for $3 once so they can be found.

v5mac

So my final opinion? The 7500/7600 can be found pretty cheap and easily off places like Craigslist. I’m running OS 8.5 on mine but they can run OS 7 and 9 without issues according to your needs and wants. With a G3 upgrade and 1GB of RAM these things fly for a machine that came out in 1996. Even with a moderate graphics card like the Rage 128 and a more moderate amount of RAM such as 512MB or even 256MB you should be able to do most of you 90’s Macintosh gaming with ease. The SCSI can be a bit of a hassle though if your not familiar with it and of course replacing drives is more of a hassle. It just makes a nice all around 90’s gaming Macintosh in my opinion and for a time served as my main Macintosh

The toolless cases though as with most 90’s Macs I could do without. It seems kind of cheap and as I’ve said the plastic did not age well and is prone to cracking.

m76004

Well, this will be my first scripted video review. Don’t fret though as I stated before I am not switching to all video but I am possibly staying video only for game reviews. This video review is for my annual Halloween special. This years game review. Beast Busters, the 1989 arcade shooter from SNK.

Happy Halloween!

UPDATE! I’ve tweaked the script and added some screenshots to also make the review into a good old fashioned article for those that prefer the written things in life, or that hate my voice.

0008

well, its that time again, October and we all know what that means. a shoehorned Halloween themed game review for my otherwise hardware centric blog and now blog slash YouTube channel. I mean unless anyone out there knows of a Halloween themed PC I could review. I suppose i could paint a pumpkin on the side of a PC tower or something but…na. This years game  will be the 1989 arcade gun game beast busters.Beast Busters was developed by SNK and was their final game before the Neo Geo.

Beast Busters is generally referred to as an Operation Wolf clone with zombies and that is fairly accurate.The zombies in Beast Busters aren’t even your common mindless flesh eaters but are gun toting, knife flinging, motorcycle riding soldiers of the undead. This doesn’t help at all in dispelling the clone stigma.

bbm
The Beast Busters arcade cabinet allowed for three players and featured uzi gun controllers for all three players. Unlike many arcade games of the late 80s and early 90s Beast Busters was not ported to every home computer imaginable and only made an appearance on the 16 bit Amiga and Atari ST machines. The Amiga version was my first experience with the game as a child but I don’t recall ever getting past the first level due to either my incompetence on figuring out the mouse controls or my lack of a joystick I only remember I couldn’t get the gun sight to move acceptably and the game was just to much of a chore because of this despite my enthusiasm for a zombie shooter. My local arcade at the mall, Giggles, did feature the game for awhile back in the far forsaken corner and so I did get to play it in its original format some.

For this review I will be taking the unfortunate step of emulating but since I cant horde arcade cabinets and boards can be a little hard to come across I make an exception for arcade games.

The game starts off with a very vague plot about a random city overrun with the undead. You get to choose from three characters who as far as I can tell play identically in game. The names though just scream 80’s action cheese. Our hero’s go by Johnny Justice, Sammy Stately and Paul Patriot. Sammy Stately? that’s actually pretty clever. The writers must of been up all night patting themselves on the back over coming up with that one. I’m surprised we don’t get Reggie Regal and Patty Presidential as secret characters.

bb7

Like operation wolf and other games of the genre you automatically scroll through the levels in first person blasting everything that moves. other then your standard uzi you also have a grenade button that lobs an explosive damaging enemies in a wide area on screen. As you fire you can run out of bullets. If this happens your rate of fire slows down but ammo falling from the top of the screen is pretty abundant. grenade power ups such as rockets, napalm grenades and lightning grenades are also available as well as first aid kits and according to the intro bullet proof vests though I don’t recall seeing any in my play through.

As I mentioned earlier the bulk of the beasts you will be encountering in beast busters are zombies. Unlike your classical slow moving mindless variety though all these undead are packing heat and are rearing to pop a cap off in your stately a…derriere. These zombies also drive cars, pilot boats and the football player zombies even assault you from the air while being lifted airborne by what looks like undead owls. There are other enemies though as you traverse this city of the damned. zombie chihuahua dogs, sentient piles of scrape metal and aforementioned owls. The real highlight is the sometimes downright bizarre midboss and boss beasts. Some are fairly mild on the oddness chart such as the first boss, a switchblade flinging zombie punk rocker who transforms into a fire spitting dog mid fight. other not so odd bosses are a gang of zombie bikers and a pair of blue uzi toting zombies that look like a amalgamation of Jason Vorhees and Blaster from Mad Max and Thunderdome. some of the bosses get really…really odd. we have a river blob midboss that has the most serine look on his face.

bb3

He doesn’t even come close to the level boss though which is a floating eyeball encased within a sphere of finely toned naked blue men. As you inflict damage the hunky blue heart throbs fall off into the murky depths exposing the lurking horror within.

bb4

One boss battle also has you waiting your aim as you shoot this mad scientist type as he holds onto a hostage. after he dies you have to fight a second form which kind of looks like……..well I’m not really sure what it looks like but I find the dance like motion it continuously makes kind of disturbing. The boss that takes the cake though is without doubt the monster car. Later in the game your fighting in a parking garage when your suddenly attacked by a rocket launcher equipped jeep. not to strange yet right? how about as you damage the jeep parts start falling off revealing a disgusting jeep monster hybrid. The tires have claws, eyeballs look out where the headlights once were biological goo ozes out of the shattered windshield and a vicious fang filled mouth is where the front grill once was. The car not only serves as the levels midboss but also the main boss as it pulls itself up somehow on your elevator at the end of level for a final showdown. All and all its a pretty silly boss battle but definitely memorable.

bb5

The final level is nothing but a boss rush and ends up being pretty unsatisfying. The final boss himself though is a snarky looking mad scientist type in a techno eyeball throne. After dealing with his throne you get to face his true form. a cycloptian flying brain, because….obviously. even after slaying the eyeball brain things arn’t over yet as the final battle is against what I assume is some kind of alien machine bristling with weapons.

The ending is a bit lack luster but what can you expect from an arcade title. as your victorious dude bros celebrate amid the ruins a giant spaceship slowly descends and cue cliffhanger ending.

bb6

Visually the game isn’t horrible, at least the arcade version is not. there is some sprite scaling that goes on in a few levels as you go down a street or hallway though the effect is nothing to write home about.The environments are destructible is some places though obviously nothing like today’s games. The subway train in the first level can be shot up pretty thoroughly and I always enjoyed blasting fire hydrants in the street stage.

bb2

bb1

So what did I think of this game? Beast Busters is ultimately a fun but silly game. I never took the element of horror far enough for my tastes and in stead went in a more silly direction with simply taking gun wielding solders as enemies and giving them an undead sprite swap. Some moments are almost inspired, again in that silly kind of way such as the monster car boss and the floating eyeball surrounded by naked blue hard bodied zombies. Its certainly not the prettiest game but its fairly short and does not overstay its welcome making it a nice burst of short Halloween fun.

As I’ve probably said before, back in the 80’s and 90’s virtually every company that had anything at all to do with electronics wanted a piece of the IBM personal computer pie. To this end many companies released their own brand of IBM compatible PC’s. Compaq, Dell and Packard Bell are some of the first to come to mind but there are other companies as well that while being well known names in the business field were not especially known as PC manufacturers. Among them are Epson, AT&T and as we will see in today’s machine, Canon. Canon is a company perhaps best known in the PC world for their printers but today’s PC is a little something I stumbled upon at a thrift and had to pick up.

cinn1

I present to you the Canon Innova 486e part of Canon’s Innova PC compatible line. The front of this PC does have a little style to it with some curves on the case. The power button is the big block under the CD-ROM drive and the reset is the curious little button above the Canon logo next to the three LED’s. The third LED next to the power LED and HDD activity LED is an LED for the turbo feature. [Ctrl]-[Alt]-[ + ] on the keyboard toggles the turbo feature on and off. You get two 5 1/4 bays and one vertical 3 1/2 bays which is pretty typical for a OEM slim machine of this era. This case does seem a little less wide then most and a little more tall. I’m sure the 1.44mb floppy drive came stock but I’m not sure about the CD drive. Mine came with one installed but this may of been installed by the prior owner. This model did come with a 210MB IDE drive that fired right up and worked fine.

cinn3

The rear of the PC is pretty standard with two PS/2 ports, two serial ports a parallel port and then the built in VGA port. The extra height of this case allows for four expansion cards running off the internal riser card as you can see from the slot ports to the right.

My case happened to still have the factory sticker mostly intact touting the stock specs.

cinn2

The specs aren’t terrible for the time and there is plenty of room for possible upgrading. The thing that caught my eye was the built in video is running off the local bus so it should give me VLB card performance levels unlike a few previous OEM machines I’ve had of this era that ran the built in VGA off the ISA bus.

One thing I noticed pretty fast is the case is screwless and sort of reminds me of a 90’s Macintosh case but without the brittle plastic shell. It did take me a minute to figure out how to get the case off but it involves removing a number of tabs around the case followed by prying off the front panel and untabbing more tabs to slide the case off. Overall I think I would of preferred screws as it’s a bit of a hassle.

This slideshow requires JavaScript.

With the case off and the bay mount removed we have full access to the motherboard.

cinn13

1) CPU – the CPU in this model is a Intel 33mhz SX meaning no built in math co-processor. upgrading is very easy though and you should be able to pop in a DX version no problem. There are two options for front side bus set by jumper conveniently labeled on the motherboard for either 25mhz or 33mhz. upgrading to a 66mhz dx2, 100mhz dx4 or an AMD 133mhz 5×86 is a cinch. The sticker proclaims Pentium Overdrive compatibility which may very well be true but I’ve encountered boards in the past that claimed OD compatibility but failed to function with the chip. It also lacks the blue overdrive socket  style common on overdrive compatible machines. For that matter the socket it uses the older style LIF socket without the handle making CPU removal and replacement a little more stressful.

cinn11

2) RAM – The 486e has 4mb of RAM soldered onto the motherboard with two 72 pin RAM sockets to either side. I have two 4mb sticks installed along with the built in RAM for 12MB total. I am unsure of the total RAM limit on this motherboard but if I had to venture a guess I would say at least 32MB and perhaps 64mb total allowed.

cinn12

3) L2 cache – Here we have the sockets for adding L2 cache. There are nine sockets for 28 pin chips. eight for the SRAM and one for a tag RAM chip. It can accommodate 64kb, 128kb or 256kb of l2 cache. again with jumper instructions conveniently printed on the motherboard.

cinn15

4) Video – The video chip is a Cirrus Logic CL-GD5428 also found in mid to high performance VLB cards such as the Diamond Speedster pro card. This is a fairly capable chip and a great DOS performer. This chip is capable of addressing 2mb of VRAM but the motherboard only has 512kb built in with another 512kb able to be added for a total of 1mb VRAM via the sockets next to the chip. There are a few suspect ZIP looking sockets by the video chip that I’m very unsure about. They may be for adding even more video RAM but I find it odd they would use a completely different socket type. As I mentioned the built in video is running off the local bus or Vesa Local Bus which gives a nice speed boost over ISA. Overall this is a really good chip for having as built in video and I’m not sure theres any ISA video card that would be worth using instead since I don’t think you’ll find one more capable.

cinn10

5) Riser card with four ISA slots for expansion cards

6) AT power connector with built in Floppy controller and one built in IDE connector for supporting two IDE devices.

7) Piezo beeper speaker

So what do I think overall? as far as OEM 486 rigs go I rather like the Canon Innova 486e. I could do without the hassle of the odd screwless case design but what you find under the hood is a pretty capable beast with plenty of room to easily upgrade. The closest machines I have to compare it to are the Tandy 425 SX and the Packard Bell Legand 115 which in my opinion are inferior machines. The Innova is more powerful, at least in the built in video department as well as offering comparable and easier upgrade options.

This slideshow requires JavaScript.

Benchmarks (Intel SX 33mhz 486, no L2 Cache, 12MB FPM RAM, Built in Cirrus Logic CL-GD5428 512kb video)

3DBENCH – 24.2

PCPBENCH – 5.4

DOOM -13.96

Quake – N/A

SPEEDSYS – 12.16

Previously I had written a post on pushing the limits of Socket 7 in this article. This time I’m going to explore pushing the limits of one of my favorite motherboard’s, the socket 3 board. Socket 3 motherboards were designed for the 486 CPU and represent a golden age of DOS from the early to mid-1990’s. Its no wonder then why many Retro computer enthusiasts cherish and focus on this era of PC gaming. As a matter of fact individuals attempting to see how far they can push the limits of motherboards meant for the venerable 486 is a rather popular topic in the hobby.

before I get into the article I want to point out that Feipoa, a user over at the Vogons forum wrote a very in-depth and well-researched post on the subject titled The Ultimate 486 Benchmark ComparisonThe point of this article though is to not only perform my own benchmarks and come to my own conclusions but to try and express the results in a simplified manner. As awesome and well done as the Vogons post is it is a little bit lengthy and technical and may come off as a bit overwhelming to a retro PC novice or casual user. Hopefully this article will be user-friendly and straight forward enough for the retro PC newbie as well as maybe even make for a good read to a more experienced PC user. I do encourage readers to check out the link above though if you want to read further on the subject.

First off were obviously going to need a socket 3 motherboard. In general if you’re pushing the limits of socket 3 your going to want late model boards and this means motherboards with PCI slots. PCI slot 486 motherboards can be expensive and in some cases buggy as manufacturers hadn’t completely figured out the PCI standard but it’s really your only choice for getting the most out of the higher end 4×86/5×86 CPU’s as it offers the most options in BIOS, CPU type support as well as allowing much higher speed PCI video cards to take advantage of the fast CPU.

For my testing I used a Shuttle-HOT 433 motherboard. These boards are known to be a little buggy but support a wide array of faster 486 and 586 CPU’s at higher front side bus settings.

shuthot1

For all tests I’ll be using this motherboard. I’m running 32MB of FPM RAM, 512kb 15ns l2 cache, 0 wait states with a memory timing of 2-2-2 and for the video I am using a PCI Matrox G200.

As a baseline CPU I’m using the Intel DX2 66mhz. I’m using this CPU as a baseline as it represents the quintessential 486 of the mid 90’s and was a widely used, capable and popular gaming CPU.

20150511_193627

Write-Back and Write-through memory

I also want to take a minute to talk about Write Back and Write Through memory. Starting from the 66mhz DX2 you start to see variants of chips using “Write-Back” cache such as this 66mhz DX2 below. The SX955 designates this CPU as the write-back variant.

20150521_163410

Without getting technical this type of memory is faster than standard “Write-through” memory. Generally you need to enable write-back via the BIOS configuration screen else it simply acts as write-through. The option should be available in most late socket 3 boards and look something like this.

20150925_132329_LLS

In my personal experience I haven’t noticed a huge performance jump using write-back but if you’re trying to get every ounce of performance it’s something to keep in mind. There are a few caveats to using write-back and that’s possible issues with stability much like with early EDO RAM usage. The other issue is most if not all VLB SCSI cards are incompatible with write-back settings. This means if you plan on using a  SCSI VLB card for a hard drive or CD-ROM drive your not going to be able to enable write-back cache as well. I believe I have read this has to do with bus mastering conflicts. I have read some SCSI controller cards may be compatible or have a jumper that needs set to enable compatibility with write-back cache but that is unconfirmed by myself.

High end socket 3 CPU choices

Alright, now let’s talk about your choices for a fast high-end CPU in socket 3 format. You actually have about three choices and that comes down to the Intel route the AMD route or the Cyrix route. They each have their own positives and minuses and each tackles the situation differently.

AMD 5×86

Will start by looking at the AMD 133mhz 5×86 CPU.

20150501_205855

This is the most common solution for turbocharging a socket 3 platform. The AMD 5×86 is fairly common and cheap. The name 5×86 is a bit of a lie though as this chip doesn’t have much in common with the other socket 3 5×86 chips were going to look at and is much more of a traditional 4×86 CPU. AMD’s approach was simply to turbocharge the 486 CPU and in this case they did very well. the AMD 5×86 is perhaps the mature height of the traditional 486 CPU. The image above is of an older variant that states that it requires heatsink and fan but later chips running cooler lack this requirement (though you probably should do it anyways). All AMD 5×86 chips regardless make excellent overclockers and can be overclocked to 160mhz fairly routinely by setting the front side bus to 40mhz. The AMD 5×86 at 133mhz is about equivalent to a 75mhz Pentium in speed (but not FPU functions). Overclocked to 160mhz it hovers more around a Pentium 90mhz in performance which is a significant speed boost for a socket 3 chip. remember a Pentium is superior in speed even when operating at the same clock frequency so a true Pentium 100mhz will blow an Intel 486 DX4 at 100mhz away. This chip overall is very compatible with socket 3 boards and generally runs very cool and stable even at 160mhz. I have read about a few instances of this chip being overclocked to 200mhz but this should be considered pretty advanced and nonroutine so is beyond the scope of the article.

The AMD 5×86 was produced for some time so labeling on the CPU itself differs depending on when it was made. On the far right is a later release of the chip with a year 2000 date code. Users have stated that they had better luck overclocking ADZ chips as opposed to the ADW labeled chips.

Cyrix 5×86

Next we have the Cyrix 120mhz 5×86 CPU

c5x86120

The Cyrix CPU is actually the polar opposite of the idea behind the AMD 5×86. Where the AMD chip takes a 486 and turbo charges it the Cyrix 5×86 takes their next generation 6×86 CPU and cuts it down disabling features to make it run stable on a socket 3 board. The Cyrix 100mhz chip is very common but the 120mhz chip as seen above is pretty rare. I was able to attain mine by luck off eBay about a year ago but have not seen any pop up since. There is also a 133mhz Cyrix 5×86 but this chip is very rare and for awhile it was doubted if it was even actually produced. Being that the 133mhz chip is rather unattainable we won’t be considering it for this article.

Unlike the AMD chip the Cyrix chip needs a little work to reach its full potential as programs can be obtained to re-enable some of the features that Cyrix disabled to help with stability issues. Re-enabling some of these features produces speed increases but in turn you may suffer stability wise. The only known motherboard to have built-in options to re-enable some Cyrix chip features (LINBRST and LSSER) is the infamous M919 motherboard otherwise you need to download and execute a program to reactivate these features. More information on these features and programs can be found here. I used the Peter Moss utility with my Cyrix chips and used these settings loop_en=off, rstk_en=on, lsser=off, fp_fast=on, btb_en=on while still achieving stability. your mileage may vary.

If you can’t find a 120mhz Cyrix chip there is still hope as IBM manufactured The Cyrix 5×86 under license. Due to IBM’s superior fabrication plants they were able to produce many chips rated at 100mhz that easily overclock to 120mhz. This is the chip I used for the benchmarks in this test.

20150501_202922

Though uncommon these chips turn up on places like eBay far more then the Cyrix branded 120mhz chips and many of them are easily able to overclock to 120mhz like the one above. Note that you probably will not have the same success in overclocking the Cyrix branded 100mhz 5×86 chips that seem to be common on eBay. A number of the IBM 5×86 chips may even overclock to 133mhz but mine did not and this is to considered less likely a case than not. Results with a 120mhz overclocked IBM chip should be equivalent to a true 120mhz Cyrix chip.

Intel Pentium Overdrive

Finally we have Intel’s offering which is a paired down Pentium processor modified to work in a socket 3 slot.

20150501_202946

This chip is possibly the most technically advanced of the upgrade paths but also the lowest clocked chip of the bunch coming in at 83mhz. I’ve read Intel tried to get a faster chip out there but ran into to many issues. You can overclock the Pentium Overdrive to 100mhz but it is not advisable. In my research most sources advised not to overclock the overdrive as it is a poor overclocker and is likely to damage the chip. For this reason the overclock should not be seen as routine so is not relevant to this article.

Despite the overdrive being restrained by the socket 3 architecture tests by HighTreason, another Vogons user, has shown that the 83mhz overdrive still outperforms a true Pentium 66mhz on a socket 4 motherboard in most tests. In my own comparisons benchmarks the Overdrive and Pentium 66 were fairly neck and neck each beating out the other in about half the bench tests but then I wasn’t using comparable video cards and such.

One advantage of the overdrive over the competition is its much superior floating point math processing in comparison to the AMD and the Cyrix. Its ability to take advantage of applications with optimized Pentium code is also a huge boon in some games and apps. Will see how this takes effect in the benchmarks.

The unrepresented chip

The one chip I wanted to include in testing but never got around to was Intel’s 100mhz DX4 if only because this was Intel’s last 486 chip. I doubt this chip would add too much to the tests though as its probably about equal to the Cyrix 100mhz 5×86 and a little faster than AMD’s 100mhz 486.

Benchmarks

And now that we’ve talked about the CPU options it’s on to the Benchmark tests. For the tests I’m using Phil’s benchmark’s which is a collection of four benchmark tests that include PCBench, 3DBench as well as time demos of DOOM and Quake.

Let’s look at the results via a bar graph, because I love graphs.

486cpugraph

As we can see the poor Intel dx2 66mhz lags behind in all respects but surprisingly in some tests like DOOM it actually fairs pretty well against the Cyrix 100mhz. The AMD 5×86 133mhz is fairly close in terms of performance to the 83mhz Pentium Overdrive while the Cyrix 5×86 120mhz and AMD 5×86 160mhz lead the pack. Overall the AMD overclocked at 160mhz beats out all other chips including the Cyrix 120mhz in all tests except 3dBench where it only lags behind the Cyrix by about 1 FPS. Notice that the Pentium Overdrive dominates in the Quake test beating all other chips. This can easily be explained as Quake relies heavily on the FPU math coprocessor and is optimized for Pentium code. I would assume though that if I had a 133mhz Cyrix 5×86 it may beat out the AMD 160mhz in all tests being top dog.

So my conclusion on the best chip to push the socket 3 platform to its limits? Well it depends a little bit. Without considering a Cyrix 133mhz chip the top dog is obviously the AMD 5×86 overclocked to 160mhz. The other great thing about this chip is its availability, low cost and solid stability even when overclocked. It would definitely be the first chip I would recommend.

The Cyrix definitely has a sort of “cool” factor but it does involve a little more fine tuning with enabling enhancements. due to the higher price, scarcer availability and more hassle I probably wouldn’t recommend going the Cyrix route unless you want to be different or if you don’t want to overclock and can find a true Cyrix 120mhz chip on the cheap. Again I think overall a Cyrix 133mhz would beat all competition but if it was me I would be afraid to run and wear out such a rare chip.

Last up we have the Pentium Overdrive which despite its slower clock puts up a valiant fight beating the Cyrix 100mhz in all tests and running a slight edge in general over the AMD 133mhz. Again, the motherboard compatibility with the PO is not going to be as good as the AMD but if you plan to play a lot of later DOS games or Win9x games that take advantage of Pentium coding such as Quake or Duke 3D this may be the way to go. Pentium OD chips aren’t too rare but are generally more pricey than the AMD chips or the Cyrix 100mhz chips.

FDISKformat

A place for the pc collector

I ❤ Old Games!

Probabilmente il miglior blog bilingue al mondo*

Waltorious Writes About Games

Game-related ramblings.

NekoJonez's Gaming Blog

My Gaming Timeline

Evelynn Star

Lynn talks about video games, records and books ...

Retro Megabit

Sharing My Retro Video Game Collection.

133MHz's Junk Box

Random electronics and gaming crap

SNES A Day

Chronogaming project featuring reviews, screenshots, and videos of the entire Super Nintendo library in release order.

Retrocosm's Vintage Computing, Tech & Music Blog

Random mutterings on retro computing and music.

The PewPew Diaries.

Work(s) in Progress!

1001Up

1001 video games and beyond

retro computing and gaming plus a little more

sparcie

retro computers and stuff

jispylicious

Stay Jispy!

Design a site like this with WordPress.com
Get started